


多文件上传
文件:
2. 在FileController类中添加代码
package com.example.demo7load.controller;
import org.springframework.stereotype.Controller;
import org.springframework.web.bind.annotation.PostMapping;
import org.springframework.web.bind.annotation.RequestMapping;
import org.springframework.web.bind.annotation.RequestParam;
import org.springframework.web.bind.annotation.ResponseBody;
import org.springframework.web.multipart.MultipartFile;
import org.springframework.web.multipart.MultipartHttpServletRequest;
import javax.servlet.http.HttpServletRequest;
import javax.servlet.http.HttpServletResponse;
import java.io.File;
import java.io.FileInputStream;
import java.io.OutputStream;
import java.util.List;
import java.util.UUID;
@Controller
@RequestMapping(“/file/”)
public class FileController {
/*单文件上传*/
@RequestMapping(“upload”)
@ResponseBody
public String upload (@RequestParam(“file”) MultipartFile file) {
// 获取原始名字
String fileName = file.getOriginalFilename();
// 文件保存路径
String filePath = “E:/file/”;
// 文件重命名,防止重复
fileName = filePath + UUID.randomUUID() + fileName;
// 文件对象
File dest = new File(fileName);
// 判断路径是否存在,如果不存在则创建
if(!dest.getParentFile().exists()) {
dest.getParentFile().mkdirs();
}
try {
// 保存到服务器中
file.transferTo(dest);
return “上传成功”;
} catch (Exception e) {
e.printStackTrace();
}
return “上传失败”;
}
/*多文件上传*/
@PostMapping(“/uploads”)
@ResponseBody
public String handleFileUpload(HttpServletRequest request) {
List files = ((MultipartHttpServletRequest) request)
.getFiles(“file”);
MultipartFile file = null;
for (int i = 0; i < files.size(); ++i) {
file = files.get(i);
if (!file.isEmpty()) {
try {
// 获取原始名字
String fileName = file.getOriginalFilename();
// 文件保存路径
String filePath = “E:/file/”;
// 文件重命名,防止重复
fileName = filePath + UUID.randomUUID() + fileName;
// 文件对象
File dest = new File(fileName);
// 保存到服务器中
file.transferTo(dest);
} catch (Exception e) {
e.printStackTrace();
return “上传失败”;
}
}else {
return “上传失败”;
}
}
return “上传成功”;
}
}
#### 3、文件下载


1. 在FileController中添加代码
@RequestMapping(“download”)
public void download(HttpServletResponse response) throws Exception {
// 文件地址,真实环境是存放在数据库中的
String filename=“a.txt”;
String filePath = “E:/file” ;
File file = new File(filePath + “/” + filename);
// 创建输入对象
FileInputStream fis = new FileInputStream(file);
// 设置相关格式
response.setContentType(“application/force-download”);
// 设置下载后的文件名以及header
response.setHeader(“Content-Disposition”, “attachment;fileName=” +filename);
// 创建输出对象
OutputStream os = response.getOutputStream();
// 常规操作,把文件里的内容写上
byte[] buf = new byte[1024];
int len = 0;
while((len = fis.read(buf)) != -1) {
os.write(buf, 0, len);
}
fis.close();
}
2. 在E盘新建file文件夹,并在file文件夹中新建a.txt文本文件
3. 输入localhost:8082/file/download,然后就可以发现浏览器弹出下载框


### 二、定时器


#### 1、Task


Task是Spring自带的定时器,使用方便,简单


1. 在启动类(即main入口)添加@EnableScheduling注解
package com.example.demo7load;
import org.springframework.boot.SpringApplication;
import org.springframework.boot.autoconfigure.SpringBootApplication;
import org.springframework.scheduling.annotation.EnableScheduling;
@SpringBootApplication
@EnableScheduling
public class Demo7LoadApplication {
public static void main(String[] args) {
    SpringApplication.run(Demo7LoadApplication.class, args);
}
}
2. 创建Time目录,并创建ScheduleedTask类(这里我打错了)
 定时任务主要靠@Scheduled注解来实现
package com.example.demo7load.time;
import org.slf4j.Logger;
import org.slf4j.LoggerFactory;
import org.springframework.scheduling.annotation.Scheduled;
import org.springframework.stereotype.Component;
import java.util.Date;
@Component
public class ScheduleedTask {
private Logger log= (Logger) LoggerFactory.getLogger(ScheduleedTask.class);
//这里是cronExpression表达式,详情看后文介绍
@Scheduled(cron="0/5 \* \* \* \* ?")
public void testOne(){
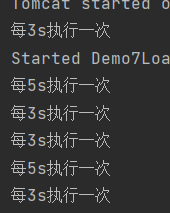
log.info("每5s执行一次");
}
@Scheduled(fixedRate = 3000)
public void testTwo(){
log.info("每3s执行一次");
}
@Scheduled(cron="0 0 14 \* \* ?") //表示每天下午14点执行
public void initTask(){
log.info("执行任务"+new Date());
}
}
3. 查看控制台
这里面出现了一个cronExpression表达式,简单解释一下
“[秒] [分] [时] [日] [月] [周] [年]”
年可以省略,还有周的1表示星期天,也即一个星期的第一天
* \*字符表示指定所有的值
* -表示一个范围
* ?表示指定非明确的值,只在日期和周期域中使用,举个例子:指定星期几但是不确定是什么日期时就可以使用
* /表示每多少分钟/秒触发一次
“ 0 15 10 ? \* 6 ”:表示每个星期五的上午10:15触发
“ 0 0/5 14 \* \* \* ”:表示下午14:00到14:59没五分钟触发一次
#### 2、Quartz
Quartz框架的核心组件包括调度器、触发器、作业等
**Quartz介绍**
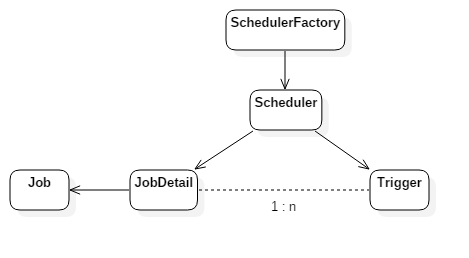
1. Job表示一个任务,要执行的具体内容
2. JobDetail表示一个具体的可执行的调度程序,包含了Job的调度方案和策略
3. Trigger是一个类,描述触发Job执行的时间及触发规则
4. Scheduler代表一个调度容器,用于将Trigger和JobDetail绑定
**使用Quartz**
1. 在pom.xml中添加Quartz的依赖
    <!--定时器依赖-->
    <dependency>
        <groupId>org.quartz-scheduler</groupId>
        <artifactId>quartz</artifactId>
        <version>2.2.1</version>
    </dependency>
    <!-- 该依赖必加,里面有sping对schedule的支持 -->
    <dependency>
        <groupId>org.springframework</groupId>
        <artifactId>spring-context-support</artifactId>
        <version>5.2.8.RELEASE</version>
    </dependency>
    <!--必须添加,要不然会出错,项目无法启动-->
    <dependency>
        <groupId>org.springframework</groupId>
        <artifactId>spring-tx</artifactId>
    </dependency>
2. 编写任务执行类JobTask
package com.beixi.timer;
import org.springframework.context.annotation.Configuration;
import org.springframework.scheduling.annotation.EnableScheduling;
import org.springframework.stereotype.Component;
import java.text.SimpleDateFormat;
import java.util.Date;
@Configuration
@Component
@EnableScheduling
public class JobTask {
public void start() throws InterruptedException {
SimpleDateFormat format=new SimpleDateFormat(“yyyy-MM-dd HH:mm:ss”);
System.err.println(“定时任务开始执行。”+format.format(new Date()));
}
}
若报红就按照提示安装相应依赖


3. 详细配置类QuartzConfigration
package com.example.demo7load.time;
import org.quartz.Trigger;
最后
俗话说,好学者临池学书,不过网络时代,对于大多数的我们来说,我倒是觉得学习意识的觉醒很重要,这是开始学习的转折点,比如看到对自己方向发展有用的信息,先收藏一波是一波,比如如果你觉得我这篇文章ok,先点赞收藏一波。这样,等真的沉下心来学习,不至于被找资料分散了心神。慢慢来,先从点赞收藏做起,加油吧!
另外,给大家安排了一波学习面试资料:


以上就是本文的全部内容,希望对大家的面试有所帮助,祝大家早日升职加薪迎娶白富美走上人生巅峰!
r;
最后
俗话说,好学者临池学书,不过网络时代,对于大多数的我们来说,我倒是觉得学习意识的觉醒很重要,这是开始学习的转折点,比如看到对自己方向发展有用的信息,先收藏一波是一波,比如如果你觉得我这篇文章ok,先点赞收藏一波。这样,等真的沉下心来学习,不至于被找资料分散了心神。慢慢来,先从点赞收藏做起,加油吧!
另外,给大家安排了一波学习面试资料:
[外链图片转存中…(img-eqD0pd19-1714459230918)]
[外链图片转存中…(img-hqH9E7j7-1714459230919)]
以上就是本文的全部内容,希望对大家的面试有所帮助,祝大家早日升职加薪迎娶白富美走上人生巅峰!


 279
279


 被折叠的 条评论
为什么被折叠?
被折叠的 条评论
为什么被折叠?
 到【灌水乐园】发言


