


holder = new ViewHolder();
convertView = mInflater.inflate(R.layout.item, null);
// convertView = mInflater.inflate(R.layout.item, parent ,false);
// convertView = mInflater.inflate(R.layout.item, parent ,true);
holder.mBtn = (Button) convertView.findViewById(R.id.id_btn);
convertView.setTag(holder);
} else
{
holder = (ViewHolder) convertView.getTag();
}
holder.mBtn.setText(mDatas.get(position));
return convertView;
}
private final class ViewHolder
{
Button mBtn;
}
}
主Activity:
package com.example.zhy_layoutinflater;
import java.util.Arrays;
import java.util.List;
import android.app.Activity;
import android.os.Bundle;
import android.widget.ListView;
public class MainActivity extends Activity
{
private ListView mListView;
private MyAdapter mAdapter;
private List mDatas = Arrays.asList(“Hello”, “Java”, “Android”);
@Override
protected void onCreate(Bundle savedInstanceState)
{
super.onCreate(savedInstanceState);
setContentView(R.layout.activity_main);
mListView = (ListView) findViewById(R.id.id_listview);
mAdapter = new MyAdapter(this, mDatas);
mListView.setAdapter(mAdapter);
}
}
好了,相信大家对这个例子都再熟悉不过了,没啥好说的,我们主要关注getView里面的inflate那行代码:下面我依次把getView里的写成:
1、convertView = mInflater.inflate(R.layout.item, null);
2、convertView = mInflater.inflate(R.layout.item, parent ,false);
3、convertView = mInflater.inflate(R.layout.item, parent ,true);
分别看效果图:
图1:
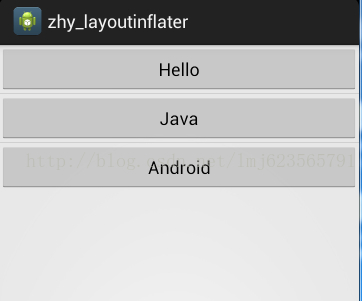
图2:
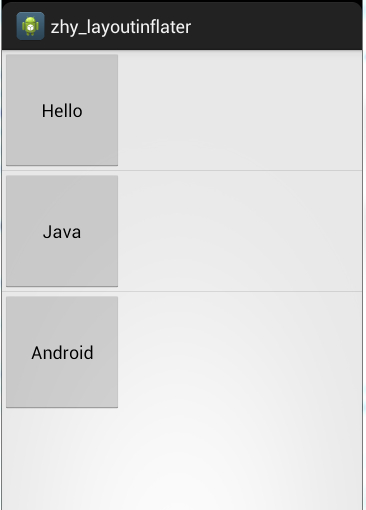
图3:
FATAL EXCEPTION: main
java.lang.UnsupportedOperationException:
addView(View, LayoutParams) is not supported in AdapterView
嗯,没错没有图3,第三种写法会报错。
由上面三行代码的变化,产生3个不同的结果,可以看到
inflater(resId, null )的确不能正确处理宽高的值,但是inflater(resId,parent,false)并非和inflater(resId, null )效果一致,它可以看出完美的显示了宽和高。
而inflater(resId,parent,true)报错了(错误的原因在解析源码的时候说)。
由此可见:文章开始提出的理解是绝对错误的。
3、源码解析
下面我通过源码来解释,这三种写法真正的差异
这三个方法,最终都会执行下面的代码:
public View inflate(XmlPullParser parser, ViewGroup root, boolean attachToRoot) {
synchronized (mConstructorArgs) {
final AttributeSet attrs = Xml.asAttributeSet(parser);
Context lastContext = (Context)mConstructorArgs[0];
mConstructorArgs[0] = mContext;
View result = root;
try {
// Look for the root node.
int type;
while ((type = parser.next()) != XmlPullParser.START_TAG &&
type != XmlPullParser.END_DOCUMENT) {
// Empty
}
if (type != XmlPullParser.START_TAG) {
throw new InflateException(parser.getPositionDescription()
- “: No start tag found!”);
}
final String name = parser.getName();
if (DEBUG) {
System.out.println(“**************************”);
System.out.println("Creating root view: "
- name);
System.out.println(“**************************”);
}
if (TAG_MERGE.equals(name)) {
if (root == null || !attachToRoot) {
throw new InflateException(" can be used only with a valid "
- “ViewGroup root and attachToRoot=true”);
}
rInflate(parser, root, attrs, false);
} else {
// Temp is the root view that was found in the xml
View temp;
if (TAG_1995.equals(name)) {
temp = new BlinkLayout(mContext, attrs);
} else {
temp = createViewFromTag(root, name, attrs);
}
ViewGroup.LayoutParams params = null;
if (root != null) {
if (DEBUG) {
System.out.println("Creating params from root: " +
root);
}
// Create layout params that match root, if supplied
params = root.generateLayoutParams(attrs);
if (!attachToRoot) {
// Set the layout params for temp if we are not
// attaching. (If we are, we use addView, below)
temp.setLayoutParams(params);
}
}
if (DEBUG) {
System.out.println(“-----> start inflating children”);
}
// Inflate all children under temp
rInflate(parser, temp, attrs, true);
if (DEBUG) {
System.out.println(“-----> done inflating children”);
}
// We are supposed to attach all the views we found (int temp)
// to root. Do that now.
if (root != null && attachToRoot) {
root.addView(temp, params);
}
// Decide whether to return the root that was passed in or the
// top view found in xml.
if (root == null || !attachToRoot) {
result = temp;
}
}
} catch (XmlPullParserException e) {
InflateException ex = new InflateException(e.getMessage());
ex.initCause(e);
throw ex;
} catch (IOException e) {
InflateException ex = new InflateException(
parser.getPositionDescription()
- ": " + e.getMessage());
ex.initCause(e);
throw ex;
} finally {
// Don’t retain static reference on context.
mConstructorArgs[0] = lastContext;
mConstructorArgs[1] = null;
}
return result;
}
}
第6行:首先声明了View result = root ;//最终返回值为result
第43行执行了:temp = createViewFromTag(root, name, attrs);创建了View
然后直接看48-59:
if(root!=null)
{
params = root.generateLayoutParams(attrs);
if (!attachToRoot)
{
temp.setLayoutParams(params);
}
}
可以看到,当root不为null,attachToRoot为false时,为temp设置了LayoutParams.
继续往下,看73-75行:
if (root != null && attachToRoot)
{
root.addView(temp, params);
}
当root不为null,attachToRoot为true时,将tmp按照params添加到root中。
然后78-81行:
if (root == null || !attachToRoot) {
result = temp;
}
如果root为null,或者attachToRoot为false则,将temp赋值给result。
最后返回result。
从上面的分析已经可以看出:
Inflate(resId , null ) 只创建temp ,返回temp
Inflate(resId , parent, false )创建temp,然后执行temp.setLayoutParams(params);返回temp
Inflate(resId , parent, true ) 创建temp,然后执行root.addView(temp, params);最后返回root
由上面已经能够解释:
Inflate(resId , null )不能正确处理宽和高是因为:layout_width,layout_height是相对了父级设置的,必须与父级的LayoutParams一致。而此temp的getLayoutParams为null
Inflate(resId , parent,false ) 可以正确处理,因为temp.setLayoutParams(params);这个params正是root.generateLayoutParams(attrs);得到的。
Inflate(resId , parent,true )不仅能够正确的处理,而且已经把resId这个view加入到了parent,并且返回的是parent,和以上两者返回值有绝对的区别,还记得文章前面的例子上,MyAdapter里面的getView报的错误:
java.lang.UnsupportedOperationException:
addView(View, LayoutParams) is not supported in AdapterView
这是因为源码中调用了root.addView(temp, params);而此时的root是我们的ListView,ListView为AdapterView的子类:
直接看AdapterView的源码:
@Override
public void addView(View child) {
throw new UnsupportedOperationException(“addView(View) is not supported in AdapterView”);
}
可以看到这个错误为啥产生了。
4、 进一步的解析
上面我根据源码得出的结论可能大家还是有一丝的迷惑,我再写个例子论证我们上面得出的结论:
主布局文件:
<Button xmlns:android=“http://schemas.android.com/apk/res/android”
xmlns:tools=“http://schemas.android.com/tools”
android:id=“@+id/id_btn”
android:layout_width=“120dp”
android:layout_height=“120dp”
android:text=“Button” >
主Activity:
package com.example.zhy_layoutinflater;
import android.app.ListActivity;
import android.os.Bundle;
import android.util.Log;
import android.view.LayoutInflater;
import android.view.View;
import android.view.ViewGroup;
public class MainActivity extends ListActivity
{
private LayoutInflater mInflater;
@Override
protected void onCreate(Bundle savedInstanceState)
{
super.onCreate(savedInstanceState);
mInflater = LayoutInflater.from(this);
View view1 = mInflater.inflate(R.layout.activity_main, null);
View view2 = mInflater.inflate(R.layout.activity_main,
(ViewGroup)findViewById(android.R.id.content), false);
View view3 = mInflater.inflate(R.layout.activity_main,
(ViewGroup)findViewById(android.R.id.content), true);
Log.e(“TAG”, “view1 = " + view1 +” , view1.layoutParams = " + view1.getLayoutParams());
Log.e(“TAG”, “view2 = " + view2 +” , view2.layoutParams = " + view2.getLayoutParams());
最后
有任何问题,欢迎广大网友一起来交流,分享高阶Android学习视频资料和面试资料包~
偷偷说一句:群里高手如云,欢迎大家加群和大佬们一起交流讨论啊!

《Android学习笔记总结+移动架构视频+大厂面试真题+项目实战源码》,点击传送门,即可获取!
l);
View view2 = mInflater.inflate(R.layout.activity_main,
(ViewGroup)findViewById(android.R.id.content), false);
View view3 = mInflater.inflate(R.layout.activity_main,
(ViewGroup)findViewById(android.R.id.content), true);
Log.e(“TAG”, “view1 = " + view1 +” , view1.layoutParams = " + view1.getLayoutParams());
Log.e(“TAG”, “view2 = " + view2 +” , view2.layoutParams = " + view2.getLayoutParams());
最后
有任何问题,欢迎广大网友一起来交流,分享高阶Android学习视频资料和面试资料包~
偷偷说一句:群里高手如云,欢迎大家加群和大佬们一起交流讨论啊!
[外链图片转存中…(img-2oZZgWxJ-1714651841372)]
《Android学习笔记总结+移动架构视频+大厂面试真题+项目实战源码》,点击传送门,即可获取!


 847
847

 被折叠的 条评论
为什么被折叠?
被折叠的 条评论
为什么被折叠?
 到【灌水乐园】发言


