


=====================================================================
用过RecyclerView的同学大概都应该知道Adapter有几个notify相关的方法,它们分别是:
-
notifyDataSetChanged()
-
notifyItemChanged(int)
-
notifyItemInserted(int)
-
notifyItemRemoved(int)
-
notifyItemRangeChanged(int, int)
-
notifyItemRangeInserted(int, int)
-
notifyItemRangeRemoved(int, int)
-
notifyItemMoved(int, int)
稍微有点开发经验的同学都知道,notifyDataSetChanged()方法比其它的几个方法更重量级一点,它会导致整个列表刷新,其它几个方法则不会。有更多开发经验的同学可能还知道notifyDataSetChanged()方法不会触发RecyclerView的动画机制,其它几个方法则会触发各种不同类型的动画。
2.1 RecyclerView的dispatchLayout
dispatchLayout顾名思义,当然是把子View布局(添加并放置到合适的位置)到RecyclerView上面了。打开它的源码我们可以看到这样一段注释。
Wrapper around layoutChildren() that handles animating changes caused by layout. Animations work on the assumption that there are five different kinds of items in play:
- PERSISTENT: items are visible before and after layout
- REMOVED: items were visible before layout and were removed by the app
- ADDED: items did not exist before layout and were added by the app
- DISAPPEARING: items exist in the data set before/after, but changed from visible to non-visible in the process of layout (they were moved off screen as a side-effect of other changes)
- APPEARING: items exist in the data set before/after, but changed from non-visible to visible in the process of layout (they were moved on screen as a side-effect of other changes)
从注释我们可以知道。dispatchLayout方法不仅有给子View布局的功能,而且可以处理动画。动画主要分为五种:
-
PERSISTENT:针对布局前和布局后都在手机界面上的View所做的动画
-
REMOVED:在布局前对用户可见,但是数据已经从数据源中删除掉了
-
ADDED:新增数据到数据源中,并且在布局后对用户可见
-
DISAPPEARING:数据一直都存在于数据源中,但是布局后从可见变成不可见状态
-
APPEARING:数据一直都存在于数据源中,但是布局后从不可见变成可见状态
到目前为止,我们还不能完全理解这五种类型的动画有什么具体的区别,分别在什么样的场景下会触发这些类型的动画。但是给我们提供了很好的研究思路。目前我们只需要简单了解有这五种动画,接着往下,我们这里看下dispatchLayout的源码,为了响应文章标题,这里贴出精简过的源码:
void dispatchLayout(){
…
dispatchLayoutStep1();
dispatchLayoutStep2();
dispatchLayoutStep3();
…
}
关于dispatchLayoutStepX方法,相信很多人都听说或者了解过,文章后面我会做详细的介绍,简单介绍如下:
从dispatchLayout的注释中,我们注意到before和after两个单词,分别表示布局前和布局后。这么说来那就简单了。dispatchLayoutStep1对应的是before(布局前),dispatchLayoutStep2的意思是布局中,dispatchLayoutStep3对应的是after(布局后)。它们的作用描述如下:
-
dispatchLayoutStep1
-
判断是否需要开启动画功能
-
如果开启动画,将当前屏幕上的Item相关信息保存起来供后续动画使用
-
如果开启动画,调用mLayout.onLayoutChildren方法预布局
-
预布局后,与第二步保存的信息对比,将新出现的Item信息保存到Appeared中
精简后的代码如下:
private void dispatchLayoutStep1() {
…
//第一步 判断是否需要开启动画功能
processAdapterUpdatesAndSetAnimationFlags();
…
if (mState.mRunSimpleAnimations) {
…
//第二步 将当前屏幕上的Item相关信息保存起来供后续动画使用
int count = mChildHelper.getChildCount();
for (int i = 0; i < count; ++i) {
final ViewHolder holder = getChildViewHolderInt(mChildHelper.getChildAt(i));
final ItemHolderInfo animationInfo = mItemAnimator
.recordPreLayoutInformation(mState, holder,
ItemAnimator.buildAdapterChangeFlagsForAnimations(holder),
holder.getUnmodifiedPayloads());
mViewInfoStore.addToPreLayout(holder, animationInfo);
}
…
if (mState.mRunPredictiveAnimations) {
saveOldPositions();
//第三步 调用onLayoutChildren方法预布局
mLayout.onLayoutChildren(mRecycler, mState);
mState.mStructureChanged = didStructureChange;
for (int i = 0; i < mChildHelper.getChildCount(); ++i) {
final View child = mChildHelper.getChildAt(i);
final ViewHolder viewHolder = getChildViewHolderInt(child);
if (viewHolder.shouldIgnore()) {
continue;
}
//第四步 预布局后,对比预布局前后,哪些item需要放入到Appeared中
if (!mViewInfoStore.isInPreLayout(viewHolder)) {
if (wasHidden) {
recordAnimationInfoIfBouncedHiddenView(viewHolder, animationInfo);
} else {
mViewInfoStore.addToAppearedInPreLayoutHolders(viewHolder, animationInfo);
}
}
}
clearOldPositions();
} else {
clearOldPositions();
}
}
}
- dispatchLayoutStep2 根据数据源中的数据进行布局,真正展示给用户看的最终界面
private void dispatchLayoutStep2() {
…
// Step 2: Run layout
mState.mInPreLayout = false;//此处关闭预布局模式
mLayout.onLayoutChildren(mRecycler, mState);
…
}
- dispatchLayoutStep3 触发动画
private void dispatchLayoutStep3() {
…
if (mState.mRunSimpleAnimations) {
// Step 3: Find out where things are now, and process change animations.
// traverse list in reverse because we may call animateChange in the loop which may
// remove the target view holder.
for (int i = mChildHelper.getChildCount() - 1; i >= 0; i–) {
ViewHolder holder = getChildViewHolderInt(mChildHelper.getChildAt(i));
if (holder.shouldIgnore()) {
continue;
}
long key = getChangedHolderKey(holder);
final ItemHolderInfo animationInfo = mItemAnimator
.recordPostLayoutInformation(mState, holder);
ViewHolder oldChangeViewHolder = mViewInfoStore.getFromOldChangeHolders(key);
if (oldChangeViewHolder != null && !oldChangeViewHolder.shouldIgnore()) {
// run a change animation
…
} else {
mViewInfoStore.addToPostLayout(holder, animationInfo);
}
}
// Step 4: Process view info lists and trigger animations
//触发动画
mViewInfoStore.process(mViewInfoProcessCallback);
}
…
}
从代码我们可以看出dispatchLayoutStep1和dispatchLayoutStep2方法中调用了onLayoutChildren方法,而dispatchLayoutStep3没有调用。
2.2 LinearLayoutManager的onLayoutChildren方法
以垂直方向的RecyclerView为例子,我们填充RecyclerView的方向有两种,从上往下填充和从下往上填充。开始填充的位置不是固定的,可以从RecyclerView的任意位置处开始填充。该方法的功能我精简为以下几个步骤:
-
寻找填充的锚点(最终调用findReferenceChild方法)
-
移除屏幕上的Views(最终调用detachAndScrapAttachedViews方法)
-
从锚点处从上往下填充(调用fill和layoutChunk方法)
-
从锚点处从下往上填充(调用fill和layoutChunk方法)
-
如果还有多余的空间,继续填充(调用fill和layoutChunk方法)
-
非预布局,将scrapList中多余的ViewHolder填充(调用layoutForPredictiveAnimations)
本文只讲解onLayoutChildren的主流程,具体的填充逻辑请参考RecyclerView填充逻辑一文
LinearLayoutManager#onLayoutChildren
public void onLayoutChildren(RecyclerView.Recycler recycler, RecyclerView.State state) {
…
//1. 寻找填充的锚点
updateAnchorInfoForLayout(recycler, state, mAnchorInfo);
…
//2. 移除屏幕上的Views
detachAndScrapAttachedViews(recycler);
…
//3. 从锚点处从上往下填充
updateLayoutStateToFillEnd(mAnchorInfo);
mLayoutState.mExtraFillSpace = extraForEnd;
fill(recycler, mLayoutState, state, false);
…
//4. 从锚点处从下往上填充
// fill towards start
updateLayoutStateToFillStart(mAnchorInfo);
mLayoutState.mExtraFillSpace = extraForStart;
mLayoutState.mCurrentPosition += mLayoutState.mItemDirection;
fill(recycler, mLayoutState, state, false);
…
//5. 如果还有多余的空间,继续填充
if (mLayoutState.mAvailable > 0) {
extraForEnd = mLayoutState.mAvailable;
// start could not consume all it should. add more items towards end
updateLayoutStateToFillEnd(lastElement, endOffset);
mLayoutState.mExtraFillSpace = extraForEnd;
fill(recycler, mLayoutState, state, false);
endOffset = mLayoutState.mOffset;
}
}
…
//6. 非预布局,将scrapList中多余的ViewHolder填充
layoutForPredictiveAnimations(recycler, state, startOffset, endOffset);
…
LinearLayoutManager#layoutForPredictiveAnimations
private void layoutForPredictiveAnimations(RecyclerView.Recycler recycler,
RecyclerView.State state, int startOffset,
int endOffset) {
//判断是否满足条件,如果是预布局直接返回
if (!state.willRunPredictiveAnimations() || getChildCount() == 0 || state.isPreLayout()
|| !supportsPredictiveItemAnimations()) {
return;
}
// 遍历scrapList,步骤2中屏幕中被移除的View
int scrapExtraStart = 0, scrapExtraEnd = 0;
final List<RecyclerView.ViewHolder> scrapList = recycler.getScrapList();
final int scrapSize = scrapList.size();
final int firstChildPos = getPosition(getChildAt(0));
for (int i = 0; i < scrapSize; i++) {
RecyclerView.ViewHolder scrap = scrapList.get(i);
//如果被remove掉了,跳过
if (scrap.isRemoved()) {
continue;
}
//计算额外的控件
scrapExtraEnd += mOrientationHelper.getDecoratedMeasurement(scrap.itemView);
}
mLayoutState.mScrapList = scrapList;
…
// 步骤6 继续填充
if (scrapExtraEnd > 0) {
View anchor = getChildClosestToEnd();
updateLayoutStateToFillEnd(getPosition(anchor), endOffset);
mLayoutState.mExtraFillSpace = scrapExtraEnd;
mLayoutState.mAvailable = 0;
mLayoutState.assignPositionFromScrapList();
fill(recycler, mLayoutState, state, false);
}
mLayoutState.mScrapList = null;
}
至此,布局的逻辑已经讲解完毕。关于具体的动画执行逻辑,由于篇幅有限。不在本文中讲解
=====================================================================
我们来测试从屏幕中删除View,调用notifyItemRemoved相关的方法,dispatchLayout是如何重新布局的。假设初始状态如下图,假设Adapter数据有100条,屏幕上有Item1~Item6 6个View,删除Item1和Item2。 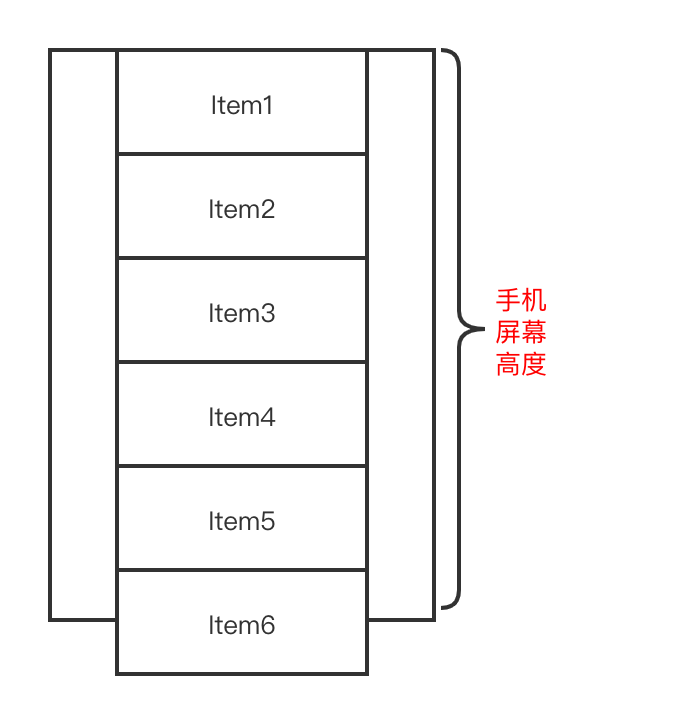
-
将Item1 Item2对应的ViewHolder设置为REMOVE状态
-
将所有的Item对应的ViewHolder的mPreLayoutPosition字段赋值为当前的position
我们回顾以下onLayoutChildren的几个步骤
-
寻找填充的锚点(最终调用findReferenceChild方法)
-
移除屏幕上的Views(最终调用detachAndScrapAttachedViews方法)
-
从锚点处从上往下填充(调用fill和layoutChunk方法)
-
从锚点处从下往上填充(调用fill和layoutChunk方法)
学习分享,共勉
Android高级架构师进阶之路
题外话,我在阿里工作多年,深知技术改革和创新的方向,Android开发以其美观、快速、高效、开放等优势迅速俘获人心,但很多Android兴趣爱好者所需的进阶学习资料确实不太系统,完整。今天我把我搜集和整理的这份学习资料分享给有需要的人
- Android进阶知识体系学习脑图

- Android进阶高级工程师学习全套手册

- 对标Android阿里P7,年薪50w+学习视频

- 大厂内部Android高频面试题,以及面试经历

《Android学习笔记总结+移动架构视频+大厂面试真题+项目实战源码》,点击传送门,即可获取!
- 从锚点处从下往上填充(调用fill和layoutChunk方法)
学习分享,共勉
Android高级架构师进阶之路
题外话,我在阿里工作多年,深知技术改革和创新的方向,Android开发以其美观、快速、高效、开放等优势迅速俘获人心,但很多Android兴趣爱好者所需的进阶学习资料确实不太系统,完整。今天我把我搜集和整理的这份学习资料分享给有需要的人
- Android进阶知识体系学习脑图
[外链图片转存中…(img-cbwOjB0S-1715128516441)]
- Android进阶高级工程师学习全套手册
[外链图片转存中…(img-W6bQbI0s-1715128516445)]
- 对标Android阿里P7,年薪50w+学习视频
[外链图片转存中…(img-Rx02SSPd-1715128516448)]
- 大厂内部Android高频面试题,以及面试经历
[外链图片转存中…(img-Fyxa7iGN-1715128516449)]
《Android学习笔记总结+移动架构视频+大厂面试真题+项目实战源码》,点击传送门,即可获取!


 598
598


 被折叠的 条评论
为什么被折叠?
被折叠的 条评论
为什么被折叠?
 到【灌水乐园】发言


