


先自我介绍一下,小编浙江大学毕业,去过华为、字节跳动等大厂,目前阿里P7
深知大多数程序员,想要提升技能,往往是自己摸索成长,但自己不成体系的自学效果低效又漫长,而且极易碰到天花板技术停滞不前!
因此收集整理了一份《2024年最新HarmonyOS鸿蒙全套学习资料》,初衷也很简单,就是希望能够帮助到想自学提升又不知道该从何学起的朋友。

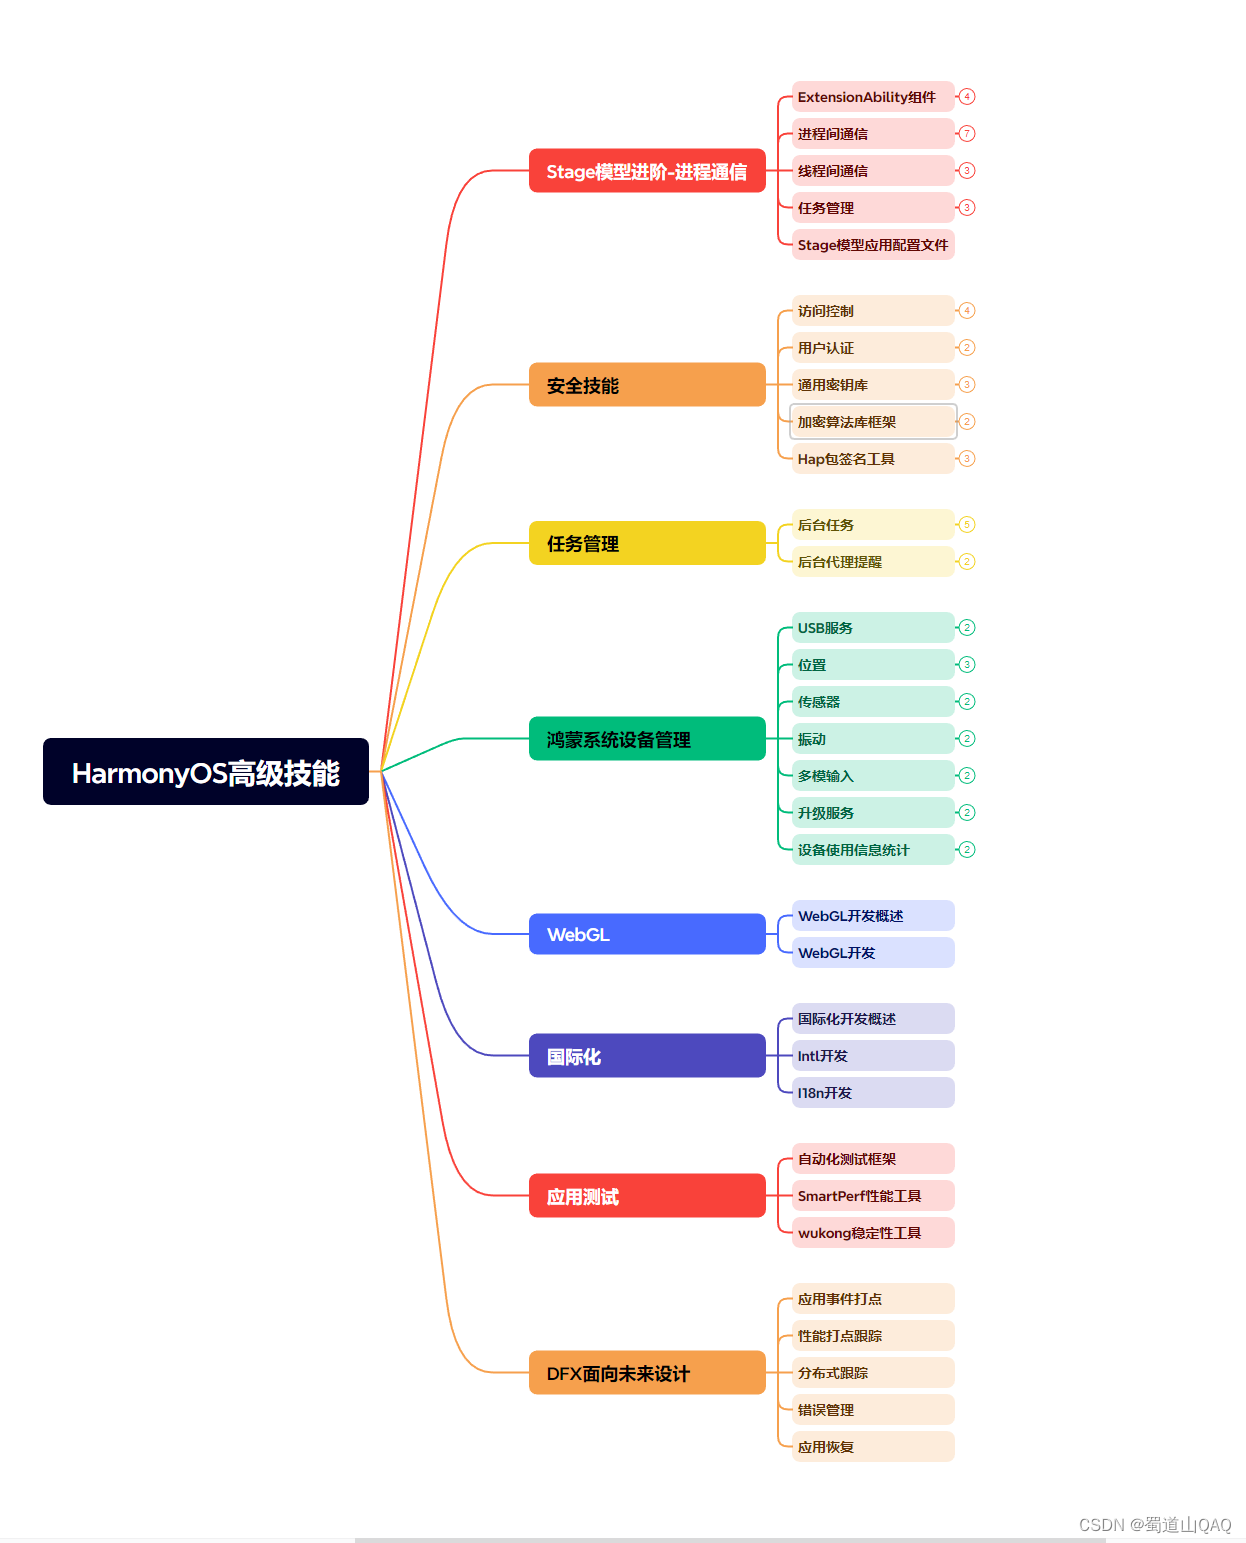


既有适合小白学习的零基础资料,也有适合3年以上经验的小伙伴深入学习提升的进阶课程,涵盖了95%以上鸿蒙开发知识点,真正体系化!
由于文件比较多,这里只是将部分目录截图出来,全套包含大厂面经、学习笔记、源码讲义、实战项目、大纲路线、讲解视频,并且后续会持续更新
如果你需要这些资料,可以添加V获取:vip204888 (备注鸿蒙)

正文
.textAlign(TextAlign.Start)
.margin(5)
Row({ space: 15 }) {
ForEach(this.dragList, (item, index) => {
Text(item)
.textStyle()
.visibility(this.fruitVisible[index])
.onDragStart(() => {
this.bool = true
this.text = item
this.fruitVisible[index] = Visibility.None
return this.pixelMapBuilder
})
.onTouch((event: TouchEvent) => {
if (event.type === TouchType.Down) {
this.eventType = ‘Down’
this.idx = index
}
if (event.type === TouchType.Up) {
this.eventType = ‘Up’
if (this.bool) {
this.fruitVisible[index] = Visibility.Visible
}
}
})
})
}.padding({ top: 10, bottom: 10 }).margin(10)
Text(‘This is a List element’)
.fontSize(12)
.fontColor(0xCCCCCC)
.width(‘90%’)
.textAlign(TextAlign.Start)
.margin(15)
List({ space: 20 }) {
ForEach(this.numbers, (item) => {
ListItem() {
Text(item)
.width(‘100%’)
.height(80)
.fontSize(16)
.borderRadius(10)
.textAlign(TextAlign.Center)
.backgroundColor(0xAFEEEE)
}
}, item => item)
}
.editMode(true)
.height(‘50%’)
.width(‘90%’)
.border({ width: 1 })
.padding(15)
.divider({ strokeWidth: 2, color: 0xFFFFFF, startMargin: 20, endMargin: 20 })
.onDragEnter((event: DragEvent, extraParams: string) => {
console.log('List onDragEnter, ’ + extraParams + ‘X:’ + event.getX() + ‘Y:’ + event.getY())
})
.onDragMove((event: DragEvent, extraParams: string) => {
console.log('List onDragMove, ’ + extraParams + ‘X:’ + event.getX() + ‘Y:’ + event.getY())
})
.onDragLeave((event: DragEvent, extraParams: string) => {
console.log('List onDragLeave, ’ + extraParams + ‘X:’ + event.getX() + ‘Y:’ + event.getY())
})
.onDrop((event: DragEvent, extraParams: string) => {
let jsonString = JSON.parse(extraParams);
if (this.bool) {
// 通过splice方法插入元素
this.numbers.splice(jsonString.insertIndex, 0, this.text)
this.bool = false
}
this.fruitVisible[this.idx] = Visibility.None
})
}.width(‘100%’).height(‘100%’).padding({ top: 20 }).margin({ top: 20 })
}
}

六、按键事件
按键事件指组件与键盘、遥控器等按键设备交互时触发的事件,适用于所有可获焦组件,例如Button。对于Text,Image等默认不可获焦的组件,可以设置focusable属性为true后使用按键事件。
事件
| 名称 | 支持冒泡 | 功能描述 |
|---|---|---|
| onKeyEvent(event: (event?: KeyEvent) => void) | 是 | 绑定该方法的组件获焦后,按键动作触发该回调,event返回值见KeyEvent介绍。 |
KeyEvent对象说明
| 名称 | 类型 | 描述 |
|---|---|---|
| type | KeyType | 按键的类型。 |
| keyCode | number | 按键的键码。 |
| keyText | string | 按键的键值。 |
| keySource | KeySource | 触发当前按键的输入设备类型。 |
| deviceId | number | 触发当前按键的输入设备ID。 |
| metaKey | number | 按键发生时元键(即Windows键盘的WIN键、Mac键盘的Command键)的状态,1表示按压态,0表示未按压态。 |
| timestamp | number | 事件时间戳。触发事件时距离系统启动的时间间隔,单位纳秒。 |
| stopPropagation | () => void | 阻塞事件冒泡传递。 |
示例
@Entry
@Component
struct KeyEventExample {
// 定义一个名为text的状态变量,类型为string,初始值为空字符串
@State
text: string = ‘’;
// 定义一个名为eventType的状态变量,类型为string,初始值为空字符串
@State
eventType: string = ‘’;
// build方法是一个特殊的方法,在Flutter中用于构建和渲染组件
build() {
// 创建一个Column垂直布局容器,用于放置其他组件
Column() {
// 创建一个Button组件,显示文字“KeyEvent”
Button(‘KeyEvent’)
// 当这个按钮接收到键盘事件时,触发onKeyEvent函数
.onKeyEvent((event: KeyEvent) => {
// 如果事件类型是按下(Down)
if (event.type === KeyType.Down) {
// 将eventType设置为’Down’
this.eventType = ‘Down’;
}
// 如果事件类型是释放(Up)
if (event.type === KeyType.Up) {
// 将eventType设置为’Up’
this.eventType = ‘Up’;
}
// 更新text的值,显示按键的类型、键码和键文
this.text = ‘KeyType:’ + this.eventType + ‘\nkeyCode:’ + event.keyCode + ‘\nkeyText:’ + event.keyText;
})
// 创建一个Text组件,显示text的值,并设置内边距为15像素
Text(this.text).padding(15)
// 设置Column的高度为300像素,宽度为100%,即全屏宽度,并设置外边距为35像素
}.height(300).width(‘100%’).padding(35);
}
}

七、焦点事件
焦点事件指页面焦点在可获焦组件间移动时触发的事件,组件可使用焦点事件来处理相关逻辑。
- 从API Version 8开始支持。后续版本如有新增内容,则采用上角标单独标记该内容的起始版本。
- 目前仅支持通过外接键盘的tab键、方向键触发。
- 存在默认交互逻辑的组件例如Button、TextInput等,默认即为可获焦,Text、Image等组件则默认状态为不可获焦,不可获焦状态下,无法触发焦点事件,需要设置focusable属性为true才可触发。
事件
| 名称 | 支持冒泡 | 功能描述 |
|---|---|---|
| onFocus(event: () => void) | 否 | 当前组件获取焦点时触发的回调。 |
| onBlur(event:() => void) | 否 | 当前组件失去焦点时触发的回调。 |
示例
@Entry
@Component
struct FocusEventExample {
// 定义三个状态变量,分别表示三个按钮的颜色
@State
oneButtonColor: string = ‘#FFC0CB’;
@State
twoButtonColor: string = ‘#87CEFA’;
@State
threeButtonColor: string = ‘#90EE90’;
build() {
// 创建一个Column垂直布局容器,并设置外边距为20像素
Column({ space: 20 }) {
// 创建一个名为“First Button”的按钮,设置背景颜色为oneButtonColor,宽度为260像素,高度为70像素,字体颜色为黑色,可获取焦点
Button(‘First Button’)
.backgroundColor(this.oneButtonColor)
.width(260)
.height(70)
.fontColor(Color.Black)
.focusable(true)
// 当按钮获得焦点时,将oneButtonColor设置为红色
.onFocus(() => {
this.oneButtonColor = ‘#FF0000’;
})
// 当按钮失去焦点时,将oneButtonColor设置回原来的颜色(#FFC0CB)
.onBlur(() => {
this.oneButtonColor = ‘#FFC0CB’;
});
// 创建一个名为“Second Button”的按钮,设置背景颜色为twoButtonColor,宽度为260像素,高度为70像素,字体颜色为黑色,可获取焦点
Button(‘Second Button’)
.backgroundColor(this.twoButtonColor)
.width(260)
.height(70)
.fontColor(Color.Black)
.focusable(true)
// 当按钮获得焦点时,将twoButtonColor设置为红色
.onFocus(() => {
this.twoButtonColor = ‘#FF0000’;
})
// 当按钮失去焦点时,将twoButtonColor设置回原来的颜色(#87CEFA)
.onBlur(() => {
this.twoButtonColor = ‘#87CEFA’;
});
// 创建一个名为“Third Button”的按钮,设置背景颜色为threeButtonColor,宽度为260像素,高度为70像素,字体颜色为黑色,可获取焦点
Button(‘Third Button’)
.backgroundColor(this.threeButtonColor)
.width(260)
.height(70)
.fontColor(Color.Black)
.focusable(true)
// 当按钮获得焦点时,将threeButtonColor设置为红色
.onFocus(() => {
this.threeButtonColor = ‘#FF0000’;
})
// 当按钮失去焦点时,将threeButtonColor设置回原来的颜色(#90EE90)
.onBlur(() => {
this.threeButtonColor = ‘#90EE90’;
});
}
}
}

八、鼠标事件
在鼠标的单个动作触发多个事件时,事件的顺序是固定的,鼠标事件默认透传。
- 从API Version 8开始支持。后续版本如有新增内容,则采用上角标单独标记该内容的起始版本。
- 目前仅支持通过外接鼠标触发。
事件
| 名称 | 支持冒泡 | 描述 |
|---|---|---|
| onHover(event: (isHover?: boolean) => void) | 否 | 鼠标进入或退出组件时触发该回调。 isHover:表示鼠标是否悬浮在组件上,鼠标进入时为true, 退出时为false。 |
| onMouse(event: (event?: MouseEvent) => void) | 是 | 当前组件被鼠标按键点击时或者鼠标在组件上悬浮移动时,触发该回调,event返回值包含触发事件时的时间戳、鼠标按键、动作、鼠标位置在整个屏幕上的坐标和相对于当前组件的坐标。 |
MouseEvent对象说明
| 名称 | 属性类型 | 描述 |
|---|---|---|
| screenX | number | 鼠标位置相对于应用窗口左上角的x轴坐标。 |
| screenY | number | 鼠标位置相对于应用窗口左上角的y轴坐标。 |
| x | number | 鼠标位置相对于当前组件左上角的x轴坐标。 |
| y | number | 鼠标位置相对于当前组件左上角的y轴坐标。 |
| button | MouseButton | 鼠标按键。 |
| action | MouseAction | 鼠标动作。 |
| stopPropagation | () => void | 阻塞事件冒泡。 |
| timestamp8+ | number | 事件时间戳。触发事件时距离系统启动的时间间隔,单位纳秒。 |
| target8+ | EventTarget | 触发事件的元素对象显示区域。 |
| source8+ | SourceType | 事件输入设备。 |
示例
@Entry
@Component
struct MouseEventExample {
@State hoverText: string = ‘no hover’;
@State mouseText: string = ‘’;
@State action: string = ‘’;
@State mouseBtn: string = ‘’;
@State color: Color = Color.Blue;
build() {
Column({ space: 20 }) {
Button(this.hoverText)
.width(180).height(80)
.backgroundColor(this.color)
.onHover((isHover: boolean) => {
// 通过onHover事件动态修改按钮在是否有鼠标悬浮时的文本内容与背景颜色
if (isHover) {
this.hoverText = ‘hover’;
this.color = Color.Pink;
} else {
this.hoverText = ‘no hover’;
this.color = Color.Blue;
}
})
Button(‘onMouse’)
.width(180).height(80)
.onMouse((event: MouseEvent) => {
switch (event.button) {
case MouseButton.None:
this.mouseBtn = ‘None’;
break;
case MouseButton.Left:
this.mouseBtn = ‘Left’;
break;
case MouseButton.Right:
this.mouseBtn = ‘Right’;
break;
case MouseButton.Back:
this.mouseBtn = ‘Back’;
break;
case MouseButton.Forward:
this.mouseBtn = ‘Forward’;
break;
case MouseButton.Middle:
this.mouseBtn = ‘Middle’;
break;
}
switch (event.action) {
case MouseAction.Hover:
this.action = ‘Hover’;
break;
case MouseAction.Press:
this.action = ‘Press’;
break;
case MouseAction.Move:
this.action = ‘Move’;
break;
case MouseAction.Release:
this.action = ‘Release’;
break;
}
this.mouseText = 'onMouse:\nButton = ’ + this.mouseBtn +
'\nAction = ’ + this.action + ‘\nXY=(’ + event.x + ‘,’ + event.y + ‘)’ +
‘\nscreenXY=(’ + event.screenX + ‘,’ + event.screenY + ‘)’;
})
Text(this.mouseText)
}.padding({ top: 30 }).width(‘100%’)
}
}
鼠标悬浮时改变文本内容与背景颜色:

鼠标点击时:

九、组件区域变化事件
组件区域变化事件指组件显示的尺寸、位置等发生变化时触发的事件。
事件
| 名称 | 支持冒泡 | 功能描述 |
|---|---|---|
| onAreaChange(event: (oldValue: Area, newValue: Area) => void) | 否 | 组件区域变化时触发该回调。仅会响应由布局变化所导致的组件大小、位置发生变化时的回调。由绘制变化所导致的渲染属性变化不会响应回调,如translate、offset。 - Area:返回目标元素的宽高以及目标元素相对父元素和页面左上角的坐标位置。 |
示例
@Entry
@Component
struct AreaExample {
// 定义一个状态变量value,初始值为’Text’
@State
value: string = ‘Text’;
// 定义一个状态变量sizeValue,初始值为空字符串
@State
sizeValue: string = ‘’;
build() {
// 创建一个Column垂直布局容器
Column() {
// 创建一个Text组件,显示当前value的值,背景颜色为绿色,外边距为30像素,字体大小为20像素
Text(this.value)
.backgroundColor(Color.Green).margin(30).fontSize(20)
// 当Text组件被点击时,将value的值追加’Text’
.onClick(() => {
this.value = this.value + ‘Text’;
})
// 当Text组件的面积发生变化时,打印出变化前后的面积值到控制台,并将变化后的面积值赋给sizeValue
.onAreaChange((oldValue: Area, newValue: Area) => {
console.info(Ace: on area change, oldValue is ${JSON.stringify(oldValue)} value is ${JSON.stringify(newValue)});
this.sizeValue = JSON.stringify(newValue);
});
// 创建一个新的Text组件,显示’new area is: '和sizeValue的值,外边距分别为30像素(右边)和30像素(左边)
Text(‘new area is: \n’ + this.sizeValue).margin({ right: 30, left: 30 });
}
}
}

十、组件可见区域变化事件
组件可见区域变化事件是组件在屏幕中的显示区域面积变化时触发的事件,提供了判断组件是否完全或部分显示在屏幕中的能力,适用于广告曝光埋点之类的场景。
事件
| 名称 | 功能描述 |
|---|---|
| onVisibleAreaChange(ratios: Array, event: (isVisible: boolean, currentRatio: number) => void) | 组件可见区域变化时触发该回调。 -ratios:阈值数组。其中,每个阈值代表组件可见面积(即组件在屏幕显示区的面积)与组件自身面积的比值。当组件可见面积与自身面积的比值大于或小于阈值时,均会触发该回调。每个阈值的取值范围为[0.0, 1.0],如果开发者设置的阈值超出该范围,则会实际取值0.0或1.0. -isVisible:表示组件的可见面积与自身面积的比值是否大于阈值,true表示大于,false表示小于。 -currentRatio:触发回调时,组件可见面积与自身面积的比值。 说明: 该接口只适用于组件布局区域超出或离开了当前屏幕显示区域的情况,不支持组件堆叠(Stack)导致的面积不可见、使用offset或translate等图形变换接口导致的面积超出情况。 |
示例
// xxx.ets
@Entry
@Component
struct ScrollExample {
scroller: Scroller = new Scroller()
private arr: number[] = [0, 1, 2, 3, 4, 5, 6, 7, 8, 9]
@State testTextStr: string = ‘test’
@State testRowStr: string = ‘test’
build() {
Column() {
Column() {
Text(this.testTextStr)
.fontSize(20)
Text(this.testRowStr)
.fontSize(20)
}
.height(100)
.backgroundColor(Color.Gray)
.opacity(0.3)
Scroll(this.scroller) {
Column() {
Text(“Test Text Visible Change”)
.fontSize(20)
.height(200)
.margin({ top: 50, bottom: 20 })
.backgroundColor(Color.Green)
// 通过设置ratios为[0.0, 1.0],实现当组件完全显示或完全消失在屏幕中时触发回调
.onVisibleAreaChange([0.0, 1.0], (isVisible: boolean, currentRatio: number) => {
console.info('Test Text isVisible: ’ + isVisible + ‘, currentRatio:’ + currentRatio)
if (isVisible && currentRatio >= 1.0) {
console.info(‘Test Text is fully visible. currentRatio:’ + currentRatio)
this.testTextStr = ‘Test Text is fully visible’
}
if (!isVisible && currentRatio <= 0.0) {
console.info(‘Test Text is completely invisible.’)
this.testTextStr = ‘Test Text is completely invisible’
}
})
Row() {
Text(‘Test Row Visible Change’)
.fontSize(20)
.margin({ bottom: 20 })
}
.height(200)
.backgroundColor(Color.Yellow)
.onVisibleAreaChange([0.0, 1.0], (isVisible: boolean, currentRatio: number) => {
console.info(‘Test Row isVisible:’ + isVisible + ‘, currentRatio:’ + currentRatio)
if (isVisible && currentRatio >= 1.0) {
console.info(‘Test Row is fully visible.’)
this.testRowStr = ‘Test Row is fully visible’
}
if (!isVisible && currentRatio <= 0.0) {
console.info(‘Test Row is is completely invisible.’)
this.testRowStr = ‘Test Row is is completely invisible’
}
})
ForEach(this.arr, (item) => {
Text(item.toString())
.width(‘90%’)
.height(150)
.backgroundColor(0xFFFFFF)
.borderRadius(15)
.fontSize(16)
.textAlign(TextAlign.Center)
.margin({ top: 10 })
}, item => item)
}.width(‘100%’)
}
.backgroundColor(0x317aff)
.scrollable(ScrollDirection.Vertical)
.scrollBar(BarState.On)
.scrollBarColor(Color.Gray)
.scrollBarWidth(10)
.onScroll((xOffset: number, yOffset: number) => {
console.info(xOffset + ’ ’ + yOffset)
})
.onScrollEdge((side: Edge) => {
console.info(‘To the edge’)
})
网上学习资料一大堆,但如果学到的知识不成体系,遇到问题时只是浅尝辄止,不再深入研究,那么很难做到真正的技术提升。
需要这份系统化的资料的朋友,可以添加V获取:vip204888 (备注鸿蒙)

一个人可以走的很快,但一群人才能走的更远!不论你是正从事IT行业的老鸟或是对IT行业感兴趣的新人,都欢迎加入我们的的圈子(技术交流、学习资源、职场吐槽、大厂内推、面试辅导),让我们一起学习成长!
tem => item)
}.width(‘100%’)
}
.backgroundColor(0x317aff)
.scrollable(ScrollDirection.Vertical)
.scrollBar(BarState.On)
.scrollBarColor(Color.Gray)
.scrollBarWidth(10)
.onScroll((xOffset: number, yOffset: number) => {
console.info(xOffset + ’ ’ + yOffset)
})
.onScrollEdge((side: Edge) => {
console.info(‘To the edge’)
})
网上学习资料一大堆,但如果学到的知识不成体系,遇到问题时只是浅尝辄止,不再深入研究,那么很难做到真正的技术提升。
需要这份系统化的资料的朋友,可以添加V获取:vip204888 (备注鸿蒙)
[外链图片转存中…(img-5DRR604Z-1713589830971)]
一个人可以走的很快,但一群人才能走的更远!不论你是正从事IT行业的老鸟或是对IT行业感兴趣的新人,都欢迎加入我们的的圈子(技术交流、学习资源、职场吐槽、大厂内推、面试辅导),让我们一起学习成长!


 3518
3518

 被折叠的 条评论
为什么被折叠?
被折叠的 条评论
为什么被折叠?
 到【灌水乐园】发言


