


既有适合小白学习的零基础资料,也有适合3年以上经验的小伙伴深入学习提升的进阶课程,涵盖了95%以上大数据知识点,真正体系化!
由于文件比较多,这里只是将部分目录截图出来,全套包含大厂面经、学习笔记、源码讲义、实战项目、大纲路线、讲解视频,并且后续会持续更新
注:1-4步每台服务器均需操作
5. 配置rabbitmq集群
5.1. 选取某IP为主节点,读取其cookie,并复制到其他节点(节点之间通过cookie确定相互是否可通信,权限400,只读)举例:目前有172.16.10.1(hostname为mq01-10-1)及172.16.10.2(hostname为mq02-10-2)两台服务器,我们已172.16.10.1为主节点
# 查看主节点也就是172.16.10.1的cookie
cd /var/lib/rabbitmq/
cat .erlang.cookie
# 将查看到的内容复制到172.16.10.2的/var/lib/rabbitmq/.erlang.cookie下(直接覆盖)
# 设置只读权限(每台服务器都需要执行)
chmod 400 .erlang.cookie
# 查看确认一下权限
ll -a .erlang.cookie
5.2. 各节点依次启动rabbitmq
rabbitmq-server -detached 或者 systemctl restart rabbitmq-server
5.3. 查看各节点和集群的状态:
rabbitmqctl status
rabbitmqctl cluster_status
5.4. 建立集群,以mq01-10-1为主节点
#建立集群之前请先在各个节点的/etc/hosts记录好主机名及IP
#在172.16.10.1中设置
vim /etc/hosts
172.16.10.2 mq02-10-2
#在172.16.10.2中etc/hosts设置
172.16.10.1 mq01-10-1
#在主节点以外的mq02-10-2上执行:
rabbitmqctl stop_app
#显示如下
#-----------------------
#Stopping rabbit application on node rabbit@mq02-10-2 ...
#-----------------------
#重置
rabbitmqctl reset
#-----------------------------------
#Resetting node rabbit@mq02-10-2 ...
#-----------------------------------
#加入主节点
rabbitmqctl join_cluster rabbit@mq01-10-1
#------------------------------------------------------
#Clustering node rabbit@mq01-10-1 with rabbit@mq01-10-2
#------------------------------------------------------
#启动mq
rabbitmqctl start_app
#----------------------------------
#Starting node rabbit@mq01-10-2 ...
#completed with 0 plugins.
#----------------------------------
# 查看集群状态
rabbitmqctl cluster_status
#---------------------------------------------
#Cluster status of node rabbit@mq02-10-2 ...
#Basics
#Cluster name: rabbit@mq02-10-2
#Disk Nodes
#rabbit@mq01-10-1
#rabbit@mq02-10-2
#Running Nodes
#rabbit@mq01-10-1
#rabbit@mq02-10-2
#...........
#---------------------------------------------
5.5. 添加后台管理账户(只需一台操作,集群之间同步)
rabbitmqctl add_user xiaosen xiaosen123
#---------
# Adding user "xiaosen" ...
#--------
#设置该用户为管理员
rabbitmqctl set_user_tags xiaosen administrator
#-------
#Setting tags for user "xiaosen" to [administrator] ...
#------
#设置访问权限
rabbitmqctl set_permissions -p / xiaosen ".\*" ".\*" ".\*"
#------
#Setting permissions for user "xiaosen" in vhost "/" ...
#-------
#设置镜像模式
rabbitmqctl set_policy ha-all "^" '{"ha-mode":"all"}'
#-----------
#Setting policy "ha-all" for pattern "^" to "{"ha-mode":"all"}" with priority "0" for vhost "/" ...
#------------
6.访问rabbitmq管理平台:http://{ip}:15672 账号密码为5.5设置的
至此集群搭建完成
一些mq的使用命令
# 当前窗口启动 rabbitmq
rabbitmq-server
# 后台启动 rabbitmq
rabbitmq-server -detached
# 停止 rabbitmq
rabbitmqctl stop
# 查看所有队列
rabbitmqctl list_queues
# 查看所有虚拟主机
rabbitmqctl list_vhosts
# 在Erlang VM运行的情况下启动RabbitMQ应用
rabbitmqctl start_app
rabbitmqctl stop_app
# 查看节点状态
rabbitmqctl status
# 查看所有可用的插件
rabbitmq-plugins list
# 启用插件
rabbitmq-plugins enable <plugin-name>
# 停用插件
rabbitmq-plugins disable <plugin-name>
# 添加用户
rabbitmqctl add_user username password
# 列出所有用户
rabbitmqctl list_users
# 删除用户
rabbitmqctl delete_user username
# 清除用户权限
rabbitmqctl clear_permissions -p vhostpath username
# 列出用户权限
rabbitmqctl list_user_permissions username
# 修改密码
rabbitmqctl change_password username newpassword
# 设置用户权限
rabbitmqctl set_permissions -p vhostpath username ".\*" ".\*" ".\*"
# 创建虚拟主机
rabbitmqctl add_vhost vhostpath
# 列出虚拟主机上的所有权限
rabbitmqctl list_permissions -p vhostpath
# 删除虚拟主机
rabbitmqctl delete_vhost vhost vhostpath
# 移除所有数据,要在 rabbitmqctl stop\_app 之后使用
rabbitmqctl reset
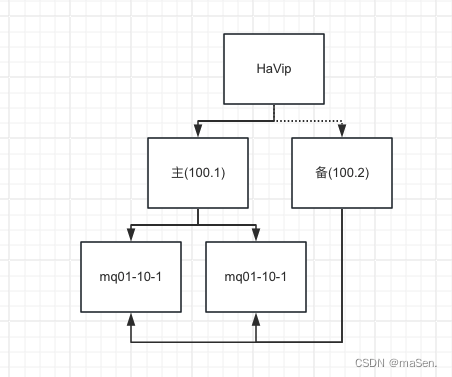
为了保证rabbitmq的高可用性,我们可以在这基础上部署haproxy及keepalived来保证服务的高可用性
配合阿里云的havip(高可用虚拟IP,设ip为:172.16.100.100)来进行搭建。实现主备切换功能。主宕机了由备来替补
如图:
1. 安装haproxy(主及备都需要安装)
yum -y install haproxy keepalived
cd /etc/haproxy/
cp haproxy.cfg haproxy.cfg.old
vim haproxy.cfg
# 配置如下:
global
    log         127.0.0.1 local2 info
    chroot      /var/lib/haproxy
    pidfile     /var/run/haproxy.pid
    maxconn     4000
    user        haproxy
    group       haproxy
    daemon
    # turn on stats unix socket
    stats socket /var/lib/haproxy/stats
defaults
    mode                    tcp
    log                     global
    option                  tcplog
    option                  dontlognull
    option http-server-close
    option                  redispatch
    retries                 3
    timeout http-request    10s
    timeout queue           90s
    timeout connect         90s
    timeout client          120s
    timeout server          120s
    timeout http-keep-alive 10s
    timeout check           10s
    maxconn                 3000
listen private_monitoring
    bind 0.0.0.0:5100
    mode http
    option httplog
    stats enable
    stats uri /stats
    stats refresh 30s
    # 查看haproxy状态的登录账号及密码 可访问:http://{HaVip}:5100/stats进行查看
    stats auth admin:mg_admin
    stats realm welcome login\ Haproxy
    stats hide-version
listen rabbitmq_cluster
    bind 0.0.0.0:5672
    timeout client          3h
    timeout server          3h
    mode tcp
    option tcplog
    balance roundrobin
    #mq的地址
    server mq001 172.16.10.1:5672 check inter 2000 rise 2 fall 2
    server mq002 172.16.10.2:5672 check inter 2000 rise 2 fall 2
listen rabbitmq_admin
    bind 0.0.0.0:15672
    #mq管理后台的地址
    server mq001 172.16.10.1:15672
    server mq002 172.16.10.2:15672
#(UDP配置取消注释,添加local0的haproxy日志)
vim /etc/rsyslog.conf
-----------------------------------------------------------------
# Provides UDP syslog reception
$ModLoad imudp
$UDPServerRun 514
# Save haproxy log
 local2.*                       /var/log/haproxy/haproxy.log
-----------------------------------------------------------------
vim /etc/sysconfig/rsyslog
------------------------------
#SYSLOGD\_OPTIONS=""
SYSLOGD\_OPTIONS="-r -m 0 -c 2"
------------------------------
# 重启日志服务
systemctl restart rsyslog.service
# 开机自启动
systemctl enable haproxy
# 启动服务
systemctl start haproxy
# 重启
systemctl restart haproxy
# 查看状态
systemctl status haproxy
2.配置keepalived主从
# 配置主节点的keepalived.conf
vim /etc/keepalived/keepalived.conf
-----------------------------------------------
global_defs {
router_id HA115
script_user root
enable_script_security
}
vrrp_script chk_haproxy
{
script "/etc/keepalived/scripts/haproxy\_check.sh"
interval 1


**网上学习资料一大堆,但如果学到的知识不成体系,遇到问题时只是浅尝辄止,不再深入研究,那么很难做到真正的技术提升。**
**[需要这份系统化资料的朋友,可以戳这里获取](https://bbs.csdn.net/forums/4f45ff00ff254613a03fab5e56a57acb)**
**一个人可以走的很快,但一群人才能走的更远!不论你是正从事IT行业的老鸟或是对IT行业感兴趣的新人,都欢迎加入我们的的圈子(技术交流、学习资源、职场吐槽、大厂内推、面试辅导),让我们一起学习成长!**
-1715466707958)]
[外链图片转存中...(img-Tpma0Flb-1715466707959)]
**网上学习资料一大堆,但如果学到的知识不成体系,遇到问题时只是浅尝辄止,不再深入研究,那么很难做到真正的技术提升。**
**[需要这份系统化资料的朋友,可以戳这里获取](https://bbs.csdn.net/forums/4f45ff00ff254613a03fab5e56a57acb)**
**一个人可以走的很快,但一群人才能走的更远!不论你是正从事IT行业的老鸟或是对IT行业感兴趣的新人,都欢迎加入我们的的圈子(技术交流、学习资源、职场吐槽、大厂内推、面试辅导),让我们一起学习成长!**


 1120
1120

 被折叠的 条评论
为什么被折叠?
被折叠的 条评论
为什么被折叠?
 到【灌水乐园】发言


