SpringBoot集成SpringSecurity5和OAuth2 — 3、基于数据库的OAuth2认证服务器_springboot oauth 客户端模式使用数据库

先自我介绍一下,小编浙江大学毕业,去过华为、字节跳动等大厂,目前阿里P7

深知大多数程序员,想要提升技能,往往是自己摸索成长,但自己不成体系的自学效果低效又漫长,而且极易碰到天花板技术停滞不前!

因此收集整理了一份《2024年最新Golang全套学习资料》,初衷也很简单,就是希望能够帮助到想自学提升又不知道该从何学起的朋友。
img
img
img
img
img

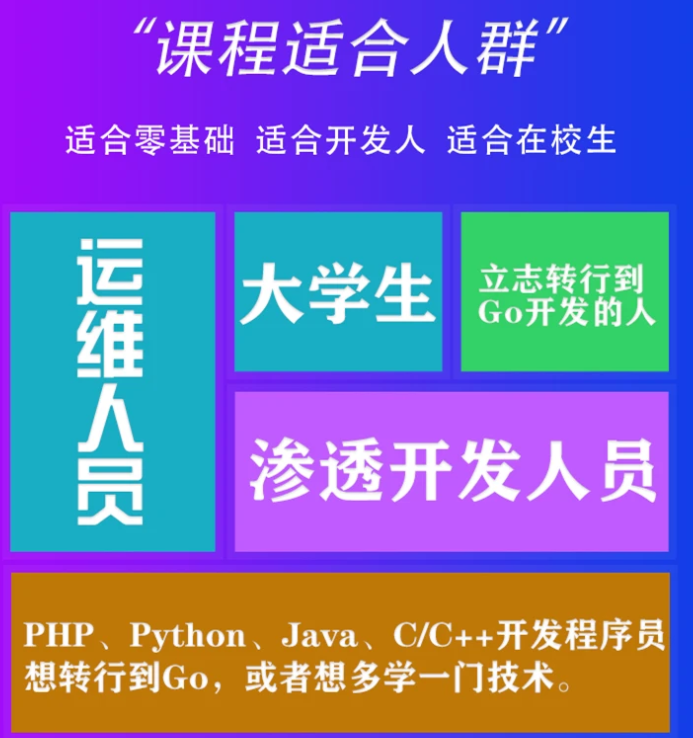
既有适合小白学习的零基础资料,也有适合3年以上经验的小伙伴深入学习提升的进阶课程,涵盖了95%以上Go语言开发知识点,真正体系化!

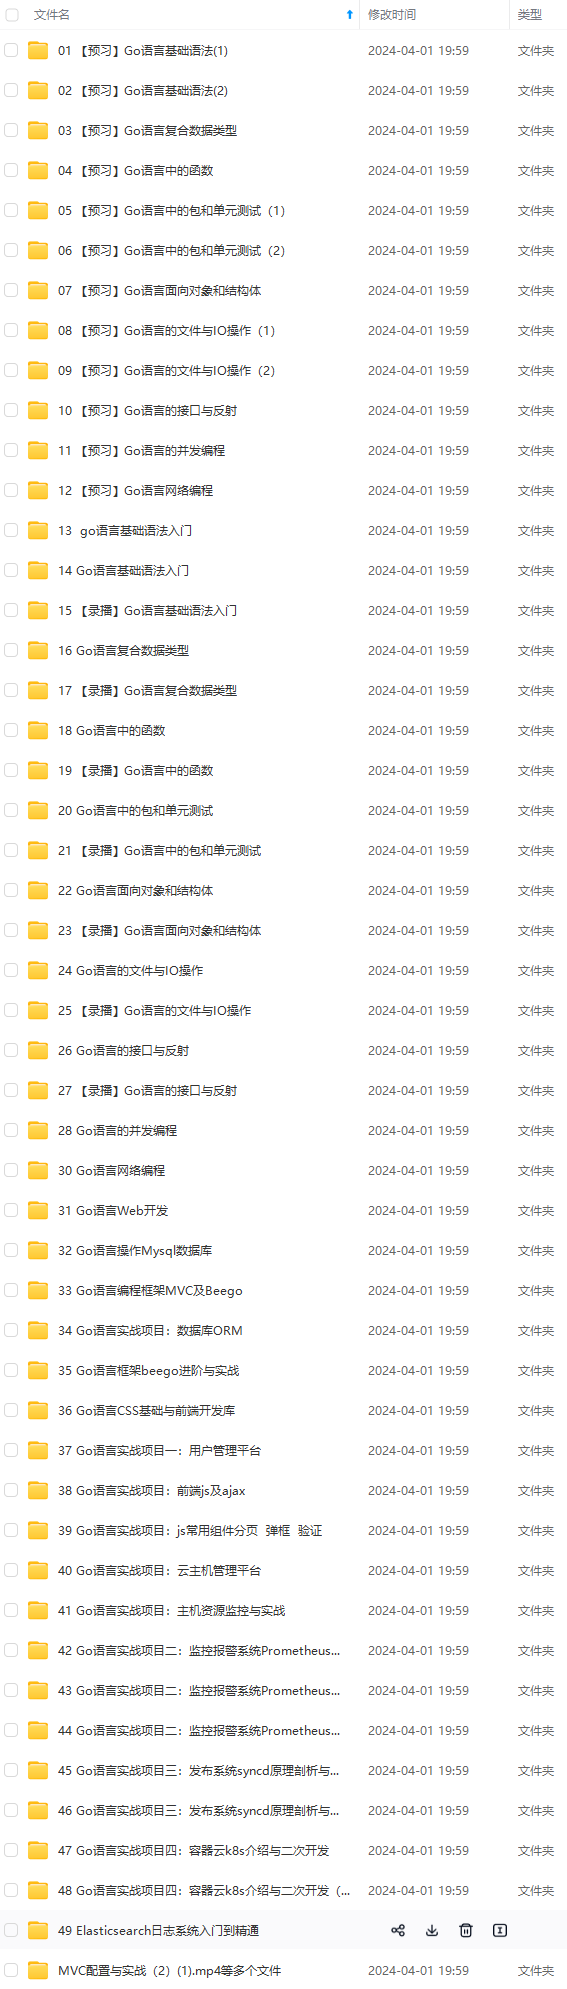
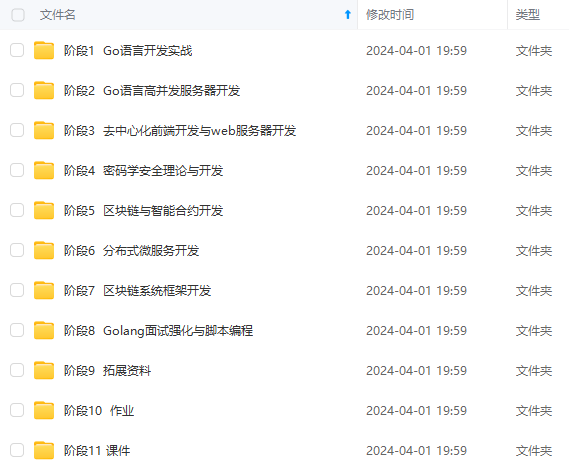
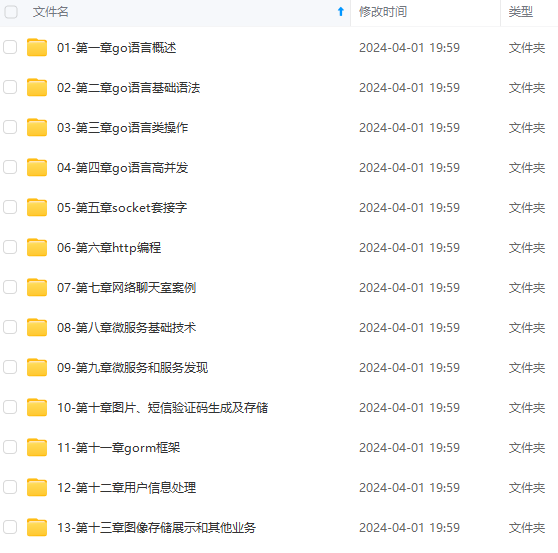
由于文件比较多,这里只是将部分目录截图出来,全套包含大厂面经、学习笔记、源码讲义、实战项目、大纲路线、讲解视频,并且后续会持续更新

如果你需要这些资料,可以添加V获取:vip1024b (备注go)
img

正文

org.mybatis.spring.boot mybatis-spring-boot-starter 2.1.2 mysql mysql-connector-java 5.1.47 runtime com.alibaba druid 1.1.13 org.projectlombok lombok true org.springframework.boot spring-boot-starter-test test org.junit.vintage junit-vintage-engine org.springframework.cloud spring-cloud-dependencies ${spring-cloud.version} pom import org.springframework.boot spring-boot-maven-plugin

2、application.properties

2.1 thymeleaf的配置

spring.thymeleaf.prefix = classpath:/templates/
#spring.thymeleaf.suffix = .html
spring.thymeleaf.encoding = UTF-8
spring.thymeleaf.servlet.content-type=text/html
spring.thymeleaf.cache = false

2.2 数据库连接的配置

spring.datasource.type=com.alibaba.druid.pool.DruidDataSource
spring.datasource.driver-class-name=com.mysql.jdbc.Driver
spring.datasource.url=jdbc:mysql://localhost:3306/security_oauth2?useUnicode=true&characterEncoding=utf8&useSSL=false&useTimezone=true&serverTimezone=GMT%2B8
spring.datasource.username=root
spring.datasource.password=root

2.3 MyBatis的配置

mybatis.mapper-locations=classpath:mybatis//.xml
#将扫描到的mapper.xml显示在控制台
mybatis.configuration.log-impl=org.apache.ibatis.logging.stdout.StdOutImpl

2.4完整的application.properties文件

mybatis.mapper-locations=classpath:mapper//.xml
#将扫描到的mapper.xml显示在控制台
mybatis.configuration.log-impl=org.apache.ibatis.logging.stdout.StdOutImpl

spring.datasource.type=com.alibaba.druid.pool.DruidDataSource
spring.datasource.driver-class-name=com.mysql.jdbc.Driver
spring.datasource.url=jdbc:mysql://localhost:3306/oauth2jdbc?useUnicode=true&characterEncoding=utf8&useSSL=false&useTimezone=true&serverTimezone=GMT%2B8
spring.datasource.username=root
spring.datasource.password=root

spring.thymeleaf.prefix = classpath:/templates/
#spring.thymeleaf.suffix = .html
spring.thymeleaf.encoding = UTF-8
spring.thymeleaf.servlet.content-type=text/html
spring.thymeleaf.cache = false

#http://localhost:8080/oauth/authorize?response_type=code&client_id=client&scope=read&redirect_uri=http://localhost:8090/callback

#http://localhost:8080/oauth/token?grant_type=authorization_code&code=25R5tn&client_id=client&client_secret=secret&redirect_uri=http://localhost:8090/callback

三、代码

所涉及的代码结构:

3.1WebSecurityConfig

package cn.iotspider.oauth2jdbc.config;

import org.springframework.beans.factory.annotation.Autowired;
import org.springframework.context.annotation.Bean;
import org.springframework.context.annotation.Configuration;
import org.springframework.security.config.annotation.authentication.builders.AuthenticationManagerBuilder;
import org.springframework.security.config.annotation.method.configuration.EnableGlobalMethodSecurity;
import org.springframework.security.config.annotation.web.builders.WebSecurity;
import org.springframework.security.config.annotation.web.configuration.EnableWebSecurity;
import org.springframework.security.config.annotation.web.configuration.WebSecurityConfigurerAdapter;
import org.springframework.security.crypto.bcrypt.BCryptPasswordEncoder;

@Configuration
@EnableWebSecurity
//对全部方法进行验证
@EnableGlobalMethodSecurity(prePostEnabled = true, securedEnabled = true, jsr250Enabled = true)
public class WebSecurityConfig extends WebSecurityConfigurerAdapter {

@Autowired
private UserDetailsServiceImpl userDetailsService;

/**

  • 配置用户登录验证服务
  • @param auth
  • @throws Exception
    */
    @Override
    protected void configure(AuthenticationManagerBuilder auth) throws Exception {
    auth.userDetailsService(userDetailsService);
    }

@Override
public void configure(WebSecurity web) {
//“oauth/check_token"是校验token的地址
web.ignoring().antMatchers(”/oauth/check_token");
}

/**

  • 必须注入,验证密码需要使用
  • @return
    */
    @Bean
    public BCryptPasswordEncoder passwordEncoder() {
    return new BCryptPasswordEncoder();
    }

}

3.2 Oauth2AuthenticationServer

package cn.iotspider.oauth2jdbc.config;

import org.springframework.beans.factory.annotation.Autowired;
import org.springframework.context.annotation.Bean;
import org.springframework.context.annotation.Configuration;
import org.springframework.http.HttpMethod;
import org.springframework.security.oauth2.config.annotation.configurers.ClientDetailsServiceConfigurer;
import org.springframework.security.oauth2.config.annotation.web.configuration.AuthorizationServerConfigurerAdapter;
import org.springframework.security.oauth2.config.annotation.web.configuration.EnableAuthorizationServer;
import org.springframework.security.oauth2.config.annotation.web.configurers.AuthorizationServerEndpointsConfigurer;
import org.springframework.security.oauth2.config.annotation.web.configurers.AuthorizationServerSecurityConfigurer;
import org.springframework.security.oauth2.provider.ClientDetailsService;
import org.springframework.security.oauth2.provider.client.JdbcClientDetailsService;
import org.springframework.security.oauth2.provider.token.TokenStore;
import org.springframework.security.oauth2.provider.token.store.JdbcTokenStore;

import javax.sql.DataSource;

@Configuration
@EnableAuthorizationServer
public class Oauth2AuthenticationServer extends AuthorizationServerConfigurerAdapter {

@Autowired
public DataSource dataSource;

@Autowired
private UserDetailsServiceImpl userDetailsService;

@Bean
public TokenStore tokenStore() {
//token默认保存在内存中(也可以保存在数据库、Redis中)。
//如果保存在中间件(数据库、Redis),那么资源服务器与认证服务器可以不在同一个工程中。
//注意:如果不保存access_token,则没法通过access_token取得用户信息
return new JdbcTokenStore(dataSource);
}

@Bean
public ClientDetailsService jdbcClientDetailsService() {
return new JdbcClientDetailsService(dataSource);
}

/**

  • 配置客户端
  • @param clients
  • @throws Exception
    */
    @Override
    public void configure(ClientDetailsServiceConfigurer clients) throws Exception {
    clients.withClientDetails(jdbcClientDetailsService());
    }

/**

  • 用来配置授权(authorization)以及令牌(token)的访问端点和令牌服务(token services)
    */
    @Override
    public void configure(AuthorizationServerEndpointsConfigurer endpoints) {
    endpoints.tokenStore(tokenStore()).userDetailsService(userDetailsService)
    //reuseRefreshTokens设置为false时,每次通过refresh_token获得access_token时,
    // 也会刷新refresh_token;也就是说,会返回全新的access_token与refresh_token。
    //默认值是true,只返回新的access_token,refresh_token不变。
    .reuseRefreshTokens(true)
    // 允许 GET、POST 请求获取 token,即访问端点:oauth/token
    .allowedTokenEndpointRequestMethods(HttpMethod.GET, HttpMethod.POST);

/*

  • 默认获取token的路径是/oauth/token,通过pathMapping方法,可改变默认路径
  • pathMapping用来配置端点URL链接,有两个参数,都将以 “/” 字符为开始的字符串
  • defaultPath:这个端点URL的默认链接
  • customPath:你要进行替代的URL链接
    */
    endpoints.pathMapping(“/oauth/token”, “/oauth/token”);
    }

/**

  • 配置资源服务器向认证服务器请求及验证token的规则:默认允许获取token,但是需要授权后才能获取到
    *过来验令牌有效性的请求,不是谁都能验的,必须要是经过身份认证的。
  • 所谓身份认证就是,必须携带clientId,clientSecret,否则随便一请求过来验token是不验的
    */
    @Override
    public void configure(AuthorizationServerSecurityConfigurer security) throws Exception {
    // security.tokenKeyAccess(“permitAll()”).checkTokenAccess(
    // “isAuthenticated()”);

//默认允许获取token,但是需要授权后才能获取到 ,所以可以去掉 tokenKeyAccess()
security.checkTokenAccess(“isAuthenticated()”);
//允许客户端使用表单方式发送请求token的认证(因为表单一般是POST请求,所以使用POST方式发送获取token,但必须携带clientId,clientSecret,否则随便一请求过来验token是不验的)
security.allowFormAuthenticationForClients();
}

}

3.3 UserDetailsServiceImpl

package cn.iotspider.oauth2jdbc.config;

import cn.iotspider.oauth2jdbc.entity.TbPermission;
import cn.iotspider.oauth2jdbc.entity.TbUser;
import cn.iotspider.oauth2jdbc.service.TbPermissionService;
import cn.iotspider.oauth2jdbc.service.TbUserService;
import org.springframework.beans.factory.annotation.Autowired;
import org.springframework.security.core.GrantedAuthority;
import org.springframework.security.core.authority.SimpleGrantedAuthority;
import org.springframework.security.core.userdetails.User;
import org.springframework.security.core.userdetails.UserDetails;
import org.springframework.security.core.userdetails.UserDetailsService;
import org.springframework.security.core.userdetails.UsernameNotFoundException;
import org.springframework.stereotype.Service;

import java.util.ArrayList;
import java.util.List;

@Service
public class UserDetailsServiceImpl implements UserDetailsService {

@Autowired
private TbUserService tbUserService;

@Autowired
private TbPermissionService tbPermissionService;

@Override
public UserDetails loadUserByUsername(String username) throws UsernameNotFoundException {
TbUser user = tbUserService.queryByUserName(username);
if(user == null){
throw new UsernameNotFoundException(“不存在该用户!”);
}
List authorities = new ArrayList<>();

//获取用户权限
List tbPermissionList = tbPermissionService.queryByUserId(user.getId());
for(TbPermission permission : tbPermissionList){
authorities.add(new SimpleGrantedAuthority(permission.getEname()));
}
//返回认证用户
return new User(username, user.getPassword(), authorities);
}
}

主要涉及的就是上面三个类,其他的请看码云上的代码。

四、数据库表

4.1 Oauth2认证相关的:

①、oauth_access_token (token存储表)

②、oauth_client_details(客户端存储表)

③、oauth_code(授权码表)

④、oauth_refresh_token(refresh_token表)

4.2 用户相关的

①、tb_user(用户表)

②、tb_role(角色表)

③、tb_permission(权限表)

④、tb_user_role(用户角色表)

⑤、tb_role_permission(角色权限表)

五、测试

5.1获取授权码:

http://localhost:8080/oauth/authorize?response_type=code&client_id=client&scope=read&redirect_uri=http://localhost:8090/callback

client_id、scope、redirect_uri必须和客户端存储表设置的一致。

因为我在oauth_client_details数据表的autoapprove字段设置了true,所以在输入密码登陆成功后就不会有选择同意或拒绝授权这一步操作,而是直接跳回redirect_uri设置的地址,同时返回了授权码

登陆成功后获取的授权码:

网上学习资料一大堆,但如果学到的知识不成体系,遇到问题时只是浅尝辄止,不再深入研究,那么很难做到真正的技术提升。

需要这份系统化的资料的朋友,可以添加V获取:vip1024b (备注Go)
img

一个人可以走的很快,但一群人才能走的更远!不论你是正从事IT行业的老鸟或是对IT行业感兴趣的新人,都欢迎加入我们的的圈子(技术交流、学习资源、职场吐槽、大厂内推、面试辅导),让我们一起学习成长!
_uri必须和客户端存储表设置的一致。**

因为我在oauth_client_details数据表的autoapprove字段设置了true,所以在输入密码登陆成功后就不会有选择同意或拒绝授权这一步操作,而是直接跳回redirect_uri设置的地址,同时返回了授权码

登陆成功后获取的授权码:

网上学习资料一大堆,但如果学到的知识不成体系,遇到问题时只是浅尝辄止,不再深入研究,那么很难做到真正的技术提升。

需要这份系统化的资料的朋友,可以添加V获取:vip1024b (备注Go)
[外链图片转存中…(img-SgZvQaj5-1713416272114)]

一个人可以走的很快,但一群人才能走的更远!不论你是正从事IT行业的老鸟或是对IT行业感兴趣的新人,都欢迎加入我们的的圈子(技术交流、学习资源、职场吐槽、大厂内推、面试辅导),让我们一起学习成长!

  • 4
    点赞
  • 7
    收藏
    觉得还不错? 一键收藏
  • 0
    评论
Spring Boot是一个用于构建独立的、生产级别的基于Spring的应用程序的框架,而Spring SecuritySpring的一个强大的安全框架,用于身份验证和授权OAuth2是一种用于授权的开放标准,JWT是一种用于在用户和服务器之间传递安全信息的开放标准。这些技术的整合可以帮助我们构建一个完善的认证服务器,网关和微服务之间的权限认证系统。 首先,我们可以使用Spring Boot整合Spring Security来构建认证服务器。通过Spring Security提供的各种认证授权功能,我们可以实现用户的身份验证和授权管理。然后,结合OAuth2的开放标准,我们可以实现用户的授权码、密码、客户端凭证和刷新令牌等授权方式,从而提高系统的安全性和灵活性。 接着,我们可以利用Spring Boot搭建网关来统一管理微服务之间的访问权限。通过网关,我们可以对各个微服务进行统一的权限验证和访问控制,从而实现统一的安全管理和监控。 最后,我们可以在微服务中集成JWT来实现基于令牌的安全验证。JWT可以帮助我们在客户端服务器之间传递安全信息,并通过签名和加密保障信息的安全性。 总之,通过Spring Boot整合Spring SecurityOAuth2和JWT,我们可以构建一个完善的认证服务器、网关和微服务之间的权限认证系统,从而实现系统的安全可靠和权限灵活控制。这将有助于我们构建高效、安全的微服务架构,并为用户提供更加可靠的服务。

“相关推荐”对你有帮助么?

  • 非常没帮助
  • 没帮助
  • 一般
  • 有帮助
  • 非常有帮助
提交
评论
添加红包

请填写红包祝福语或标题

红包个数最小为10个

红包金额最低5元

当前余额3.43前往充值 >
需支付:10.00
成就一亿技术人!
领取后你会自动成为博主和红包主的粉丝 规则
hope_wisdom
发出的红包
实付
使用余额支付
点击重新获取
扫码支付
钱包余额 0

抵扣说明:

1.余额是钱包充值的虚拟货币,按照1:1的比例进行支付金额的抵扣。
2.余额无法直接购买下载,可以购买VIP、付费专栏及课程。

余额充值