


- 连接管理(状态判断
isOpen、接收消息的MessageHandler、发送消息的异步远程端点RemoteEndpoint.Async和同步远程端点RemoteEndpoint.Basic等)。
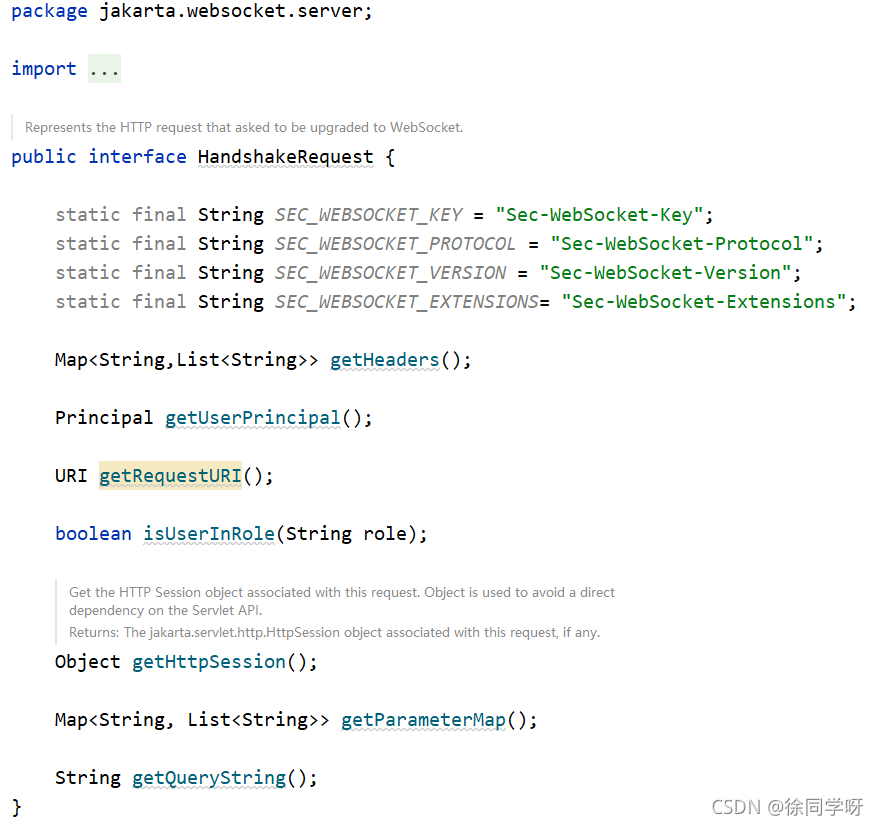
4、HandshakeRequest 和 HandshakeResponse
HandshakeRequest 和 HandshakeResponse了解即可,这两个接口主要用于WebScoket握手升级过程中握手请求响应的封装,如果只是单纯使用WebSocket,不会接触到这两个接口。
(1)HandshakeRequest
(2)HandshakeResponse

Sec-WebSocket-Accept根据客户端传的Sec-WebSocket-Key生成,如下是Tomcat10.0.6 WebSocket源码实现中生成Sec-WebSocket-Accept的算法:
private static String getWebSocketAccept(String key) {
byte[] digest = ConcurrentMessageDigest.digestSHA1(
key.getBytes(StandardCharsets.ISO_8859_1), WS_ACCEPT);
return Base64.encodeBase64String(digest);
}
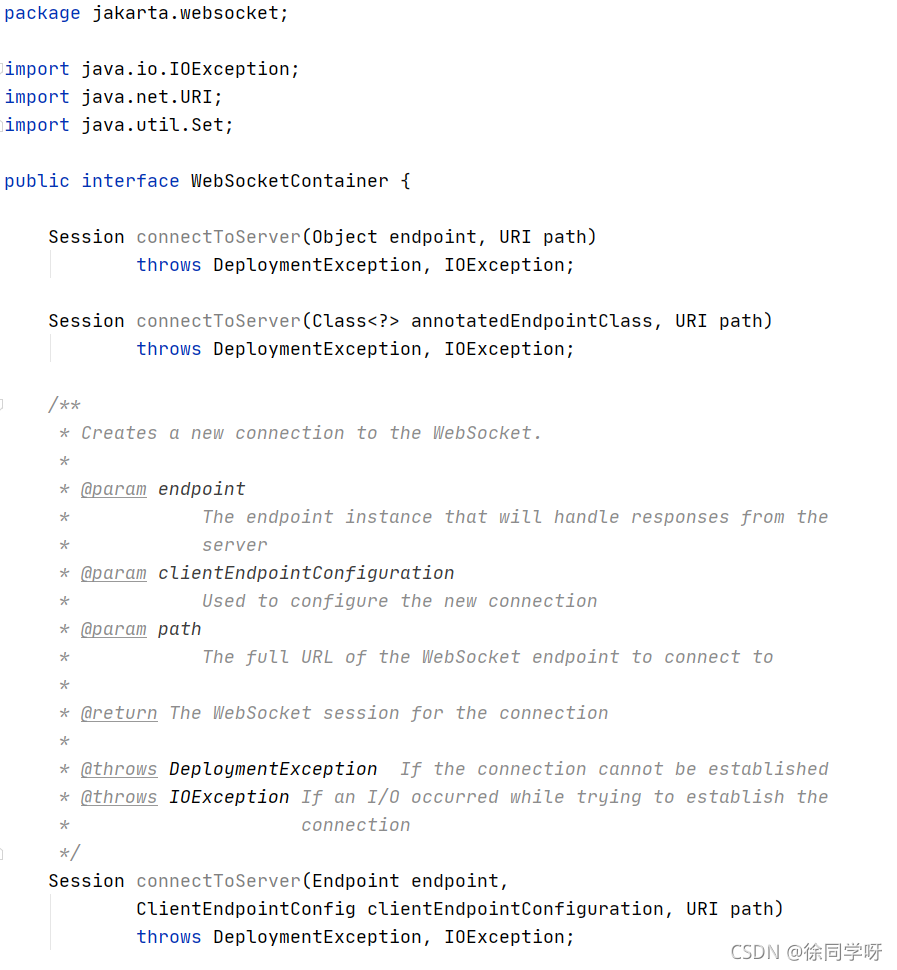
5、WebSocketContainer
jakarta.websocket.WebSocketContainer顾名思义,就是WebSocket的容器,集大成者。其主要职责包括但不限于connectToServer,客户端连接服务器端,基于浏览器的WebSocket客户端连接服务器端,由浏览器支持,但是基于Java版的WebSocket客户端就可以通过WebSocketContainer#connectToServer向服务端发起连接请求。

(如下使用的是javax.websocket包,未使用最新的jakarta.websocket,主要是测试项目基于SpringBoot+Tomcat9.x的,Java API for WebSocket版本需要保持一致。)
1、服务器端实现
(1)@ServerEndpoint注解方式
import javax.websocket.*;
import javax.websocket.server.PathParam;
import javax.websocket.server.ServerEndpoint;
import java.io.IOException;
import java.util.concurrent.ConcurrentHashMap;
import java.util.concurrent.atomic.AtomicLong;
@ServerEndpoint(value = “/ws/test/{userId}”, encoders = {MessageEncoder.class}, decoders = {MessageDecoder.class}, configurator = MyServerConfigurator.class)
public class WebSocketServerEndpoint {
private Session session;
private String userId;
@OnOpen
public void OnOpen(Session session, @PathParam(value = “userId”) String userId) {
this.session = session;
this.userId = userId;
// 建立连接后,将连接存到一个map里
endpointMap.put(userId, this);
Message message = new Message(0, "connected, hello " + userId);
sendMsg(message);
}
@OnClose
public void OnClose() {
// 关闭连接时触发,从map中删除连接
endpointMap.remove(userId);
System.out.println(“server closed…”);
}
@OnMessage
public void onMessage(Message message) {
System.out.println(“server recive message=” + message.toString());
}
@OnError
public void onError(Throwable t) throws Throwable {
this.session.close(new CloseReason(CloseReason.CloseCodes.CLOSED_ABNORMALLY, “系统异常”));
t.printStackTrace();
}
/**
-
群发
-
@param data
*/
public void sendAllMsg(Message data) {
for (WebSocketServerEndpoint value : endpointMap.values()) {
value.sendMsgAsync(data);
}
}
/**
-
推送消息给指定 userId
-
@param data
-
@param userId
*/
public void sendMsg(Message data, String userId) {
WebSocketServerEndpoint endpoint = endpointMap.get(userId);
if (endpoint == null) {
System.out.println("not conected to " + userId);
return;
}
endpoint.sendMsgAsync(data);
}
private void sendMsg(Message data) {
try {
this.session.getBasicRemote().sendObject(data);
} catch (IOException ioException) {
ioException.printStackTrace();
} catch (EncodeException e) {
e.printStackTrace();
}
}
private void sendMsgAsync(Message data) {
this.session.getAsyncRemote().sendObject(data);
}
// 存储建立连接的Endpoint
private static ConcurrentHashMap<String, WebSocketServerEndpoint> endpointMap = new ConcurrentHashMap<String, WebSocketServerEndpoint>();
}
每一个客户端与服务器端建立连接后,都会生成一个WebSocketServerEndpoint,可以通过一个Map将其与userId对应存起来,为后续群发广播和单独推送消息给某个客户端提供便利。
注意:@ServerEndpoint的encoders、decoders、configurator等配置信息在实际使用中可以不定义,如果项目简单,完全可以用默认的。
如果通信消息被封装成一个对象,如示例的Message(因为源码过于简单就不展示了,属性主要有code、msg、data),就必须提供编码器和解码器。也可以在每次发送消息时硬编码转为字符串,在接收到消息时转为Message。有了编码器和解码器,显得比较规范,转为字符串由编码器做,字符串转为对象由解码器做,但也使得架构变复杂了,视项目需求而定。


Configurator的用处就是自定义Endpoint对象创建方式,默认Tomcat提供的是通过反射。WebScoket是每个连接都会创建一个Endpoint对象,如果连接比较多,很频繁,通过反射创建,用后即毁,可能不是一个好主意,所以可以搞一个对象池,用过回收,用时先从对象池中拿,有就重置,省去实例化分配内存等消耗过程。

如果使用SpringBoot内置Tomcat、undertow、Netty等,接入WebSocket时除了加@ServerEndpoint还需要加一个@Component,再给Spring注册一个ServerEndpointExporter类,这样,服务端Endpoint就交由Spring去扫描注册了。
@Configuration
public class WebSocketConfig {
@Bean
public ServerEndpointExporter serverEndpointExporter() {
ServerEndpointExporter serverEndpointExporter = new ServerEndpointExporter();
return serverEndpointExporter;
}
}
外置Tomcat就不需要这么麻烦,Tomcat会默认扫描classpath下带有@ServerEndpoint注解的类。(SpringBoot接入Websocket后续会单独出文章讲解,也挺有意思的)
(2)继承抽象类Endpoint方式
import javax.websocket.*;
import java.io.IOException;
import java.util.concurrent.ConcurrentHashMap;
public class WebSocketServerEndpoint extends Endpoint {
private Session session;
private String userId;
@Override
public void onOpen(Session session, EndpointConfig endpointConfig) {
this.session = session;
this.userId = session.getPathParameters().get(“userId”);
session.addMessageHandler(new MessageHandler());
endpointMap.put(userId, this);
Message message = new Message(0, "connected, hello " + userId);
sendMsg(message);
}
@Override
public void onClose(Session session, CloseReason closeReason) {
endpointMap.remove(userId);
}
@Override
public void onError(Session session, Throwable throwable) {
throwable.printStackTrace();
}
/**
-
群发
-
@param data
*/
public void sendAllMsg(Message data) {
for (WebSocketServerEndpoint value : endpointMap.values()) {
value.sendMsgAsync(data);
}
}
/**
-
推送消息给指定 userId
-
@param data
-
@param userId
*/
public void sendMsg(Message data, String userId) {
WebSocketServerEndpoint endpoint = endpointMap.get(userId);
if (endpoint == null) {
System.out.println("not conected to " + userId);
return;
}
endpoint.sendMsgAsync(data);
}
private void sendMsg(Message data) {
try {
this.session.getBasicRemote().sendObject(data);
} catch (IOException ioException) {
ioException.printStackTrace();
} catch (EncodeException e) {
e.printStackTrace();
}
}
private void sendMsgAsync(Message data) {
this.session.getAsyncRemote().sendObject(data);
}
private class MessageHandler implements javax.websocket.MessageHandler.Whole {
@Override
public void onMessage(Message message) {
System.out.println(“server recive message=” + message.toString());
}
}
private static ConcurrentHashMap<String, WebSocketServerEndpoint> endpointMap = new ConcurrentHashMap<String, WebSocketServerEndpoint>();
}
继承抽象类Endpoint方式比加注解@ServerEndpoint方式麻烦的很,主要是需要自己实现MessageHandler和ServerApplicationConfig。@ServerEndpoint的话都是使用默认的,原理上差不多,只是注解更自动化,更简洁。
MessageHandler做的事情,一个@OnMessage就搞定了,ServerApplicationConfig做的URI映射、decoders、encoders,configurator等,一个@ServerEndpoint就可以了。
import javax.websocket.Decoder;
import javax.websocket.Encoder;
import javax.websocket.Endpoint;
import javax.websocket.server.ServerApplicationConfig;
import javax.websocket.server.ServerEndpointConfig;
import java.util.ArrayList;
import java.util.HashSet;
import java.util.List;
import java.util.Set;
public class MyServerApplicationConfig implements ServerApplicationConfig {
@Override
public Set getEndpointConfigs(Set<Class<? extends Endpoint>> set) {
Set result = new HashSet();
List<Class<? extends Decoder>> decoderList = new ArrayList<Class<? extends Decoder>>();
decoderList.add(MessageDecoder.class);
List<Class<? extends Encoder>> encoderList = new ArrayList<Class<? extends Encoder>>();
encoderList.add(MessageEncoder.class);
if (set.contains(WebSocketServerEndpoint3.class)) {
ServerEndpointConfig serverEndpointConfig = ServerEndpointConfig.Builder
.create(WebSocketServerEndpoint3.class, “/ws/test3”)
.decoders(decoderList)
.encoders(encoderList)
.configurator(new MyServerConfigurator())
.build();
result.add(serverEndpointConfig);
}
return result;
}
@Override
public Set<Class<?>> getAnnotatedEndpointClasses(Set
return set;
}
}
如果使用SpringBoot内置Tomcat,则不需要ServerApplicationConfig了,但是需要给Spring注册一个ServerEndpointConfig。
@Bean
public ServerEndpointConfig serverEndpointConfig() {
List<Class<? extends Decoder>> decoderList = new ArrayList<Class<? extends Decoder>>();
decoderList.add(MessageDecoder.class);
List<Class<? extends Encoder>> encoderList = new ArrayList<Class<? extends Encoder>>();
encoderList.add(MessageEncoder.class);
ServerEndpointConfig serverEndpointConfig = ServerEndpointConfig.Builder
.create(WebSocketServerEndpoint3.class, “/ws/test3/{userId}”)
.decoders(decoderList)
.encoders(encoderList)
.configurator(new MyServerConfigurator())
.build();
return serverEndpointConfig;
}
(3)早期Tomcat7中Server端实现对比
Tomcat7早期版本7.0.47之前还没有出JSR 356时,自己搞了一套接口,其实就是一个Servlet。
和遵循JSR356标准的版本对比,有一个比较大的变化是,createWebSocketInbound创建生命周期事件处理器StreamInbound的时机是WebSocket协议升级之前,此时还可以通过用户线程缓存(ThreadLocal等)的HttpServletRequest对象,获取一些请求头等信息。
而遵循JSR356标准的版本实现,创建生命周期事件处理的Endpoint是在WebSocket协议升级完成(经过HTTP握手)之后创建的,而WebSocket握手成功给客户端响应101前,会结束销毁HttpServletRequest对象,此时是获取不到请求头等信息的。
import org.apache.catalina.websocket.StreamInbound;
import org.apache.catalina.websocket.WebSocketServlet;
import javax.servlet.annotation.WebServlet;
import javax.servlet.http.HttpServletRequest;
@WebServlet(urlPatterns = “/ws/test”)
public class MyWeSocketServlet extends WebSocketServlet {
@Override
protected StreamInbound createWebSocketInbound(String subProtocol, HttpServletRequest request) {
MyMessageInbound messageInbound = new MyMessageInbound(subProtocol, request);
return messageInbound;
}
}
import org.apache.catalina.websocket.MessageInbound;
import org.apache.catalina.websocket.WsOutbound;
import javax.servlet.http.HttpServletRequest;
import java.io.IOException;
import java.nio.ByteBuffer;
import java.nio.CharBuffer;
public class MyMessageInbound extends MessageInbound {
private String subProtocol;
private HttpServletRequest request;
public MyMessageInbound(String subProtocol, HttpServletRequest request) {
this.subProtocol = subProtocol;
this.request = request;
}
@Override
protected void onOpen(WsOutbound outbound) {
String msg = “connected, hello”;
ByteBuffer byteBuffer = ByteBuffer.wrap(msg.getBytes());
try {
outbound.writeBinaryMessage(byteBuffer);
} catch (IOException e) {
e.printStackTrace();
}
}
@Override
protected void onClose(int status) {
}
@Override
protected void onBinaryMessage(ByteBuffer byteBuffer) throws IOException {
// 接收到客户端信息
}
@Override
protected void onTextMessage(CharBuffer charBuffer) throws IOException {
// 接收到客户端信息
}
}
2、客户端实现
(1)前端js版
js版的客户端主要依托浏览器对WebScoket的支持,在生命周期事件触发上和服务器端的差不多,这也应证了建立WebSocket连接的两端是对等的。
编写WebSocket客户端需要注意以下几点:
-
和服务器端商议好传输的消息的格式,一般为json字符串,比较直观,编码解码都很简单,也可以是其他商定的格式。
-
需要心跳检测,定时给服务器端发送消息,保持连接正常。
-
正常关闭连接,即关闭浏览器窗口前主动关闭连接,以免服务器端抛异常。
-
如果因为异常断开连接,支持重连。
// 对websocket进行简单封装
WebSocketOption.prototype = {
// 创建websocket操作
createWebSocket: function () {
try {
if(‘WebSocket’ in window) {
this.ws = new WebSocket(this.wsUrl);
} else if(‘MozWebSocket’ in window) {
this.ws = new MozWebSocket(this.wsUrl);
} else {
alert(“您的浏览器不支持websocket协议,建议使用新版谷歌、火狐等浏览器,请勿使用IE10以下浏览器,360浏览器请使用极速模式,不要使用兼容模式!”);
}
this.lifeEventHandle();
} catch(e) {
this.reconnect(this.wsUrl);
console.log(e);
}
},
// 生命周期事件操作
lifeEventHandle: function() {
var self = this;
this.ws.onopen = function (event) {
self.connectCount = 1;
//心跳检测重置
if (self.heartCheck == null) {
self.heartCheck = new HeartCheckObj(self.ws);
}
self.sendMsg(5, “”)
self.heartCheck.reset().start();
console.log(“websocket连接成功!” + new Date().toUTCString());
};
this.ws.onclose = function (event) {
// 全部设置为初始值
self.heartCheck = null;
self.reconnect(self.wsUrl);
console.log(“websocket连接关闭!” + new Date().toUTCString());
};
this.ws.onerror = function () {
self.reconnect(self.wsUrl);
console.log(“websocket连接错误!”);
};
//如果获取到消息,心跳检测重置
this.ws.onmessage = function (event) {
//心跳检测重置
if (self.heartCheck == null) {
self.heartCheck = new HeartCheckObj(self.ws);
}
self.heartCheck.reset().start();
console.log(“websocket收到消息啦:” + event.data);
// 业务处理
// 接收到的消息可以放到localStorage里,然后在其他地方取出来
}
},
// 断线重连操作
reconnect: function() {
var self = this;
if (this.lockReconnect) return;
console.log(this.lockReconnect)
this.lockReconnect = true;
//没连接上会一直重连,设置延迟避免请求过多,重连时间设置按倍数增加
setTimeout(function () {
self.createWebSocket(self.wsUrl);
self.lockReconnect = false;
self.connectCount++;
}, 10000 * (self.connectCount));
},
// 发送消息操作
sendMsg: function(cmd, data) {
var sendData = {“cmd”: cmd, “msg”: data};
try {
this.ws.send(JSON.stringify(sendData));
} catch(err) {
console.log(“发送数据失败, err=” + err)
}
},
// 关闭websocket接口操作
closeWs: function() {
this.ws.close();
}
}
/**
- 封装心跳检测对象
*/
function HeartCheckObj(ws) {
this.ws = ws;
// 心跳时间
this.timeout = 10000;
// 定时事件
this.timeoutObj = null;
// 自动断开事件
this.serverTimeoutObj = null;
}
HeartCheckObj.prototype = {
setWs: function(ws) {
this.ws = ws;
},
reset: function() {
clearTimeout(this.timeoutObj);
clearTimeout(this.serverTimeoutObj);
return this;
},
// 开始心跳检测
start: function() {
var self = this;
this.timeoutObj = setTimeout(function() {
//这里发送一个心跳,后端收到后,返回一个心跳消息,
//onmessage拿到返回的心跳就说明连接正常
var ping = {“cmd”:1, “msg”: “ping”};
self.ws.send(JSON.stringify(ping));
//如果onmessage那里超过一定时间还没重置,说明后端主动断开了
self.serverTimeoutObj = setTimeout(function() {
//如果onclose会执行reconnect,我们执行ws.close()就行了.如果直接执行reconnect 会触发onclose导致重连两次
self.ws.close();
}, self.timeout)
}, self.timeout)
}
}
/**
-
-
创建websocket的主流程 *
-
*/
var currentDomain = document.domain;
var wsUrl = “ws://” + currentDomain + “/test”
var webSocketOption = new WebSocketOption(wsUrl)
webSocketOption.createWebSocket()
// 监听窗口关闭事件,当窗口关闭时,主动去关闭websocket连接,防止连接还没断开就关闭窗口,server端会抛异常。
window.onbeforeunload = function() {
webSocketOption.closeWs();
}
这里推荐一个在线测试WebSocket连接和发送消息的网站easyswoole.com/wstool.html:
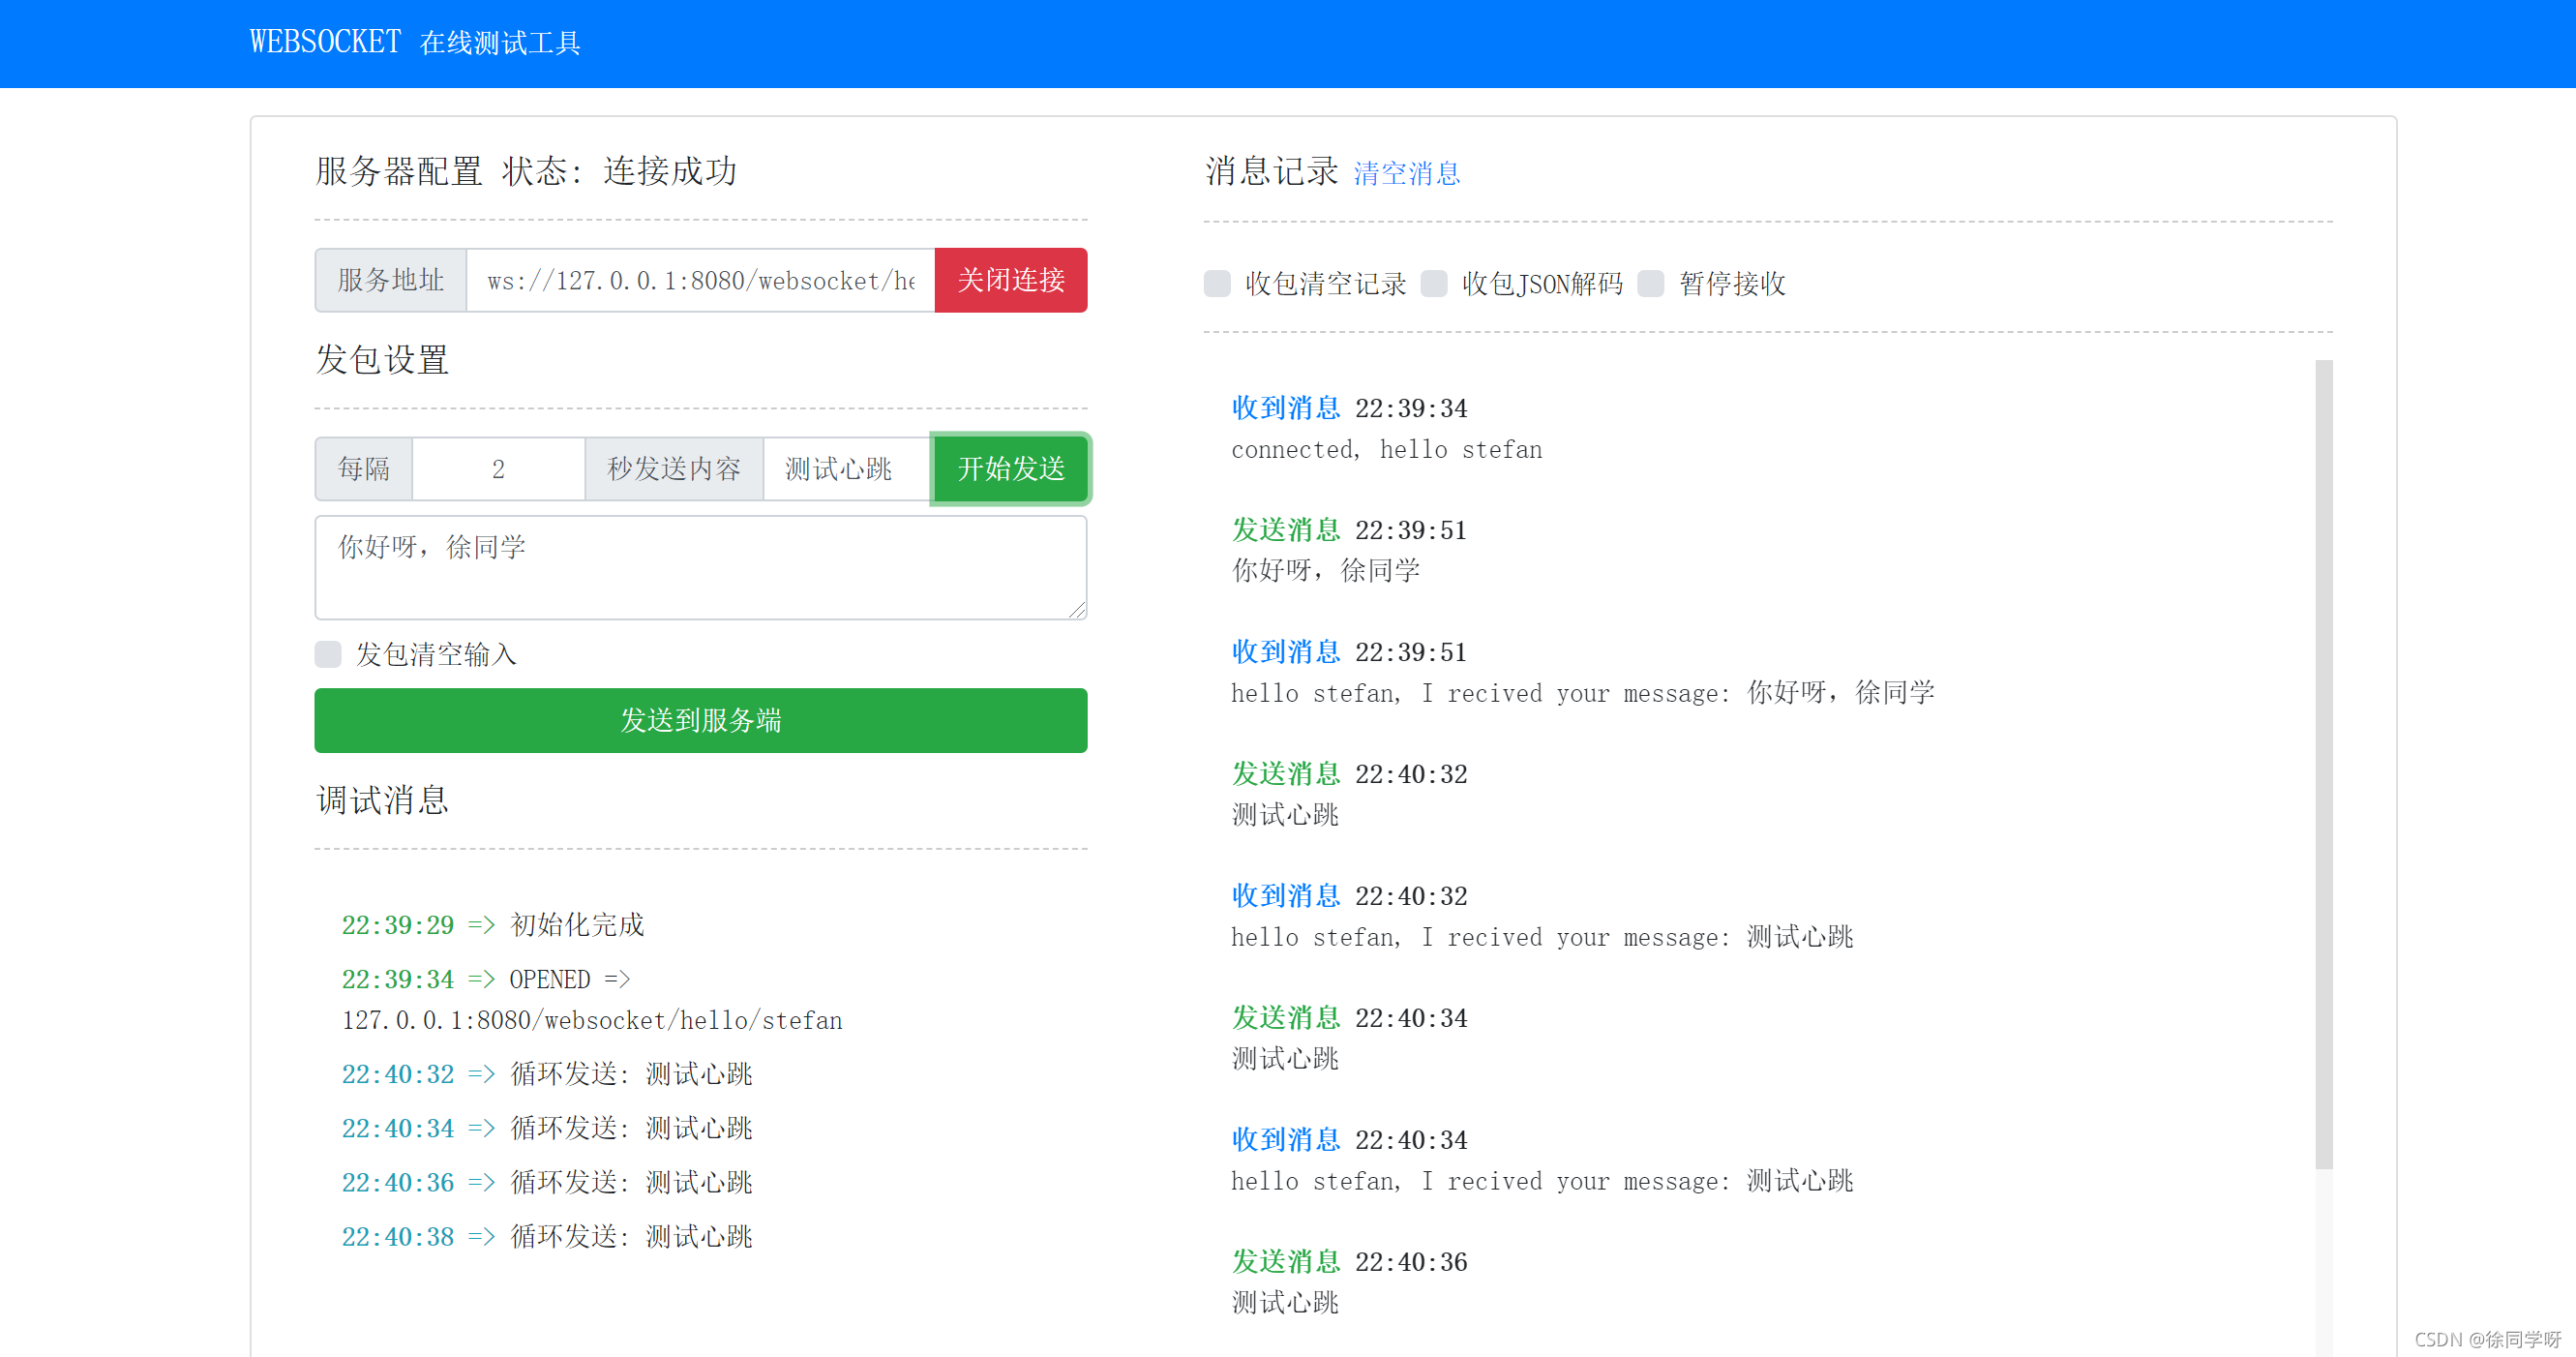
真的很牛逼,很方便,很简单。还有源码github:https://github.com/easy-swoole/wstool,感兴趣可以看看。
(2)@ClientEndpoint注解方式
Java版客户端不用多说,把@ServerEndpoint换成@ClientEndpoint就可以了,其他都一样。@ClientEndpoint比@ServerEndpoint就少了一个value,不需要设置URI。
@ClientEndpoint(encoders = {MessageEncoder.class}, decoders = {MessageDecoder.class})
public class WebSocketClientEndpoint {
private Session session;
@OnOpen
public void OnOpen(Session session) {
this.session = session;
Message message = new Message(0, “connecting…”);
sendMsg(message);
}
@OnClose
public void OnClose() {
Message message = new Message(0, “client closed…”);
sendMsg(message);
System.out.println(“client closed”);
}
@OnMessage
public void onMessage(Message message) {
System.out.println(“client recive message=” + message.toString());
}
@OnError
public void onError(Throwable t) throws Throwable {
t.printStackTrace();
}
public void sendMsg(Message data) {
try {
this.session.getBasicRemote().sendObject(data);
} catch (IOException ioException) {
ioException.printStackTrace();
} catch (EncodeException e) {
e.printStackTrace();
}
}
public void sendMsgAsync(Message data) {
this.session.getAsyncRemote().sendObject(data);
}
}
连接服务器端:
WebSocketContainer container = ContainerProvider.getWebSocketContainer();
container.connectToServer(WebSocketClientEndpoint.class,
new URI(“ws://localhost:8080/ws/test”));
(3)继承抽象类Endpoint方式
继承抽象类Endpoint方式也和服务器端的差不多,但是不需要实现ServerApplicationConfig,需要实例化一个ClientEndpointConfig。Endpoint实现类和服务器端的一样,就省略了,如下是连接服务器端的代码:
ClientEndpointConfig clientEndpointConfig = ClientEndpointConfig.Builder.create().build();
container.connectToServer(new WebSocketClientEndpoint(),clientEndpointConfig,
new URI(“ws://localhost:8080/websocket/hello”));
3、基于Nginx反向代理注意事项
一般web服务器会用Nginx做反向代理,经过Nginx反向转发的HTTP请求不会带上Upgrade和Connection消息头,所以需要在Nginx配置里显式指定需要升级为WebSocket的URI带上这两个头:
location /chat/ {
proxy_pass http://backend;
proxy_http_version 1.1;
proxy_set_header Upgrade $http_upgrade;
proxy_set_header Connection “upgrade”;
proxy_connect_timeout 4s;
proxy_read_timeout 7200s;
proxy_send_timeout 12s;
}
默认情况下,如果代理服务器在60秒内没有传输任何数据,连接将被关闭。这个超时可以通过proxy_read_timeout指令来增加。或者,可以将代理服务器配置为定期发送WebSocket PING帧以重置超时并检查连接是否仍然活跃。
具体可参考:http://nginx.org/en/docs/http/websocket.html

所有兼容Java EE的应用服务器,必须遵循JSR356 WebSocket Java API标准,Tomcat也不例外。而且Tomcat也是支持WebSocket最早的Web应用服务器框架(之一),在还没有出JSR356标准时,就已经自定义了一套WebSocket API,但是JSR356一出,不得不改弦更张。
通过前面的讲解,在使用上完全没有问题,但是有几个问题完全是黑盒的:
-
Server Endpoint是如何被扫描加载的? -
WebSocket是如何借助HTTP 进行握手升级的? -
WebSocket建立连接后如何保持连接不断,互相通信的?
(如下源码解析,需要对Tomcat连接器源码有一定了解)
1、WsSci初始化
Tomcat 提供了一个org.apache.tomcat.websocket.server.WsSci类来初始化、加载WebSocket。从类名上顾名思义,利用了Sci加载机制,何为Sci加载机制?就是实现接口 jakarta.servlet.ServletContainerInitializer,在Tomcat部署装载Web项目(org.apache.catalina.core.StandardContext#startInternal)时主动触发ServletContainerInitializer#onStartup,做一些扩展的初始化操作。
WsSci主要做了一件事,就是扫描加载Server Endpoint,并将其加到WebSocket容器里jakarta.websocket.WebSocketContainer。
WsSci主要会扫描三种类:
-
加了
@ServerEndpoint的类。 -
Endpoint的子类。 -
ServerApplicationConfig的子类。
(1)WsSci#onStartup
@HandlesTypes({ServerEndpoint.class, ServerApplicationConfig.class,
Endpoint.class})
public class WsSci implements ServletContainerInitializer {
@Override
public void onStartup(Set<Class<?>> clazzes, ServletContext ctx)
throws ServletException {
WsServerContainer sc = init(ctx, true);
if (clazzes == null || clazzes.size() == 0) {
return;
}
// Group the discovered classes by type
Set serverApplicationConfigs = new HashSet<>();
Set<Class<? extends Endpoint>> scannedEndpointClazzes = new HashSet<>();
Set<Class<?>> scannedPojoEndpoints = new HashSet<>();
try {
// wsPackage is “jakarta.websocket.”
String wsPackage = ContainerProvider.class.getName();
wsPackage = wsPackage.substring(0, wsPackage.lastIndexOf(‘.’) + 1);
for (Class<?> clazz : clazzes) {
JreCompat jreCompat = JreCompat.getInstance();
int modifiers = clazz.getModifiers();
if (!Modifier.isPublic(modifiers) ||
Modifier.isAbstract(modifiers) ||
Modifier.isInterface(modifiers) ||
!jreCompat.isExported(clazz)) {
// Non-public, abstract, interface or not in an exported
// package (Java 9+) - skip it.
continue;
}
// Protect against scanning the WebSocket API JARs
// 防止扫描WebSocket API jar
if (clazz.getName().startsWith(wsPackage)) {
continue;
}
if (ServerApplicationConfig.class.isAssignableFrom(clazz)) {
// 1、clazz是ServerApplicationConfig子类
serverApplicationConfigs.add(
(ServerApplicationConfig) clazz.getConstructor().newInstance());
}
if (Endpoint.class.isAssignableFrom(clazz)) {
// 2、clazz是Endpoint子类
@SuppressWarnings(“unchecked”)
Class<? extends Endpoint> endpoint =
(Class<? extends Endpoint>) clazz;
scannedEndpointClazzes.add(endpoint);
}
if (clazz.isAnnotationPresent(ServerEndpoint.class)) {
// 3、clazz是加了注解ServerEndpoint的类
scannedPojoEndpoints.add(clazz);
}
}
} catch (ReflectiveOperationException e) {
throw new ServletException(e);
}
// Filter the results
Set filteredEndpointConfigs = new HashSet<>();
Set<Class<?>> filteredPojoEndpoints = new HashSet<>();
if (serverApplicationConfigs.isEmpty()) {
// 从这里看出@ServerEndpoint的服务器端是可以不用ServerApplicationConfig的
filteredPojoEndpoints.addAll(scannedPojoEndpoints);
} else {
// serverApplicationConfigs不为空,
for (ServerApplicationConfig config : serverApplicationConfigs) {
Set configFilteredEndpoints =
config.getEndpointConfigs(scannedEndpointClazzes);
if (configFilteredEndpoints != null) {
filteredEndpointConfigs.addAll(configFilteredEndpoints);
}
// getAnnotatedEndpointClasses 对于 scannedPojoEndpoints起到一个过滤作用
// 不满足条件的后面不加到WsServerContainer里
Set<Class<?>> configFilteredPojos =
config.getAnnotatedEndpointClasses(
scannedPojoEndpoints);
if (configFilteredPojos != null) {
filteredPojoEndpoints.addAll(configFilteredPojos);
}
}
}
try {
// 继承抽象类Endpoint的需要使用者手动封装成ServerEndpointConfig
// 而加了注解@ServerEndpoint的类 Tomcat会自动封装成ServerEndpointConfig
// Deploy endpoints
for (ServerEndpointConfig config : filteredEndpointConfigs) {
sc.addEndpoint(config);
}
// Deploy POJOs
for (Class<?> clazz : filteredPojoEndpoints) {
sc.addEndpoint(clazz, true);
}
} catch (DeploymentException e) {
throw new ServletException(e);
}
}
static WsServerContainer init(ServletContext servletContext,
boolean initBySciMechanism) {
WsServerContainer sc = new WsServerContainer(servletContext);
servletContext.setAttribute(
Constants.SERVER_CONTAINER_SERVLET_CONTEXT_ATTRIBUTE, sc);
// 注册监听器WsSessionListener给servletContext,
// 在http session销毁时触发 ws session的关闭销毁
servletContext.addListener(new WsSessionListener(sc));
// Can’t register the ContextListener again if the ContextListener is
// calling this method
if (initBySciMechanism) {
// 注册监听器WsContextListener给servletContext,
// 在 servletContext初始化时触发WsSci.init
// 在 servletContext销毁时触发WsServerContainer的销毁
// 不过呢,只在WsSci.onStartup时注册一次
servletContext.addListener(new WsContextListener());
}
return sc;
}
}
从上述源码中可以看出ServerApplicationConfig起到一个过滤的作用:
-
当没有
ServerApplicationConfig时,加了@ServerEndpoint的类会默认全部加到一个Set集合(filteredPojoEndpoints),所以加了@ServerEndpoint的类可以不需要自定义实现ServerApplicationConfig。 -
当有
ServerApplicationConfig时,ServerApplicationConfig#getEndpointConfigs用来过滤Endpoint子类,并且Endpoint子类必须封装成一个ServerEndpointConfig。 -
ServerApplicationConfig#getAnnotatedEndpointClasses用来过滤加了注解@ServerEndpoint的类,一般空实现就行了(如果不想某个类被加到WsServerContainer里,那不加@ServerEndpoint不就可以了)。
过滤之后的Endpoint子类和加了注解@ServerEndpoint的类会分别调用不同形参的WsServerContainer#addEndpoint,将其加到WsServerContainer里。
(2)WsServerContainer#addEndpoint
- 将
Endpoint子类加到WsServerContainer里,调用的是形参为ServerEndpointConfig的addEndpoint:
public void addEndpoint(ServerEndpointConfig sec) throws DeploymentException {
addEndpoint(sec, false);
}
因为Endpoint子类需要使用者封装成ServerEndpointConfig,不需要Tomcat来封装。
- 将加了注解
@ServerEndpoint的类加到WsServerContainer,调用的是形参为Class<?>的addEndpoint(fromAnnotatedPojo参数暂时在这个方法里没什么用处):
该方法主要职责就是解析@ServerEndpoint,获取path、decoders、encoders、configurator等构建一个ServerEndpointConfig对象
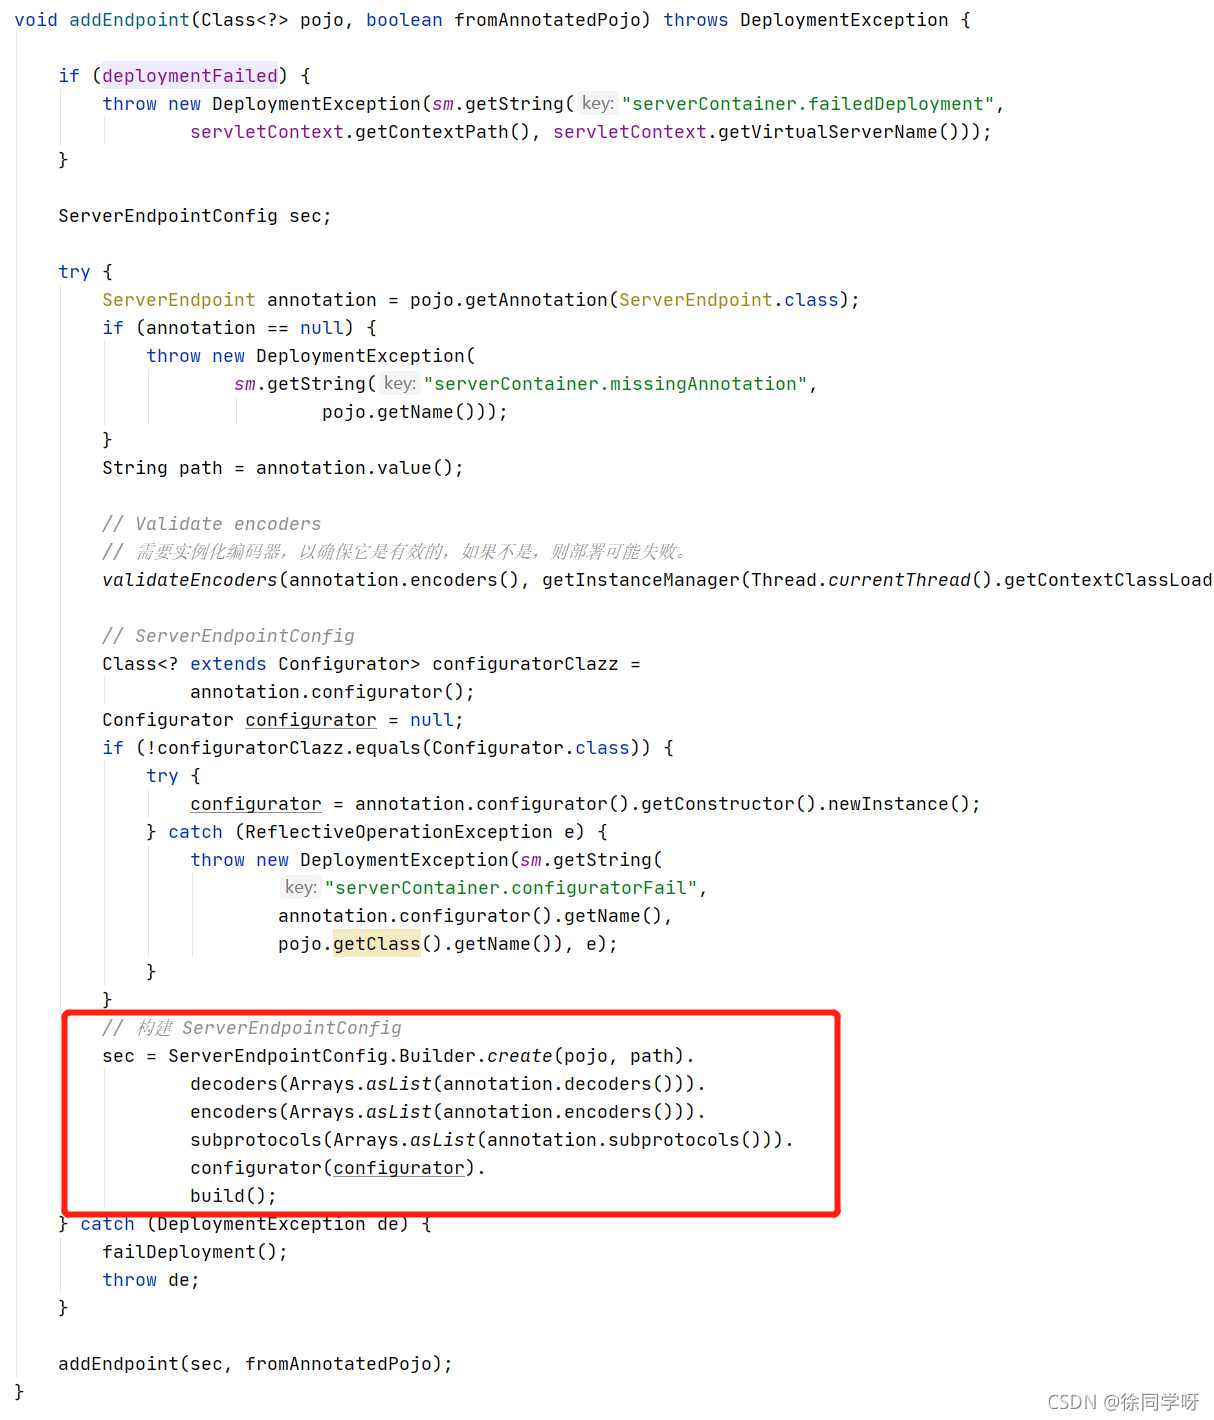
最终调用的都是如下这个比较复杂的方法,fromAnnotatedPojo表示是否是加了@ServerEndpoint的类。主要做了两件事:
-
对加了
@ServerEndpoint类的生命周期方法(@OnOpen、@OnClose、@OnError、@OnMessage)的扫描和映射封装。 -
对
path的有效性检查和path param解析。
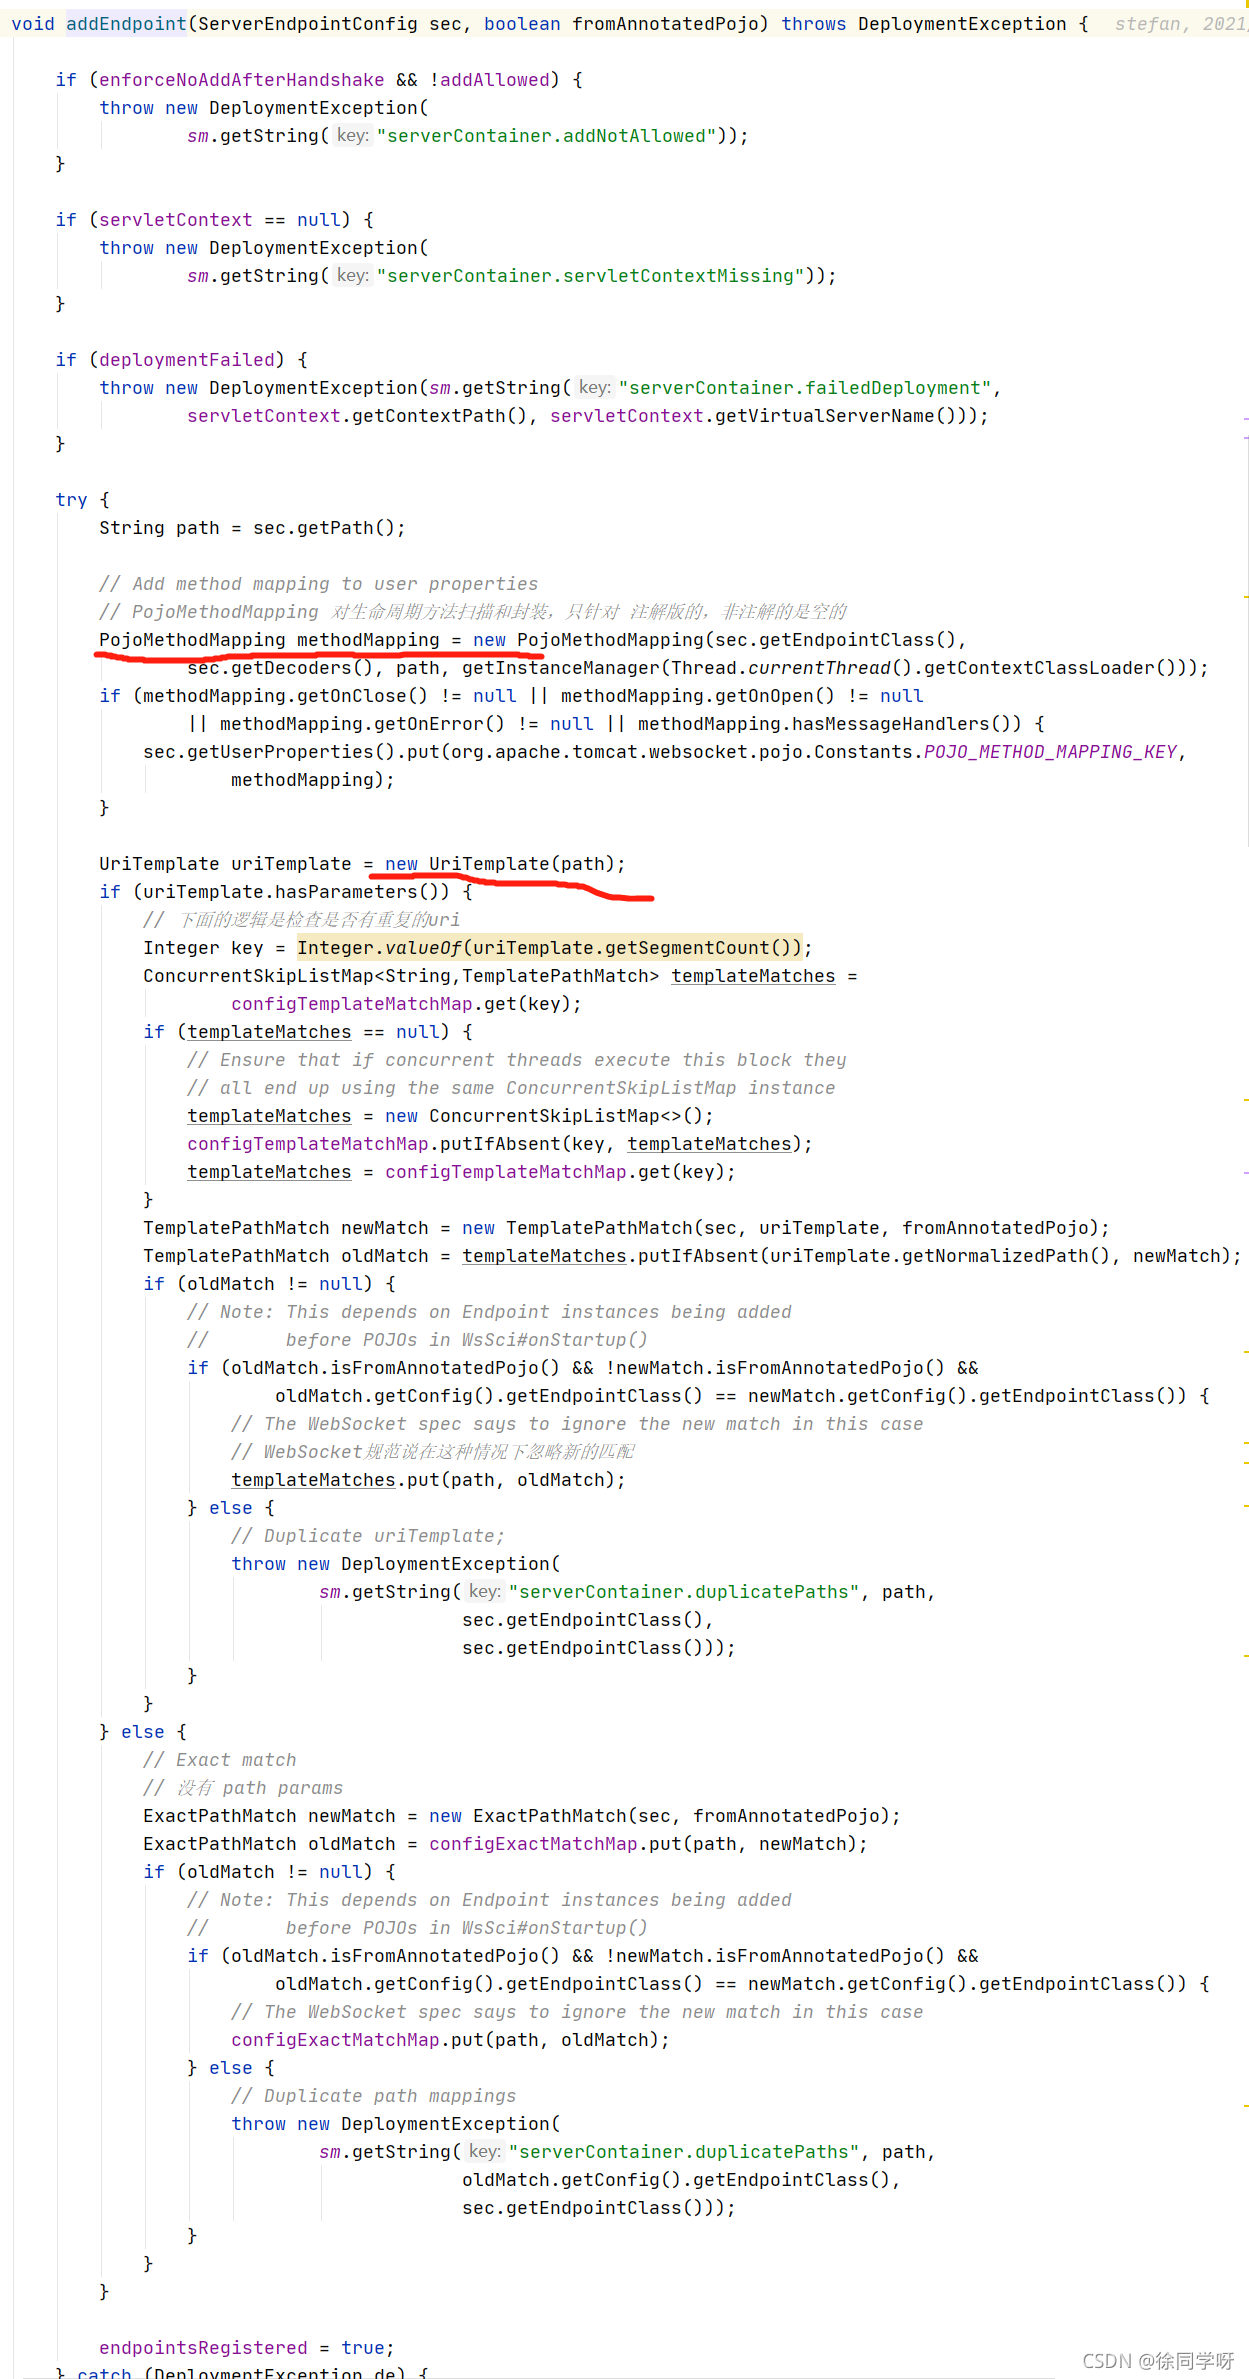
(3)PojoMethodMapping方法映射和形参解析
PojoMethodMapping构造函数比较长,主要是对加了@OnOpen、@OnClose、@OnError、@OnMessage的方法进行校验和映射,以及对每个方法的形参进行解析和校验,主要逻辑总结如下:
-
对当前类以及其父类中的方法进行扫描。
-
当前类中不能存在多个相同注解的方法,否则会抛出Duplicate annotation异常。
-
父类和子类中存在相同注解的方法,子类必须重写该方法,否则会抛出Duplicate annotation异常。
-
对于
@OnMessage,可以有多个,但是接收消息的类型必须不同,消息类型大概分为三种:PongMessage心跳消息、字节型、字符型。 -
如果扫描到对的注解都是父类的方法,子类重写了该方法,但是没有加响应的注解,则会被清除。
-
形参解析。
public PojoMethodMapping(Class<?> clazzPojo, List<Class<? extends Decoder>> decoderClazzes, String wsPath,
InstanceManager instanceManager) throws DeploymentException {
this.wsPath = wsPath;
List decoders = Util.getDecoders(decoderClazzes, instanceManager);
Method open = null;
Method close = null;
Method error = null;
Method[] clazzPojoMethods = null;
Class<?> currentClazz = clazzPojo;
while (!currentClazz.equals(Object.class)) {
Method[] currentClazzMethods = currentClazz.getDeclaredMethods();
if (currentClazz == clazzPojo) {
clazzPojoMethods = currentClazzMethods;
}
for (Method method : currentClazzMethods) {
if (method.isSynthetic()) {
// Skip all synthetic methods.
// They may have copies of annotations from methods we are
// interested in and they will use the wrong parameter type
// (they always use Object) so we can’t used them here.
continue;
}
if (method.getAnnotation(OnOpen.class) != null) {
checkPublic(method);
if (open == null) {
open = method;
} else {
if (currentClazz == clazzPojo ||
!isMethodOverride(open, method)) {
// Duplicate annotation
// 抛出Duplicate annotation异常的两种情况:
// 1. 当前的类有多个相同注解的方法,如有两个@OnOpen
// 2. 当前类时父类,有相同注解的方法,但是其子类没有重写这个方法
// 即 父类和子类有多个相同注解的方法,且没有重写关系
throw new DeploymentException(sm.getString(
“pojoMethodMapping.duplicateAnnotation”,
OnOpen.class, currentClazz));
}
}
} else if (method.getAnnotation(OnClose.class) != null) {
checkPublic(method);
if (close == null) {
close = method;
} else {
if (currentClazz == clazzPojo ||
!isMethodOverride(close, method)) {
// Duplicate annotation
throw new DeploymentException(sm.getString(
“pojoMethodMapping.duplicateAnnotation”,
OnClose.class, currentClazz));
}
}
} else if (method.getAnnotation(OnError.class) != null) {
checkPublic(method);
if (error == null) {
error = method;
} else {
if (currentClazz == clazzPojo ||
!isMethodOverride(error, method)) {
// Duplicate annotation
throw new DeploymentException(sm.getString(
“pojoMethodMapping.duplicateAnnotation”,
OnError.class, currentClazz));
}
}
} else if (method.getAnnotation(OnMessage.class) != null) {
checkPublic(method);
MessageHandlerInfo messageHandler = new MessageHandlerInfo(method, decoders);
boolean found = false;
// 第一次扫描OnMessage时,onMessage为空,不会走下面的for,然后就把messageHandler加到onMessage里
// 如果非首次扫描到这里,即向上扫描父类,允许有多个接收消息类型完全不同的onmessage
for (MessageHandlerInfo otherMessageHandler : onMessage) {
// 如果多个onmessage接收的消息类型有相同的,则可能会抛出Duplicate annotation
// 1. 同一个类中多个onmessage有接收相同类型的消息
// 2. 父子类中多个onmessage有接收相同类型的消息,但不是重写关系
if (messageHandler.targetsSameWebSocketMessageType(otherMessageHandler)) {
found = true;
if (currentClazz == clazzPojo ||
!isMethodOverride(messageHandler.m, otherMessageHandler.m)) {
// Duplicate annotation
throw new DeploymentException(sm.getString(
“pojoMethodMapping.duplicateAnnotation”,
OnMessage.class, currentClazz));
}
}
}
if (!found) {
onMessage.add(messageHandler);
}
} else {
// Method not annotated
}
}
currentClazz = currentClazz.getSuperclass();
}
// If the methods are not on clazzPojo and they are overridden
// by a non annotated method in clazzPojo, they should be ignored
if (open != null && open.getDeclaringClass() != clazzPojo) {
// open 有可能是父类的,子类即clazzPojo有重写该方法,但是没有加OnOpen注解
// 则 open置为null
总结
=============================================================
从转行到现在,差不多两年的时间,虽不能和大佬相比,但也是学了很多东西。我个人在学习的过程中,习惯简单做做笔记,方便自己复习的时候能够快速理解,现在将自己的笔记分享出来,和大家共同学习。
开源分享:【大厂前端面试题解析+核心总结学习笔记+真实项目实战+最新讲解视频】
个人将这段时间所学的知识,分为三个阶段:
第一阶段:HTML&CSS&JavaScript基础
第二阶段:移动端开发技术
第三阶段:前端常用框架

-
推荐学习方式:针对某个知识点,可以先简单过一下我的笔记,如果理解,那是最好,可以帮助快速解决问题;如果因为我的笔记太过简陋不理解,可以关注我以后我还会继续分享。
-
大厂的面试难在,针对一个基础知识点,比如JS的事件循环机制,不会上来就问概念,而是换个角度,从题目入手,看你是否真正掌握。所以对于概念的理解真的很重要。


 691
691


 被折叠的 条评论
为什么被折叠?
被折叠的 条评论
为什么被折叠?
 到【灌水乐园】发言


