


		* [3.2.1.3、执行业务表脚本](#3213_571)
	- [3.2.2、common-service中添加依赖](#322commonservice_604)
	- [3.2.3、加配置](#323_620)
	- [3.2.4、定义数据库代理](#324_649)
前言
本章节介绍微服务分布式项目中,使用的事务框架seata。
官网:http://seata.io/zh-cn/
springcloud-nacos-seata:https://github.com/seata/seata-samples/tree/master/springcloud-nacos-seata
1、概念
Seata 是一款开源的分布式事务解决方案,致力于提供高性能和简单易用的分布式事务服务。Seata 将为用户提供了 AT、TCC、SAGA 和 XA 事务模式,为用户打造一站式的分布式解决方案。
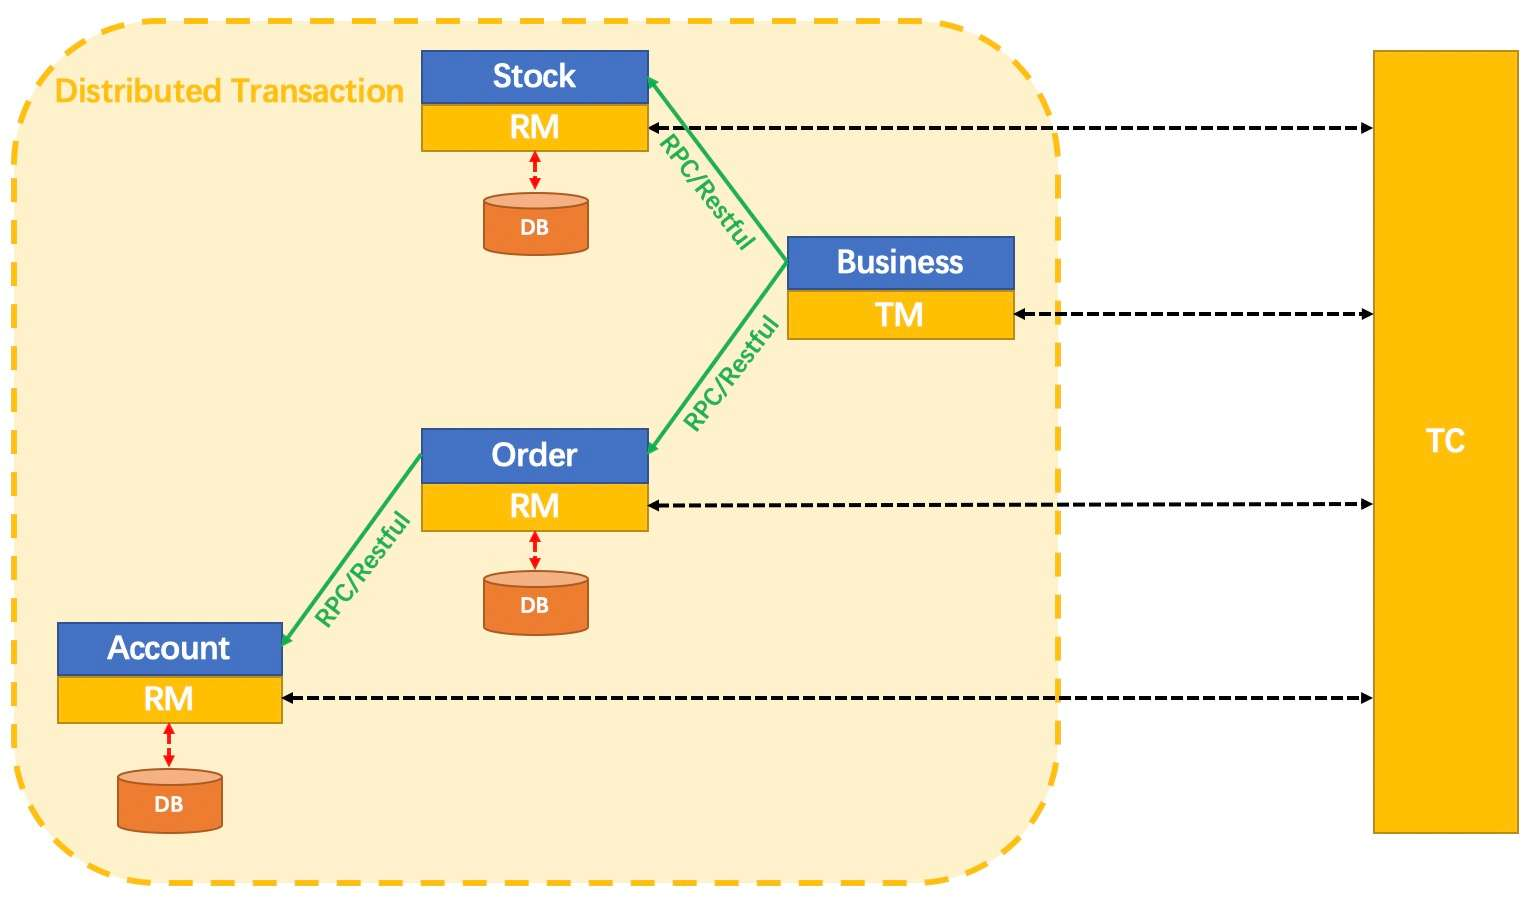
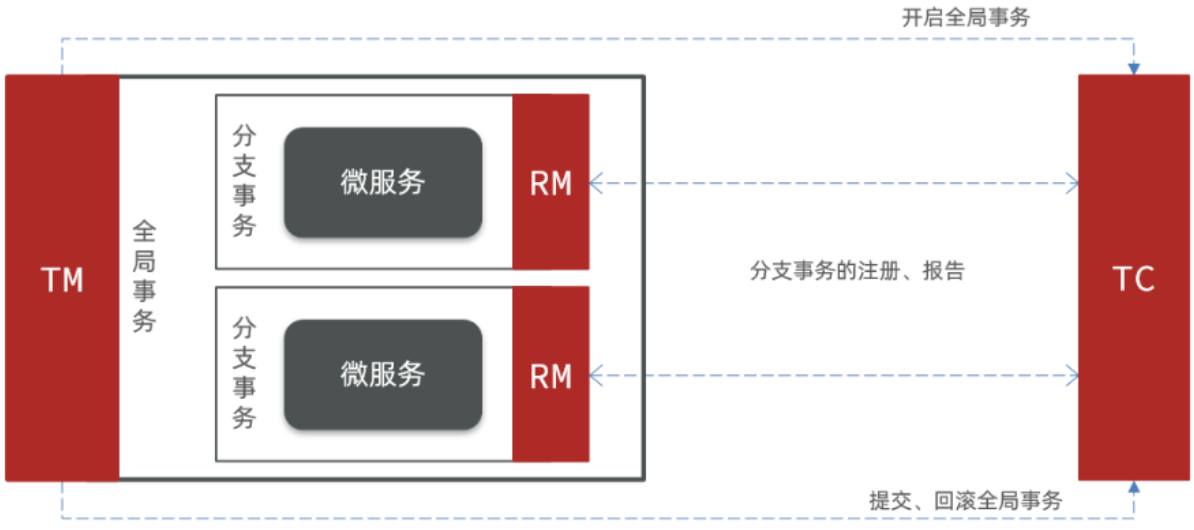
- TC (Transaction Coordinator) - 事务协调者
维护全局和分支事务的状态,驱动全局事务提交或回滚。 - TM (Transaction Manager) - 事务管理器
定义全局事务的范围:开始全局事务、提交或回滚全局事务。 - RM (Resource Manager) - 资源管理器
管理分支事务处理的资源,与TC交谈以注册分支事务和报告分支事务的状态,并驱动分支事务提交或回滚。
2、AT模式
2.1、应用前提
- 基于支持本地 ACID 事务的关系型数据库。
- Java 应用,通过 JDBC 访问数据库。
- 文件操作与关系型数据库操作
2.2、两阶段提交概念
- 一阶段:业务数据和回滚日志记录在同一个本地事务中提交,释放本地锁和连接资源。
- 二阶段:
提交异步化,非常快速地完成。
回滚通过一阶段的回滚日志进行反向补偿。
2.3、写隔离
- 一阶段本地事务提交前,需要确保先拿到 全局锁 。
- 拿不到 全局锁 ,不能提交本地事务。
- 拿 全局锁 的尝试被限制在一定范围内,超出范围将放弃,并回滚本地事务,释放本地锁
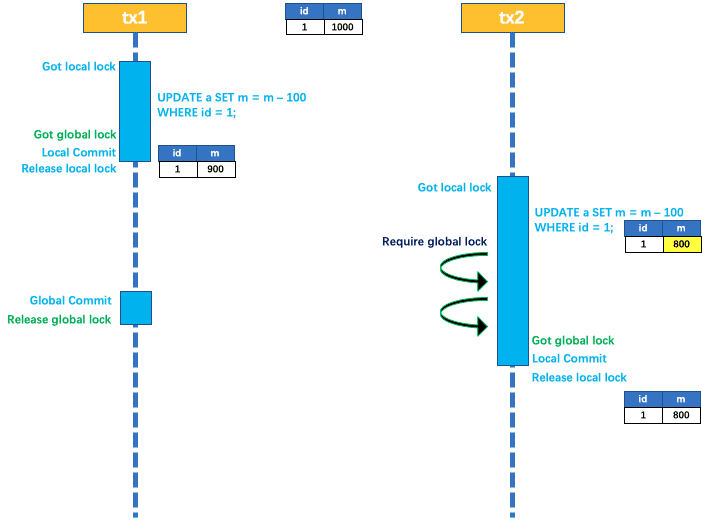
两个全局事务 tx1 和 tx2,分别对 a 表的 m 字段进行更新操作,m 的初始值 1000。
tx1 先开始,开启本地事务,拿到本地锁,更新操作 m = 1000 - 100 = 900。本地事务提交前,先拿到该记录的 全局锁 ,本地提交释放本地锁。 tx2 后开始,开启本地事务,拿到本地锁,更新操作 m = 900 - 100 = 800。本地事务提交前,尝试拿该记录的 全局锁 ,tx1 全局提交前,该记录的全局锁被 tx1 持有,tx2 需要重试等待 全局锁 。
tx1 二阶段全局提交,释放 全局锁 。tx2 拿到 全局锁 提交本地事务。
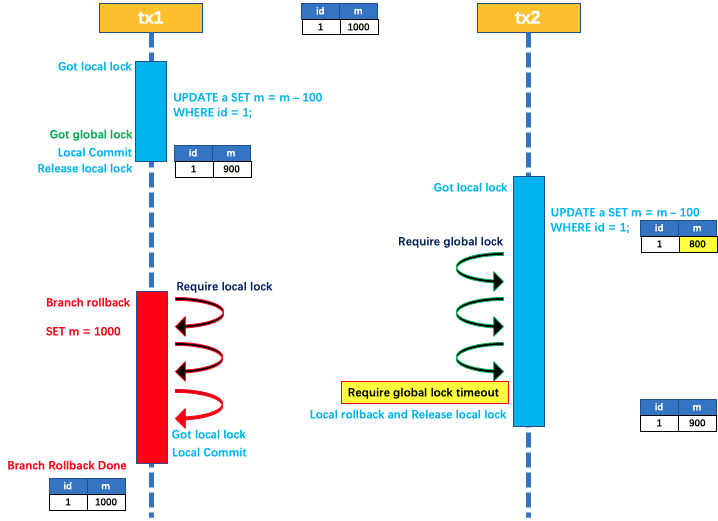
如果 tx1 的二阶段全局回滚,则 tx1 需要重新获取该数据的本地锁,进行反向补偿的更新操作,实现分支的回滚。
此时,如果 tx2 仍在等待该数据的 全局锁,同时持有本地锁,则 tx1 的分支回滚会失败。分支的回滚会一直重试,直到 tx2 的 全局锁 等锁超时,放弃 全局锁 并回滚本地事务释放本地锁,tx1 的分支回滚最终成功。
因为整个过程 全局锁 在 tx1 结束前一直是被 tx1 持有的,所以不会发生 脏写 的问题。
2.4、读隔离
在数据库本地事务隔离级别 读已提交(Read Committed) 或以上的基础上,Seata(AT 模式)的默认全局隔离级别是 读未提交(Read Uncommitted)。
如果应用在特定场景下,必需要求全局的 读已提交 ,目前 Seata 的方式是通过 SELECT FOR UPDATE 语句的代理。

SELECT FOR UPDATE 语句的执行会申请 全局锁 ,如果 全局锁 被其他事务持有,则释放本地锁(回滚 SELECT FOR UPDATE 语句的本地执行)并重试。这个过程中,查询是被 block 住的,直到 全局锁 拿到,即读取的相关数据是 已提交 的,才返回。
出于总体性能上的考虑,Seata 目前的方案并没有对所有 SELECT 语句都进行代理,仅针对 FOR UPDATE 的 SELECT 语句。
2.5、AT模式工作过程的案例
业务表:product
| Field | Type | Key |
|---|---|---|
| id | bigint(20) | PRI |
| name | varchar(100) | |
| since | varchar(100) |
AT 分支事务的业务逻辑:
update product set name = 'GTS' where name = 'TXC';
2.5.1、一阶段
过程:
解析 SQL:得到 SQL 的类型(UPDATE),表(product),条件(where name = ‘TXC’)等相关的信息。
查询前镜像:根据解析得到的条件信息,生成查询语句,定位数据。
select id, name, since from product where name = 'TXC';
得到前镜像:
| id | name | since |
|---|---|---|
| 1 | TXC | 2014 |
执行业务 SQL:更新这条记录的 name 为 ‘GTS’。
查询后镜像:根据前镜像的结果,通过 主键 定位数据。
select id, name, since from product where id = 1;
得到后镜像:
| id | name | since |
|---|---|---|
| 1 | GTS | 2014 |
插入回滚日志:把前后镜像数据以及业务 SQL 相关的信息组成一条回滚日志记录,插入到
UNDO_LOG 表中。
{
    "branchId": 641789253,
    "undoItems": [{
        "afterImage": {
            "rows": [{
                "fields": [{
                    "name": "id",
                    "type": 4,
                    "value": 1
                }, {
                    "name": "name",
                    "type": 12,
                    "value": "GTS"
                }, {
                    "name": "since",
                    "type": 12,
                    "value": "2014"
                }]
            }],
            "tableName": "product"
        },
        "beforeImage": {
            "rows": [{
                "fields": [{
                    "name": "id",
                    "type": 4,
                    "value": 1
                }, {
                    "name": "name",
                    "type": 12,
                    "value": "TXC"
                }, {
                    "name": "since",
                    "type": 12,
                    "value": "2014"
                }]

            }],
            "tableName": "product"
        },
        "sqlType": "UPDATE"
    }],
    "xid": "xid:xxx"
}
提交前,向 TC 注册分支:申请
product 表中,主键值等于 1 的记录的 全局锁 。
本地事务提交:业务数据的更新和前面步骤中生成的 UNDO LOG 一并提交。
将本地事务提交的结果上报给 TC。
2.5.2、 二阶段-回滚
收到 TC 的分支回滚请求,开启一个本地事务,执行如下操作。
通过 XID 和 Branch ID 查找到相应的 UNDO LOG 记录。
数据校验:拿 UNDO LOG 中的后镜与当前数据进行比较,如果有不同,说明数据被当前全局事务之外的动作做了修改。这种情况,需要根据配置策略来做处理,详细的说明在另外的文档中介绍。
根据 UNDO LOG 中的前镜像和业务 SQL 的相关信息生成并执行回滚的语句:
update product set name = 'TXC' where id = 1;
提交本地事务。并把本地事务的执行结果(即分支事务回滚的结果)上报给 TC。
2.5.3、二阶段-提交
收到 TC 的分支提交请求,把请求放入一个异步任务的队列中,马上返回提交成功的结果给 TC。
异步任务阶段的分支提交请求将异步和批量地删除相应 UNDO LOG 记录。
3、spring cloud 与seata整合
3.1、seata配置
下载地址:https://github.com/seata/seata/releases/download/v1.4.2/seata-server-1.4.2.zip
解压到D盘
3.1.1、修改配置文件
3.1.1.1、conf/file.conf 修改成db模式
## transaction log store, only used in seata-server
store {
  ## store mode: file、db、redis
  mode = "db"
  ## rsa decryption public key
  publicKey = ""
  ## file store property
  file {
    ## store location dir
    dir = "sessionStore"
    # branch session size , if exceeded first try compress lockkey, still exceeded throws exceptions
    maxBranchSessionSize = 16384
    # globe session size , if exceeded throws exceptions
    maxGlobalSessionSize = 512
    # file buffer size , if exceeded allocate new buffer
    fileWriteBufferCacheSize = 16384
    # when recover batch read size
    sessionReloadReadSize = 100
    # async, sync
    flushDiskMode = async
  }

  ## database store property
  db {
    ## the implement of javax.sql.DataSource, such as DruidDataSource(druid)/BasicDataSource(dbcp)/HikariDataSource(hikari) etc.
    datasource = "druid"
    ## mysql/oracle/postgresql/h2/oceanbase etc.
    dbType = "mysql"
    driverClassName = "com.mysql.jdbc.Driver"
    ## if using mysql to store the data, recommend add rewriteBatchedStatements=true in jdbc connection param
    url = "jdbc:mysql://127.0.0.1:3306/seata?rewriteBatchedStatements=true"
    user = "root"
    password = "root"
    minConn = 5
    maxConn = 100
    globalTable = "global\_table"
    branchTable = "branch\_table"
    lockTable = "lock\_table"
    queryLimit = 100
    maxWait = 5000
  }

  ## redis store property
  redis {
    ## redis mode: single、sentinel
    mode = "single"
    ## single mode property
    single {
      host = "127.0.0.1"
      port = "6379"
    }
    ## sentinel mode property
    sentinel {
      masterName = ""
      ## such as "10.28.235.65:26379,10.28.235.65:26380,10.28.235.65:26381"
      sentinelHosts = ""
    }
    password = ""
    database = "0"
    minConn = 1
    maxConn = 10
    maxTotal = 100
    queryLimit = 100
  }
}
3.1.1.2、conf/registry.conf
registry {
  # file 、nacos 、eureka、redis、zk、consul、etcd3、sofa
  type = "nacos"

  nacos {
    application = "seata-server"
    serverAddr = "127.0.0.1:8848"
    group = "SEATA\_GROUP"
    namespace = "1ff3782d-b62d-402f-8bc4-ebcf40254d0a"
    cluster = "default"
    username = "nacos"
    password = "nacos"
  }
  eureka {
    serviceUrl = "http://localhost:8761/eureka"
    application = "default"
    weight = "1"
  }
  redis {
    serverAddr = "localhost:6379"
    db = 0
    password = ""
    cluster = "default"
    timeout = 0
  }
  zk {
    cluster = "default"
    serverAddr = "127.0.0.1:2181"
    sessionTimeout = 6000
    connectTimeout = 2000
    username = ""
    password = ""
  }
  consul {
    cluster = "default"
    serverAddr = "127.0.0.1:8500"
    aclToken = ""
  }
  etcd3 {
    cluster = "default"
    serverAddr = "http://localhost:2379"
  }
  sofa {
    serverAddr = "127.0.0.1:9603"
    application = "default"
    region = "DEFAULT\_ZONE"
    datacenter = "DefaultDataCenter"
    cluster = "default"
    group = "SEATA\_GROUP"
    addressWaitTime = "3000"
  }
  file {
    name = "file.conf"
  }
}

config {
  # file、nacos 、apollo、zk、consul、etcd3
  type = "file"

  nacos {
    serverAddr = "127.0.0.1:8848"
    namespace = ""
    group = "SEATA\_GROUP"
    username = "nacos"
    password = "nacos"
    dataId = "seataServer.properties"
  }
  consul {
    serverAddr = "127.0.0.1:8500"
    aclToken = ""
  }
  apollo {
    appId = "seata-server"
    ## apolloConfigService will cover apolloMeta
    apolloMeta = "http://192.168.1.204:8801"
    apolloConfigService = "http://192.168.1.204:8080"
    namespace = "application"
    apolloAccesskeySecret = ""
    cluster = "seata"
  }
  zk {
    serverAddr = "127.0.0.1:2181"
    sessionTimeout = 6000
    connectTimeout = 2000
    username = ""
    password = ""
    nodePath = "/seata/seata.properties"
  }
  etcd3 {
    serverAddr = "http://localhost:2379"
  }
  file {
    name = "file.conf"
  }
}
注意:nacos命名空间namespace定义成自己的。
3.1.1.3、下载config.tex
https://github.com/seata/seata/tree/develop/script/config-center/config.text 保存到seata根目录,文件名config.txt
#For details about configuration items, see https://seata.io/zh-cn/docs/user/configurations.html
#Transport configuration, for client and server
transport.type=TCP
transport.server=NIO
transport.heartbeat=true
transport.enableTmClientBatchSendRequest=false
transport.enableRmClientBatchSendRequest=true
transport.enableTcServerBatchSendResponse=false
transport.rpcRmRequestTimeout=30000
transport.rpcTmRequestTimeout=30000
transport.rpcTcRequestTimeout=30000
transport.threadFactory.bossThreadPrefix=NettyBoss
transport.threadFactory.workerThreadPrefix=NettyServerNIOWorker
transport.threadFactory.serverExecutorThreadPrefix=NettyServerBizHandler
transport.threadFactory.shareBossWorker=false
transport.threadFactory.clientSelectorThreadPrefix=NettyClientSelector
transport.threadFactory.clientSelectorThreadSize=1
transport.threadFactory.clientWorkerThreadPrefix=NettyClientWorkerThread
transport.threadFactory.bossThreadSize=1
transport.threadFactory.workerThreadSize=default
transport.shutdown.wait=3
transport.serialization=seata
transport.compressor=none
#Transaction routing rules configuration, only for the client
service.vgroupMapping.default\_tx\_group=default
#If you use a registry, you can ignore it
service.default.grouplist=127.0.0.1:8091
service.enableDegrade=false
service.disableGlobalTransaction=false
#Transaction rule configuration, only for the client
client.rm.asyncCommitBufferLimit=10000
client.rm.lock.retryInterval=10
client.rm.lock.retryTimes=30
client.rm.lock.retryPolicyBranchRollbackOnConflict=true
client.rm.reportRetryCount=5
client.rm.tableMetaCheckEnable=true
client.rm.tableMetaCheckerInterval=60000
client.rm.sqlParserType=druid
client.rm.reportSuccessEnable=false
client.rm.sagaBranchRegisterEnable=false
client.rm.sagaJsonParser=fastjson
client.rm.tccActionInterceptorOrder=-2147482648
client.tm.commitRetryCount=5
client.tm.rollbackRetryCount=5
client.tm.defaultGlobalTransactionTimeout=60000
client.tm.degradeCheck=false
client.tm.degradeCheckAllowTimes=10
client.tm.degradeCheckPeriod=2000
client.tm.interceptorOrder=-2147482648
client.undo.dataValidation=true
client.undo.logSerialization=jackson
client.undo.onlyCareUpdateColumns=true
server.undo.logSaveDays=7
server.undo.logDeletePeriod=86400000
client.undo.logTable=undo_log
client.undo.compress.enable=true
client.undo.compress.type=zip
现在能在网上找到很多很多的学习资源,有免费的也有收费的,当我拿到1套比较全的学习资源之前,我并没着急去看第1节,我而是去审视这套资源是否值得学习,有时候也会去问一些学长的意见,如果可以之后,我会对这套学习资源做1个学习计划,我的学习计划主要包括规划图和学习进度表。
分享给大家这份我薅到的免费视频资料,质量还不错,大家可以跟着学习
**网上学习资料一大堆,但如果学到的知识不成体系,遇到问题时只是浅尝辄止,不再深入研究,那么很难做到真正的技术提升。**
**[需要这份系统化学习资料的朋友,可以戳这里无偿获取](https://bbs.csdn.net/topics/618317507)**
**一个人可以走的很快,但一群人才能走的更远!不论你是正从事IT行业的老鸟或是对IT行业感兴趣的新人,都欢迎加入我们的的圈子(技术交流、学习资源、职场吐槽、大厂内推、面试辅导),让我们一起学习成长!**


 1205
1205


 被折叠的 条评论
为什么被折叠?
被折叠的 条评论
为什么被折叠?
 到【灌水乐园】发言


