


现在能在网上找到很多很多的学习资源,有免费的也有收费的,当我拿到1套比较全的学习资源之前,我并没着急去看第1节,我而是去审视这套资源是否值得学习,有时候也会去问一些学长的意见,如果可以之后,我会对这套学习资源做1个学习计划,我的学习计划主要包括规划图和学习进度表。
分享给大家这份我薅到的免费视频资料,质量还不错,大家可以跟着学习

网上学习资料一大堆,但如果学到的知识不成体系,遇到问题时只是浅尝辄止,不再深入研究,那么很难做到真正的技术提升。
一个人可以走的很快,但一群人才能走的更远!不论你是正从事IT行业的老鸟或是对IT行业感兴趣的新人,都欢迎加入我们的的圈子(技术交流、学习资源、职场吐槽、大厂内推、面试辅导),让我们一起学习成长!
if name == ‘__main__’:
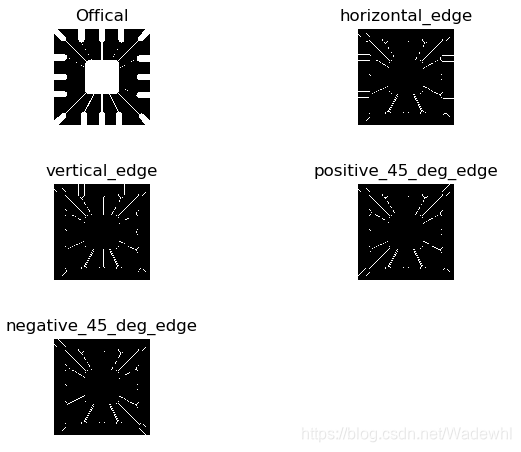
src = cv2.imread(‘enhance.jpg’, 1)
plt.subplot(3, 2, 1)
plt.imshow(src)
plt.axis('off')
plt.title('Offical')

kernel = np.array([[-1, -1, -1],
                   [2, 2, 2],
                   [-1, -1, -1]])
horizontal_edge = cv2.filter2D(src, cv2.CV_32F, kernel)
horizontal_edge = cv2.convertScaleAbs(horizontal_edge)
# \_, horizontal\_edge = cv2.threshold(horizontal\_edge, horizontal\_edge.max() \* 0.8, 255, cv2.THRESH\_BINARY)

plt.subplot(3, 2, 2)
plt.imshow(horizontal_edge)
plt.axis('off')
plt.title('horizontal\_edge')

kernel = np.array([[-1, 2, -1],
                   [-1, 2, -1],
                   [-1, 2, -1]])
vertical_edge = cv2.filter2D(src, ddepth=cv2.CV_32F, kernel=kernel)
vertical_edge = cv2.convertScaleAbs(vertical_edge)
# \_, vertical\_edge = cv2.threshold(vertical\_edge, vertical\_edge.max() \* 0.8, 255, cv2.THRESH\_BINARY)

plt.subplot(3, 2, 3)
plt.imshow(vertical_edge)
plt.axis('off')
plt.title('vertical\_edge')

kernel = np.array([[-1, -1, 2],
                   [-1, 2, -1],
                   [2, -1, -1]])
positive_45_deg_edge = cv2.filter2D(src, ddepth=cv2.CV_32F, kernel=kernel)
positive_45_deg_edge = cv2.convertScaleAbs(positive_45_deg_edge)
# positive\_45\_deg\_edge = cv2.threshold(positive\_45\_deg\_edge, positive\_45\_deg\_edge.max() \* 0.8, 255, cv2.THRESH\_BINARY)

plt.subplot(3, 2, 4)
plt.imshow(positive_45_deg_edge)
plt.axis('off')
plt.title('positive\_45\_deg\_edge')

kernel = np.array([[2, -1, -1],
                   [-1, 2, -1],
                   [-1, -1, 2]])
negative_45_deg_edge = cv2.filter2D(src, ddepth=cv2.CV_32F, kernel=kernel)
negative_45_deg_edge = cv2.convertScaleAbs(negative_45_deg_edge)
# negative\_45\_deg\_edge = cv2.threshold(negative\_45\_deg\_edge, negative\_45\_deg\_edge.max() \* 0.8, 255, cv2.THRESH\_BINARY)
cv2.imshow('negative\_45\_deg\_edge', negative_45_deg_edge)
plt.subplot(3, 2, 5)
plt.imshow(negative_45_deg_edge)
plt.axis('off')
plt.title('negative\_45\_deg\_edge')

plt.show()
结果展示:
### LoG和DoG算子
LoG和DoG算子是拉普拉斯算子的改进方法。
LoG:高斯拉普拉斯算子(LoG,Laplacian of Gaussian),首先对图像进行高斯暖卷积滤波进行降噪处理,再采用Laplace算子进行边缘检测。
DoG:高斯函数差分(DoG, Difference of Gaussian), 是可以通过将图像与高斯函数进行卷积得到一幅图像的低通滤波结果,即去噪过程,这里的Gaussian和高斯低通滤波器的高斯一样,是一个函数,即为正态分布函数。同时,它对高斯拉普拉斯LoG的近似.
图像增强算法
LoG和DoG算子
均为基于拉普拉斯算子的改进
可用于边缘检测和角点检测
import cv2
import numpy as np
import matplotlib.pyplot as plt
def genGaussianKernel(ksize, sigma):
half_ksize = ksize // 2
C = 2 * np.pi * sigma * sigma
x = y = np.linspace(-half_ksize, half_ksize, ksize)
x, y = np.meshgrid(x, y)
kernel = np.exp(-(x ** 2 + y ** 2) / (2 * sigma ** 2)) / C
return kernel
def zerosCrossing(src, thresh):
dsize = (src.shape[1], src.shape[0])
M = np.array([[1, 0, -1], [0, 1, 0]], dtype=np.float32)
shift_left = cv2.warpAffine(src, M, dsize)
M = np.array([[1, 0, 1], [0, 1, 0]], dtype=np.float32)
shift_right = cv2.warpAffine(src, M, dsize)
M = np.array([[1, 0,  0], [0, 1, -1]], dtype=np.float32)
shift_up = cv2.warpAffine(src, M, dsize)
M = np.array([[1, 0,  0], [0, 1, 1]], dtype=np.float32)
shift_down = cv2.warpAffine(src, M, dsize)

M = np.array([[1, 0,  1], [0, 1, 1]], dtype=np.float32)
shift_right_down = cv2.warpAffine(src, M, dsize)
M = np.array([[1, 0,  -1], [0, 1, -1]], dtype=np.float32)
shift_left_up = cv2.warpAffine(src, M, dsize)

M = np.array([[1, 0,  1], [0, 1, -1]], dtype=np.float32)
shift_right_up = cv2.warpAffine(src, M, dsize)
M = np.array([[1, 0,  -1], [0, 1, 1]], dtype=np.float32)
shift_left_down = cv2.warpAffine(src, M, dsize)

shift_left_right_sign = (shift_left \* shift_right)
shift_up_down_sign = (shift_up \* shift_down)
shift_rd_lu_sign = (shift_right_down \* shift_left_up)
shift_ru_ld_sign = (shift_right_up \* shift_left_down)

shift_left_right_norm = abs(shift_left - shift_right)
shift_up_down_norm = abs(shift_up - shift_down)
shift_rd_lu_norm = abs(shift_right_down - shift_left_up)
shift_ru_ld_norm = abs(shift_right_up - shift_left_down)

candidate_zero_crossing = \
    ((shift_left_right_sign < 0) & (shift_left_right_norm > thresh)).astype('uint8') +\
    ((shift_up_down_sign < 0) & (shift_up_down_norm > thresh)).astype('uint8') + \
    ((shift_rd_lu_sign < 0) & (shift_rd_lu_norm > thresh)).astype('uint8') + \
    ((shift_ru_ld_sign < 0) & (shift_ru_ld_norm > thresh)).astype('uint8')

ResImg = np.zeros(shape=src.shape, dtype=np.uint8)
ResImg[candidate_zero_crossing >= 2] = 255

return ResImg
def LoG(src, ksize, sigma=0, thresh=None, alpha=0.01):
blur_img = cv2.GaussianBlur(src.astype(‘float32’), (ksize, ksize), sigmaX=sigma)
LoG_img = cv2.Laplacian(blur_img, cv2.CV_32F)
if thresh is None:
thresh = abs(LoG_img).max() * alpha
edge_image = zerosCrossing(LoG_img, thresh)
return edge_image
def DoG(src, ksize, sigma, thresh=None, alpha=0.01):
sigma2 = sigma / 1.6
kernel_1 = genGaussianKernel(ksize=ksize, sigma=sigma)
kernel_2 = genGaussianKernel(ksize=ksize, sigma=sigma2)
kernel = kernel_1 - kernel_2
DoG_img = cv2.filter2D(src=src, ddepth=cv2.CV_32FC1, kernel=kernel)
一、Python所有方向的学习路线
Python所有方向路线就是把Python常用的技术点做整理,形成各个领域的知识点汇总,它的用处就在于,你可以按照上面的知识点去找对应的学习资源,保证自己学得较为全面。

二、学习软件
工欲善其事必先利其器。学习Python常用的开发软件都在这里了,给大家节省了很多时间。

三、入门学习视频
我们在看视频学习的时候,不能光动眼动脑不动手,比较科学的学习方法是在理解之后运用它们,这时候练手项目就很适合了。

网上学习资料一大堆,但如果学到的知识不成体系,遇到问题时只是浅尝辄止,不再深入研究,那么很难做到真正的技术提升。
一个人可以走的很快,但一群人才能走的更远!不论你是正从事IT行业的老鸟或是对IT行业感兴趣的新人,都欢迎加入我们的的圈子(技术交流、学习资源、职场吐槽、大厂内推、面试辅导),让我们一起学习成长!


 3352
3352


 被折叠的 条评论
为什么被折叠?
被折叠的 条评论
为什么被折叠?
 到【灌水乐园】发言


