


网上学习资料一大堆,但如果学到的知识不成体系,遇到问题时只是浅尝辄止,不再深入研究,那么很难做到真正的技术提升。
一个人可以走的很快,但一群人才能走的更远!不论你是正从事IT行业的老鸟或是对IT行业感兴趣的新人,都欢迎加入我们的的圈子(技术交流、学习资源、职场吐槽、大厂内推、面试辅导),让我们一起学习成长!
[submodule “third_party/benchmark”]
path = third_party/benchmark
#url = https://github.com/google/benchmark
url = https://gitee.com/mirrors/google-benchmark.git
[submodule “third_party/boringssl-with-bazel”]
path = third_party/boringssl-with-bazel
#url = https://github.com/google/boringssl.git
url = https://gitee.com/mirrors/boringssl.git
[submodule “third_party/re2”]
path = third_party/re2
#url = https://github.com/google/re2.git
url = https://gitee.com/local-grpc/re2.git
[submodule “third_party/cares/cares”]
path = third_party/cares/cares
#url = https://github.com/c-ares/c-ares.git
url = https://gitee.com/mirrors/c-ares.git
branch = cares-1_12_0
[submodule “third_party/bloaty”]
path = third_party/bloaty
#url = https://github.com/google/bloaty.git
url = https://gitee.com/local-grpc/bloaty.git
[submodule “third_party/abseil-cpp”]
path = third_party/abseil-cpp
#url = https://github.com/abseil/abseil-cpp.git
url = https://gitee.com/mirrors/abseil-cpp.git
branch = lts_2020_02_25
[submodule “third_party/envoy-api”]
path = third_party/envoy-api
#url = https://github.com/envoyproxy/data-plane-api.git
url = https://gitee.com/local-grpc/data-plane-api.git
[submodule “third_party/googleapis”]
path = third_party/googleapis
#url = https://github.com/googleapis/googleapis.git
url = https://gitee.com/mirrors/googleapis.git
[submodule “third_party/protoc-gen-validate”]
path = third_party/protoc-gen-validate
#url = https://github.com/envoyproxy/protoc-gen-validate.git
url = https://gitee.com/local-grpc/protoc-gen-validate.git
[submodule “third_party/udpa”]
path = third_party/udpa
#url = https://github.com/cncf/udpa.git
url = https://gitee.com/local-grpc/udpa.git
[submodule “third_party/libuv”]
path = third_party/libuv
#url = https://github.com/libuv/libuv.git
url = https://gitee.com/mirrors/libuv.git
在grpc目录下,在git 上使用更新命令
cd grpc
git submodule update --init
使用cmake对grpc进行编译。
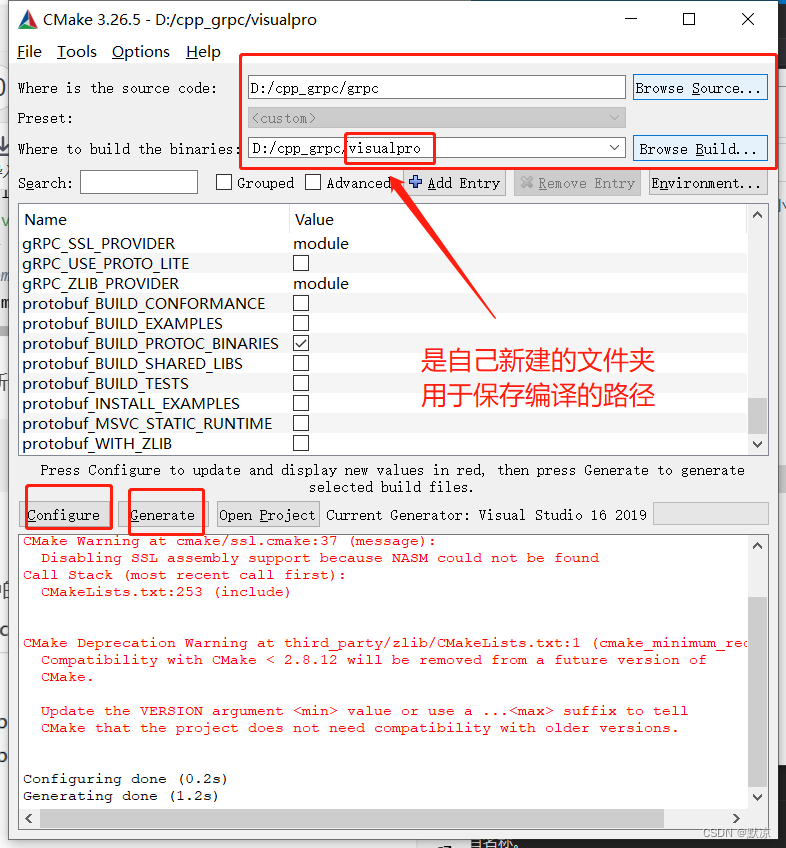
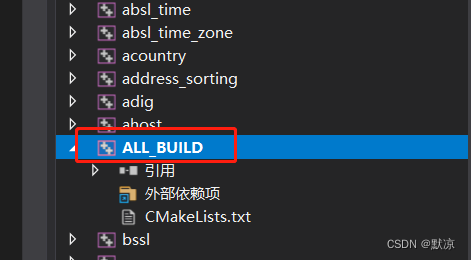
编译结束后,使用vs打开目录中的grpc.sln文件

右键ALL——BUILD,点击重新生成。
### 第二步 编写 .proto 文件
新建一个C++控制台项目,新建 demo.proto 文件
文件内容:
syntax = “proto3”;
package hello;
service Greeter {
rpc SayHello (HelloRequest) returns (HelloReply) {}
}
message HelloRequest {
string message = 1;
}
message HelloReply {
string message = 1;
}
在资源文件中右键添加现有项,将demo.proto 文件添加进来。
demo.proto里面不能有中文或者utf-8的格式
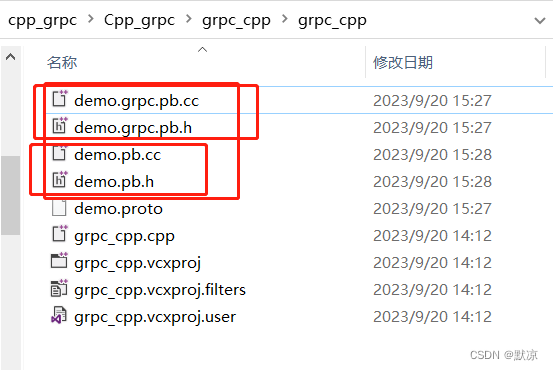
### 第三步 生成头文件与源文件
在自己新建的控制台项目中,按住Shift + 右键 调处控制台
接下来我们利用grpc编译后生成的proc.exe生成proto的头文件和源文件
D:\cpp_grpc\visualpro\third_party\protobuf\Debug\protoc.exe -I=“.” --grpc_out=“.” --plugin=protoc-gen-grpc=“D:\cpp_grpc\visualpro\Debug\grpc_cpp_plugin.exe” “demo.proto”
D:\cpp_grpc\visualpro\third_party\protobuf\Debug\protoc.exe --cpp_out=. “demo.proto”

生成出来的文件:
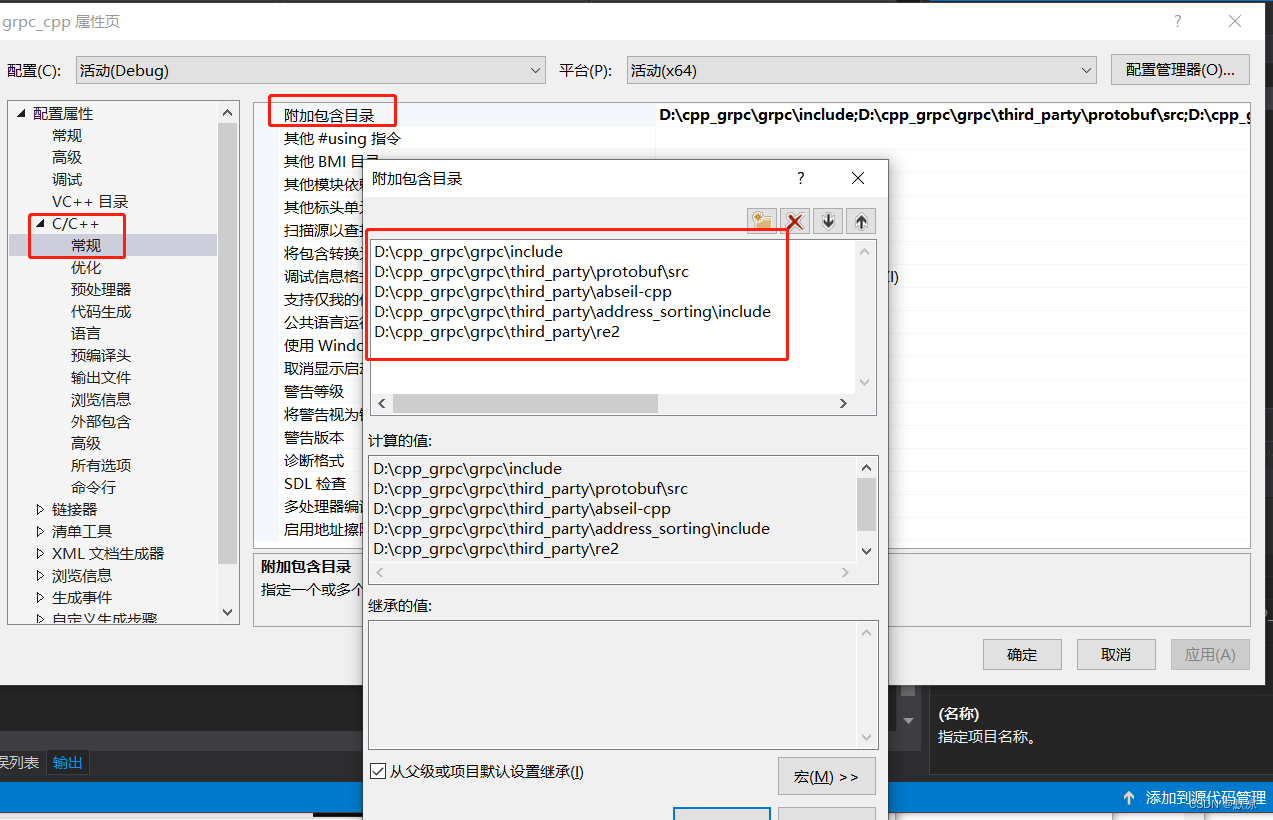
### 第四步 配置VS
将这4个都右键添加现有项的方法添加到C++的控制台项目中去。
开始配置VS
右键项目,点击属性,选择c/c++,选择常规,选择附加包含目录
D:\cpp_grpc\grpc\third_party\re2
D:\cpp_grpc\grpc\third_party\address_sorting\include
D:\cpp_grpc\grpc\third_party\abseil-cpp
D:\cpp_grpc\grpc\third_party\protobuf\src
D:\cpp_grpc\grpc\include
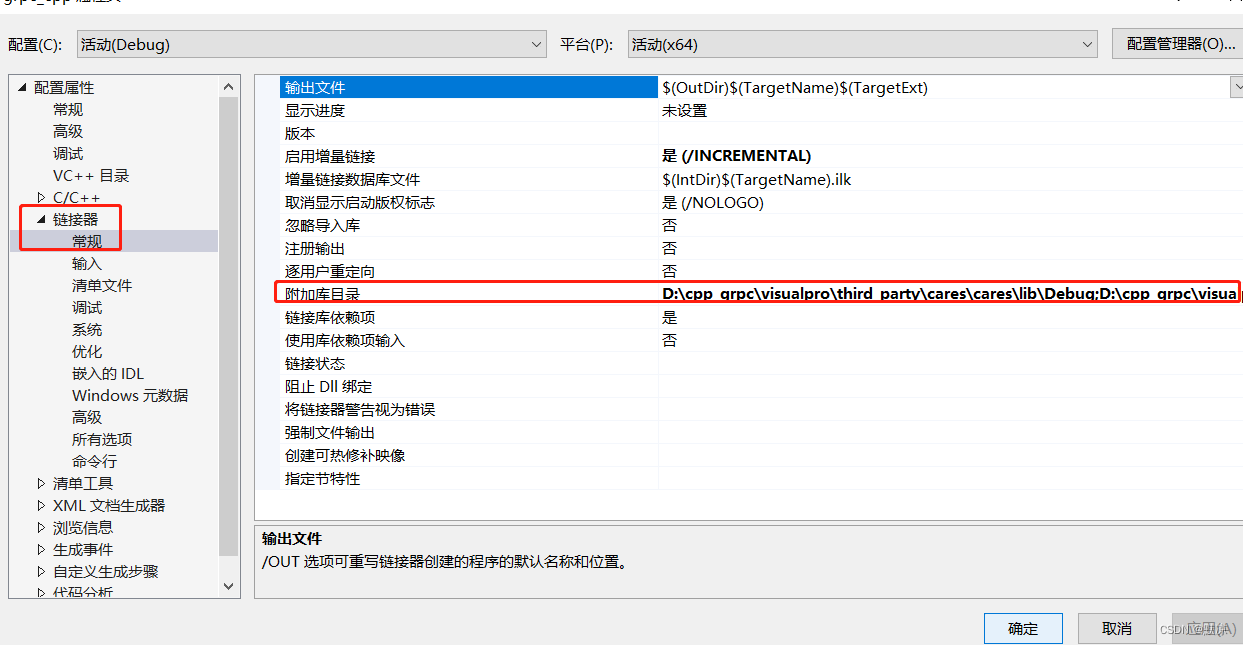
接下来配置库路径, 在链接器常规选项下,点击附加库目录,添加我们需要的库目录。
右键项目,点击属性,选择链接器,选择附加库目录
D:\cpp_grpc\visualpro\third_party\re2\Debug
D:\cpp_grpc\visualpro\third_party\abseil-cpp\absl\types\Debug
D:\cpp_grpc\visualpro\third_party\abseil-cpp\absl\synchronization\Debug
D:\cpp_grpc\visualpro\third_party\abseil-cpp\absl\status\Debug
D:\cpp_grpc\visualpro\third_party\abseil-cpp\absl\random\Debug
D:\cpp_grpc\visualpro\third_party\abseil-cpp\absl\flags\Debug
D:\cpp_grpc\visualpro\third_party\abseil-cpp\absl\debugging\Debug
D:\cpp_grpc\visualpro\third_party\abseil-cpp\absl\container\Debug
D:\cpp_grpc\visualpro\third_party\abseil-cpp\absl\hash\Debug
D:\cpp_grpc\visualpro\third_party\boringssl-with-bazel\Debug
D:\cpp_grpc\visualpro\third_party\abseil-cpp\absl\numeric\Debug
D:\cpp_grpc\visualpro\third_party\abseil-cpp\absl\time\Debug
D:\cpp_grpc\visualpro\third_party\abseil-cpp\absl\base\Debug
D:\cpp_grpc\visualpro\third_party\abseil-cpp\absl\strings\Debug
D:\cpp_grpc\visualpro\third_party\protobuf\Debug
D:\cpp_grpc\visualpro\third_party\zlib\Debug
D:\cpp_grpc\visualpro\Debug
D:\cpp_grpc\visualpro\third_party\cares\cares\lib\Debug
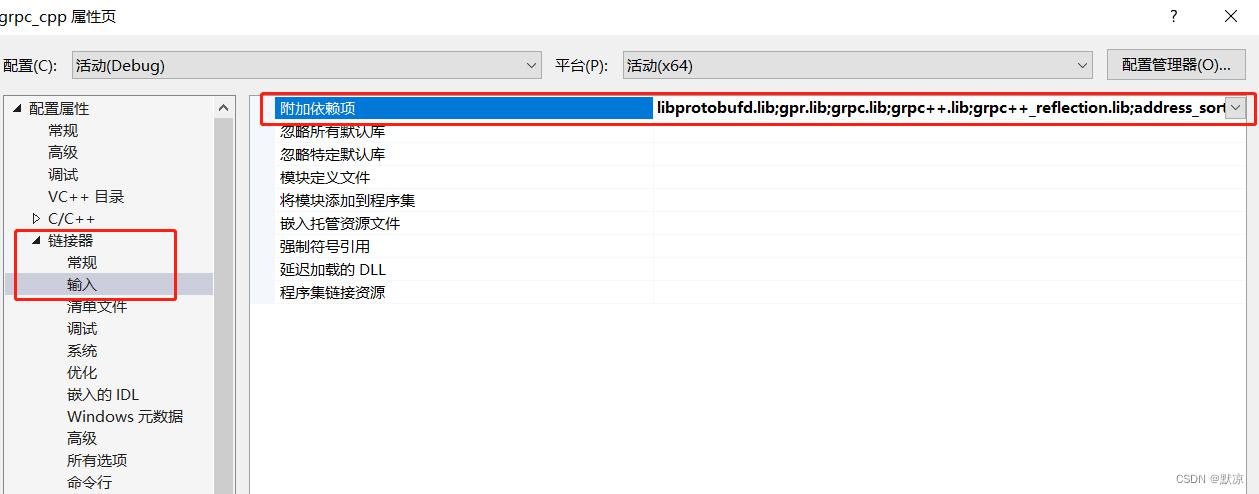
另外,我们虽然配置了库目录,但还要将要使用的库链接到项目
点击链接器,选择输入选项,点击附加依赖项,添加依赖的库名字
libprotobufd.lib
gpr.lib
grpc.lib
grpc++.lib
grpc++_reflection.lib
address_sorting.lib
ws2_32.lib
cares.lib
zlibstaticd.lib
upb.lib
ssl.lib
crypto.lib
absl_bad_any_cast_impl.lib
absl_bad_optional_access.lib
absl_bad_variant_access.lib
absl_base.lib
absl_city.lib
absl_civil_time.lib
absl_cord.lib
absl_debugging_internal.lib
absl_demangle_internal.lib
absl_examine_stack.lib
absl_exponential_biased.lib
absl_failure_signal_handler.lib
absl_flags.lib
absl_flags_config.lib
absl_flags_internal.lib
absl_flags_marshalling.lib
absl_flags_parse.lib
absl_flags_program_name.lib
absl_flags_usage.lib
absl_flags_usage_internal.lib
absl_graphcycles_internal.lib
absl_hash.lib
absl_hashtablez_sampler.lib
absl_int128.lib
absl_leak_check.lib
absl_leak_check_disable.lib
absl_log_severity.lib
absl_malloc_internal.lib
absl_periodic_sampler.lib
absl_random_distributions.lib
absl_random_internal_distribution_test_util.lib
absl_random_internal_pool_urbg.lib
absl_random_internal_randen.lib
absl_random_internal_randen_hwaes.lib
absl_random_internal_randen_hwaes_impl.lib
absl_random_internal_randen_slow.lib
absl_random_internal_seed_material.lib
absl_random_seed_gen_exception.lib
absl_random_seed_sequences.lib
absl_raw_hash_set.lib
absl_raw_logging_internal.lib
absl_scoped_set_env.lib
absl_spinlock_wait.lib
absl_stacktrace.lib
absl_status.lib
absl_strings.lib
absl_strings_internal.lib
absl_str_format_internal.lib
absl_symbolize.lib
absl_synchronization.lib
absl_throw_delegate.lib
absl_time.lib
absl_time_zone.lib
absl_statusor.lib
re2.lib
### 第五步 编写服务端代码:


**既有适合小白学习的零基础资料,也有适合3年以上经验的小伙伴深入学习提升的进阶课程,涵盖了95%以上大数据知识点,真正体系化!**
**由于文件比较多,这里只是将部分目录截图出来,全套包含大厂面经、学习笔记、源码讲义、实战项目、大纲路线、讲解视频,并且后续会持续更新**
**[需要这份系统化资料的朋友,可以戳这里获取](https://bbs.csdn.net/forums/4f45ff00ff254613a03fab5e56a57acb)**
片转存中...(img-KRPA4Wuh-1715423657840)]
**既有适合小白学习的零基础资料,也有适合3年以上经验的小伙伴深入学习提升的进阶课程,涵盖了95%以上大数据知识点,真正体系化!**
**由于文件比较多,这里只是将部分目录截图出来,全套包含大厂面经、学习笔记、源码讲义、实战项目、大纲路线、讲解视频,并且后续会持续更新**
**[需要这份系统化资料的朋友,可以戳这里获取](https://bbs.csdn.net/forums/4f45ff00ff254613a03fab5e56a57acb)**


 3515
3515

 被折叠的 条评论
为什么被折叠?
被折叠的 条评论
为什么被折叠?
 到【灌水乐园】发言


