
网上学习资料一大堆,但如果学到的知识不成体系,遇到问题时只是浅尝辄止,不再深入研究,那么很难做到真正的技术提升。
一个人可以走的很快,但一群人才能走的更远!不论你是正从事IT行业的老鸟或是对IT行业感兴趣的新人,都欢迎加入我们的的圈子(技术交流、学习资源、职场吐槽、大厂内推、面试辅导),让我们一起学习成长!
}
Queue := []*btNode{root}
for len(Queue) > 0 {
	cur := Queue[0]
	Queue = Queue[1:]
	if cur.Lchild != nil {
		Queue = append(Queue, cur.Lchild)
	} else {
		cur.Lchild = &btNode{Data: data}
		return
	}
	if cur.Rchild != nil {
		Queue = append(Queue, cur.Rchild)
	} else {
		cur.Rchild = &btNode{Data: data}
		break
	}
}
}
func (bt *biTree) Levelorder() []interface{} {
var res []interface{}
root := bt.root
if root == nil {
return res
}
Queue := []*btNode{root}
for len(Queue) > 0 {
cur := Queue[0]
Queue = Queue[1:]
res = append(res, cur.Data)
if cur.Lchild != nil {
Queue = append(Queue, cur.Lchild)
}
if cur.Rchild != nil {
Queue = append(Queue, cur.Rchild)
}
}
return res
}
func (bt *biTree) Preorder() []interface{} {
var res []interface{}
cur := bt.root
Stack := []*btNode{}
for cur != nil || len(Stack) > 0 {
for cur != nil {
res = append(res, cur.Data)
Stack = append(Stack, cur)
cur = cur.Lchild
}
if len(Stack) > 0 {
cur = Stack[len(Stack)-1]
Stack = Stack[:len(Stack)-1]
cur = cur.Rchild
}
}
return res
}
func (bt *biTree) Inorder() []interface{} {
var res []interface{}
cur := bt.root
Stack := []*btNode{}
for cur != nil || len(Stack) > 0 {
for cur != nil {
Stack = append(Stack, cur)
cur = cur.Lchild
}
if len(Stack) > 0 {
cur = Stack[len(Stack)-1]
res = append(res, cur.Data)
Stack = Stack[:len(Stack)-1]
cur = cur.Rchild
}
}
return res
}
func (bt *biTree) Postorder() []interface{} {
var res []interface{}
var cur, pre *btNode
Stack := []*btNode{bt.root}
for len(Stack) > 0 {
cur = Stack[len(Stack)-1]
if cur.Lchild == nil && cur.Rchild == nil ||
pre != nil && (pre == cur.Lchild || pre == cur.Rchild) {
res = append(res, cur.Data)
Stack = Stack[:len(Stack)-1]
pre = cur
} else {
if cur.Rchild != nil {
Stack = append(Stack, cur.Rchild)
}
if cur.Lchild != nil {
Stack = append(Stack, cur.Lchild)
}
}
}
return res
}
func main() {
list := []interface{}{1, 2, 3, 4, 5, 6, 7}

tree := &biTree{}
fmt.Println(tree.Preorder())
tree.Append(0)
fmt.Println(tree.Preorder())
tree.Append(1)
fmt.Println(tree.Preorder())

tree = Create(list)
fmt.Println(tree.Preorder())
fmt.Println(tree.Inorder())
fmt.Println(tree.Postorder())

tree.Append("+")
tree.Append("-")
fmt.Println(tree.Inorder())
tree.Append([]interface{}{"A", "B", "C"})
fmt.Println(tree.Preorder())
fmt.Println(tree.Inorder())
fmt.Println(tree.Postorder())
}
/*
[]
[0]
[0 1]
[1 2 4 5 3 6 7]
[4 2 5 1 6 3 7]
[4 5 2 6 7 3 1]
[+ 4 - 2 5 1 6 3 7]
[1 2 4 + - 5 A B 3 6 C 7]
[+ 4 - 2 A 5 B 1 C 6 3 7]
[+ - 4 A B 5 2 C 6 7 3 1]
*/
### 自定义包 biTree


上面的代码中,去掉import "fmt"一行 及 main()函数全部,package main替换成 package biTree,然后另存为 biTree.go。


接下来在DOS窗口用set gopath查看GOPATH变量,我的电脑返回:


>
> C:\Users\admin>set gopath
>
>
> GOPATH=C:\Users\admin\go;d:\GOsrc
>
>
>


在gopath的任一路径下新建一个src文件夹,再在src下新建biTree文件夹,最后把biTree.go存放到此文件夹下,就能导入import使用了。


注意:**自定义包中的函数和方法命名时一定要首字母大写**,否则调用会无法找到。


#### 导入和调用
package main
import (
“biTree” //导入二叉树自定义包 biTree
“fmt”
)
func main() {
list := []interface{}{1, 2, 3, 4, 5, 6, 7}

tree := biTree.Create(list)  //调用自定义包中的函数,需要用“包名称.”作前缀
fmt.Println(tree.Preorder()) //调用方法则不需要前缀,tree就是此包定义的对象
fmt.Println(tree.Inorder())
fmt.Println(tree.Postorder())
fmt.Println(tree.Levelorder())

tree.Append(0)
tree.Append("+")
tree.Append("-")
fmt.Println(tree.Inorder())
tree.Append([]interface{}{"A", "B", "C"})
fmt.Println(tree.Preorder())
fmt.Println(tree.Inorder())
fmt.Println(tree.Postorder())
fmt.Println(tree.Levelorder())
}
/*
[1 2 4 5 3 6 7]
[4 2 5 1 6 3 7]
[4 5 2 6 7 3 1]
[1 2 3 4 5 6 7]
[0 4 + 2 - 5 1 6 3 7]
[1 2 4 0 + 5 - A 3 6 B C 7]
[0 4 + 2 - 5 A 1 B 6 C 3 7]
[0 + 4 - A 5 2 B C 6 7 3 1]
[1 2 3 4 5 6 7 0 + - A B C]
*/
### 广度优先搜索BFS & 深度优先搜索DFS
是连通图等图结构的一种遍历算法原型,而树也可以看作是一种没用环的特殊图结构。
#### 广度优先搜索BFS
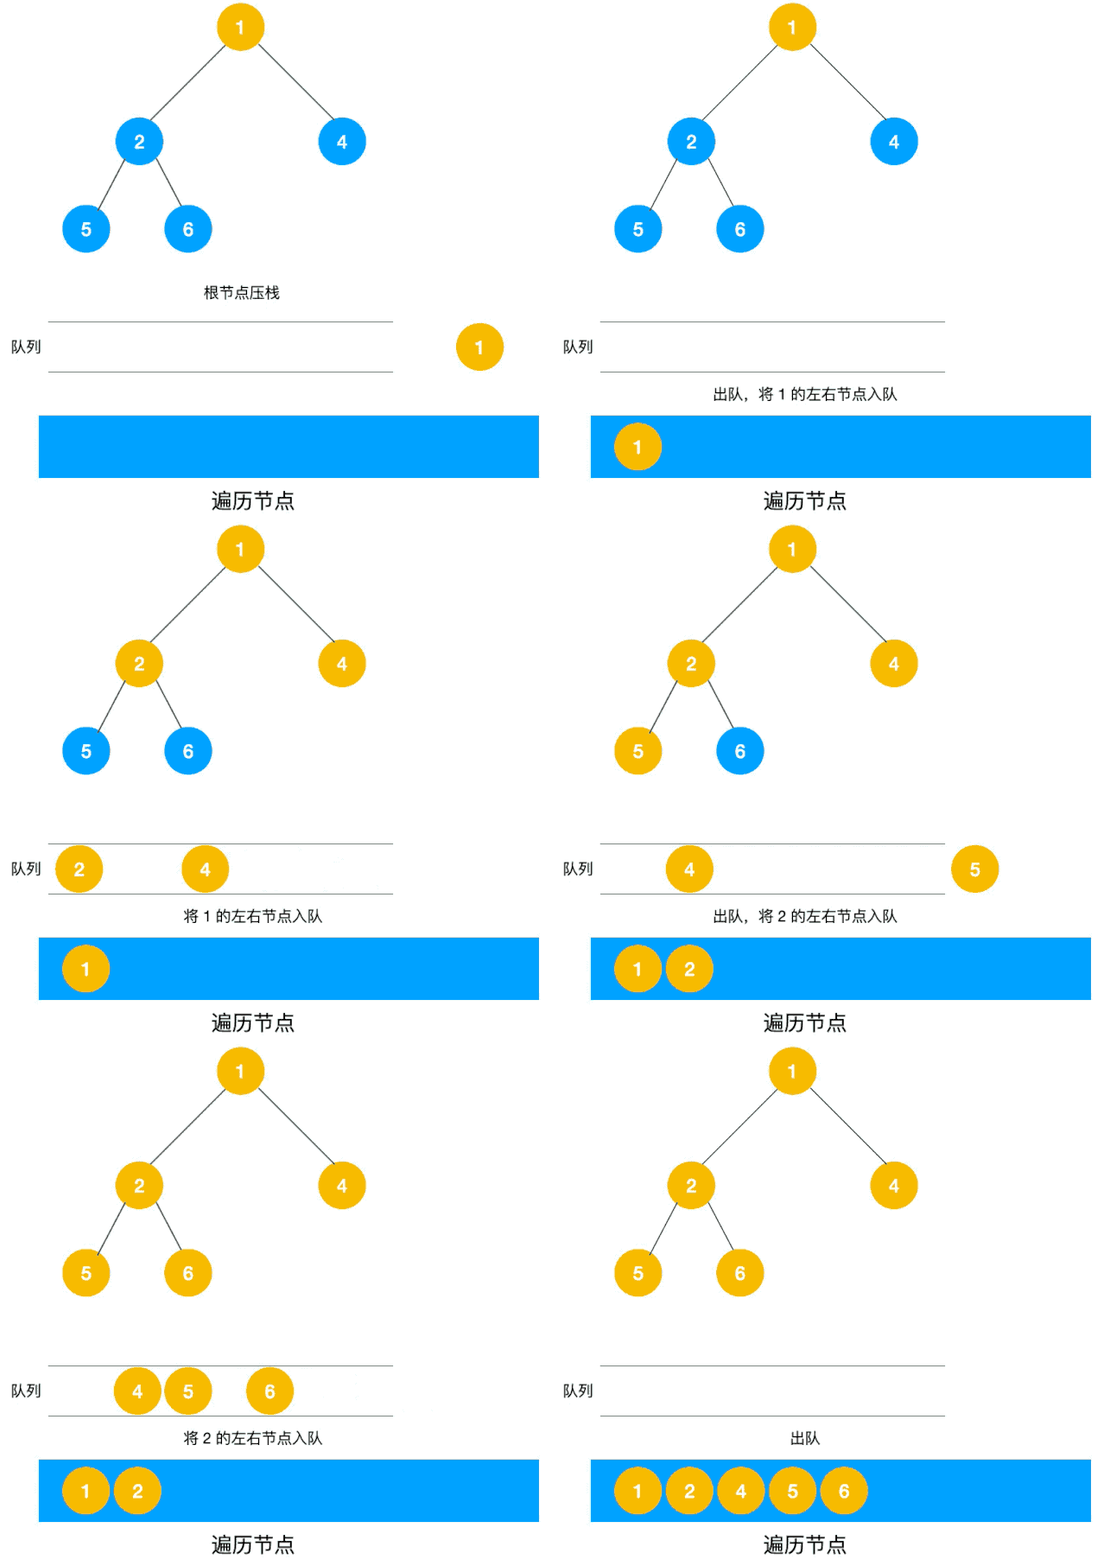
Breath First Search,也称宽度优先搜索,缩写BFS。也即先横向再纵向的搜索,BFS使用**队列**来实现。BFS就是上一集中写的层序遍历Levelorder(),层序遍历即广度优先。
#### 深度优先搜索DFS
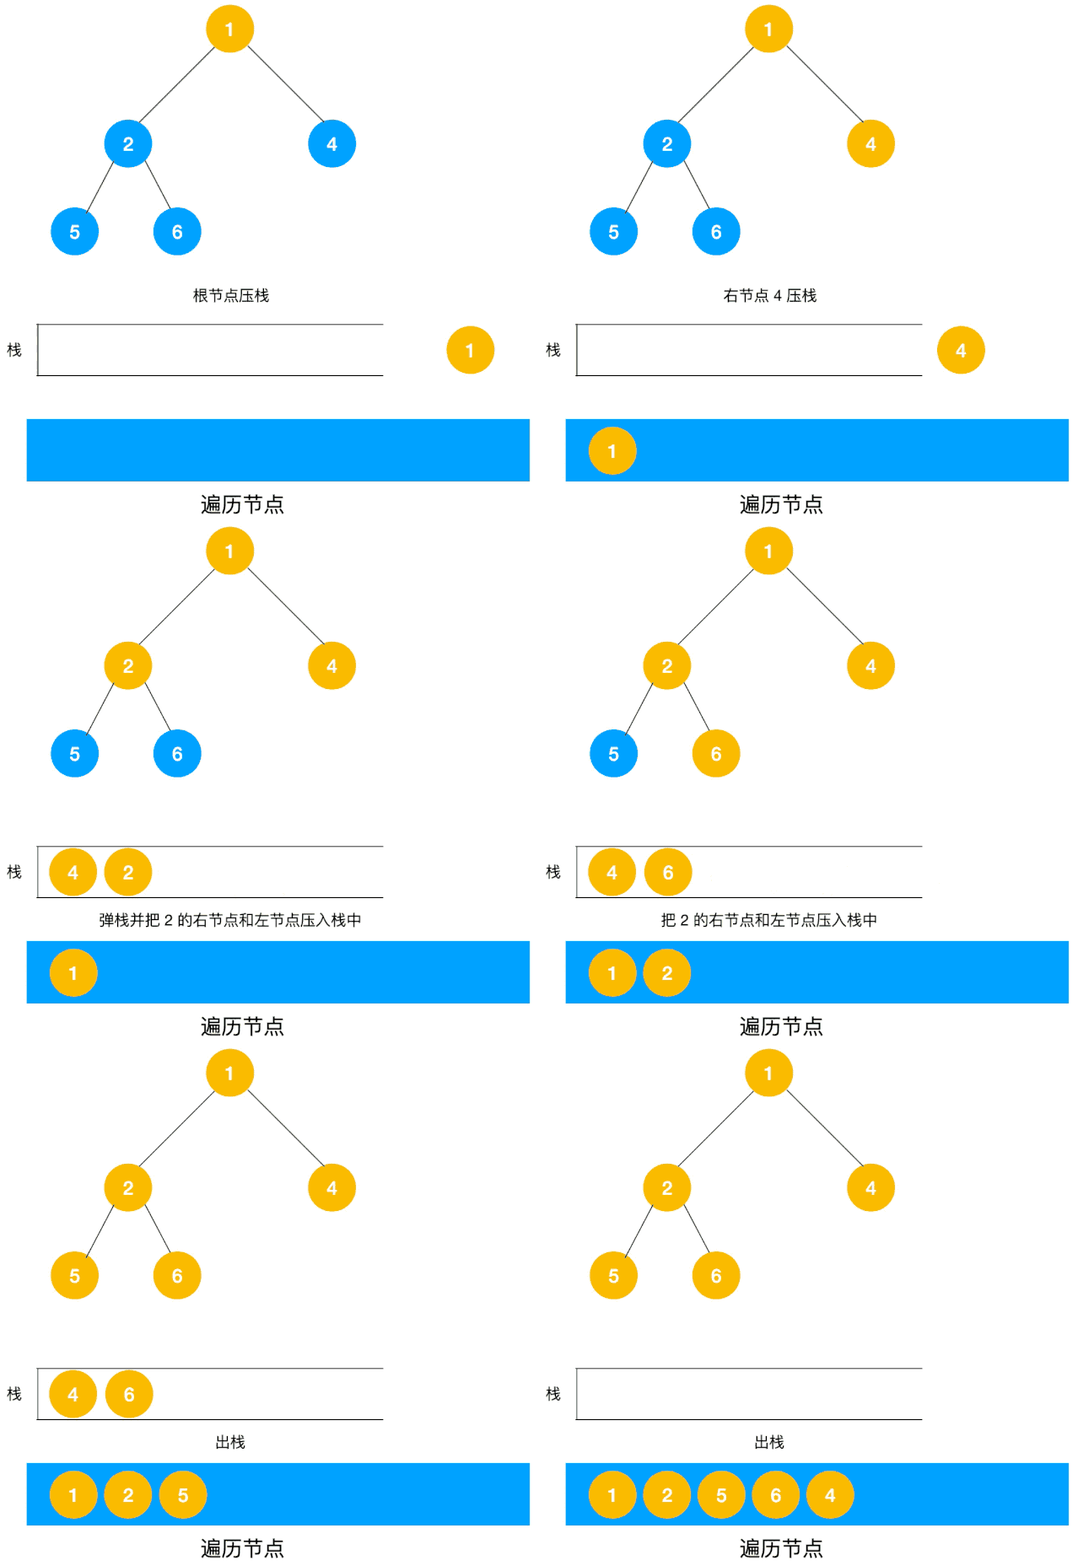
Depth First Search,缩写DFS。也即先纵向再横向的搜索,DFS使用**栈**来实现。DFS就是上一集中写的先序遍历Preorder(),可认为先序遍历即深度优先。
#### 遍历二叉树全部叶子结点
**递归法:**
func (bt *btNode) leaves() []interface{} {
var res []interface{}
if bt != nil {
if bt.Lchild == nil && bt.Rchild == nil {
res = append(res, bt.Data)
}
res = append(res, bt.Lchild.leaves()…)
res = append(res, bt.Rchild.leaves()…)
}
return res
}
**广度优先BFS:**
func (bt *biTree) LeafNodeBFS() []interface{} {
var res []interface{}
root := bt.root
if root == nil {
return res
}
Queue := []*btNode{root}
for len(Queue) > 0 {
cur := Queue[0]
Queue = Queue[1:]
if cur.Lchild == nil && cur.Rchild == nil {
res = append(res, cur.Data)
}
if cur.Lchild != nil {
Queue = append(Queue, cur.Lchild)
}
if cur.Rchild != nil {
Queue = append(Queue, cur.Rchild)
}
}
return res
}
**深度优先DFS:**
func (bt *biTree) LeafNodeDFS() []interface{} {
var res []interface{}
cur := bt.root
Stack := []*btNode{}
for cur != nil || len(Stack) > 0 {
for cur != nil {
if cur.Lchild == nil && cur.Rchild == nil {
res = append(res, cur.Data)
}
Stack = append(Stack, cur)
cur = cur.Lchild
}
if len(Stack) > 0 {
cur = Stack[len(Stack)-1]
Stack = Stack[:len(Stack)-1]
cur = cur.Rchild
}
}
return res
}
---


### **BFS/DFS题目实例**


#### **实例1:层序遍历二叉树成二维数组**


>
> **(leetcode102#) Binary Tree Level Order Traversal**
>
>
> Given a binary tree, return the level order traversal of its nodes' values. (ie, from left to right, level by level).
>  For Example:
>  Given binary tree [3,9,20,null,null,15,7],
>   3
>   / \
>  9 20
>      / \
>    15 7
>
>
> return its level order traversal as:
>  [
>  [3],
>  [9,20],
>  [15,7]
>  ]
>
>
>
> **(leetcode107#) Binary Tree Level Order Traversal II**
>
>
> 102题的结果倒序,返回[[3],[9,20],[15,7]],代码略。
>
>
>


遍历代码如下,把它写进biTree.go备用:
func (bt *biTree) BForder2D() [][]interface{} {
var res [][]interface{}
root := bt.root
if root == nil {
return res
}
Queue := []*btNode{root}
for len(Queue) > 0 {
Nodes := []interface{}{}
Levels := len(Queue)
for Levels > 0 {
cur := Queue[0]
Queue = Queue[1:]
Nodes = append(Nodes, cur.Data)
Levels–
if cur.Lchild != nil {
Queue = append(Queue, cur.Lchild)
}
if cur.Rchild != nil {
Queue = append(Queue, cur.Rchild)
}
}
res = append(res, Nodes)
}
return res
}
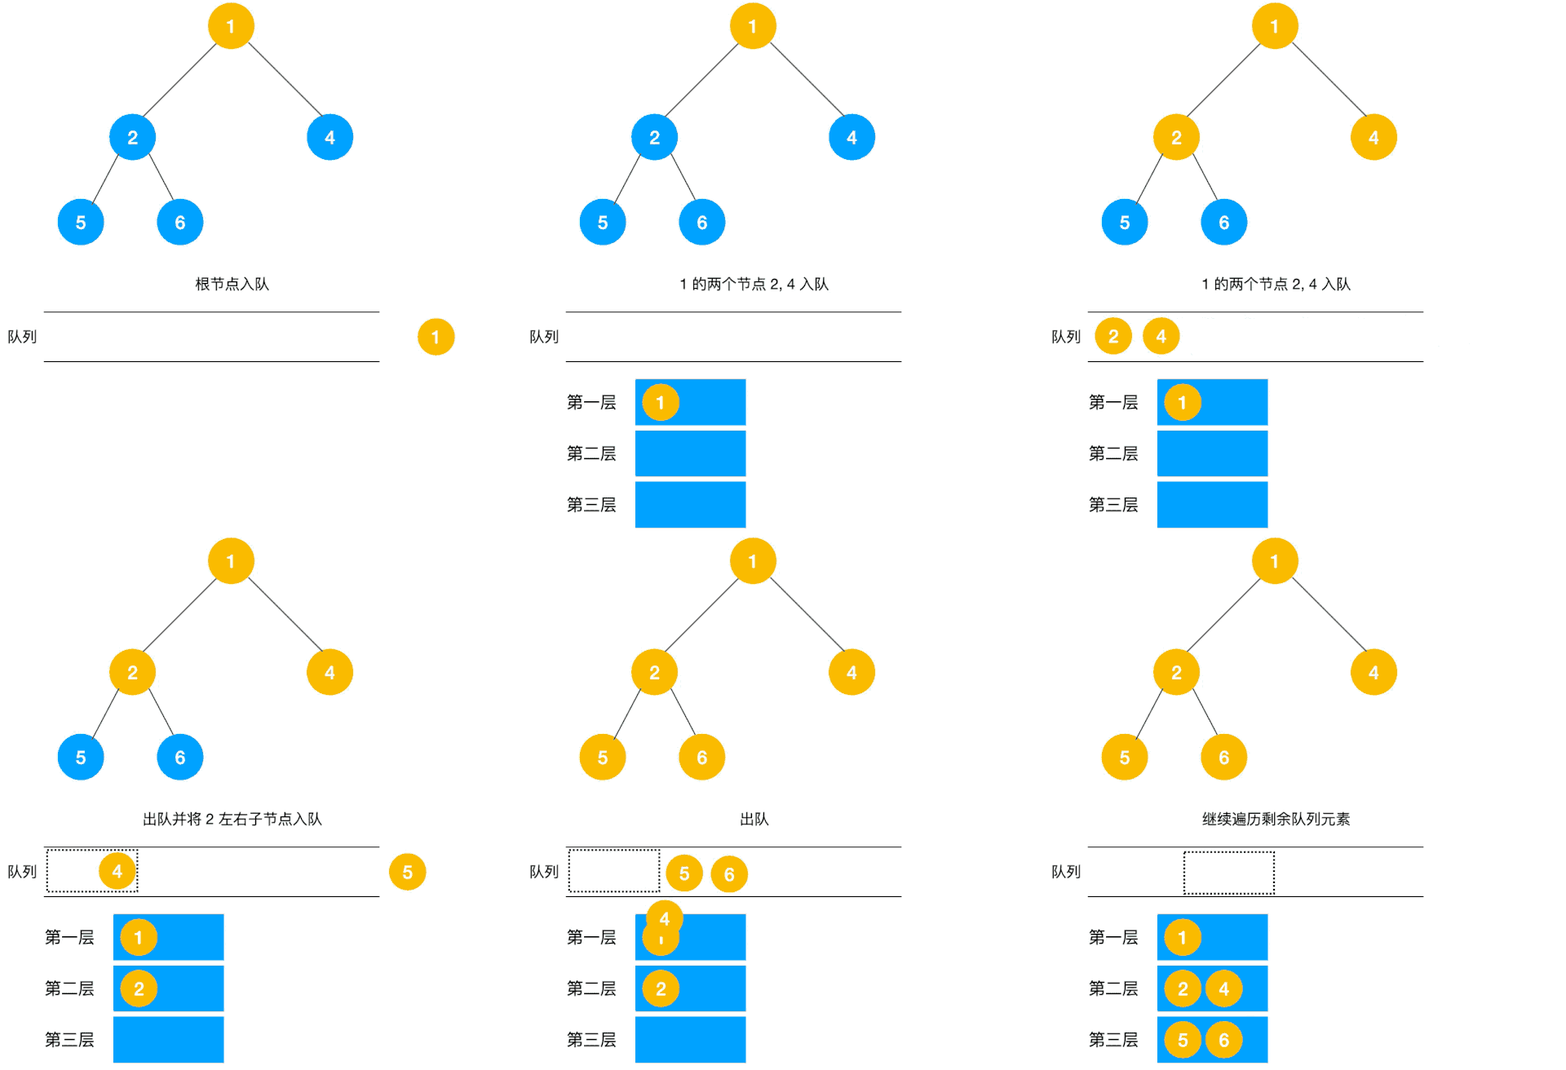
遍历过程如以下动图:
测试代码:
package main
import (
“biTree” //导入二叉树自定义包 biTree
“fmt”
)
func main() {
list1 := []interface{}{1, 2, 4, 5, 6}
list2 := []interface{}{3, 9, 20, 15, 7}

tree := biTree.Create(list1)
fmt.Println(tree.BForder2D())

tree = biTree.Create(list2)
fmt.Println(tree.BForder2D())
}
/*
[[1] [2 4] [5 6]]
[[3] [9 20] [15 7]]
*/
注意:代码遍历方法是正确的,但是题目给定的数组是 [3,9,20,null,null,15,7],而Create()函数按层再从左到右添加结点的,它创建的是一个完全二叉树。需要增加对数据域的类型判断,空值在Go语言中用**nil**表示,在遍历数组时碰到**nil**值,则跳过创建此结点,这样就可以创建一个非完全二叉树。另外存在没法创建的可能,比如: {1, nil, nil, 2, 3},要么忽略要么抛出错误。


改进后的创建代码Build()函数,放进biTree.go,以备调用。
func Build(data interface{}) *biTree {
var list []interface{}
if data == nil {
return &biTree{}
}
switch data.(type) {
case []interface{}:
list = append(list, data.([]interface{})…)
default:
list = append(list, data)
}
if len(list) == 0 {
return &biTree{}
}

网上学习资料一大堆,但如果学到的知识不成体系,遇到问题时只是浅尝辄止,不再深入研究,那么很难做到真正的技术提升。
一个人可以走的很快,但一群人才能走的更远!不论你是正从事IT行业的老鸟或是对IT行业感兴趣的新人,都欢迎加入我们的的圈子(技术交流、学习资源、职场吐槽、大厂内推、面试辅导),让我们一起学习成长!
ace{}:
list = append(list, data.([]interface{})…)
default:
list = append(list, data)
}
if len(list) == 0 {
return &biTree{}
}
[外链图片转存中…(img-tT1sUBAw-1715526348621)]
[外链图片转存中…(img-elgi6u8J-1715526348621)]
网上学习资料一大堆,但如果学到的知识不成体系,遇到问题时只是浅尝辄止,不再深入研究,那么很难做到真正的技术提升。
一个人可以走的很快,但一群人才能走的更远!不论你是正从事IT行业的老鸟或是对IT行业感兴趣的新人,都欢迎加入我们的的圈子(技术交流、学习资源、职场吐槽、大厂内推、面试辅导),让我们一起学习成长!


 2008
2008


 被折叠的 条评论
为什么被折叠?


