


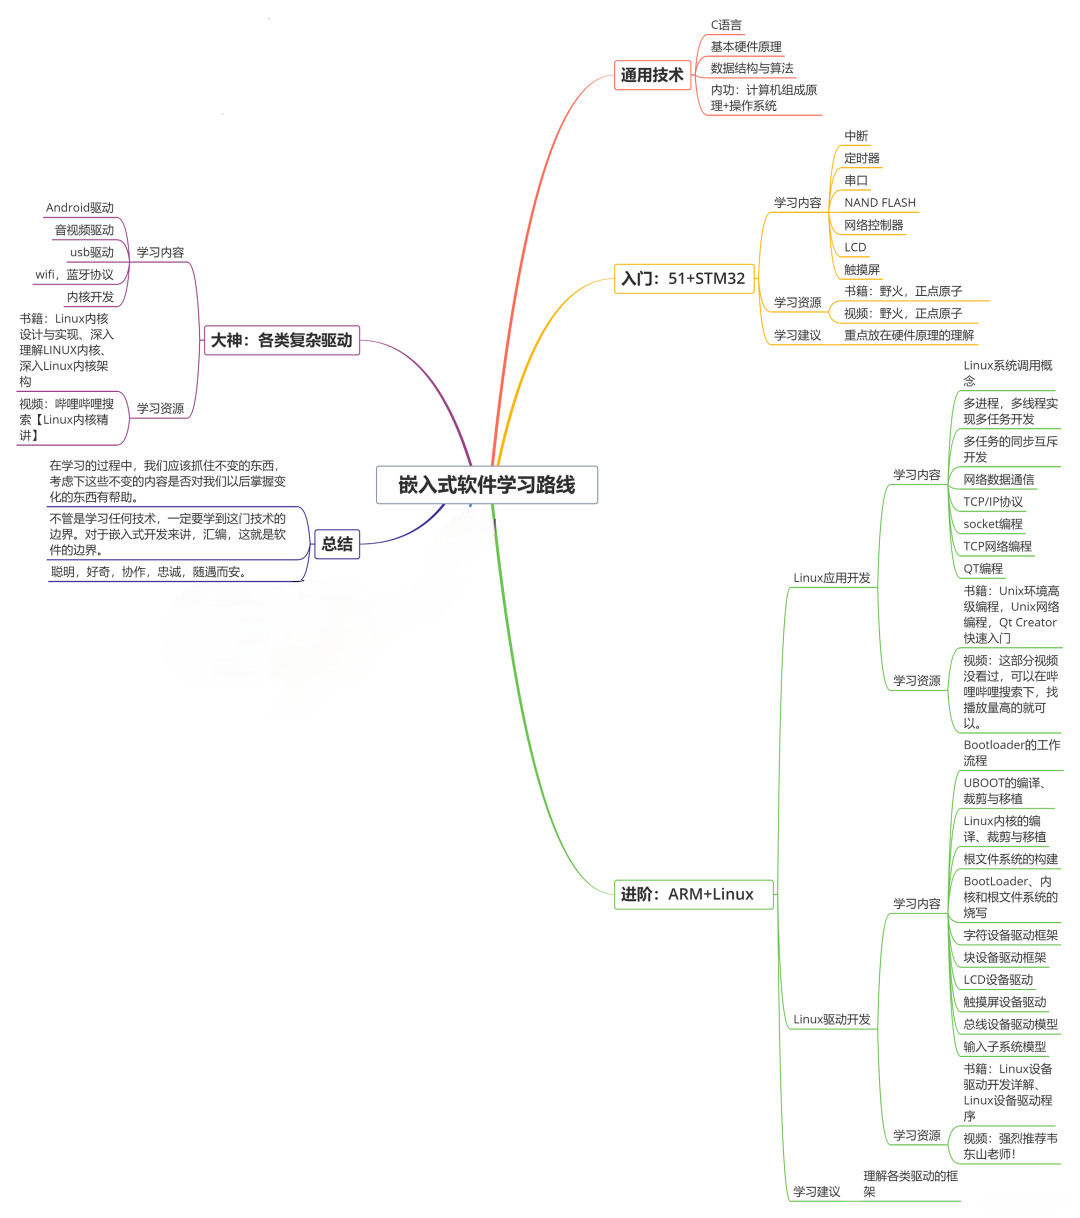
收集整理了一份《2024年最新物联网嵌入式全套学习资料》,初衷也很简单,就是希望能够帮助到想自学提升的朋友。
一个人可以走的很快,但一群人才能走的更远!不论你是正从事IT行业的老鸟或是对IT行业感兴趣的新人
都欢迎加入我们的的圈子(技术交流、学习资源、职场吐槽、大厂内推、面试辅导),让我们一起学习成长!
创建项目:
vue create vue3-ts-template

// 选择Manually select features

composition-api ([Vue 2] router, vuex, less, babel, eslint)
Default ([Vue 2] babel, eslint)
Default (Vue 3 Preview) ([Vue 3] babel, eslint)
✅ Manually select features
- Choose Vue version
- Babel
- TypeScript
- Progressive Web App (PWA) Support
- Router
- Vuex
- CSS Pre-processors
- Linter / Formatter
- Unit Testing
- E2E Testing
然后 Vue 选 3.0, css预处理器,看个人习惯,sass,less,stylus都可以。
创建完项目,把那些不需要的页面例如:helloword删了就行了,有一个shims-vue.d.ts 得留着。
安装 ElementPlus
yarn add element-plus

// main.ts

import ElementPlus from 'element-plus';
import 'element-plus/lib/theme-chalk/index.css';

const app = createApp(App);
app.use(ElementPlus);
app.mount('#app');
登录页面
页面内容没什么好说的,想怎么画就怎么画。
<el-form ref="ruleForm" :model="form">
    <el-form-item prop="email" :rules="{required:true, message:'请输入账号', trigger:'change'}">
        <el-input placeholder="请输入账号" v-model="form.email"></el-input>
    </el-form-item>
    <el-form-item prop="pass" :rules="{required:true, message:'请输入密码', trigger:'change'}">
        <el-input type="password" placeholder="请输入密码" v-model="form.pass"></el-input>
    </el-form-item>
    <el-form-item>
        <el-button class="width100" type="primary" @click="onSubmit">登陆</el-button>
    </el-form-item>
</el-form>
说说验证吧!ElementPlus 官方文档里面,还是按照Vue2.x的方式optionsApi写的:

但是我们既然采用了vue3,还是要紧跟时代步伐:
import { defineComponent, toRefs, reactive, ref } from 'vue';
import { useRouter } from 'vue-router';

interface UserForm {
    email: string;
    pass: string | number;
}

export default defineComponent({
    setup () {
        const router = useRouter();
        const state = reactive({
            form: {
                email: 'admin',
                pass: 'admin123'
            } as UserForm,
            ruleForm: ref<any>(null)
        });
        const onSubmit = () => {
            // ruleForm.value.validate
            state.ruleForm.validate().then((valid: boolean) => {
                if (valid) {
                    if (state.form.email === 'admin') {
                        router.push({ path: '/' });
                    }
                }
            });
        };

        return {
            ...toRefs(state),
            onSubmit
        };
    }
});
<el-form ref="ruleForm">绑定ruleForm: ref<any>(null)声明ruleForm,并返回state.ruleForm.validate()而不是state.ruleForm.value.validate()
布局

<div :class="['wrapper',isCollapse?'hideSidebar':'']">
    <el-container>
      <el-aside :width="isCollapse?'64px':'210px'">
        <sidebar/>
      </el-aside>
      <el-container>
        <el-header height="50px">
          <topbar @reload="handleReload"/>
        </el-header>
        <el-main>
          <breadcrumb/>
          <div v-if="isRouterAlive">
            <app-main/>
          </div>
        </el-main>
        <el-footer>Footer</el-footer>
      </el-container>
    </el-container>
</div>
刷新页面
布局全凭自己喜欢,我这里采用最简单,最常见的布局。这里做了一个刷新主要内容的功能。
setup() {
  const isRouterAlive = ref<boolean>(true);
  const handleReload = () => {
    isRouterAlive.value = false;
    nextTick(() => {
        isRouterAlive.value = true;
    });
  };
  return {handleReload}
}
网页全屏
yarn add screenfull
import screenfull, { Screenfull } from 'screenfull';

setup() {
    const change = () => {
            fullscreen.value = (screenfull as Screenfull).isFullscreen;
        };
    // 全屏事件
    const handleFullScreen = () => {
        if (!screenfull.isEnabled) {
            // 如果不允许进入全屏,发出不允许提示
            ElMessage({
                message: '暂不不支持全屏',
                type: 'warning'
            });
            return false;
        }
        screenfull.toggle();
    };
    if (screenfull.isEnabled) {
        screenfull.on('change', change);
    }
}
要引入 Screenfull 这个接口,并做一下类型断言
(screenfull as Screenfull),不这样ts编译通不过。
引入axios
yarn add axios
import axios, { AxiosResponse, AxiosRequestConfig } from 'axios';
import { ElMessage } from 'element-plus';
const instance = axios.create({
    baseURL: process.env.VUE_APP_API_BASE_URL || '',
    timeout: 120 * 1000,
    withCredentials: true
});

const err = (error) => {
    if (error.message.includes('timeout')) {
        // console.log('error---->',error.config)
        ElMessage({
            message: '请求超时,请刷新网页重试',
            type: 'error'
        });
    }
    if (error.response) {
        const data = error.response.data;
        const token = '';
        if (error.response.status === 403) {
            ElMessage({
                message: 'Forbidden',
                type: 'error'
            });
        }
        if (error.response.status === 401 && !(data.result && data.result.isLogin)) {
            ElMessage({
                message: 'Unauthorized',
                type: 'error'
            });
            if (token) {
                // store.dispatch('Logout').then(() => {
                //     setTimeout(() => {
                //         window.location.reload();
                //     }, 1500);
                // });
            }
        }
    }
    return Promise.reject(error);
};
instance.interceptors.request.use((config: AxiosRequestConfig) => {
    return config;
}, err);

instance.interceptors.response.use((response: AxiosResponse) => {
    console.log(response);
    const config: AxiosRequestConfig = response.config || '';

    const code = Number(response.data.status);
    if (code === 200) {
        if (config && config.successNotice) {
            ElMessage({
                message: response.data.msg,
                type: 'success'
            });
        }
        return response.data;
    } else {
        let errCode = [402, 403];
        if (errCode.includes(response.data.code)) {
            ElMessage({
                message: response.data.msg || '没有权限',
                type: 'warning'
            });
            setTimeout(() => {
                window.location.reload();
            }, 500);
        }
    }
}, err);

export default instance;
这个axios二次封装就见仁见智了,看你们的业务和习惯,我只提供一个示例。
挂载到全局:
import axios from '@/utils/request';

app.config.globalProperties.$http = axios;

// 使用

import { getCurrentInstance } from 'vue';
const { ctx } = getCurrentInstance() as any;

ctx.$http(...).then(...)
这里需要说明一点的是,如果引入AxiosResponse, AxiosRequestConfig这两个接口来做类型判断。要是在config中定义了一些额外的参数,又要使用就需要定义一个声明文件了。
我在config中定义了successNotice和errorNotice分别来判断请求成功和失败是否需要提示信息,并且它们都是非必填。
// shims.axios.d.ts
import { AxiosRequestConfig } from 'axios';

declare module 'axios' {
  export interface AxiosRequestConfig {
    successNotice? : boolean,
    errorNotice? : boolean
  }
}
二次封装组件
为了更方便快捷的写业务,可以二次封装一些组件,简化操作。
Table 表格
<template>
<div>
    <el-table
        border
        v-bind="$attrs"
        :data="data"
        :rowKey="rowKey"
        size='small'
        :onSelectionChange="handleSelectionChange"
    >
        <el-table-column v-if="allowSelect" type="selection" width="55"></el-table-column>
        <template v-for="item in columns" :key="item.prop">
            <el-table-column v-bind="item" v-if="item.slot" >
                <template v-slot:header>
                    <slot :name="item.slot.header">{{item.label || '自定义header'}}</slot>
                </template>
                <template v-slot:default="scope">
                    <slot :name="item.slot.body" :data="scope.row">{{scope.row[item.prop] || '需要自定义' }}</slot>
                </template>
            </el-table-column>
            <el-table-column v-else v-bind="item"></el-table-column>
        </template>
        <slot/>
    </el-table>
    <HeroPaging
        v-if="showPaging"
        class="marginT10 text-right"
        :pagination="pagination"
        @pagingChange="handlePagingChange"/>
</div>
</template>

<script>
import { defineComponent, PropType } from 'vue';
import HeroPaging from '../HeroPaging/index';
export default defineComponent({
    components: { HeroPaging },
    props: {
        // 数据
        data: {
            type: Array,
            default: () => []
        },
        // 表格项
        columns: {
            type: Array,
            default: () => []
        },
        // 绑定key
        rowKey: {
            type: String,
            default: 'id'
        },
        // 分页信息
        pagination: {
            type: Object,
            default: () => {
                return {
                    page: 1,
                    pageSize: 10,
                    total: 100
                };
            }
        },
        // 是否可选
        allowSelect: {
            type: Boolean,
            default: false
        },
        // 是否分页
        showPaging: {
            type: Boolean,
            default: true
        }
    },
    setup (props, { emit, slots, attrs }) {
        let multipleSelection = [];
        const handleSelectionChange = (val) => {
            multipleSelection = val;
            emit('select', multipleSelection);
        };
        const handlePagingChange = (option) => {
            emit('pagingChange', option);
        };
        return {
            handleSelectionChange,
            handlePagingChange
        };
    }
});
</script>
在一些常见的业务场景下,用起来就比较方便了:

<HeroTable
:allowSelect="true"
:data="tableData"
:columns="columns"


**既有适合小白学习的零基础资料,也有适合3年以上经验的小伙伴深入学习提升的进阶课程,涵盖了95%以上物联网嵌入式知识点,真正体系化!**
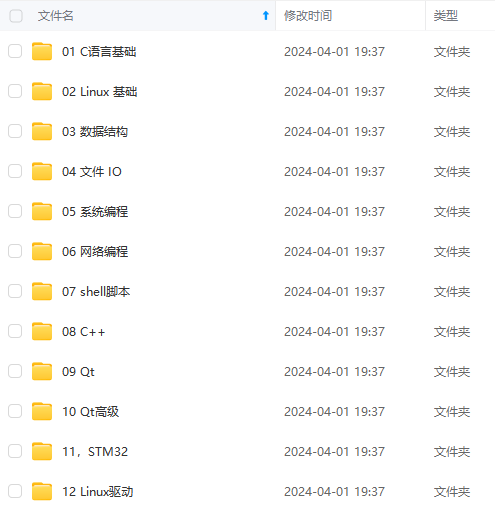
**由于文件比较多,这里只是将部分目录截图出来,全套包含大厂面经、学习笔记、源码讲义、实战项目、大纲路线、电子书籍、讲解视频,并且后续会持续更新**
**[如果你需要这些资料,可以戳这里获取](https://bbs.csdn.net/topics/618679757)**
_10,text_aHR0cHM6Ly9ibG9nLmNzZG4ubmV0L2t3YW1lMjEx,size_16,color_FFFFFF,t_70)
<HeroTable
:allowSelect=“true”
:data=“tableData”
:columns=“columns”
[外链图片转存中…(img-Ro2ONcGm-1715627468867)]
[外链图片转存中…(img-5vlfSjgW-1715627468868)]
既有适合小白学习的零基础资料,也有适合3年以上经验的小伙伴深入学习提升的进阶课程,涵盖了95%以上物联网嵌入式知识点,真正体系化!
由于文件比较多,这里只是将部分目录截图出来,全套包含大厂面经、学习笔记、源码讲义、实战项目、大纲路线、电子书籍、讲解视频,并且后续会持续更新


 1762
1762


 被折叠的 条评论
为什么被折叠?
被折叠的 条评论
为什么被折叠?
 到【灌水乐园】发言


