


如何实现
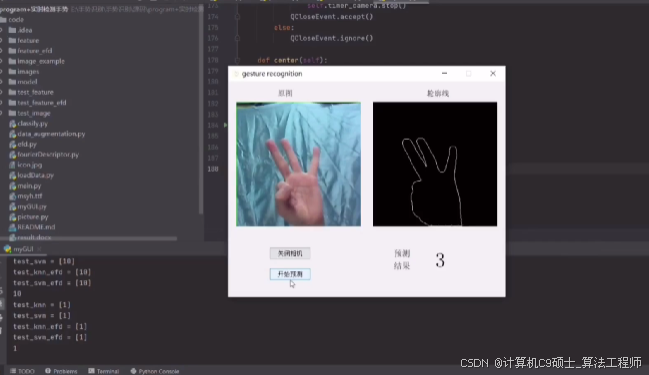
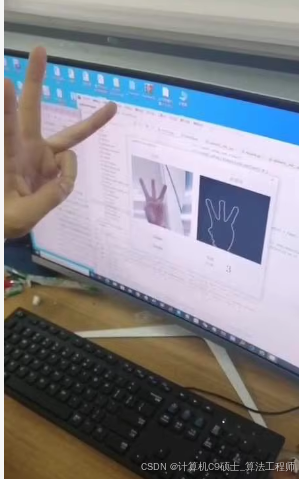
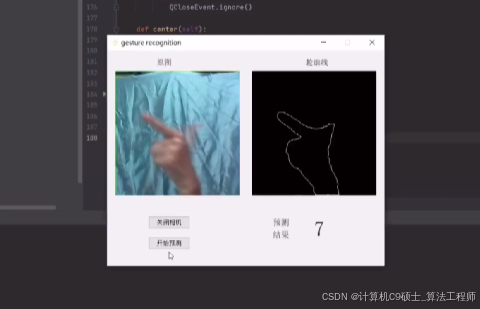
基于+python+opencv的手势识别系统。基于 win10+Python3.7的环境,利用Python的OpenCV、Sklearn和PyQt5等库搭建了一个较为完整的手势识别系统,用于识别日常生活中1-10的静态手势。
以下文字及代码仅供参考。
要实现一个基于Python和OpenCV的手势识别系统,我们可以按照以下步骤进行:
- 环境搭建:确保安装了Python 3.7、OpenCV、Scikit-learn(Sklearn)和PyQt5。
- 数据预处理:包括肤色识别、图像锐化等。
- 特征提取:从手势图像中提取特征。
- 模型训练:使用SVM模型进行训练。
- 界面设计:使用PyQt5设计用户界面。
步骤详解
1. 环境搭建
确保安装了必要的库:
pip install opencv-python-headless
pip install scikit-learn
pip install PyQt5
2. 数据预处理
- 肤色识别:使用HSV颜色空间来识别手部区域。
- 图像锐化:使用高斯模糊和拉普拉斯算子进行图像锐化。
3. 特征提取
可以使用HOG(Histogram of Oriented Gradients)特征或简单的像素值作为特征。
4. 模型训练
使用SVM模型进行训练。
5. 界面设计
使用PyQt5设计用户界面,显示实时手势识别结果。
示例代码
下面是一个简化的示例代码,展示了如何实现上述功能:
import cv2
import numpy as np
from sklearn import svm
from PyQt5.QtWidgets import QApplication, QMainWindow, QLabel, QVBoxLayout, QWidget
from PyQt5.QtGui import QImage, QPixmap
from PyQt5.QtCore import QTimer

# 数据预处理函数
def preprocess_image(frame):
    # 转换为HSV颜色空间
    hsv = cv2.cvtColor(frame, cv2.COLOR_BGR2HSV)

    # 定义肤色范围
    lower_skin = np.array([0, 20, 70], dtype=np.uint8)
    upper_skin = np.array([20, 255, 255], dtype=np.uint8)

    # 提取肤色区域
    mask = cv2.inRange(hsv, lower_skin, upper_skin)
    skin = cv2.bitwise_and(frame, frame, mask=mask)

    # 图像锐化
    blurred = cv2.GaussianBlur(skin, (5, 5), 0)
    sharpened = cv2.addWeighted(skin, 1.5, blurred, -0.5, 0)

    return sharpened

# 特征提取函数
def extract_features(image):
    # 使用HOG特征
    hog = cv2.HOGDescriptor()
    features = hog.compute(image)
    return features.flatten()

# SVM模型训练
def train_svm(features, labels):
    model = svm.SVC()
    model.fit(features, labels)
    return model

# 主窗口类
class GestureRecognitionWindow(QMainWindow):
    def __init__(self):
        super().__init__()

        self.setWindowTitle("Gesture Recognition")
        self.setGeometry(100, 100, 640, 480)

        self.label = QLabel(self)
        self.label.setGeometry(10, 10, 620, 460)

        self.timer = QTimer(self)
        self.timer.timeout.connect(self.update_frame)
        self.timer.start(30)  # 更新频率

        # 加载模型
        self.model = train_svm(features, labels)

    def update_frame(self):
        # 获取摄像头帧
        ret, frame = cap.read()
        if not ret:
            return

        # 预处理图像
        processed_frame = preprocess_image(frame)

        # 提取特征
        features = extract_features(processed_frame)

        # 预测手势
        prediction = self.model.predict([features])

        # 显示预测结果
        self.label.setText(f"Prediction: {prediction[0]}")

        # 显示图像
        height, width, channel = processed_frame.shape
        bytes_per_line = 3 * width
        q_img = QImage(processed_frame.data, width, height, bytes_per_line, QImage.Format_RGB888).rgbSwapped()
        self.label.setPixmap(QPixmap.fromImage(q_img))

if __name__ == "__main__":
    app = QApplication([])
    window = GestureRecognitionWindow()
    window.show()
    app.exec_()
由于我无法直接访问上传的图片或文件,下面我将提供一个完整的基于Python、OpenCV、Scikit-learn和PyQt5的手势识别系统的简化示例代码。这个系统包括了肤色检测、图像锐化处理、特征提取(这里以轮廓面积作为简单示例)、SVM模型训练以及使用PyQt5构建用户界面。
请注意,实际应用中可能需要更复杂的特征提取方法(如HOG特征)和更大的数据集来训练模型,以获得更好的性能。以下代码仅供参考:
安装必要的库
首先,请确保安装了必要的Python库:
pip install opencv-python-headless scikit-learn PyQt5
示例代码
1. 数据预处理与SVM模型训练
我们先定义一些基本的函数用于数据预处理和SVM模型训练。
import cv2
import numpy as np
from sklearn import svm
from sklearn.model_selection import train_test_split
from sklearn.metrics import accuracy_score

# 肤色检测函数
def skin_detection(image):
    # 转换到HSV颜色空间
    hsv = cv2.cvtColor(image, cv2.COLOR_BGR2HSV)
    lower_skin = np.array([0, 20, 70], dtype=np.uint8)
    upper_skin = np.array([20, 255, 255], dtype=np.uint8)
    mask = cv2.inRange(hsv, lower_skin, upper_skin)
    return cv2.bitwise_and(image, image, mask=mask)

# 图像锐化函数
def sharpen_image(image):
    kernel = np.array([[0, -1, 0],
                       [-1, 5,-1],
                       [0, -1, 0]])
    return cv2.filter2D(image, -1, kernel)

# 特征提取:这里简化为计算轮廓面积
def extract_features(image):
    gray = cv2.cvtColor(image, cv2.COLOR_BGR2GRAY)
    _, contours, _ = cv2.findContours(gray, cv2.RETR_TREE, cv2.CHAIN_APPROX_SIMPLE)
    if contours:
        max_contour = max(contours, key=cv2.contourArea)
        return cv2.contourArea(max_contour)
    else:
        return 0

# SVM模型训练
def train_svm(features, labels):
    model = svm.SVC()
    model.fit(features.reshape(-1, 1), labels)
    return model
2. 使用PyQt5创建用户界面并集成手势识别功能
from PyQt5.QtWidgets import QApplication, QMainWindow, QLabel, QVBoxLayout, QWidget
from PyQt5.QtGui import QImage, QPixmap
from PyQt5.QtCore import QTimer
import sys

class GestureRecognitionApp(QMainWindow):
    def __init__(self):
        super().__init__()
        self.setWindowTitle("Gesture Recognition")
        self.setGeometry(100, 100, 640, 480)

        self.image_label = QLabel(self)
        layout = QVBoxLayout()
        layout.addWidget(self.image_label)
        container = QWidget()
        container.setLayout(layout)
        self.setCentralWidget(container)

        self.cap = cv2.VideoCapture(0)
        self.timer = QTimer()
        self.timer.timeout.connect(self.update_frame)
        self.timer.start(30)

        # 假设已经准备好了features和labels,并训练了model
        self.model = None  # 需要预先训练好的模型

    def update_frame(self):
        ret, frame = self.cap.read()
        if not ret:
            return

        processed_frame = self.preprocess_frame(frame)
        feature = extract_features(processed_frame)
        prediction = self.model.predict([[feature]])[0]

        self.display_image(processed_frame)
        print(f"Prediction: {prediction}")

    def preprocess_frame(self, frame):
        skin = skin_detection(frame)
        sharpened = sharpen_image(skin)
        return sharpened

    def display_image(self, img):
        rgb_img = cv2.cvtColor(img, cv2.COLOR_BGR2RGB)
        h, w, ch = rgb_img.shape
        bytes_per_line = ch * w
        convert_to_Qt_format = QImage(rgb_img.data, w, h, bytes_per_line, QImage.Format_RGB888)
        p = convert_to_Qt_format.scaled(640, 480, Qt.KeepAspectRatio)
        self.image_label.setPixmap(QPixmap.fromImage(p))

if __name__ == "__main__":
    app = QApplication(sys.argv)
    window = GestureRecognitionApp()
    window.show()
    sys.exit(app.exec_())
注意:上述代码是一个简化的示例,旨在展示如何将这些组件组合在一起。在实际开发中,您需要根据您的具体需求调整参数、增加异常处理逻辑、优化特征提取算法等。此外,为了训练SVM模型,您需要准备适当的数据集,并使用train_svm函数进行模型训练。在运行GUI之前,确保您的模型已经训练完成,并且可以正确加载到GestureRecognitionApp类中。


 被折叠的 条评论
为什么被折叠?
被折叠的 条评论
为什么被折叠?
 到【灌水乐园】发言


