


深度学习如何建立行人入侵检测识别并预警提示 区域行人入侵识别报警检测 基于yolov5-v11和deepsort的行人入侵检测系统
文章目录
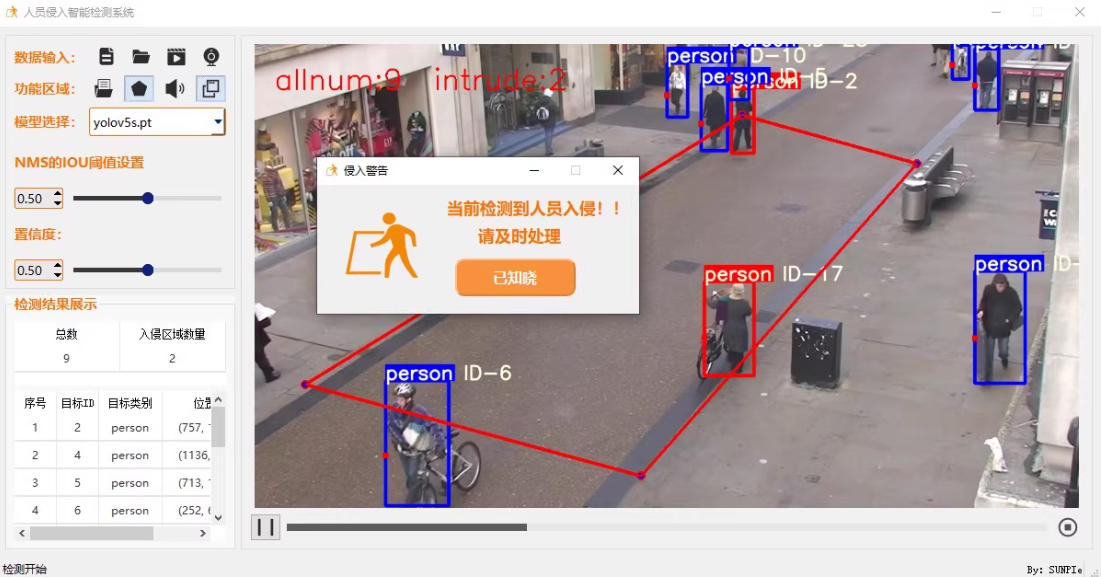
基于yolov5-v11和deepsort的行人入侵检测系统
本项目GUI部分使用pyqt5制作,包括数据库、多线程、自定义组件等知识 学习深度学习和pyqt5时
预实现功能目标如下:
1.系统带注册登录功能
2.输入数据格式:图片、文件夹、视频以及支持摄像头的实时检测,并自动保存最终检测结果。
3.支持自定义绘制禁行区域
4.支持语音、弹窗、截图三种报警方式
5.支持交并比和置信度的动态调节
6.支持rtsp流检测
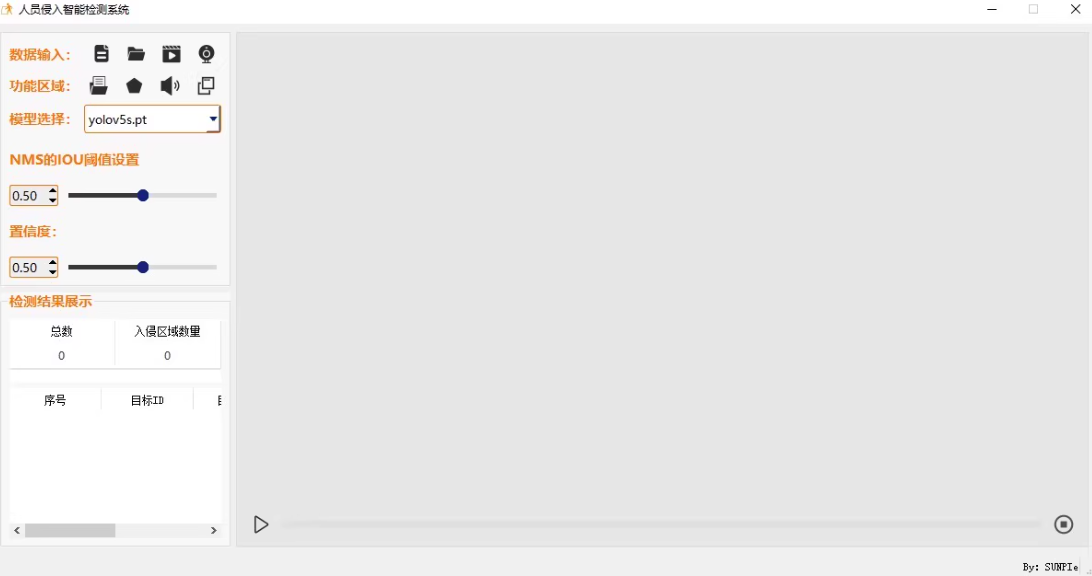
基于YOLOv5-v11和DeepSORT的行人入侵检测系统,结合PyQt5制作GUI界面,并包含注册登录、自定义禁行区域、多种报警方式等功能,
代码示例,仅供参考。
基于YOLOv5-v11和DeepSORT的行人入侵检测系统在Windows环境下的完整配置,以下是详细的步骤和代码示例。从安装必要的软件开始,逐步进行到模型训练和推理。
仅供参考。同学们
Step 1: 安装 PyCharm + Miniconda
安装Miniconda
- 访问Miniconda官网:https://docs.conda.io/en/latest/miniconda.html
- 下载适合你操作系统的Miniconda安装包(推荐使用Python 3.8版本)。
- 运行安装程序并按照提示进行安装。
安装PyCharm
- 访问JetBrains官网:https://www.jetbrains.com/pycharm/download/
- 下载社区版或专业版的PyCharm安装包。
- 运行安装程序并按照提示进行安装。
配置PyCharm使用Conda环境
- 打开PyCharm,选择“File” -> “Settings” -> “Project: [你的项目名称]” -> “Python Interpreter”。
- 点击齿轮图标,选择“Add” -> “Conda Environment”。
- 选择现有的Conda环境或创建新的环境。
Step 2: 安装CUDA以及配置PyTorch的环境
检查CUDA版本
打开命令提示符,输入以下命令检查CUDA版本:
nvcc --version
下载CUDA和cuDNN
访问NVIDIA官网下载对应版本的CUDA和cuDNN:
- CUDA下载地址:https://developer.nvidia.com/cuda-downloads
- cuDNN下载地址:https://developer.nvidia.com/rdp/cudnn-archive
安装PyTorch
根据你的CUDA版本选择合适的PyTorch版本进行安装。例如,如果你的CUDA版本是11.3,可以使用以下命令安装PyTorch:
pip install torch torchvision torchaudio --extra-index-url https://download.pytorch.org/whl/cu113
Step 3: 克隆YOLOv5和DeepSORT仓库
克隆YOLOv5仓库
git clone https://github.com/ultralytics/yolov5.git
cd yolov5
pip install -r requirements.txt
克隆DeepSORT仓库
git clone https://github.com/nwojke/deep_sort.git
cd deep_sort
pip install -r requirements.txt
Step 4: 数据准备和格式转换
数据格式转换
假设你的数据集是COCO格式,需要将其转换为YOLO格式:
import os
import json

def convert_coco_to_yolo(coco_file, output_dir):
    with open(coco_file) as f:
        data = json.load(f)

    for img in data['images']:
        img_id = img['id']
        img_width = img['width']
        img_height = img['height']
        img_filename = img['file_name']

        txt_filename = os.path.splitext(img_filename)[0] + '.txt'
        txt_path = os.path.join(output_dir, txt_filename)

        with open(txt_path, 'w') as f:
            for ann in data['annotations']:
                if ann['image_id'] == img_id:
                    bbox_2d = ann['bbox']
                    x_min, y_min, w, h = bbox_2d
                    x_center = (x_min + w / 2) / img_width
                    y_center = (y_min + h / 2) / img_height
                    width = w / img_width
                    height = h / img_height

                    class_id = ann['category_id'] - 1  # Assuming category IDs start from 1
                    f.write(f"{class_id} {x_center} {y_center} {width} {height}\n")

# Example usage
convert_coco_to_yolo('path/to/coco.json', 'path/to/output')
Step 5: 模型训练
配置文件
创建data.yaml配置文件:
train: ./dataset/train/images
val: ./dataset/val/images
test: ./dataset/test/images

nc: 1  # Number of classes
names: ['person']
训练模型
cd yolov5
python train.py --img 640 --batch 16 --epochs 100 --data ../data.yaml --weights yolov5s.pt --cache
Step 6: 模型推理
推理代码
import cv2
import torch
from models.experimental import attempt_load
from utils.datasets import LoadStreams, LoadImages
from utils.general import non_max_suppression, scale_coords
from utils.torch_utils import select_device, time_synchronized

def detect(source='path/to/video.mp4'):
    device = select_device('')
    model = attempt_load('runs/train/exp/weights/best.pt', map_location=device)
    stride = int(model.stride.max())
    dataset = LoadStreams(source, img_size=640, stride=stride)

    for path, img, im0s, vid_cap in dataset:
        img = torch.from_numpy(img).to(device)
        img = img.float() / 255.0
        if img.ndimension() == 3:
            img = img.unsqueeze(0)

        pred = model(img, augment=False)[0]
        pred = non_max_suppression(pred, 0.25, 0.45, classes=None, agnostic=False)

        for i, det in enumerate(pred):
            p, s, im0 = path[i], '%g: ' % i, im0s[i].copy()
            s += '%gx%g ' % img.shape[2:]

            if len(det):
                det[:, :4] = scale_coords(img.shape[2:], det[:, :4], im0.shape).round()

                for *xyxy, conf, cls in reversed(det):
                    label = f'{model.names[int(cls)]} {conf:.2f}'
                    plot_one_box(xyxy, im0, label=label, color=(0, 255, 0), line_thickness=3)

            cv2.imshow(p, im0)
            if cv2.waitKey(1) == ord('q'):
                break

detect()
Step 7: GUI开发
使用PyQt5创建界面
import sys
from PyQt5.QtWidgets import QApplication, QMainWindow, QPushButton, QVBoxLayout, QWidget, QLabel, QFileDialog, QTextEdit
from PyQt5.QtGui import QImage, QPixmap
import cv2

class IntrusionDetectionApp(QMainWindow):
    def __init__(self):
        super().__init__()
        self.setWindowTitle("人员入侵智能检测系统")
        self.setGeometry(100, 100, 800, 600)

        self.initUI()

    def initUI(self):
        layout = QVBoxLayout()

        self.image_label = QLabel(self)
        layout.addWidget(self.image_label)

        self.create_button("选择图片", self.select_image)
        self.create_button("选择视频", self.select_video)
        self.create_button("打开摄像头", self.open_camera)
        self.create_button("开始检测", self.start_detection)
        self.create_button("暂停检测", self.pause_detection)
        self.create_button("结束检测", self.stop_detection)

        self.log_text = QTextEdit(self)
        layout.addWidget(self.log_text)

        container = QWidget()
        container.setLayout(layout)
        self.setCentralWidget(container)

    def create_button(self, text, command):
        button = QPushButton(text, self)
        button.clicked.connect(command)
        return button

    def select_image(self):
        file_path, _ = QFileDialog.getOpenFileName(self, "选择图片", "", "Image Files (*.jpg *.png)")
        if file_path:
            self.image_path = file_path
            self.show_image(file_path)

    def show_image(self, image_path):
        image = QImage(image_path)
        pixmap = QPixmap.fromImage(image)
        self.image_label.setPixmap(pixmap)

    def select_video(self):
        file_path, _ = QFileDialog.getOpenFileName(self, "选择视频", "", "Video Files (*.mp4 *.avi)")
        if file_path:
            self.video_path = file_path

    def open_camera(self):
        self.cap = cv2.VideoCapture(0)

    def start_detection(self):
        if hasattr(self, 'image_path'):
            self.infer_image(self.image_path)
        elif hasattr(self, 'video_path'):
            self.infer_video(self.video_path)
        elif self.cap is not None:
            self.running = True
            self.detect_from_camera()

    def pause_detection(self):
        self.running = False

    def stop_detection(self):
        self.running = False
        if self.cap is not None:
            self.cap.release()
            self.cap = None

    def infer_image(self, image_path):
        # Add your inference code here
        pass

    def infer_video(self, video_path):
        # Add your inference code here
        pass

    def detect_from_camera(self):
        if self.running and self.cap is not None:
            ret, frame = self.cap.read()
            if ret:
                # Add your inference code here
                pass

            self.update()
            self.root.after(10, self.detect_from_camera)

if __name__ == "__main__":
    app = QApplication(sys.argv)
    window = IntrusionDetectionApp()
    window.show()
    sys.exit(app.exec_())
这个项目涵盖了从环境搭建到模型训练、推理以及GUI开发的全过程,适合大学生和研究生作为学习和实践的项目。
环境搭建
1. 安装Anaconda
访问官网 https://www.anaconda.com/download 下载并安装Anaconda。
2. 创建运行环境
conda create -n yolo5 python==3.8
conda activate yolo5
3. 安装必要的库
pip install torch torchvision torchaudio --extra-index-url https://download.pytorch.org/whl/cu113
pip install opencv-python-headless==4.5.5.64
pip install numpy==1.19.3
pip install matplotlib==3.3.4
pip install pandas==1.1.5
pip install seaborn==0.11.0
pip install scikit-learn==0.24.1
pip install tqdm==4.62.3
pip install pyyaml==5.4.1
pip install scipy==1.7.3
pip install pillow==8.2.0
pip install PySide2==5.15.2
pip install PyQt5==5.15.4
pip install PyQt5-sip==12.9.0
pip install PyQtWebEngine==5.15.4
pip install deepsort-realtime
数据准备
1. 数据格式转换
假设你的数据集是COCO格式,需要将其转换为YOLO格式:
import os
import json

def convert_coco_to_yolo(coco_file, output_dir):
    with open(coco_file) as f:
        data = json.load(f)

    for img in data['images']:
        img_id = img['id']
        img_width = img['width']
        img_height = img['height']
        img_filename = img['file_name']

        txt_filename = os.path.splitext(img_filename)[0] + '.txt'
        txt_path = os.path.join(output_dir, txt_filename)

        with open(txt_path, 'w') as f:
            for ann in data['annotations']:
                if ann['image_id'] == img_id:
                    bbox_2d = ann['bbox']
                    x_min, y_min, w, h = bbox_2d
                    x_center = (x_min + w / 2) / img_width
                    y_center = (y_min + h / 2) / img_height
                    width = w / img_width
                    height = h / img_height

                    class_id = ann['category_id'] - 1  # Assuming category IDs start from 1
                    f.write(f"{class_id} {x_center} {y_center} {width} {height}\n")

# Example usage
convert_coco_to_yolo('path/to/coco.json', 'path/to/output')
2. 数据划分
将数据集划分为训练集、验证集和测试集:
mkdir -p dataset/train/images dataset/train/labels dataset/val/images dataset/val/labels dataset/test/images dataset/test/labels

# Move files accordingly
mv path/to/train/images/* dataset/train/images/
mv path/to/train/labels/* dataset/train/labels/
mv path/to/val/images/* dataset/val/images/
mv path/to/val/labels/* dataset/val/labels/
mv path/to/test/images/* dataset/test/images/
mv path/to/test/labels/* dataset/test/labels/
模型训练
1. 配置文件
创建data.yaml配置文件:
train: ./dataset/train/images
val: ./dataset/val/images
test: ./dataset/test/images

nc: 1  # Number of classes
names: ['person']
2. 训练模型
cd yolov5
python train.py --img 640 --batch 16 --epochs 100 --data ../data.yaml --weights yolov5s.pt --cache
模型推理
1. 推理代码
import cv2
import torch
from models.experimental import attempt_load
from utils.datasets import LoadStreams, LoadImages
from utils.general import non_max_suppression, scale_coords
from utils.torch_utils import select_device, time_synchronized

def detect(source='path/to/video.mp4'):
    device = select_device('')
    model = attempt_load('runs/train/exp/weights/best.pt', map_location=device)
    stride = int(model.stride.max())
    dataset = LoadStreams(source, img_size=640, stride=stride)

    for path, img, im0s, vid_cap in dataset:
        img = torch.from_numpy(img).to(device)
        img = img.float() / 255.0
        if img.ndimension() == 3:
            img = img.unsqueeze(0)

        pred = model(img, augment=False)[0]
        pred = non_max_suppression(pred, 0.25, 0.45, classes=None, agnostic=False)

        for i, det in enumerate(pred):
            p, s, im0 = path[i], '%g: ' % i, im0s[i].copy()
            s += '%gx%g ' % img.shape[2:]

            if len(det):
                det[:, :4] = scale_coords(img.shape[2:], det[:, :4], im0.shape).round()

                for *xyxy, conf, cls in reversed(det):
                    label = f'{model.names[int(cls)]} {conf:.2f}'
                    plot_one_box(xyxy, im0, label=label, color=(0, 255, 0), line_thickness=3)

            cv2.imshow(p, im0)
            if cv2.waitKey(1) == ord('q'):
                break

detect()
GUI开发
1. 使用PyQt5创建界面
import sys
from PyQt5.QtWidgets import QApplication, QMainWindow, QPushButton, QVBoxLayout, QWidget, QLabel, QFileDialog, QTextEdit
from PyQt5.QtGui import QImage, QPixmap
import cv2

class IntrusionDetectionApp(QMainWindow):
    def __init__(self):
        super().__init__()
        self.setWindowTitle("人员入侵智能检测系统")
        self.setGeometry(100, 100, 800, 600)

        self.initUI()

    def initUI(self):
        layout = QVBoxLayout()

        self.image_label = QLabel(self)
        layout.addWidget(self.image_label)

        self.create_button("选择图片", self.select_image)
        self.create_button("选择视频", self.select_video)
        self.create_button("打开摄像头", self.open_camera)
        self.create_button("开始检测", self.start_detection)
        self.create_button("暂停检测", self.pause_detection)
        self.create_button("结束检测", self.stop_detection)

        self.log_text = QTextEdit(self)
        layout.addWidget(self.log_text)

        container = QWidget()
        container.setLayout(layout)
        self.setCentralWidget(container)

    def create_button(self, text, command):
        button = QPushButton(text, self)
        button.clicked.connect(command)
        return button

    def select_image(self):
        file_path, _ = QFileDialog.getOpenFileName(self, "选择图片", "", "Image Files (*.jpg *.png)")
        if file_path:
            self.image_path = file_path
            self.show_image(file_path)

    def show_image(self, image_path):
        image = QImage(image_path)
        pixmap = QPixmap.fromImage(image)
        self.image_label.setPixmap(pixmap)

    def select_video(self):
        file_path, _ = QFileDialog.getOpenFileName(self, "选择视频", "", "Video Files (*.mp4 *.avi)")
        if file_path:
            self.video_path = file_path

    def open_camera(self):
        self.cap = cv2.VideoCapture(0)

    def start_detection(self):
        if hasattr(self, 'image_path'):
            self.infer_image(self.image_path)
        elif hasattr(self, 'video_path'):
            self.infer_video(self.video_path)
        elif self.cap is not None:
            self.running = True
            self.detect_from_camera()

    def pause_detection(self):
        self.running = False

    def stop_detection(self):
        self.running = False
        if self.cap is not None:
            self.cap.release()
            self.cap = None

    def infer_image(self, image_path):
        # Add your inference code here
        pass

    def infer_video(self, video_path):
        # Add your inference code here
        pass

    def detect_from_camera(self):
        if self.running and self.cap is not None:
            ret, frame = self.cap.read()
            if ret:
                # Add your inference code here
                pass

            self.update()
            self.root.after(10, self.detect_from_camera)

if __name__ == "__main__":
    app = QApplication(sys.argv)
    window = IntrusionDetectionApp()
    window.show()
    sys.exit(app.exec_())
这个项目涵盖了从环境搭建到模型训练、推理以及GUI开发的全过程,


 被折叠的 条评论
为什么被折叠?
被折叠的 条评论
为什么被折叠?
 到【灌水乐园】发言


