


前言:
本文章主要讲解了STM32串口USART的使用及代码编写,实现了STM32单片机与电脑端的串口发送与接收。
USART基本结构
可以根据USART的基本结构来编写程序
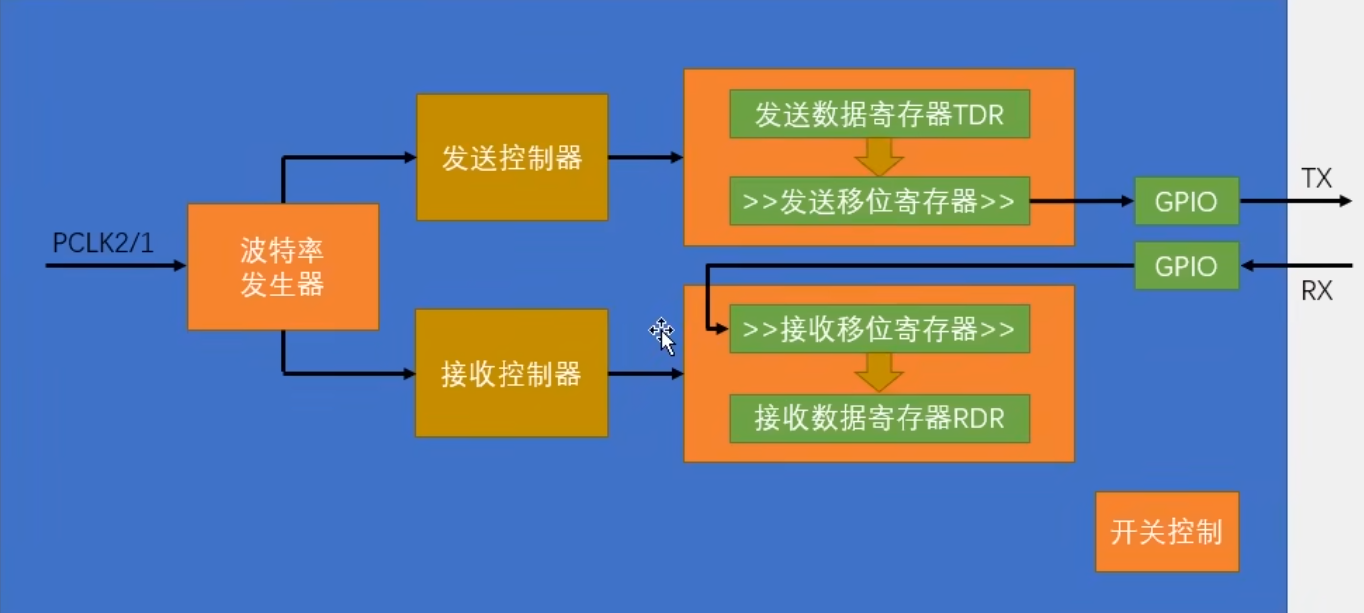
USART初始化大体流程:
1、开启时钟,把需要的USART和GPIO的时钟打开
2、GPIO初始化,把TX配置成复用输出,RX配置成输入
3、配置USART(使用一个结构体)
4、如果还需要接收的功能,还需要配置中断
5、使能USART
usart.h库函数介绍
主要介绍一些新的库函数
这两个函数用来配置同步时钟输出(包括时钟是否要输出,时钟的极性相位等参数)
void USART_ClockInit(USART_TypeDef* USARTx, USART_ClockInitTypeDef* USART_ClockInitStruct);
void USART_ClockStructInit(USART_ClockInitTypeDef* USART_ClockInitStruct);
这个可以开启USART到DMA的触发通道
void USART_DMACmd(USART_TypeDef* USARTx, uint16_t USART_DMAReq, FunctionalState NewState);
下面这些,设置地址、唤醒、LIN(这些函数,不常用)
void USART_SetAddress(USART_TypeDef* USARTx, uint8_t USART_Address);
void USART_WakeUpConfig(USART_TypeDef* USARTx, uint16_t USART_WakeUp);
void USART_ReceiverWakeUpCmd(USART_TypeDef* USARTx, FunctionalState NewState);
void USART_LINBreakDetectLengthConfig(USART_TypeDef* USARTx, uint16_t USART_LINBreakDetectLength);
void USART_LINCmd(USART_TypeDef* USARTx, FunctionalState NewState);发送数据(写DR寄存器)和接收数据(读DR寄存器)(比较重要)
void USART_SendData(USART_TypeDef* USARTx, uint16_t Data);
uint16_t USART_ReceiveData(USART_TypeDef* USARTx);
下面这一些函数,有关智能卡、IrDA(不常用)
void USART_SendBreak(USART_TypeDef* USARTx);
void USART_SetGuardTime(USART_TypeDef* USARTx, uint8_t USART_GuardTime);
void USART_SetPrescaler(USART_TypeDef* USARTx, uint8_t USART_Prescaler);
void USART_SmartCardCmd(USART_TypeDef* USARTx, FunctionalState NewState);
void USART_SmartCardNACKCmd(USART_TypeDef* USARTx, FunctionalState NewState);
void USART_HalfDuplexCmd(USART_TypeDef* USARTx, FunctionalState NewState);
void USART_OverSampling8Cmd(USART_TypeDef* USARTx, FunctionalState NewState);
void USART_OneBitMethodCmd(USART_TypeDef* USARTx, FunctionalState NewState);
void USART_IrDAConfig(USART_TypeDef* USARTx, uint16_t USART_IrDAMode);
void USART_IrDACmd(USART_TypeDef* USARTx, FunctionalState NewState);
最后四个,标志位相关的函数
FlagStatus USART_GetFlagStatus(USART_TypeDef* USARTx, uint16_t USART_FLAG);
void USART_ClearFlag(USART_TypeDef* USARTx, uint16_t USART_FLAG);
ITStatus USART_GetITStatus(USART_TypeDef* USARTx, uint16_t USART_IT);
void USART_ClearITPendingBit(USART_TypeDef* USARTx, uint16_t USART_IT);
初始化串口及串口的发送详细步骤
创建Serial.c
编写USART初始化函数
1、开启时钟,把需要的USART和GPIO的时钟打开
	/*开启时钟*/
	RCC_APB2PeriphClockCmd(RCC_APB2Periph_USART1,ENABLE);
RCC_APB2PeriphClockCmd(RCC_APB2Periph_GPIOA,ENABLE);2、GPIO初始化,把TX配置成复用输出,RX配置成输入
	/*GPIO初始化*/
	/*把PA9配置为复用推挽输出,供USART1的TX使用*/
	GPIO_InitTypeDef GPIO_InitStructure;
	GPIO_InitStructure.GPIO_Mode = GPIO_Mode_AF_PP;    //选择复用推挽输出
	GPIO_InitStructure.GPIO_Pin = GPIO_Pin_9;
	GPIO_InitStructure.GPIO_Speed = GPIO_Speed_50MHz;
	GPIO_Init(GPIOA, &GPIO_InitStructure);
3、初始化配置USART(使用一个结构体)
	/*USART初始化*/
	USART_InitTypeDef USART_InitStructure;
	USART_InitStructure.USART_BaudRate = 9600; //波特率
	USART_InitStructure.USART_HardwareFlowControl = USART_HardwareFlowControl_None; //硬件流控制,不使用
	USART_InitStructure.USART_Mode = USART_Mode_Tx;	//串口模式,发送模式
	USART_InitStructure.USART_Parity = USART_Parity_No;	//校验,不需要校验
	USART_InitStructure.USART_StopBits = USART_StopBits_1;	//停止位,1位
	USART_InitStructure.USART_WordLength = USART_WordLength_8b;		//字长,8位
	USART_Init(USART1,&USART_InitStructure);
4、中断暂时不用
5、使能USART
	/*使能USART*/
	USART_Cmd(USART1,ENABLE);
封装函数
编写发送一个字节数据的函数
调用这个函数,就可以从TX引脚发送一个字节数据
/*发送一个字节函数*/
void Serial_SendByte(uint8_t Byte)
{
	USART_SendData(USART1,Byte);   //向TDR写入数据
	while(USART_GetFlagStatus(USART1,USART_FLAG_TXE) ==  RESET); //等待数据写入移位寄存器
}
注意在头文件中声明一下函数名
然后在主文件main.c中调用
#include "stm32f10x.h"                  // Device header
#include "Delay.h"
#include "OLED.h"
#include "Serial.h"

int main(void)
{
	/*模块初始化*/
	OLED_Init();		//OLED初始化
	Serial_Init();

	Serial_SendByte(0x41);


	while (1)
	{

	}
}
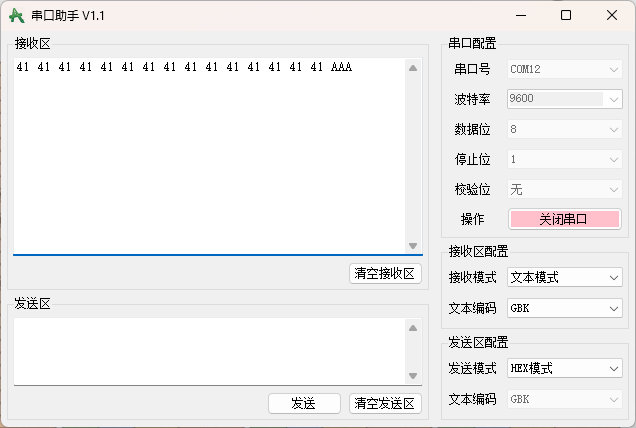
然后在电脑串口助手上就可以收到单片机发出的数据了
编写发送数组数据的函数
比如有一个很大的数组,需要通过串口发送到电脑
封装一个发送数组的函数
/*发送数组函数*/
void Serial_SendArray(uint8_t* Array, uint16_t Length)
{
	uint16_t i;
	for(i = 0;i < Length;i ++)
	{
		Serial_SendByte(Array[i]);
	}
}
编写发送字符串的函数
封装一个发送字符串的
/*发送字符串函数*/
void Serial_SendString(char* String)
{
	uint8_t i;
	for(i = 0;String[i] != '\0';i ++)
	{
		Serial_SendByte(String[i]);
	}
}
编写发送数字字符的函数
封装一个发送数字字符的函数
/*发送数字字符串函数*/
void Serial_SendNumber(uint32_t Number,uint8_t Length)
{
	uint8_t i;
	for(i = 0; i < Length; i ++)
	{
		Serial_SendByte(Number / Serial_Pow(10, Length - i - 1) % 10 + '0');
	}
}
以下介绍使用printf函数的移植方法
先打开MicroLIB精简库

对printf进行重定向(因为printf默认是打印到屏幕,但是现在单片机没有屏幕,所以我们需要对printf进行重定向)
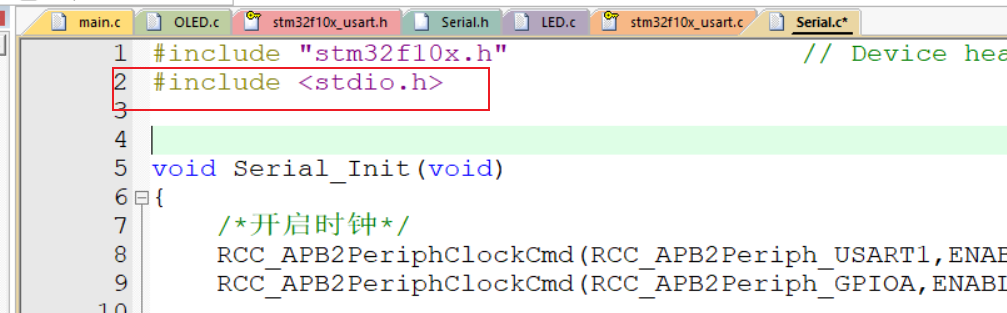
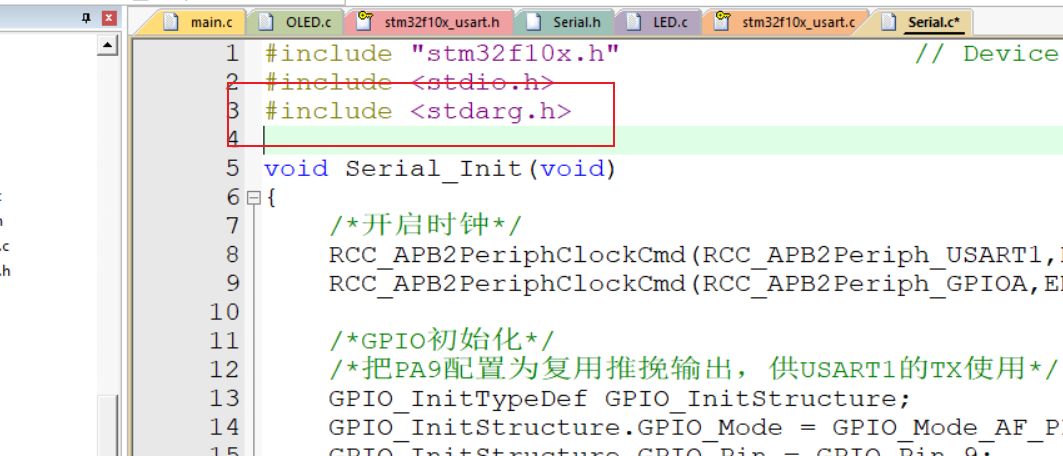
加入头文件引用
重定向printf
/*重定向printf*/
//fputc是printf的底层函数
int fputc(int ch,FILE *f)
{
	Serial_SendByte(ch);
	return ch;
}
sprintf格式化字符串
	char String[100];
	sprintf(String,"Num=%d\r\n", 666);
	Serial_SendString(String);
封装sprintf函数
/*封装sprintf函数*/
void Serial_Printf(char *format,...)
{
	char String[100];
	va_list arg;
	va_start(arg,format);
	vsprintf(String,format,arg);
	va_end(arg);
	Serial_SendString(String);
}
怎么解决串口打印中文不乱码的情况
第一种方法:
在UTF-8编码环境下
打开魔术棒输入以下
--no-multibyte-chars
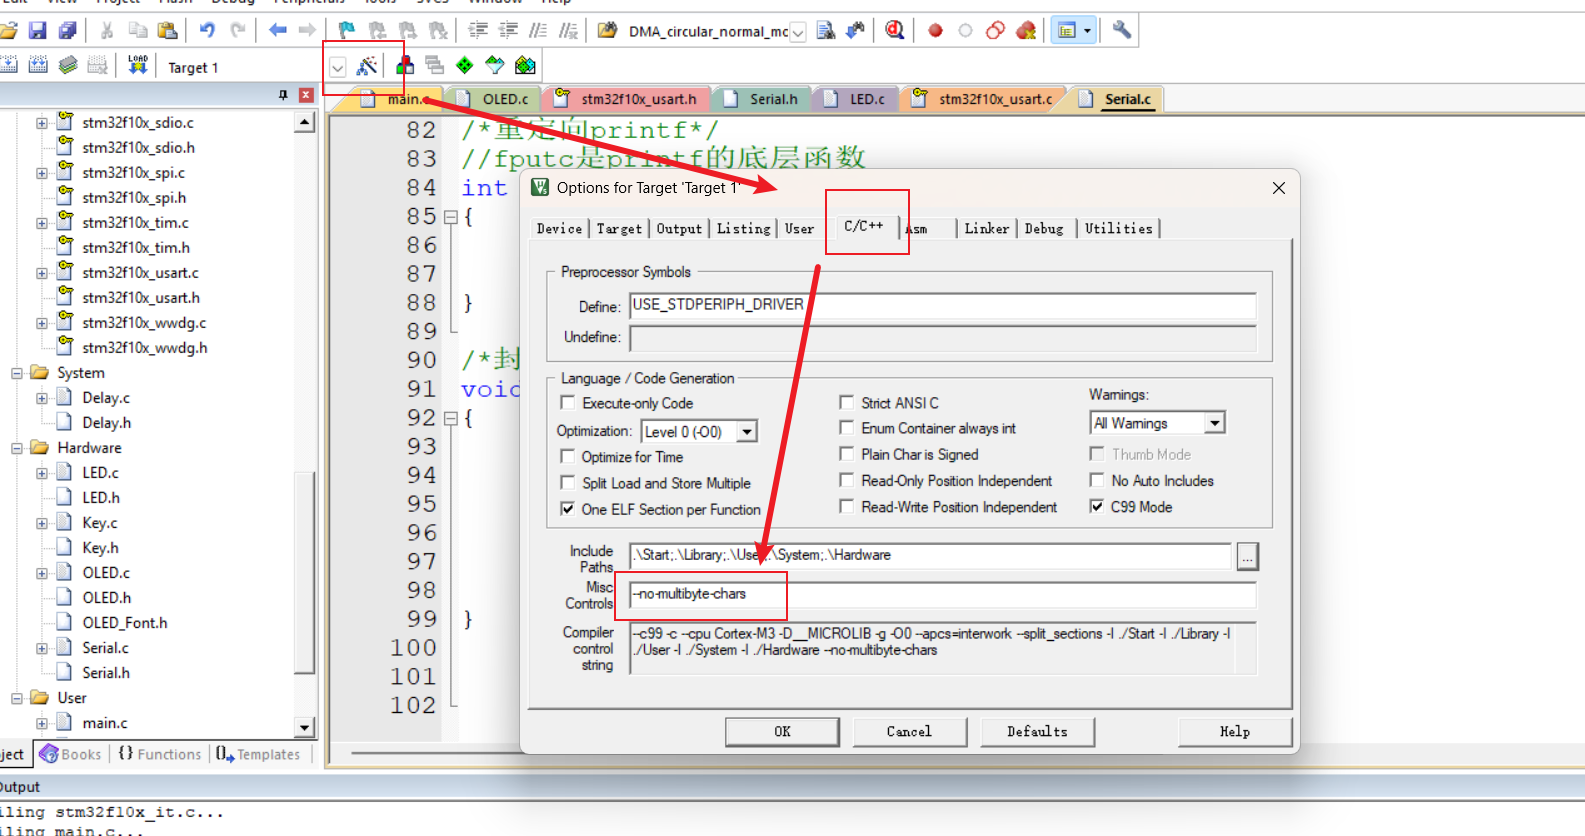
这样子打印就不会乱码
printf("你好,世界");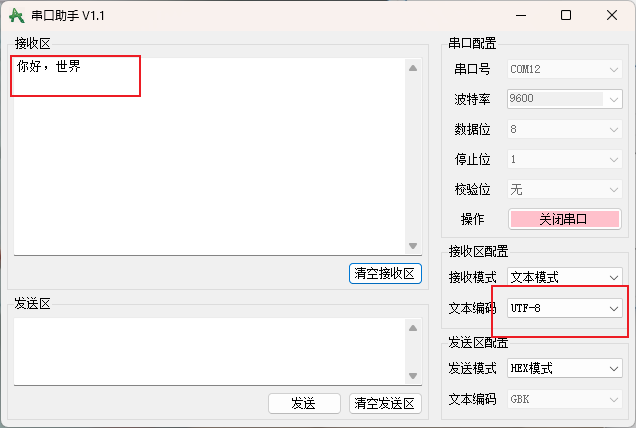
第二种方法:
切换为GB2312编码
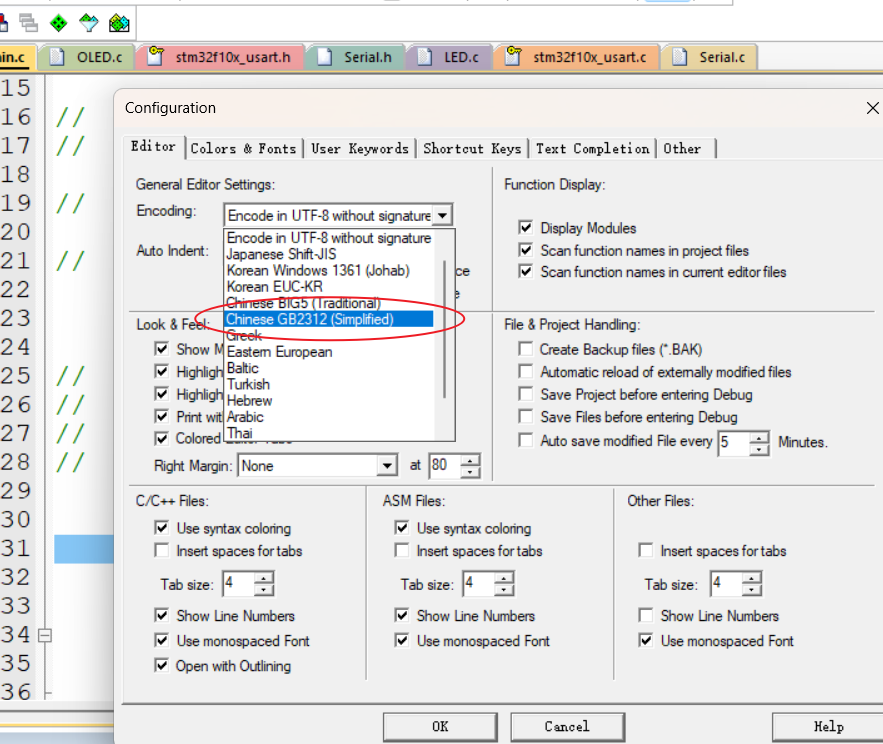
然后关掉文件重新打开就可以了
以上就是串口的发送了
以下讲解如何实现串口的接收
串口的接收详细步骤
对于串口接收来说,可以使用查询和中断两种方法
首先介绍一下查询的方法
1、查询
串口初始化
void Serial_Init(void)
{
	/*开启时钟*/
	RCC_APB2PeriphClockCmd(RCC_APB2Periph_USART1,ENABLE);
	RCC_APB2PeriphClockCmd(RCC_APB2Periph_GPIOA,ENABLE);

	/*GPIO初始化*/
	/*把PA9配置为复用推挽输出,供USART1的TX使用*/
	GPIO_InitTypeDef GPIO_InitStructure;
	GPIO_InitStructure.GPIO_Mode = GPIO_Mode_AF_PP;    //选择复用推挽输出
	GPIO_InitStructure.GPIO_Pin = GPIO_Pin_9;
	GPIO_InitStructure.GPIO_Speed = GPIO_Speed_50MHz;
	GPIO_Init(GPIOA, &GPIO_InitStructure);

	GPIO_InitStructure.GPIO_Mode = GPIO_Mode_IPU;    //选择上拉输入输出
	GPIO_InitStructure.GPIO_Pin = GPIO_Pin_10;
	GPIO_InitStructure.GPIO_Speed = GPIO_Speed_50MHz;
	GPIO_Init(GPIOA, &GPIO_InitStructure);

	/*USART初始化*/
	USART_InitTypeDef USART_InitStructure;
	USART_InitStructure.USART_BaudRate = 9600; //波特率
	USART_InitStructure.USART_HardwareFlowControl = USART_HardwareFlowControl_None; //硬件流控制,不使用
	USART_InitStructure.USART_Mode = USART_Mode_Tx | USART_Mode_Rx;	//串口模式,发送模式和接收模式
	USART_InitStructure.USART_Parity = USART_Parity_No;	//校验,不需要校验
	USART_InitStructure.USART_StopBits = USART_StopBits_1;	//停止位,1位
	USART_InitStructure.USART_WordLength = USART_WordLength_8b;		//字长,8位
	USART_Init(USART1,&USART_InitStructure);

	/*使能USART*/
	USART_Cmd(USART1,ENABLE);

}
#include "stm32f10x.h" // Device header
#include "Delay.h"
#include "OLED.h"
#include "Serial.h"
uint8_t RxData;
int main(void)
{
/*模块初始化*/
OLED_Init(); //OLED初始化
Serial_Init();
while (1)
{
if(USART_GetFlagStatus(USART1,USART_FLAG_RXNE) == SET)
{
RxData = USART_ReceiveData(USART1);
OLED_ShowHexNum(1,1,RxData,2);
}
}
}
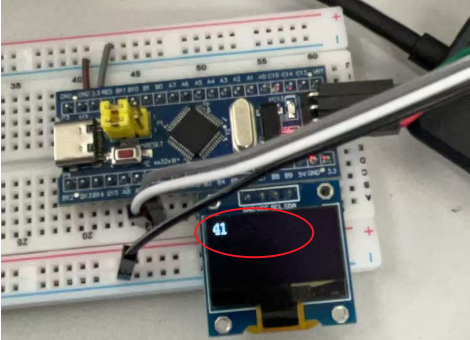
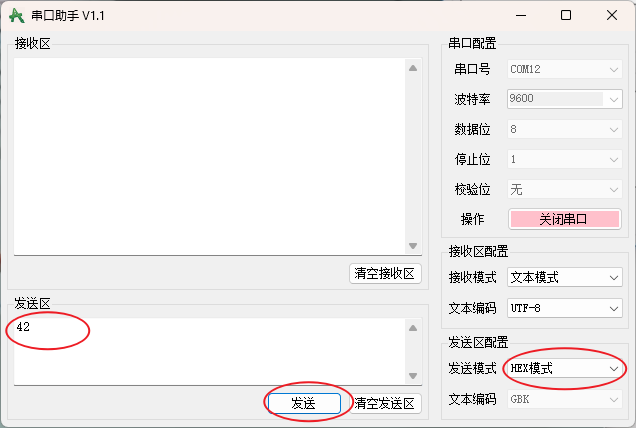
打开串口助手发送数据给单片机
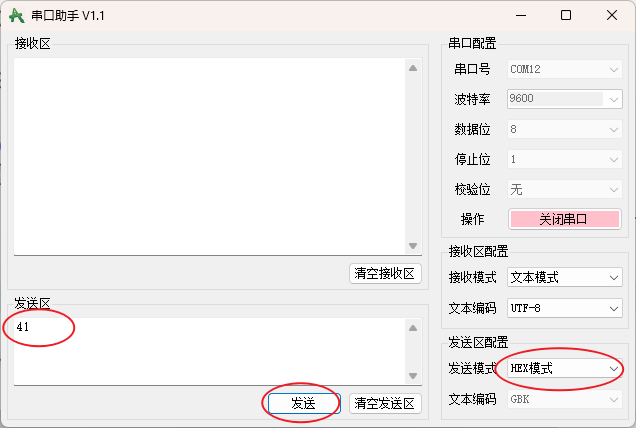
单片机收到数据,显示
2、中断
串口初始化
void Serial_Init(void)
{
	/*开启时钟*/
	RCC_APB2PeriphClockCmd(RCC_APB2Periph_USART1,ENABLE);
	RCC_APB2PeriphClockCmd(RCC_APB2Periph_GPIOA,ENABLE);

	/*GPIO初始化*/
	/*把PA9配置为复用推挽输出,供USART1的TX使用*/
	GPIO_InitTypeDef GPIO_InitStructure;
	GPIO_InitStructure.GPIO_Mode = GPIO_Mode_AF_PP;    //选择复用推挽输出
	GPIO_InitStructure.GPIO_Pin = GPIO_Pin_9;
	GPIO_InitStructure.GPIO_Speed = GPIO_Speed_50MHz;
	GPIO_Init(GPIOA, &GPIO_InitStructure);

	GPIO_InitStructure.GPIO_Mode = GPIO_Mode_IPU;    //选择上拉输入输出
	GPIO_InitStructure.GPIO_Pin = GPIO_Pin_10;
	GPIO_InitStructure.GPIO_Speed = GPIO_Speed_50MHz;
	GPIO_Init(GPIOA, &GPIO_InitStructure);

	/*USART初始化*/
	USART_InitTypeDef USART_InitStructure;
	USART_InitStructure.USART_BaudRate = 9600; //波特率
	USART_InitStructure.USART_HardwareFlowControl = USART_HardwareFlowControl_None; //硬件流控制,不使用
	USART_InitStructure.USART_Mode = USART_Mode_Tx | USART_Mode_Rx;	//串口模式,发送模式和接收模式
	USART_InitStructure.USART_Parity = USART_Parity_No;	//校验,不需要校验
	USART_InitStructure.USART_StopBits = USART_StopBits_1;	//停止位,1位
	USART_InitStructure.USART_WordLength = USART_WordLength_8b;		//字长,8位
	USART_Init(USART1,&USART_InitStructure);

	/*打开中断*/
	USART_ITConfig(USART1, USART_IT_RXNE, ENABLE); // 开启RXNE标志位到NVIC的输出

	/*配置NVIC*/
	NVIC_PriorityGroupConfig(NVIC_PriorityGroup_2);  //分组
	NVIC_InitTypeDef NVIC_InitStructure;
	NVIC_InitStructure.NVIC_IRQChannel = USART1_IRQn;
	NVIC_InitStructure.NVIC_IRQChannelCmd = ENABLE;
	NVIC_InitStructure.NVIC_IRQChannelPreemptionPriority = 1;
	NVIC_InitStructure.NVIC_IRQChannelSubPriority = 1;
	NVIC_Init(&NVIC_InitStructure);

	/*使能USART*/
	USART_Cmd(USART1,ENABLE);

}
编写中断函数
/*串口接收中断函数*/
void USART1_IRQHandler(void)
{
	if(USART_GetITStatus(USART1,USART_IT_RXNE) == SET)
	{
		Serial_RxData = USART_ReceiveData(USART1);
		Serial_RxFlag = 1;
		USART_ClearITPendingBit(USART1,USART_IT_RXNE);
	}

}
封装两个函数:用来转存
uint8_t Serial_RxData;
uint8_t Serial_RxFlag;

uint8_t Serial_GetRxFlag(void)
{
	if(Serial_RxFlag == 1)
	{
		Serial_RxFlag = 0;
		return 1;
	}
	return 0;
}

uint8_t Serial_GetRxData(void)
{
	return Serial_RxData;
}
主函数调用
#include "stm32f10x.h"                  // Device header
#include "Delay.h"
#include "OLED.h"
#include "Serial.h"

uint8_t RxData;

int main(void)
{
	/*模块初始化*/
	OLED_Init();		//OLED初始化
	Serial_Init();


	while (1)
	{
		if(Serial_GetRxFlag() == 1)
		{
			RxData = Serial_GetRxData();
			OLED_ShowHexNum(1,1,RxData,2);
		}
	}
}
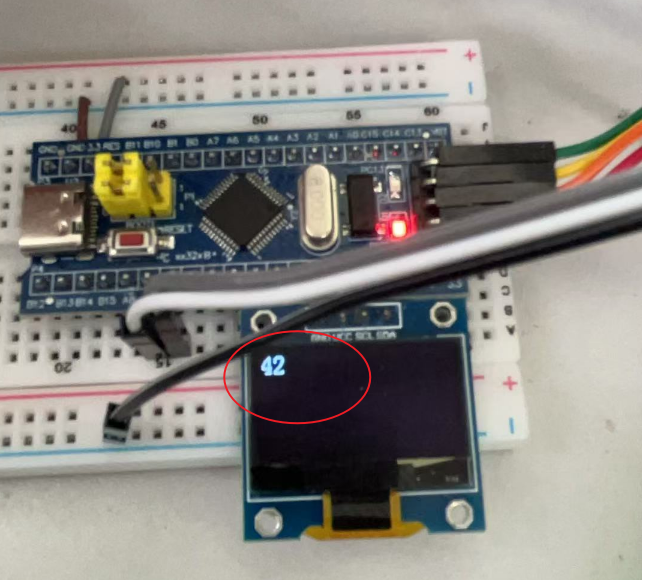
然后在电脑的串口助手发送数据给单片机
这样子单片机就接收到串口发送的数据了
附录(源代码):
Serial.c
#include "stm32f10x.h"                  // Device header
#include <stdio.h>
#include <stdarg.h>

uint8_t Serial_RxData;
uint8_t Serial_RxFlag;

void Serial_Init(void)
{
	/*开启时钟*/
	RCC_APB2PeriphClockCmd(RCC_APB2Periph_USART1,ENABLE);
	RCC_APB2PeriphClockCmd(RCC_APB2Periph_GPIOA,ENABLE);

	/*GPIO初始化*/
	/*把PA9配置为复用推挽输出,供USART1的TX使用*/
	GPIO_InitTypeDef GPIO_InitStructure;
	GPIO_InitStructure.GPIO_Mode = GPIO_Mode_AF_PP;    //选择复用推挽输出
	GPIO_InitStructure.GPIO_Pin = GPIO_Pin_9;
	GPIO_InitStructure.GPIO_Speed = GPIO_Speed_50MHz;
	GPIO_Init(GPIOA, &GPIO_InitStructure);

	GPIO_InitStructure.GPIO_Mode = GPIO_Mode_IPU;    //选择上拉输入输出
	GPIO_InitStructure.GPIO_Pin = GPIO_Pin_10;
	GPIO_InitStructure.GPIO_Speed = GPIO_Speed_50MHz;
	GPIO_Init(GPIOA, &GPIO_InitStructure);

	/*USART初始化*/
	USART_InitTypeDef USART_InitStructure;
	USART_InitStructure.USART_BaudRate = 9600; //波特率
	USART_InitStructure.USART_HardwareFlowControl = USART_HardwareFlowControl_None; //硬件流控制,不使用
	USART_InitStructure.USART_Mode = USART_Mode_Tx | USART_Mode_Rx;	//串口模式,发送模式和接收模式
	USART_InitStructure.USART_Parity = USART_Parity_No;	//校验,不需要校验
	USART_InitStructure.USART_StopBits = USART_StopBits_1;	//停止位,1位
	USART_InitStructure.USART_WordLength = USART_WordLength_8b;		//字长,8位
	USART_Init(USART1,&USART_InitStructure);

	/*打开中断*/
	USART_ITConfig(USART1, USART_IT_RXNE, ENABLE); // 开启RXNE标志位到NVIC的输出

	/*配置NVIC*/
	NVIC_PriorityGroupConfig(NVIC_PriorityGroup_2);  //分组
	NVIC_InitTypeDef NVIC_InitStructure;
	NVIC_InitStructure.NVIC_IRQChannel = USART1_IRQn;
	NVIC_InitStructure.NVIC_IRQChannelCmd = ENABLE;
	NVIC_InitStructure.NVIC_IRQChannelPreemptionPriority = 1;
	NVIC_InitStructure.NVIC_IRQChannelSubPriority = 1;
	NVIC_Init(&NVIC_InitStructure);

	/*使能USART*/
	USART_Cmd(USART1,ENABLE);

}

/*发送一个字节函数*/
void Serial_SendByte(uint8_t Byte)
{
	USART_SendData(USART1,Byte);   //向TDR写入数据
	while(USART_GetFlagStatus(USART1,USART_FLAG_TXE) ==  RESET); //等待数据写入移位寄存器
}

/*发送数组函数*/
void Serial_SendArray(uint8_t* Array, uint16_t Length)
{
	uint16_t i;
	for(i = 0;i < Length;i ++)
	{
		Serial_SendByte(Array[i]);
	}
}

/*发送字符串函数*/
void Serial_SendString(char* String)
{
	uint8_t i;
	for(i = 0;String[i] != '\0';i ++)
	{
		Serial_SendByte(String[i]);
	}
}

/*X的Y次方函数*/
uint32_t Serial_Pow(uint32_t X,uint32_t Y)
{
	uint32_t Result = 1;
	while(Y --)
	{
		Result *= X;
	}
	return Result;
}

/*发送数字字符串函数*/
void Serial_SendNumber(uint32_t Number,uint8_t Length)
{
	uint8_t i;
	for(i = 0; i < Length; i ++)
	{
		Serial_SendByte(Number / Serial_Pow(10, Length - i - 1) % 10 + '0');
	}
}

/*重定向printf*/
//fputc是printf的底层函数
int fputc(int ch,FILE *f)
{
	Serial_SendByte(ch);
	return ch;
}

/*封装sprintf函数*/
void Serial_Printf(char *format,...)
{
	char String[100];
	va_list arg;
	va_start(arg,format);
	vsprintf(String,format,arg);
	va_end(arg);
	Serial_SendString(String);
}

uint8_t Serial_GetRxFlag(void)
{
	if(Serial_RxFlag == 1)
	{
		Serial_RxFlag = 0;
		return 1;
	}
	return 0;
}

uint8_t Serial_GetRxData(void)
{
	return Serial_RxData;
}

/*串口接收中断函数*/
void USART1_IRQHandler(void)
{
	if(USART_GetITStatus(USART1,USART_IT_RXNE) == SET)
	{
		Serial_RxData = USART_ReceiveData(USART1);
		Serial_RxFlag = 1;
		USART_ClearITPendingBit(USART1,USART_IT_RXNE);
	}

}
Serial.h
#ifndef __SERIAL_H
#define	__SERIAL_H

#include <stdio.h>

void Serial_Init(void);

void Serial_SendByte(uint8_t Byte);

void Serial_SendArray(uint8_t* Array, uint16_t Length);

void Serial_SendString(char* String);

void Serial_SendNumber(uint32_t Number,uint8_t Length);

void Serial_Printf(char *format,...);

uint8_t Serial_GetRxFlag(void);

uint8_t Serial_GetRxData(void);


#endif


 4万+
4万+

 被折叠的 条评论
为什么被折叠?
被折叠的 条评论
为什么被折叠?
 到【灌水乐园】发言


