


SLAM14-3讲
一、实践Eigen
1.环境
# 若安装速度慢可以在网络配置中更换软件源,选择最为合适的软件源
sudo apt-get install libeigen3-dev
# 更新
sudo updatedb
# 定位Eigen3库安装位置
locate eigen3
# 定位eigen3库头文件位置
/usr/local/include/eigen3
注: Eigen库只有头文件,因此不需要在Cmake中使用target_link_libraries程序链接至库上
2.代码
#include <iostream>
#include <ctime>
using namespace std;

// Eigen part
#include <Eigen/Core>
//Algebraic operation of dense matrix
#include <Eigen/Dense>

#define MATRIX_SIZE 60

int main(int argc,char* argv[])
{
    // Eigen 中所有向量和矩阵都是Eigen::Matrix,它是一个模板类。它的前三个参数为:数据类型,行,列
    // 声明一个2*3的float矩阵
    Eigen::Matrix<float, 2, 3> matrix_23;

    // 同时,Eigen 通过 typedef 提供了许多内置类型,不过底层仍是Eigen::Matrix
    // 例如 Vector3d 实质上是 Eigen::Matrix<double, 3, 1>,即三维向量
    Eigen::Vector3d v_3d;
    // 这是一样的
    Eigen::Matrix<float,3,1> vd_3d;

    // Matrix3d 实质上是 Eigen::Matrix<double, 3, 3>
    Eigen::Matrix3d matrix_33 = Eigen::Matrix3d::Zero(); //初始化为零
    // 如果不确定矩阵大小,可以使用动态大小的矩阵
    Eigen::Matrix< double, Eigen::Dynamic, Eigen::Dynamic > matrix_dynamic;
    // 更简单的
    Eigen::MatrixXd matrix_x;
    // 这种类型还有很多,我们不一一列举

    // 下面是对Eigen阵的操作
    // 输入数据(初始化)
    matrix_23 << 1, 2, 3, 4, 5, 6;
    // 输出
    cout << matrix_23 << endl;

    // 用()访问矩阵中的元素
    for (int i=0; i<2; i++) {
        for (int j=0; j<3; j++)
            cout<<matrix_23(i,j)<<"\t";
        cout<<endl;
    }

    // 矩阵和向量相乘(实际上仍是矩阵和矩阵)
    v_3d << 3, 2, 1;
    vd_3d << 4,5,6;
    // 但是在Eigen里你不能混合两种不同类型的矩阵(矩阵中元素 的数据类型 不同),像这样是错的
    // Eigen::Matrix<double, 2, 1> result_wrong_type = matrix_23 * v_3d;
    // 应该显式转换
    Eigen::Matrix<double, 2, 1> result = matrix_23.cast<double>() * v_3d;
    cout << result << endl;

    // 随机数矩阵
    matrix_33 = Eigen::Matrix3d::Random();
    cout << matrix_33 << endl;

    cout << matrix_33.transpose() << endl;     // 转置
    cout << matrix_33.sum() << endl;           // 各元素和
    cout << matrix_33.trace() << endl;         // 迹
    cout << 10 * matrix_33 << endl;            // 数乘
    cout << matrix_33.inverse() << endl;       // 逆
    cout << matrix_33.determinant() << endl;   // 行列式

    // 特征求解1
    // 实对称矩阵可以保证对角化成功(实对此矩阵是对角化的充分条件)
    Eigen::SelfAdjointEigenSolver<Eigen::Matrix3d> eigen_solver ( matrix_33.transpose()*matrix_33 );// 自伴随特征求解
    cout << "Eigen values = \n" << eigen_solver.eigenvalues() << endl;
    cout << "Eigen vectors = \n" << eigen_solver.eigenvectors() << endl;

    // 特征求解2
    Eigen::EigenSolver<Eigen::Matrix3d> eigen_solve_2(matrix_33.transpose() * matrix_33);
    cout << "Eigen values = \n" << eigen_solver.eigenvalues() << endl;
    cout << "Eigen vectors = \n" << eigen_solver.eigenvectors() << endl;

    // 解方程
    // 求解 matrix_NN * x = v_Nd 这个方程
    // MATRIX_SIZE 大小在前边的宏里定义,它由随机数生成
    Eigen::Matrix< double, MATRIX_SIZE, MATRIX_SIZE > matrix_NN;
    matrix_NN = Eigen::MatrixXd::Random( MATRIX_SIZE, MATRIX_SIZE );//随机数矩阵
    Eigen::Matrix< double, MATRIX_SIZE,  1> v_Nd;
    v_Nd = Eigen::MatrixXd::Random( MATRIX_SIZE,1 );

    clock_t time_stt = clock(); // 计时

    // 直接求逆 (最直接的,但是求逆运算量大)   x = (matrix_NN)-1 * v_Nd;
    Eigen::Matrix<double,MATRIX_SIZE,1> x = matrix_NN.inverse()*v_Nd;
    cout <<"time use in normal inverse is " << 1000* (clock() - time_stt)/(double)CLOCKS_PER_SEC << "ms"<< endl;
    // cout << x.transpose() <<endl;

    // 通常用矩阵分解来求,例如QR分解,速度会快很多
    time_stt = clock();
    x = matrix_NN.colPivHouseholderQr().solve(v_Nd);
    cout <<"time use in Qr decomposition is " <<1000*  (clock() - time_stt)/(double)CLOCKS_PER_SEC <<"ms" << endl;
    return 0;
}
3.CMakeLists.txt
# Cmake最低版本要求
cmake_minimum_required(VERSION 3.20)
# 项目名称
project(ch3)
# C++ 标准
set(CMAKE_CXX_STANDARD 14)

# 单配置生成器CMAKE_BUILD_TYPE 控制生成构建系统使用的配置变量 是 CMAKE_BUILD_TYPE 。该变量默认为空,CMake识别的值为:
# Debug:用于在没有优化的情况下,使用带有调试符号构建库或可执行文件。
# Release:用于构建的优化的库或可执行文件,不包含调试符号。
# RelWithDebInfo:用于构建较少的优化库或可执行文件,包含调试符号。
# MinSizeRel:用于不增加目标代码大小的优化方式,来构建库或可执行文件。
set( CMAKE_BUILD_TYPE "Release" )

# CMAKE_CXX_FLAGS变量针对C++编译器,后设置参数-O[n]可优化源代码
set( CMAKE_CXX_FLAGS "-O3" )
# 添加Eigen头文件
include_directories( "/usr/local/include/eigen3" )
# 添加可执行文件(程序名  源代码)
add_executable(useEigen main.cpp)
4.运行结果
/home/zxz/my_slam14/ch3/useEigen/cmake-build-debug/useEigen
1 2 3
4 5 6
1	2	3
4	5	6
10
28
 0.680375   0.59688 -0.329554
-0.211234  0.823295  0.536459
 0.566198 -0.604897 -0.444451
 0.680375 -0.211234  0.566198
  0.59688  0.823295 -0.604897
-0.329554  0.536459 -0.444451
1.61307
1.05922
 6.80375   5.9688 -3.29554
-2.11234  8.23295  5.36459
 5.66198 -6.04897 -4.44451
-0.198521   2.22739    2.8357
  1.00605 -0.555135  -1.41603
 -1.62213   3.59308   3.28973
0.208598
Eigen values =
0.0242899
 0.992154
  1.80558
Eigen vectors =
-0.549013 -0.735943  0.396198
 0.253452 -0.598296 -0.760134
-0.796459  0.316906 -0.514998
Eigen values =
0.0242899
 0.992154
  1.80558
Eigen vectors =
-0.549013 -0.735943  0.396198
 0.253452 -0.598296 -0.760134
-0.796459  0.316906 -0.514998
time use in normal inverse is 0.127ms
time use in Qr decomposition is 0.08ms

进程已结束,退出代码为 0
二、Eigen集合模块Geometry
1.代码
#include <iostream>
#include <cmath>
using namespace  std;

#include <Eigen/Core>
// Eigen 几何模块
#include <Eigen/Geometry>

int main(int argc,char* argv[]) {
    // Eigen/Geometry 模块提供了各种旋转和平移的表示
    // 3D 旋转矩阵直接使用 Matrix3d 或 Matrix3f
    Eigen::Matrix3d rotation_matrix = Eigen::Matrix3d ::Identity();//单位矩阵
    // 旋转向量使用 AngleAxis, 它底层不直接是Matrix,但运算可以当作矩阵(因为重载了运算符)
    // PI/4表示旋转的角度,Eigen::Vector3d(0,0,1)表示旋转轴    沿Z轴旋转45度
    Eigen::AngleAxisd rotation_vector(M_PI/4,Eigen::Vector3d(0,0,1));
    // 浮点数的精度值  cout输出格式 进行设置
    cout.precision(3);
    // 旋转向量通过矩阵的形式输出
    cout << "rotation_vector = \n" << rotation_vector.matrix() << endl;
    // 旋转向量也可以通过直接赋值的方式进行旋转矩阵的转换
    rotation_matrix = rotation_vector.toRotationMatrix();
    cout << "rotation_matrix = \n" << rotation_matrix << endl;

    // 用 AngleAxis(轴角) 可以进行坐标变换 v is 3*1 matrix
    Eigen::Vector3d  v(1,0,0);
    // 向量v绕着z轴旋转45度 的坐标是什么
    Eigen::Vector3d v_rotated = rotation_vector * v;
    cout << "(1,0,0) after roation = " << v_rotated.transpose() << endl;
    cout << "(1,0,0) after roation = " << (rotation_matrix * v).transpose() << endl;

    // 欧拉角: 可以将旋转矩阵直接转换成欧拉角
    Eigen::Vector3d euler_angles = rotation_matrix.eulerAngles(2,1,0);  // ZYX顺序,即yaw pitch roll顺序
    cout << " yaw pitch roll = " << euler_angles.transpose() << endl;

    // 欧氏变换矩阵使用 Eigen::Isometry    欧式变换矩阵 即 变换矩阵 书中 P43
    // 向量由非齐次坐标变为齐次坐标,从三维向量变成四维向量,同理其旋转矩阵为3*3也应该增加一个维度 变为 4*4
    Eigen::Isometry3d T = Eigen::Isometry3d::Identity();  // 虽然称为3d,实质上是4*4的矩阵
    // 变换矩阵中包其中包含旋转矩阵与平移向量的信息
    T.rotate(rotation_vector);  // 按照旋转向量rotation_vector进行旋转
    // T.rotate(rotation_matrix); // 同样可以通过旋转矩阵旋转
    T.pretranslate(Eigen::Vector3d(1,3,4));  // 把平移向量设成(1,3,4)
    cout << "Transform matrix = \n" << T.matrix() << endl;

    // 用变换矩阵进行坐标变换
    Eigen::Vector3d v_transformed = T * v;   // 因为变换矩阵中包含 旋转矩阵R与平移向量t的信息所以 T*v 相当于 R*v+t
    cout << "v transformed = " << v_transformed.transpose() << endl;

    // 四元数
    // 可以直接把AngleAxis (旋转向量)赋值给四元数 反之亦然  旋转矩阵同样可以
    Eigen::Quaterniond q = Eigen::Quaterniond (rotation_vector);
    cout << "quaternion = \n" << q.coeffs() << endl;   // 注意coeffs的顺序是(x,y,z,w),w为实部,前三者为虚部
    // 旋转矩阵赋值给四元数
    q = Eigen::Quaterniond (rotation_matrix);
    cout << "quaternion = \n" << q.coeffs() << endl;
    // 使用四元数旋转一个向量,使用重载的乘法即可
    v_rotated = q * v; // 数学上是qvq^{-1}  该处对乘法进行了重载
    cout << "(1,0,0) after rotation = " << v_rotated.transpose() << endl;

    return 0;
}
2.CMakeLists.txt
cmake_minimum_required(VERSION 3.16)
project(useGeometry)

set(CMAKE_CXX_STANDARD 14)

# 添加头文件
include_directories("/usr/local/include/eigen3")

add_executable(useGeometry main.cpp)
3.运行结果
/home/zxz/my_slam14/ch3/useGeometry/cmake-build-debug/useGeometry
rotation_vector =
 0.707 -0.707      0
 0.707  0.707      0
     0      0      1
rotation_matrix =
 0.707 -0.707      0
 0.707  0.707      0
     0      0      1
(1,0,0) after roation = 0.707 0.707     0
(1,0,0) after roation = 0.707 0.707     0
 yaw pitch roll = 0.785    -0     0
Transform matrix =
 0.707 -0.707      0      1
 0.707  0.707      0      3
     0      0      1      4
     0      0      0      1
v transformed = 1.71 3.71    4
quaternion =
    0
    0
0.383
0.924
quaternion =
    0
    0
0.383
0.924
(1,0,0) after rotation = 0.707 0.707     0

进程已结束,退出代码为 0
三、测试四元数的使用
注意:
四元数使用前需要进行归一化,即对四元数进行单位化,单位四元数表示三维空间中的任意旋转:
a.类似于 二维平面的复数,可表示2D的旋转与缩放,对复数进行单位化之后,则该复数缩放效果则为1倍,即没有缩放效果,只留下旋转
b.若不对四元数进行归一化,得到的旋转矩阵可能非正交
要求:
题目要求在slam14讲第二版书中P64
1.代码
#include <iostream>
#include <cmath>
using namespace  std;

#include <Eigen/Core>
// Eigen 几何模块
#include <Eigen/Geometry>

int main(int argc,char **argv) {
    // 四元数表示旋转
    Eigen::Quaterniond q1 = Eigen::Quaterniond(0.35,0.2,0.3,0.1);
    Eigen::Quaterniond q2 = Eigen::Quaterniond(-0.5,0.4,-0.1,0.2);
    // 对四元数进行归一化操作
    q1.normalize();
    q2.normalize();
    // 平移分量
    Eigen::Vector3d t1 = Eigen::Vector3d(0.3,0.1,0.1);
    Eigen::Vector3d t2 = Eigen::Vector3d(-0.1,0.5,0.3);
    // 需要进行坐标系转换的坐标
    Eigen::Vector3d p1 = Eigen::Vector3d(0.5,0,0.2);

    // 将四元数转换为旋转矩阵
    Eigen::Matrix3d r_m1 = q1.toRotationMatrix();
    Eigen::Matrix3d r_m2 = q2.toRotationMatrix();
    // 打印r_m1  与 其转置  逆
    cout << "q1 对应的旋转矩阵: \n"<< r_m1 << endl;
    cout << "q1 对应的旋转矩阵的转置: \n"<< r_m1.transpose() << endl;
    cout << "q1 对应的旋转矩阵的逆: \n"<< r_m1.inverse() << endl;
    /******对比结果发现,归一化的四元数转换的旋转矩阵为正交,若不进行归一化则不会正交*******/

    // 打印r_m2  与 其转置  逆
    cout << "q2 对应的旋转矩阵: \n"<< r_m2 << endl;
    cout << "q2 对应的旋转矩阵的转置: \n"<< r_m2.transpose() << endl;
    cout << "q2 对应的旋转矩阵的逆: \n"<< r_m2.inverse() << endl;

    // 欧式变换矩阵
    // 1.变换矩阵通过四元数加入旋转分量
    Eigen::Isometry3d T1w  = Eigen::Isometry3d(q1);
    Eigen::Isometry3d T2w  = Eigen::Isometry3d(q2);
    // 2.将平移分量加入旋转矩阵
    T1w.pretranslate(t1);
    T2w.pretranslate(t2);

    // 则坐标p1在小萝卜二号坐标系下的坐标(通过T1w.inverse() 表示一个相反的旋转,将坐标转换之世界坐标系下)
    Eigen::Vector3d p2 = T2w * T1w.inverse() * p1;
    cout << "坐标p1在小萝卜二号坐标系下的坐标:\n" << p2.transpose() << endl;


    return 0;
}
2.CMakeLists.txt
cmake_minimum_required(VERSION 3.20)
project(test)

set(CMAKE_CXX_STANDARD 14)
include_directories("/usr/local/include/eigen3")
add_executable(test main.cpp)
3.运行结果
/home/zxz/my_slam14/ch3/test/cmake-build-debug/test
q1 对应的旋转矩阵:
  0.238095   0.190476   0.952381
   0.72381   0.619048  -0.304762
 -0.647619   0.761905 0.00952381
q1 对应的旋转矩阵的转置:
  0.238095    0.72381  -0.647619
  0.190476   0.619048   0.761905
  0.952381  -0.304762 0.00952381
q1 对应的旋转矩阵的逆:
  0.238095    0.72381  -0.647619
  0.190476   0.619048   0.761905
  0.952381  -0.304762 0.00952381
q2 对应的旋转矩阵:
 0.782609   0.26087  0.565217
-0.608696  0.130435  0.782609
 0.130435 -0.956522   0.26087
q2 对应的旋转矩阵的转置:
 0.782609 -0.608696  0.130435
  0.26087  0.130435 -0.956522
 0.565217  0.782609   0.26087
q2 对应的旋转矩阵的逆:
 0.782609 -0.608696  0.130435
  0.26087  0.130435 -0.956522
 0.565217  0.782609   0.26087
坐标p1在小萝卜二号坐标系下的坐标:
-0.0309731    0.73499   0.296108
四、显示运动轨迹
1.环境配置
// 将slambook下3rdparty下的Pangolin.tar.gz进行解压
// 进入解压的文件
cd [path-to-pangolin]
mkdir build
cd build
cmake ..
make
报错:
home/zxz/Downloads/Pangolin/include/pangolin/video/drivers/ffmpeg.h:94:5: error: ‘PixelFormat’ does not name a type; did you mean ‘AVPixelFormat’?
   94 |     PixelFormat     fmtout;
      |     ^~~~~~~~~~~
      |     AVPixelFormat
/home/zxz/Downloads/Pangolin/include/pangolin/video/drivers/ffmpeg.h:142:5: error: ‘PixelFormat’ does not name a type; did you mean ‘AVPixelFormat’?
  142 |     PixelFormat     fmtsrc;
      |     ^~~~~~~~~~~
      |     AVPixelFormat
/home/zxz/Downloads/Pangolin/include/pangolin/video/drivers/ffmpeg.h:143:5: error: ‘PixelFormat’ does not name a type; did you mean ‘AVPixelFormat’?
  143 |     PixelFormat     fmtdst;
      |     ^~~~~~~~~~~
      |     AVPixelFormat
解决报错:
// 在pangolin/src文件夹下,找到CMakeLists.txt文件,打开,并在266行将以下代码注释。
find_package(FFMPEG QUIET)
if(BUILD_PANGOLIN_VIDEO AND FFMPEG_FOUND)
  set(HAVE_FFMPEG 1)
  list(APPEND INTERNAL_INC  ${FFMPEG_INCLUDE_DIRS} )
  list(APPEND LINK_LIBS ${FFMPEG_LIBRARIES} )
  list(APPEND HEADERS ${INCDIR}/video/drivers/ffmpeg.h)
  list(APPEND SOURCES video/drivers/ffmpeg.cpp)
  message(STATUS "ffmpeg Found and Enabled")
endif()

// 删除之前的build目录,重新创建,重新cmake
注意:下载高博的slambook2源码:
git clone https://github.com/gaoxiang12/slambook2
2.代码
参考文章:
https://blog.csdn.net/Ai_July/article/details/104929300
https://blog.csdn.net/weixin_43991178/article/details/105119610
// main.cpp
#include <pangolin/pangolin.h>
#include <Eigen/Core>
#include <unistd.h>

// 本例演示了如何画出一个预先存储的轨迹

using namespace std;
using namespace Eigen;

//trajectory文件的路径(可以使用相对路径,也可以使用绝对路径)
string trajectory_file = "../trajectory.txt";

//画轨迹函数的声明
void DrawTrajectory(vector<Isometry3d, Eigen::aligned_allocator<Isometry3d>>);

int main(int argc, char **argv) {

    vector<Isometry3d, Eigen::aligned_allocator<Isometry3d>> poses;//容器的方式存储
    //因为类型是Eigen的Isometry3d和cpp的类内存分配不一样,所以要指定内存的分配方式
    //即:Eigen::aligned_allocator< Isometry3d >

    ifstream fin(trajectory_file); //读文件
    //未成功读取
    if (!fin) {
        cout << "cannot find trajectory file at " << trajectory_file << endl;
        return 1;
    }
    //一行一行读取,直到文件尾标志(efo标志)
    while (!fin.eof()) {
        double time, tx, ty, tz, qx, qy, qz, qw;
        fin >> time >> tx >> ty >> tz >> qx >> qy >> qz >> qw;

        Isometry3d Twr(Quaterniond(qw, qx, qy, qz)); //四元数转换为变换矩阵的旋转分量部分
        Twr.pretranslate(Vector3d(tx, ty, tz));//旋转矩阵加上平移变为转换矩阵
        poses.push_back(Twr);//添加到容器中
    }
    cout << "read total " << poses.size() << " pose entries" << endl;

    // draw trajectory in pangolin
    DrawTrajectory(poses);
    return 0;
}

/*******************************************************************************************/
void DrawTrajectory(vector<Isometry3d, Eigen::aligned_allocator<Isometry3d>> poses) {
    // create pangolin window and plot the trajectory
    pangolin::CreateWindowAndBind("Trajectory Viewer", 1024, 768);//新建窗口,参数分别为:窗口名称、窗口的长和宽
    glEnable(GL_DEPTH_TEST);//启用深度渲染,当需要显示3D模型时需要打开,根据目标的远近自动隐藏被遮挡的模型
    glEnable(GL_BLEND);//表示窗口使用颜色混合模式,让物体显示半透明效
    glBlendFunc(GL_SRC_ALPHA, GL_ONE_MINUS_SRC_ALPHA);
    /***
	设置颜色RGBA混合因子,前面参数表示源因子,后面参数表示目标因子
	GL_ZERO:表示使用0.0作为权重因子
	GL_ONE : 表示使用1.0作为权重因子
	GL_SRC_ALPHA :表示使用源颜色的alpha值来作为权重因子
	GL_DST_ALPHA :表示使用目标颜色的alpha值来作为权重因子
	GL_ONE_MINUS_SRC_ALPHA: 表示用1.0-源颜色的alpha的值来作为权重因子
	GL_ONE_MINUS_DST_ALPHA: 表示用1.0-目标颜色的alpha的值来作为权重因子
	GL_SRC_COLOR>:表示用源颜色的四个分量作为权重因子
	在画图的过程中如果程序glClearColor();glColor3f()则后者为源颜色,前者的颜色为目标颜色以上的GL_SRC_ALPHA和GL_ONE_MINUS_SRC_ALPHA是最常用的混合模式 ***/

    //创建相机视图
    pangolin::OpenGlRenderState s_cam(
            pangolin::ProjectionMatrix(1024, 768, 500, 500, 512, 389, 0.1, 1000),
            pangolin::ModelViewLookAt(0, -0.1, -1.8, 0, 0, 0, 0.0, -1.0, 0.0)
            );

    //ProjectionMatrix()设置相机内参,参数分别表示相机分辨率(2),焦距(1),相机光心(3),最远最大距离(2)
    //ModelViewLookAt()设置观看视角,上文对应的意思是在世界坐标(0,-0.1,-1.8)处观看坐标原点(0,0,0)并设置Y轴向上
    /**  另一种解释
	 定义观测方位向量:观测点位置:(mViewpointX mViewpointY mViewpointZ)
                     观测目标位置:(0, 0, 0)
		             观测的方位向量:(0.0,-1.0, 0.0)**/

    pangolin::View &d_cam = pangolin::CreateDisplay()
            .SetBounds(0.0, 1.0, 0.0, 1.0, -1024.0f / 768.0f)
            .SetHandler(new pangolin::Handler3D(s_cam));
    /**创建交互视图view,用于显示上一步摄像机所“拍摄”到的内容,,setBounds()函数前四个参数依次表示视图在视窗中的范围(下、上、左、右),显示界面长宽比*/

    while (pangolin::ShouldQuit() == false) {
        glClear(GL_COLOR_BUFFER_BIT | GL_DEPTH_BUFFER_BIT);//清空颜色和深度缓存
        d_cam.Activate(s_cam);//激活之前设定好的视窗对象
        glClearColor(1.0f, 1.0f, 1.0f, 1.0f);//为颜色缓存区指定确定的值
        glLineWidth(2);
        for (size_t i = 0; i < poses.size(); i++) {
            // 画每个位姿的三个坐标轴
            Vector3d Ow = poses[i].translation();//无参数,返回当前变换平移部分的向量表示(可修改),可以索引[]获取各分量
            //对三个坐标轴分别旋转
            Vector3d Xw = poses[i] * (0.1 * Vector3d(1, 0, 0));//0.1是为了让图看起来舒服,不会太大
            Vector3d Yw = poses[i] * (0.1 * Vector3d(0, 1, 0));
            Vector3d Zw = poses[i] * (0.1 * Vector3d(0, 0, 1));
            glBegin(GL_LINES);//开始画线
            glColor3f(1.0, 0.0, 0.0);
            glVertex3d(Ow[0], Ow[1], Ow[2]);
            glVertex3d(Xw[0], Xw[1], Xw[2]);
            glColor3f(0.0, 1.0, 0.0);
            glVertex3d(Ow[0], Ow[1], Ow[2]);
            glVertex3d(Yw[0], Yw[1], Yw[2]);
            glColor3f(0.0, 0.0, 1.0);
            glVertex3d(Ow[0], Ow[1], Ow[2]);
            glVertex3d(Zw[0], Zw[1], Zw[2]);
            glEnd();//结束画线
        }
        // 画出连线
        for (size_t i = 0; i < poses.size(); i++) {
            glColor3f(0.0, 0.0, 0.0);
            glBegin(GL_LINES);
            auto p1 = poses[i], p2 = poses[i + 1];
            glVertex3d(p1.translation()[0], p1.translation()[1], p1.translation()[2]);
            glVertex3d(p2.translation()[0], p2.translation()[1], p2.translation()[2]);
            glEnd();
        }
        pangolin::FinishFrame();
        usleep(5000);   // sleep 5 ms
    }
}
3.CMakeLists.txt
cmake_minimum_required(VERSION 3.20)
project(examples)

set(CMAKE_CXX_STANDARD 14)
include_directories("/usr/local/include/eigen3")

# 添加pangolin依赖
find_package(Pangolin REQUIRED)
include_directories(${Pangolin_INCLUDE_DIRS})

add_executable(plotTrajectory main.cpp)
target_link_libraries(plotTrajectory ${Pangolin_LIBRARIES})
4.运行效果
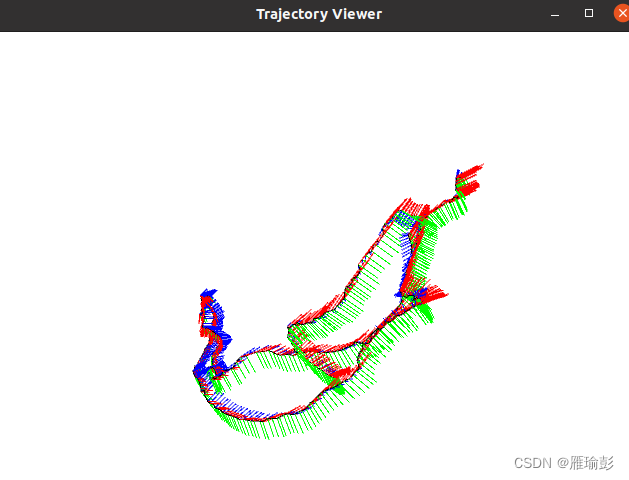


 1199
1199


 被折叠的 条评论
为什么被折叠?
被折叠的 条评论
为什么被折叠?
 到【灌水乐园】发言


