


CSS
1、选择器
1.1、基本选择器
1、标签选择器 body p{}
p{
color: red;
}
2、类选择器 class: .类名{}
3、id选择器 : 全局唯一! #id名{}
优先级 id>class>标签
1.2、层次选择器
/*层次选择器
        ( )1.后代选择器: 在某个元素的后面 祖爷爷 爷爷 爸爸 你
        (>)2.子选择器 一代 儿子
        (+)3.相邻兄弟选择器  同辈,只选中下方相邻的一个指定类型元素
        (~)4.通用选择器 当前选中元素的向下的所有兄弟元素

        */
-
后代选择器
-
子选择器
-
相邻兄弟选择器
-
通用选择器
        /*后代选择器*/
        /*body p{
            background: blue;
        }*/

        /*子选择器*/
        /*body>p{
            background-color: green;
        }*/

        /*相邻兄弟选择器*/
        /*.active + p{
            background-color: aqua;
        }*/

        /*通用兄弟选择器*/
        .active~p{
            background-color: lawngreen;
        }
1.3、结构伪类选择器
: 作用: 对:左边的元素进行筛选
<!DOCTYPE html>
<html lang="en">
<head>
    <meta charset="UTF-8">
    <title>Title</title>
    <style>
        /*ul的第一个子元素*/
        ul li:first-child{
            background-color: blueviolet;
        }
        /*ul的最后一个子元素*/
        ul li:last-child{
            background-color: deeppink;
        }
        /*选中p2*/
        /*选择当前p元素的父级元素,选中父级元素的第2个子元素,并且是p类型元素才生效*/
        p:nth-child(2){
            background-color: green;
        }
        /*选中父元素下的p类型的第三个元素(中间可以有其他类型的元素*/
        p:nth-of-type(3){
            background-color: yellow;
        }
        /*鼠标悬念的元素*/
        a:hover{
            background-color: darkolivegreen;
        }
    </style>

</head>
<body>
<a href="">jdkjkjf</a>
<p>p1</p>
<p>p2</p>
<h3>h3</h3>
<p>p3</p>
<ul>
    <li>
        li1
    </li>
    <li>
        li2
    </li>
    <li>
        li3
    </li>
    <li>li4
    </li>
</ul>
</body>
</html>

1.4、属性选择器
/*
        存在id属性的元素 a[]{}
        属性名=属性值(正则表达式)
        =  绝对等于
        *="" 模糊查询
        ^= 以什么开头
        $= 以什么结尾
        */

        /*a[id=first]*/
        /*a[id]{
            background-color: yellow;
        }*/

        /*class 中有links的元素*/
        /*  *=""  模糊查询  */
        /*a[class*="lin"]{
            background: dodgerblue;
        }*/

        /*选中href中以http开头的元素*/
        /*a[href^=http]{
            background: #FF60C5;
        }*/

        /*选中href属性以pdf结尾的元素*/
        a[href$=pdf]{
            background: chocolate;
        }
2、美化网页元素
2.1、字体样式
<!--
    font-weight: 字体粗细
    -->
    <style>

        body{
            /*可以设置一个中文字体一个英文字体*/
            font-family: "Arial Black",华文彩云;
            color: green;
        }
        .p1{
            font-weight: bold;
        }
font:
<!--字体风格
    oblique 斜体-->
    <style>
        p{
            font: oblique bolder 12px 楷体;
        }
    </style>
2.2文本样式
<!DOCTYPE html>
<html lang="en">
<head>
    <meta charset="UTF-8">
    <title>Title</title>
    <!--
    颜色:
        单词
        RGB 0~f
        RGBA A:0~1
    text-align:排版,居中center
    text-indent:2em  段落首行缩进,2em缩进两个字
    行高(line-height),和块的高度(height)一致,就可以上下居中
    -->
    <style>
        h1{
            color: rgba(255,83,116,0.9);
            text-align: right;
        }
        .p1{
            text-indent: 2em;
        }
        #p3{
            background: yellow;
            height: 100px;
            line-height: 100px;
        }
        #c1{
            /*文本-装饰 下 中 上划线*/
            text-decoration: underline;
        }
        #c2{
            text-decoration: line-through;
        }
        #c3{
            text-decoration: overline;
        }
        /*水平对齐  参照物,  a,b*/
        img,span{
            vertical-align: middle;
        }
    </style>
</head>
<body>
<p id="c1">123123</p>
<p id="c2">123123</p>
<p id="c3">123123</p>

<h1>故事介绍</h1>
<p class="p1">好多小伙伴学习找不到完整的学习路线,在这里给大家说下Java学习路线!</p>
<p>自律的人,认真学习完毕,这将为你省下几万块钱的培训费,在这里,白嫖有罪</p>
<p>明白的人,自然知道其中的价值!认真看完吧 </p>
<p id="p3">作者:遇见狂神说</p>
<p>When I wake up in the morning,
      You are all I see;
      When I think about you,
      And how happy you make me。
      You're everything I wanted;
      You're everything I need;
      I look at you and know;

      That you are all to me。</p>
<img src="../../resources/image/chenyan.jpg">
<span>jidkjikdjfipfjeojfe</span>
</body>
</html>
2.3 超链接伪类
a{
    /*去除文本装饰*/
    text-decoration: none;
    color: dodgerblue;
}
/*鼠标悬停的  (重点)  */
a:hover{
    color: red;
}
/*鼠标按住*/
a:active{
    color: chartreuse;
    font-size: 20px;
}
/*未访问过的a*/
a:link{
    color: #000;
}
/*已访问过的*/
a:visited{
    color: darkolivegreen;
}
/* 阴影颜色,水平偏移,垂直偏移,阴影半径*/
#price{
    text-shadow: burlywood -5px 8px 1px;
}
2.4 列表
list-style:
none 去掉圆点
circle 空心圆
decimal 数字
square 正方形
.title{
    font-size: 18px;
    font-weight: bold;
    text-indent: 1em;
    line-height: 35px;
    /* 颜色,图片,图片位置,平铺方式 */
    background: /*orange*/ url("../../resources/image/down.jpg") 270px 10px no-repeat;
}
/*list-style:
    none 去掉圆点
    circle 空心圆
    decimal 数字
    square 正方形
*/
ul li{
    height: 30px;
    list-style: none;
    text-indent: 1em;
    background-image: url("../../resources/image/down.jpg");
    background-repeat: no-repeat;
    background-position: 236px 2px;
}
ul{
    background: #a0a0a0;
}
a{
    text-decoration:none;
    font-size: 14px;
    color: black;
}
a:hover{
    color: darkorange;
}
2.5 背景
div{
    width:1000px;
    height:700px;
    border: 1px solid red;
    background-image: url("../../resources/image/tx.jpg");
    /*默认是全部平铺的*/
}
/*水平一排 垂直一排 一个*/
.div1{
    background-repeat: repeat-x;
}
.div2{
    background-repeat: repeat-y;
}
.div3{
    background-repeat: no-repeat;
}
2.6 渐变
Grabient 超强的一个在线设计渐变的网站,调好后复制代码即可
body{
            /*background-color: #A9C9FF;*/
            /*background-image: linear-gradient(133deg, #A9C9FF 0%, #FFBBEC 100%);*/
            background: linear-gradient(133deg, #A9C9FF 0%, #FFBBEC 100%);
        }
3、盒子模型
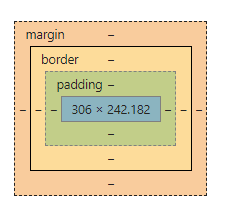
margin: 外边距
padding: 内边距
border: 边框
盒子的计算方式:你这个元素到底多大?
margin+border+padding+内容宽度
3.1边框
1、边框的粗细
2、边框的样式
3、边框的颜色
重点:html的元素都有默认的内外边距,可以先将他们去除
<!DOCTYPE html>
<html lang="en">
<head>
<meta charset="UTF-8">
<title>Title</title>
<style>
/*body总有一个默认的外边距margin:0*/
/*h1,h2,ul,li,a,body{
margin: 0;
padding: 0;
text-decoration: none;
}*/
/*border: 粗细,样式, 颜色 */
h2{
font-size:16px;
background: #28c195;
line-height: 30px;
}
#box{
width: 300px;
border: 1px solid red;
border-right-color: #000;
}
form{
background: #28c195;
}
/*form div:first-child>input{!*选中第一个input*!
border: 3px solid black;
}*/
div:nth-of-type(2) input{/*第二个input*/
border: 3px dashed deeppink;
}
</style>
</head>
<body>
<div id="box">
<h2>会员登录</h2>
<form action="#">
<div>
<span>用户名:</span>
<input type="text">
</div>
<div>
<span>密码: </span>
<input type="text">
</div>
<div>
<span>邮箱: </span>
<input type="text">
</div>
</form>
</div>
</body>
</html>
3.2内外边距
border框
padding内距
margin 外距
<!DOCTYPE html>
<html lang="en">
<head>
<meta charset="UTF-8">
<title>Title</title>
<style>
h2{
font-size:16px;
background: #28c195;
line-height: 30px;
margin:2px 10px 20px 0;
}
#box{
width: 300px;
border: 1px solid red;
border-right-color: #000;
/*外边距只写两个的情况,第一个代表上下,第二个左右*/
/*写四个的话就分别为上右下左(顺时针)*/
/**/
margin:0 auto;/*实现左右居中*/
}
form{
background: #28c195;
}
/*form div:first-child>input{!*选中第一个input*!
border: 3px solid black;
}*/
div:nth-of-type(2) input{/*第二个input*/
border: 3px dashed deeppink;
}
</style>
</head>
<body>
<div id="box">
<h2>会员登录</h2>
<form action="#">
<div>
<span>用户名:</span>
<input type="text">
</div>
<div>
<span>密码: </span>
<input type="text">
</div>
<div>
<span>邮箱: </span>
<input type="text">
</div>
</form>
</div>
</body>
</html>
3.3、圆角边框
div{
            width:100px;
            height:100px;
            border:10px solid red;
            margin: 30px;
            /*左上和右下50, 左下和右上20px
            border-radius:50px 20px;*/
            /*从左上角开顺时针*/
            border-radius:100px 0px 0px 0px;
        }
        img{
            width: 100px;
            border-radius:100px 0px 0px 0px;
        }
3.4、盒子阴影

<style>
        /* margin:0 auto;居中
        要求 div有固定的大小*/
        div{
            width: 100px;
            height: 100px;
            margin: 50px auto;
        }
        img{
            width: 100px;
            height: 100px;

            border: 10px solid red;
            border-radius: 100px;
            /*阴影*/
            box-shadow: 0px 0px 100px yellow;
        }
    </style>
4、浮动
4.0标准文档流

4.1、display
/* display
            block  块元素
            inline 行内元素
            inline-block: 是块元素,但是可以内联在一行!
            !用于做网站上方的li横向导航栏!
        */
        div{
            width: 100px;
            height: 100px;
        border:1px solid red;
            display: inline;
            float:right;
        }
        span{
            width: 100px;
            height: 100px;
            border:1px solid red;
            /*display: block;*/
            display: inline-block;
            float: left;
            clear: both;
        }
1、这个也是一种实现行内元素排列的方式,但是我们很多情况都是用float.
4.2、 float
1、左右浮动float
clear:right; 右侧不允许有浮动元素
clear:left; 左侧不允许有浮动元素
clear:both; 两侧都不允许有浮动元素
4.3 父级边框塌陷的问题
前端面试必考
解决方案:
1、增加父级元素的高度(low)
2、在浮动元素的下方增加一个空的div标签,清除浮动
<div id="clear"></div>
#clear{
            clear:both;
            padding: 0;
            margin: 0;
        }
3、overflow
在父级元素中增加一个
overflow: hidden
4、父类添加一个伪类(最好)
可以避免要增加一个空的div
#father:after{
    content:'';
    display: block;
    clear: both;
}
小结:
-
浮动元素后面增加空div
简单,代码 中尽量避免空div
-
油墨父元素的高度
简单,元素设有了固定的高度,就会被限制
-
overflow
简单,下拉的一些场景避免使用
-
父类添加一个伪类:after(推荐)
写法稍微复杂一点,但是没有副作用,推荐使用!
4.4 对比
-
display
方向不可以控制
-
float
浮动进来的话会脱离标准文档流,所以要解决父级边框塌陷的问题
5、定位
5.1、相对定位 relative
相对定位: position: relative
相对于自己原来的位置进行偏移,相对定位的的话,它在标准文档流中,
原来的位置被保留。
<!DOCTYPE html>
<html lang="en">
<head>
    <meta charset="UTF-8">
    <title>Title</title>
    <!--相对定位
        相对于自己原来的位置进行偏移
        -->
    <style>

        div{
            margin:10px;
            padding: 5px;
            font-size: 12px;
            line-height: 25px;
        }
        #father{
            padding:0;
            border: 1px solid #666666;
        }
        #first{
            background-color: #A9C9FF;
            border: 1px dashed #666666;
            position: relative;
            top: -20px;
            left: 20px;
        }
        #second{
            background-color: deeppink;
            border: 1px dashed #666666;
        }
        #third{
            background-color: green;
            border: 1px dashed #666666;
            position: relative;
            bottom: -20px;
            right:-20px
        }
    </style>
</head>
<body>
<div id="father">
    <div id="first">第一个盒子</div>
    <div id="second">第二个盒子</div>
    <div id="third">第三个盒子</div>
</div>

</body>
</html>
5.2 绝对定位 absolute
1、没有父级元素定位的前提下,相对于浏览器定位
2、假设低级元素存在定位(有position:),我们通常会相对于父级元素进行偏移
position: absolute;
left: -40px;
bottom: -50px;
5.3 固定定位 fixed

因为body的高度设置成了1000px,绝对定位的红块会随着滚动条的滑动而上下移动,fixed定位的黄块则一直固定在右下角。
<!DOCTYPE html>
<html lang="en">
<head>
    <meta charset="UTF-8">
    <title>Title</title>
    <style>
        body{
            height: 1000px;
        }
        div:nth-of-type(1){
            width: 100px;
            height: 100px;
            background-color: red;
            position: absolute;
            right: 0;
            bottom: 0;
        }
        div:nth-of-type(2){
            width: 50px;
            height: 50px;
            background-color: yellow;
            /*固定定位*/
            position:fixed;
            right: 0;
            bottom: 0;
        }
    </style>
</head>
<body>
<div>div1</div>
<div>div2</div>
</body>
</html>
5.4 z-index
图层
z-index: 默认是0,最高无限~999
值越大的显示在屏幕上层
z-index: 999;
5.5 透明度
.tipBg{
            background: #000;
            poacity: 0.5;/*背景透明度*/
            filter: alpha(opacity=50);/*用于IE8以前的浏览器*/
        }
6、动画
想拓展上菜鸟教程吧
JavaScript
1、快速入门
1.1、引入JavaScript
1、 内部标签
<script>
    // alert('hello,world');
</script>
2、外部引入
<!--外部引入
    script标签必须成对出现-->
    <script src="js/helloWorld.js"></script>
<!--    不用显式定义type,也默认就是javasc-->
    <script type="text/javascript"></script>
1.2、变量定义
严格区分大小写
var 变量名=变量值
1.3、控制台调试
console.log();
可以直接在浏览器输入
断点调试,在浏览器设置断点,刷新网页运行到断点处时点一步一步走

1.4 数据类型
变量名不能以数字开头
number
js不区分小数和整数
123 //整数123
123.1 // 浮点数123.1
1.123e3 // 科学计数法
-99 //负数
NaN  //not a number
Infinity  //表示无限大
字符串
'abc' "abc"
布尔值
true, false
逻辑运算
&& || !
比较运算符!!!重要
=
==  等于(类型不一样,值一样,也会判断为true
===  绝对等于(类型一样,值一样,结果为true
这是一个js的缺陷,坚持不要使用==比较
须知:
- NaN===NaN, 这个与所有的数值都不相等,包括自己
- 只能通过isNaN(NaN)来判断这个数是否是NaN
浮点数题:
console.log((1/3)===(1-2/3)) // false
尽量避免使用浮点数进行比较运算
console.log(((1/3)-(1-2/3))<0.000000000001) // true
null和nudefined
- null 空
- undefined 未定义
数组
var arr=[1,2,3,4,5,'abc',true,"str"]; //推荐
new Array(1,2,3,'hello');
取数组下标,如果越界了,就会
undefined
对象
对象是大括号,数组是中括号
var person={
    name: "陈艳",
    age: 18,
    tags: ['js','java','web']
}
取值
console.log(person.name);
1.5 严格检查格式
‘use strict’
<script>
    'use strict'  //严格检查模式,必须写在第一行,预防js的随意性导致产生的问题
    //全局变量
    i=1;
    console.log(i);
    //局部变量建议使用let去定义
    let j=2;
</script>
er
Infinity //表示无限大
**字符串**

```js
'abc' "abc"
布尔值
true, false
逻辑运算
&& || !
比较运算符!!!重要
=
==  等于(类型不一样,值一样,也会判断为true
===  绝对等于(类型一样,值一样,结果为true
这是一个js的缺陷,坚持不要使用==比较
须知:
- NaN===NaN, 这个与所有的数值都不相等,包括自己
- 只能通过isNaN(NaN)来判断这个数是否是NaN
浮点数题:
console.log((1/3)===(1-2/3)) // false
尽量避免使用浮点数进行比较运算
console.log(((1/3)-(1-2/3))<0.000000000001) // true
null和nudefined
- null 空
- undefined 未定义
数组
var arr=[1,2,3,4,5,'abc',true,"str"]; //推荐
new Array(1,2,3,'hello');
取数组下标,如果越界了,就会
undefined
对象
对象是大括号,数组是中括号
var person={
    name: "陈艳",
    age: 18,
    tags: ['js','java','web']
}
取值
console.log(person.name);
1.5 严格检查格式
‘use strict’
<script>
    'use strict'  //严格检查模式,必须写在第一行,预防js的随意性导致产生的问题
    //全局变量
    i=1;
    console.log(i);
    //局部变量建议使用let去定义
    let j=2;
</script>


 5226
5226


 被折叠的 条评论
为什么被折叠?
被折叠的 条评论
为什么被折叠?
 到【灌水乐园】发言


