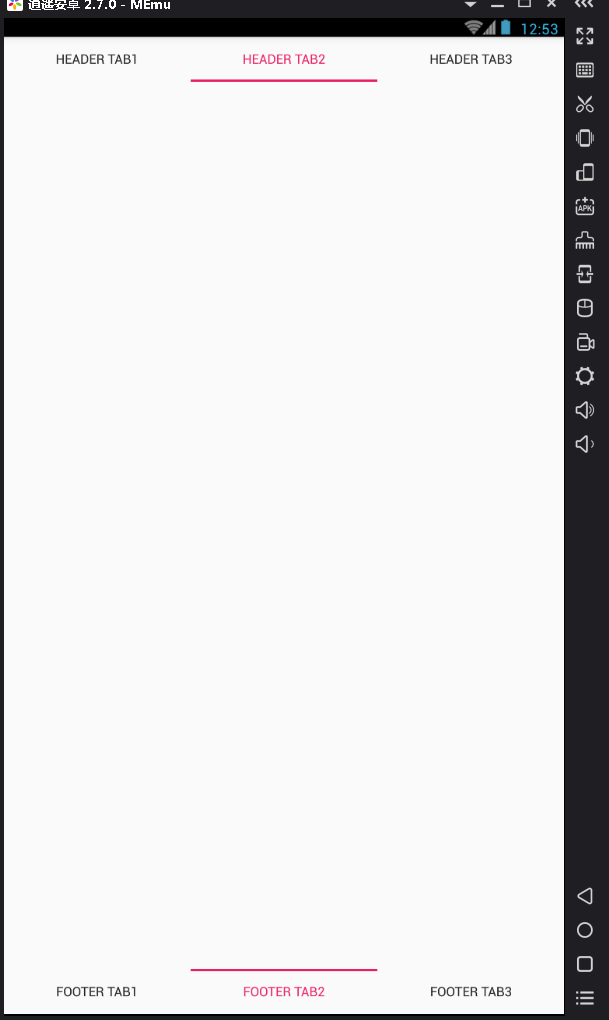
QtQuick.Controls2.0 Header、Footer:Tabbar

写一段简单的代码,顶部导航和底部导航的curindex同步

import QtQuick 2.7
import QtQuick.Controls 2.0
import QtQuick.Layouts 1.0
import QtQuick.Layouts 1.1
import QtQuick.Window 2.0
import QtQuick.Controls.Styles 1.4
import QtQuick.Controls.Material 2.0
import QtQuick.Controls.Universal 2.0
ApplicationWindow {
    id:root
    visible: true;
    height: 480;
    width: 320;

    header: TabBar {
                id: headertabBar;
                currentIndex:footertabBar.currentIndex
                TabButton {

                    text: qsTr("header Tab1");
                }
                TabButton {
                    text: qsTr("header Tab2")
                }
                TabButton {
                    text: qsTr("header Tab3")
                }
            }


    footer: TabBar {
        id: footertabBar
        currentIndex: headertabBar.currentIndex
        TabButton {

            text: qsTr("footer Tab1");
        }
        TabButton {
            text: qsTr("footer Tab2")
        }
        TabButton {
            text: qsTr("footer Tab3")
        }
    }
}

这里写图片描述

  • 0
    点赞
  • 2
    收藏
    觉得还不错? 一键收藏
  • 0
    评论
你可以使用以下代码示例创建一个可以应用于其他页面的 Tabbar 底部导航栏组件: ```vue <template> <div class="tabbar"> <router-link v-for="tab in tabbarList" :key="tab.id" :to="tab.path" class="tabbar-item"> <img :src="tab.icon" :class="{ active: currentPath === tab.path }" alt=""> <span :class="{ active: currentPath === tab.path }">{{ tab.text }}</span> </router-link> </div> </template> <script> export default { data() { return { tabbarList: [ { id: 0, path: 'pages/tab/order/index', icon: 'static/orderDefault.png', selectIcon: 'static/orderPress.png', text: '订单', centerItem: false }, { id: 1, path: 'pages/tab/quckBilling/quickBilling.vue', icon: 'static/userDefault.png', selectIcon: 'static/userPress.png', text: '快速开单', centerItem: true }, { id: 2, path: 'pages/tab/mine/mine', icon: 'static/userDefault.png', selectIcon: 'static/userPress.png', text: '我的', centerItem: false } ], currentPath: '' }; }, created() { this.currentPath = this.$route.path; } }; </script> <style> .tabbar { display: flex; justify-content: space-around; align-items: center; background-color: #f5f5f5; height: 60px; } .tabbar-item { display: flex; flex-direction: column; align-items: center; text-align: center; text-decoration: none; color: #999999; } .tabbar-item img { width: 24px; height: 24px; } .tabbar-item span { font-size: 12px; } .tabbar-item .active { color: #007aff; } </style> ``` 将上述代码保存为一个名为 `Tabbar.vue` 的组件文件,然后在其他页面中引入该组件并使用即可。请注意,你可能需要根据自己的项目配置进行一些调整,比如路由配置和样式等。

“相关推荐”对你有帮助么?

  • 非常没帮助
  • 没帮助
  • 一般
  • 有帮助
  • 非常有帮助
提交
评论
添加红包

请填写红包祝福语或标题

红包个数最小为10个

红包金额最低5元

当前余额3.43前往充值 >
需支付:10.00
成就一亿技术人!
领取后你会自动成为博主和红包主的粉丝 规则
hope_wisdom
发出的红包
实付
使用余额支付
点击重新获取
扫码支付
钱包余额 0

抵扣说明:

1.余额是钱包充值的虚拟货币,按照1:1的比例进行支付金额的抵扣。
2.余额无法直接购买下载,可以购买VIP、付费专栏及课程。

余额充值