概述
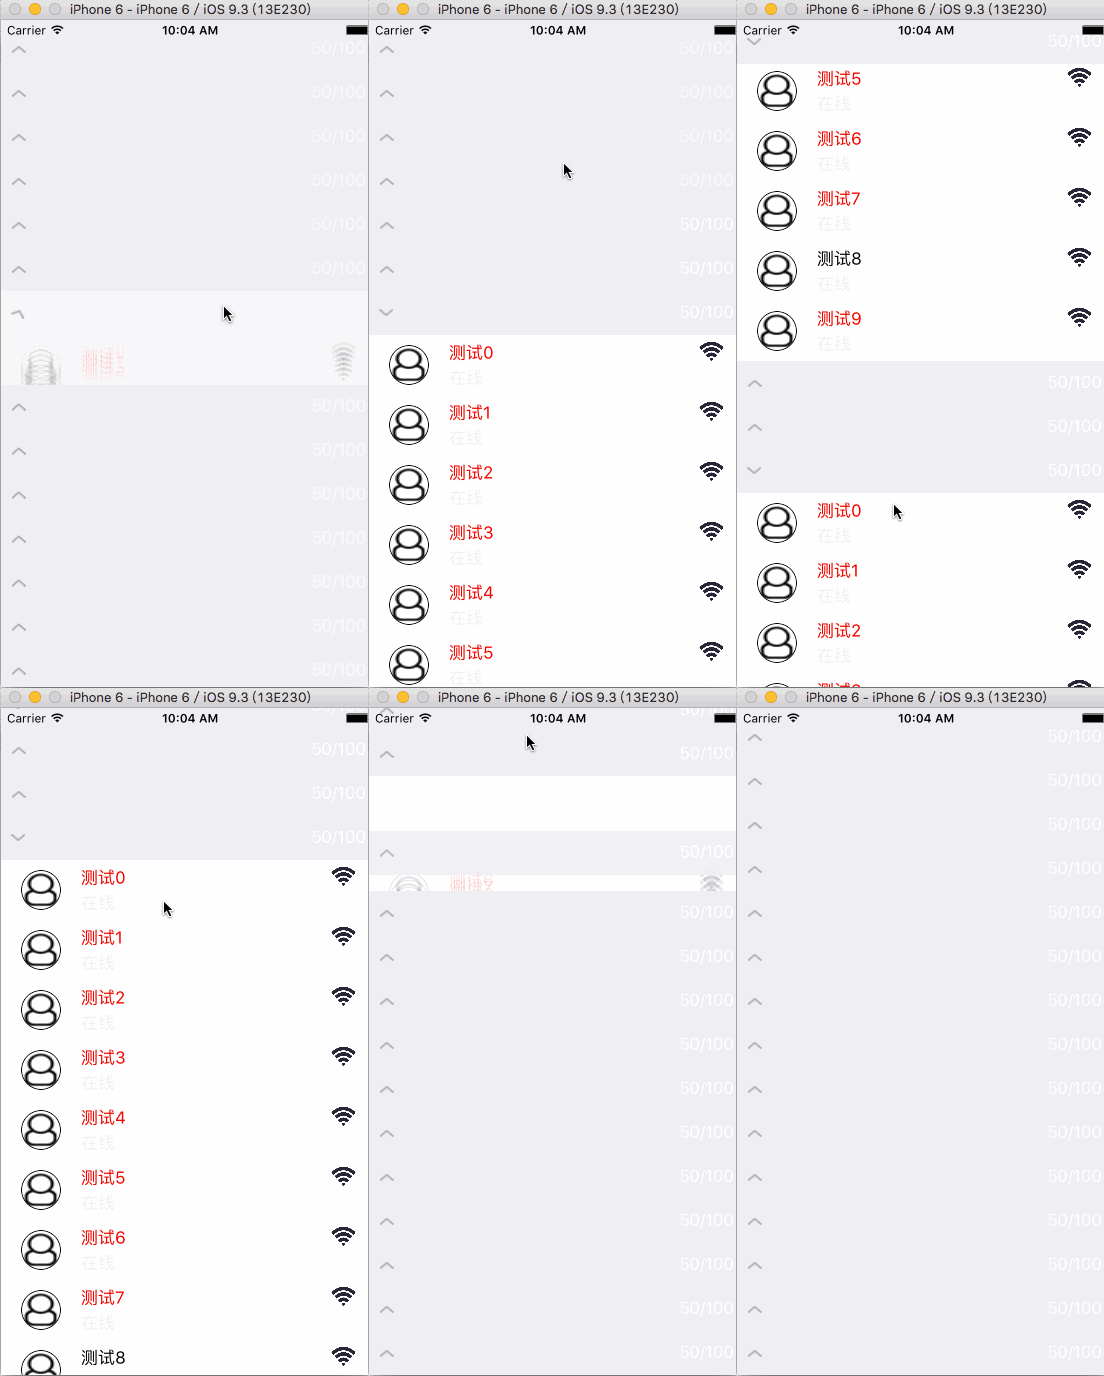
模仿qq分组那样展开与收起的效果,相信大家在项目中总会碰到,今天给大家讲讲实现的思路。
不同的人有不同的实现方式,难易程度也会大不一样,我今天给大家讲的,算是一种比较简单快捷的实现方式。
内容
利用UITableView的section来实现展开与收起效果
建立数据模型,与UI结构对应,降低代码耦合度
重用headView
## 效果图 ##
实现思路
大家看到这样一个效果,首先想到的是什么?怎样可以快速实现,
并且保证性能。对,如果你对UITableView熟悉的话,会很快想到利用section展开显示,收起隐藏多个cell,再给每个section一个bool值,判断点击状态,根据该状态判断cell应该有多少个。
当然,也可以不用tableView的section来做,自定义一个视图,给视图添加点击方法,插入和删除其子视图,以及动态改变其他视图位置。这也可以实现,但这就比较麻烦了,不仅仅是计算高度这些需要处理,还需要自己解决服用问题。
代码
 ## 建立模型 ##
 建立与UI层级关系一致的模型,可以简化代码。我们先定义section模型,section里面包含N个cell。
@interface SectionModel : NSObject

//section模型里面包含的cell模型集合
@property (nonatomic, strong)NSMutableArray *cellModels;
//判断section点击状态,达到展开收起效果
@property (nonatomic, assign)BOOL isExpanded;
@property (nonatomic, strong)NSString *sectionTitle;


@end

//section中每个cell的模型
@interface CellModel : NSObject

@property (nonatomic, strong)UIImage *headImage;
@property (nonatomic, strong)NSString *name;
@property (nonatomic, strong)NSString *status;
@property (nonatomic, strong)UIImage *netStatusImage;
@property (nonatomic, assign)BOOL isVip;

@end
自定义UITableViewCell
自定义UITableViewCell,相信这是最基础的知识了,直接上代码。
#import <UIKit/UIKit.h>

@class CellModel;
@interface CostumTableViewCell : UITableViewCell

@property (nonatomic, strong)CellModel *cellModel;


@end
说一句,在这里用@class是一种习惯,用@class在.h文件声明,在.m文件import,防止循环包含,导致编译错误。

#import "CostumTableViewCell.h"
#import "CellModel.h"

@interface CostumTableViewCell ()

@property (nonatomic, strong)UIImageView *headImageView;
@property (nonatomic, strong)UILabel *nameLabel;
@property (nonatomic, strong)UILabel *statusLabel;
@property (nonatomic, strong)UIImageView *netStatusImageView;

@end
@implementation CostumTableViewCell

- (instancetype)initWithStyle:(UITableViewCellStyle)style reuseIdentifier:(NSString *)reuseIdentifier {

    if (self = [super initWithStyle:style reuseIdentifier:reuseIdentifier]) {

        CGFloat m = [UIScreen mainScreen].bounds.size.width;
        self.headImageView = [[UIImageView alloc] initWithFrame:CGRectMake(20, 10, 40, 40)];
        self.headImageView.layer.masksToBounds = YES;
        self.headImageView.layer.cornerRadius = 20.f;
        self.headImageView.layer.borderWidth = 1.f;
        [self.contentView addSubview:self.headImageView];

        self.nameLabel = [[UILabel alloc] initWithFrame:CGRectMake(80, 10, 200, 15)];
        self.nameLabel.textColor = [UIColor blackColor];
        [self.contentView addSubview:self.nameLabel];

        self.statusLabel = [[UILabel alloc] initWithFrame:CGRectMake(80, 35, 100, 15)];
        self.statusLabel.textColor = [UIColor groupTableViewBackgroundColor];
        [self.contentView addSubview:self.statusLabel];

        self.netStatusImageView = [[UIImageView alloc] initWithFrame:CGRectMake(m-45, 5, 25, 25)];
        [self.contentView addSubview:self.netStatusImageView];

        self.contentView.backgroundColor = [UIColor whiteColor];
    }

    return self;
}

- (void)setCellModel:(CellModel *)cellModel {

    if (_cellModel != cellModel) {

        _cellModel = cellModel;
    }

    self.headImageView.image = cellModel.headImage;
    self.nameLabel.text = cellModel.name;
    self.statusLabel.text = cellModel.status;
    self.netStatusImageView.image = cellModel.netStatusImage;
    if (cellModel.isVip) {
        self.nameLabel.textColor = [UIColor redColor];
    }
}
其中,我们在给cell的model赋值时,将model属性与cell上面控件的值一一对应,达到简化代码,给control瘦身的目的。
## 自定义UITableViewHeaderFooterView ##
自定义UITableViewHeaderFooterView,可能很多朋友都没有经常用过,一般使用情况是直接自定义一个view,但涉及到比较多的内容时,复用就显得尤为重要。在这里我们需要自定义UITableViewHeaderFooterView,和自定义cell类似,都是子类化,属性也很相似。上代码。。。
#import <UIKit/UIKit.h>

@class SectionModel;

typedef void(^GWHeadViewExpandCallback)(BOOL isExpanded);

@interface HeadView : UITableViewHeaderFooterView

@property (nonatomic, strong)SectionModel *sectionModel;
@property (nonatomic, copy)GWHeadViewExpandCallback expandCallback;


@end


#import "HeadView.h"
#import "SectionModel.h"

@interface HeadView ()

@property (nonatomic, strong)UIImageView *expandImage;
@property (nonatomic, strong)UILabel *titleLabel;

@end

@implementation HeadView

- (instancetype)initWithReuseIdentifier:(NSString *)reuseIdentifier {

    if (self = [super initWithReuseIdentifier:reuseIdentifier]) {

        CGFloat m = [UIScreen mainScreen].bounds.size.width;
        self.expandImage = [[UIImageView alloc] initWithFrame:CGRectMake(10, (44-8)/2, 15, 8)];
        self.expandImage.image = [UIImage imageNamed:@"下拉图标"];
        [self.contentView addSubview:self.expandImage];

        self.titleLabel = [[UILabel alloc] initWithFrame:CGRectMake(m-100, 11, 90, 20)];
        self.titleLabel.textColor = [UIColor whiteColor];
        self.titleLabel.textAlignment = NSTextAlignmentRight;
        [self.contentView addSubview:self.titleLabel];

        UIButton *button = [UIButton buttonWithType:UIButtonTypeCustom];
        button.frame = CGRectMake(0, 0, m, 44);
        [button addTarget:self action:@selector(buttonClick:) forControlEvents:UIControlEventTouchUpInside];
        [self.contentView addSubview:button];

        self.contentView.backgroundColor = [UIColor groupTableViewBackgroundColor];
    }

    return self;
}

- (void)setSectionModel:(SectionModel *)sectionModel {

    if (_sectionModel != sectionModel) {

        _sectionModel = sectionModel;
    }

    if (sectionModel.isExpanded) {
        self.expandImage.transform = CGAffineTransformIdentity;
    }else {
        self.expandImage.transform = CGAffineTransformMakeRotation(M_PI);
    }

    self.titleLabel.text = sectionModel.sectionTitle;
}

- (void)buttonClick:(UIButton *)sender {

    self.sectionModel.isExpanded = !self.sectionModel.isExpanded;

    [UIView animateWithDuration:0.25 animations:^{

        if (self.sectionModel.isExpanded) {
            self.expandImage.transform = CGAffineTransformIdentity;
        }else {
            self.expandImage.transform = CGAffineTransformMakeRotation(M_PI);
        }
    }];

    if (self.expandCallback) {
        self.expandCallback(self.sectionModel.isExpanded);
    }
}
重写init方法相信大家都能看懂,重点讲讲sectionModel的set方法与按钮的点击方法。
在代码中我们可以看到,sectionModel的set方法中,我们给旋转按钮的transform属性设置了一个初始值,并且将section模型中的对应section标题的属性值赋给头视图中的label。
按钮的点击方法中,self.sectionModel.isExpanded = !self.sectionModel.isExpanded; 即点击完成之后就要将按钮的点击状态置为非状态。根据section模型的isExpanded的BOOL属性,对小角标添加transform动画改变角标朝向。expandCallback,因为展开与收起效果,我们添加了一个动画实现,在外部需要一个回调,所以在这里我添加了一个block。
创建UITableView
## 创建UITableView ##
- (void)viewDidLoad {
    [super viewDidLoad];

    self.tableView = [[UITableView alloc] initWithFrame:self.view.frame];
    self.tableView.dataSource = self;
    self.tableView.delegate = self;
    [self.tableView registerClass:[CostumTableViewCell class] forCellReuseIdentifier:kCellIdentifier];
    [self.tableView registerClass:[HeadView class] forHeaderFooterViewReuseIdentifier:kHeadIdentifier];

    [self.view addSubview:self.tableView];
}
## 配置数据源 ##
- (NSMutableArray *)dataSource {

    if (!_dataSource) {

        _dataSource = [[NSMutableArray alloc] initWithCapacity:20];

        for (int i = 0; i < 20; i ++) {
            SectionModel *sectionModel = [[SectionModel alloc] init];
            sectionModel.isExpanded = NO;
            sectionModel.sectionTitle = @"50/100";
            NSMutableArray *cellAry = [[NSMutableArray alloc] initWithCapacity:10];
            for (int j = 0; j < 10; j ++) {
                CellModel *cellModel = [[CellModel alloc] init];
                cellModel.headImage = [UIImage imageNamed:@"图层-13"];
                cellModel.name = [NSString stringWithFormat:@"测试%d",j];
                cellModel.status = @"在线";
                if (j < 5) {
                    cellModel.isVip = YES;
                }
                cellModel.netStatusImage = [UIImage imageNamed:@"wifi"];
                [cellAry addObject:cellModel];
            }
            sectionModel.cellModels = cellAry;
            [_dataSource addObject:sectionModel];
        }
    }

    return _dataSource;
}
因为不涉及真正开发,我们这里直接用for循环创建数据即可。
## dataSource & delegate ##
#pragma mark - dataSource & delegate
- (NSInteger)numberOfSectionsInTableView:(UITableView *)tableView {

    return self.dataSource.count;
}

- (NSInteger)tableView:(UITableView *)tableView numberOfRowsInSection:(NSInteger)section {

    SectionModel *sectionModel = self.dataSource[section];

    return sectionModel.isExpanded ? sectionModel.cellModels.count : 0;
}

- (UITableViewCell *)tableView:(UITableView *)tableView cellForRowAtIndexPath:(NSIndexPath *)indexPath {

    CostumTableViewCell *cell = [tableView dequeueReusableCellWithIdentifier:kCellIdentifier forIndexPath:indexPath];

    SectionModel *sectionModel = self.dataSource[indexPath.section];
    cell.cellModel = sectionModel.cellModels[indexPath.row];

    return cell;
}

- (UIView *)tableView:(UITableView *)tableView viewForHeaderInSection:(NSInteger)section {

    HeadView *view = [tableView dequeueReusableHeaderFooterViewWithIdentifier:kHeadIdentifier];

    SectionModel *sectionModel = self.dataSource[section];
    view.sectionModel = sectionModel;
    view.expandCallback = ^(BOOL isExpanded) {

        [tableView reloadSections:[NSIndexSet indexSetWithIndex:section] withRowAnimation:UITableViewRowAnimationAutomatic];
    };

    return view;
}

- (CGFloat)tableView:(UITableView *)tableView heightForRowAtIndexPath:(NSIndexPath *)indexPath {
    return 60;
}

- (CGFloat)tableView:(UITableView *)tableView heightForHeaderInSection:(NSInteger)section {
    return 44;
}


 2920
2920

 被折叠的 条评论
为什么被折叠?


