


前言
目前正在学习3D目标检测与知识蒸馏方向的知识,大部分基于lidar的3D目标检测算法使用的是OpenPCDet框架,该框架的安装看起来十分简单,但是在安装其中spconv库的时候及其麻烦,尤其是spcon1.x版本的安装出错的bug极多。本文主要内容如下:
- 首先介绍一下spconv2.x的安装,该安装是最为简单的;
- 由于部分算法框架使用的是spcon1.x版本,因此本文将记录一下安装spcon1.x版本的安装过程!!!!
- 最后介绍一下安装spconv1.x中遇到的问题及解决办法。
展望:将介绍一种spconv的免编译直接安装方法(还在测试阶段,敬请期待!)
一、spcon2.x版本的安装
本文根据一个我安装成功的spconv2.x版本的流程来写的,首先介绍一下我的服务器环境配置:
操作系统版本:Ubuntu18.04
GPU:1080Ti
CUDA版本:11.1
CUDNN版本:8.0.5
Pytorch:1.8.1
Python:3.7
gcc版本:7.5.0
Cmake版本:3.18.5
安装流程
1.安装spcon2.x版本所需要求

2.创建虚拟环境并安装相应的pytorch、torchvision
conda create -n pcdet python=3.7
3.安装spcon2.x
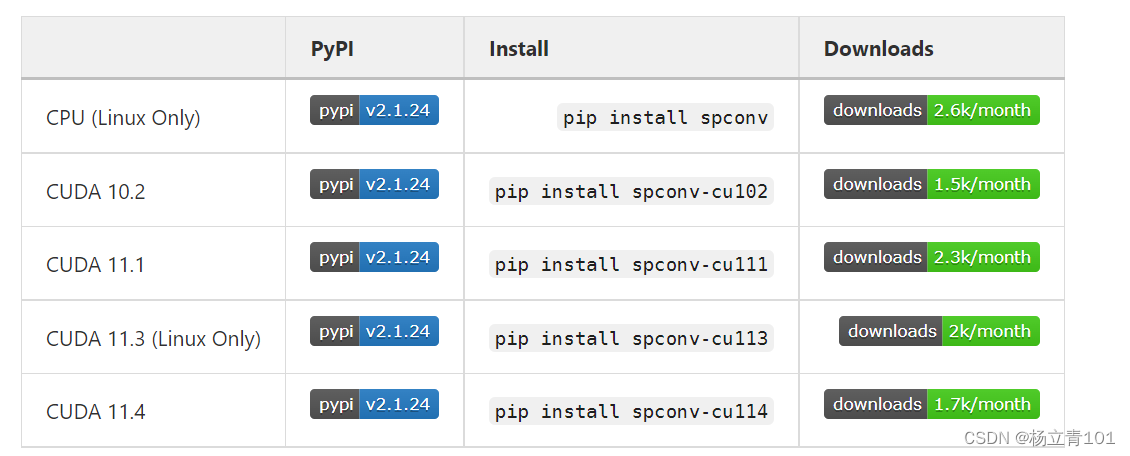
首先我们看下图,介绍了10.2及其以上的CUDA版本下spcon2.x的安装命令,可以使用一键安装,远比安装spconv1.x要简单许多。
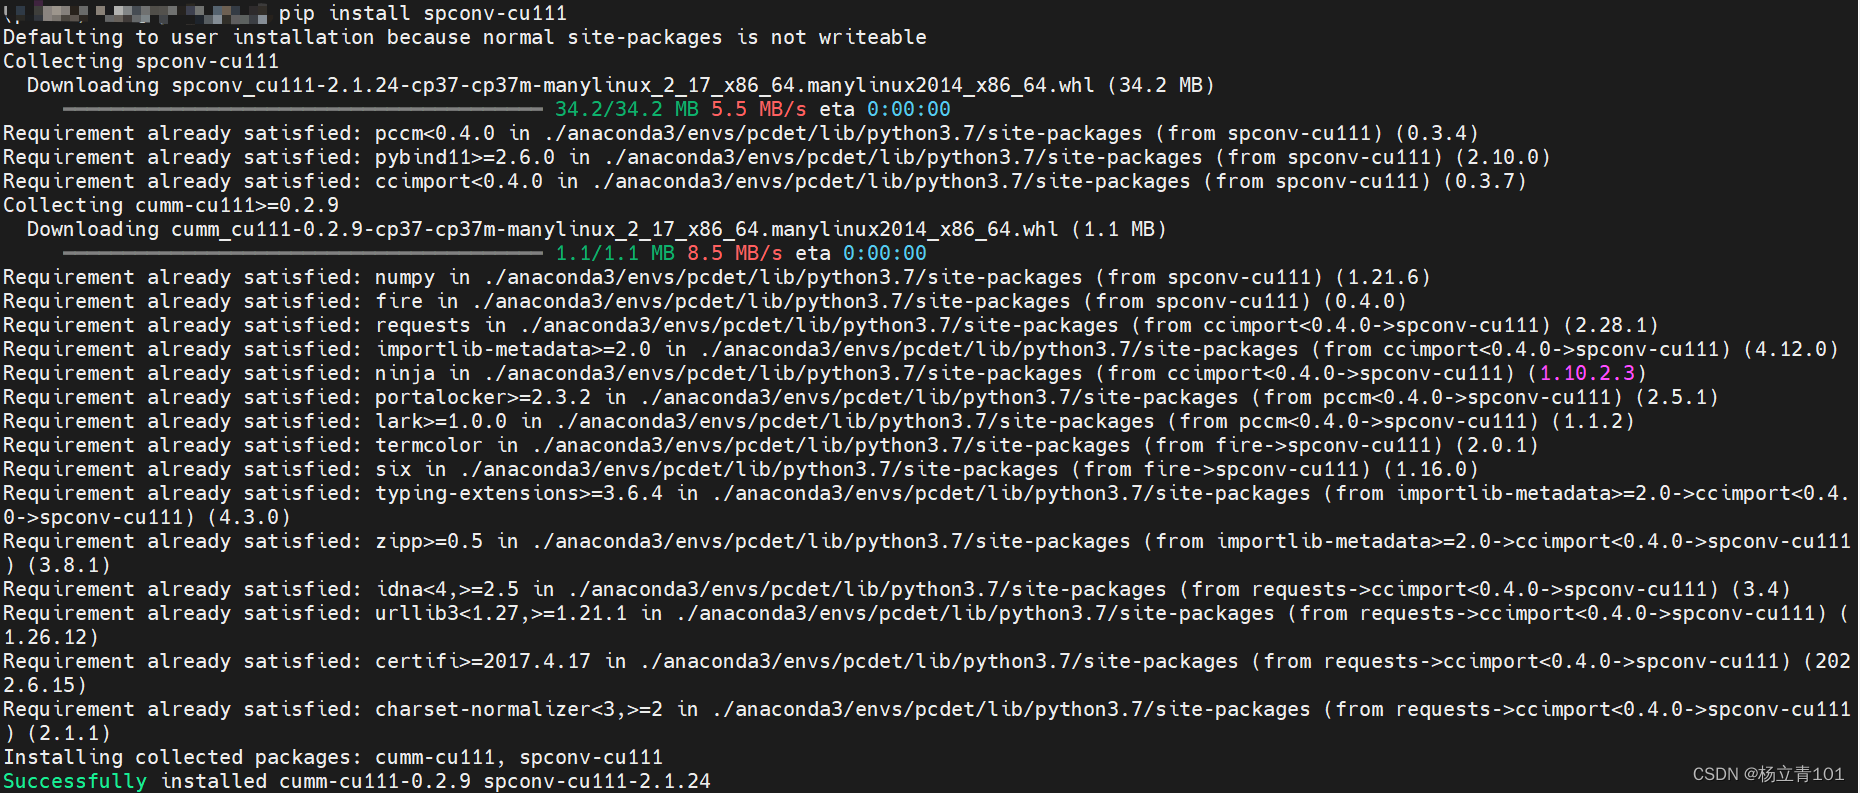
安装过程截图如下:
4.测试spcon2.x是否安装成功
python
import spconv.pytorch as spconv

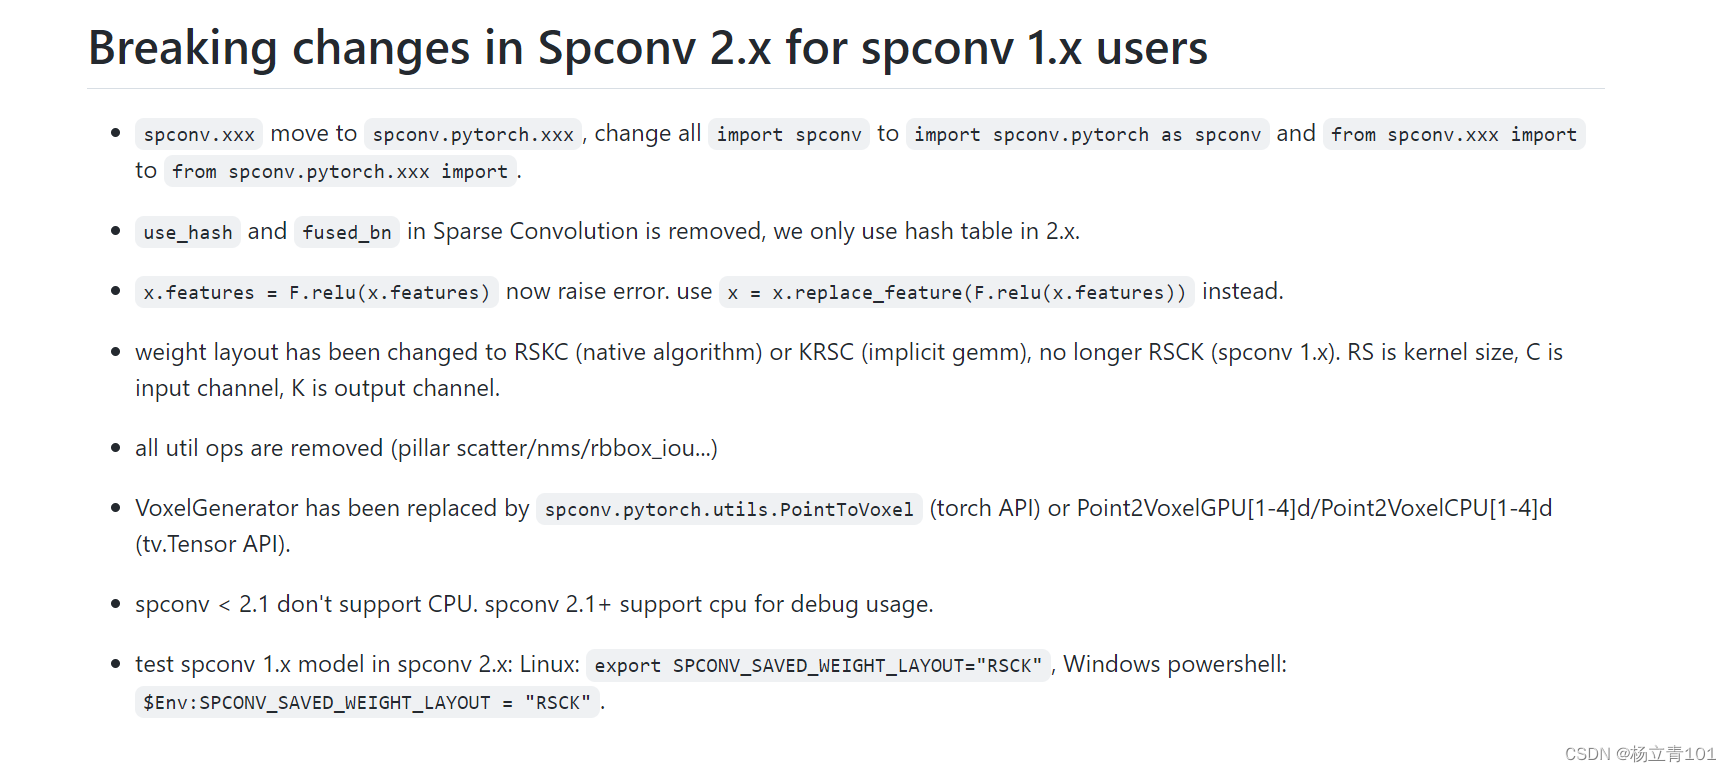
可以看到此时spcon2.x已经安装成功。但是部分用户可能会用spconv2.x跑一些用spcon1.x运行的项目,这会导致很多bug,官方对spconv2.x相比于spconv1.x的更改介绍,链接放在了下方。具体的内容如下图,对项目中使用spconv1.x按照下图中的要求修改,即可在spconv2.x中使用spcon1.x。具体的修改方法可以参照第三部分的问题7。
二、安装spcon1.x版本安装流程、问题、解决办法
本文根据一个我安装成功的spconv1.2版本的流程来写的,首先介绍一下我的服务器环境配置:
操作系统版本:Ubuntu18.04
GPU:1080Ti
CUDA版本:10.1
CUDNN版本:7.6.5
Pytorch:1.4.0
Python:3.8
gcc版本:7.5.0
Cmake版本:
1.查看cuda版本
在开始安装的之前查看自己的cuda,cudnn的版本信息,可以使用以下任一指令查看cuda:
cat /usr/local/cuda/version.txt
nvcc --version
nvcc -V
再通过下方的指令来查看cudnn的版本信息,如果显示是 No such file or directory,可能是安装包的名字发生了更改(比如安装cuda名字实际上)或者设置了软连接,可以直接进入到文件夹中,找到cudnn_version.h,打开之后也可以看到cudnn的版本信息。
cat /usr/local/cuda/include/cudnn.h | grep CUDNN_MAJOR -A 2
注意安装的时候一定要将CUDA与Cudnn的版本信息对应上,否则在后续安装过程中会发生 报错:subprocess.CalledProcessError: Command '['cmake',,具体的解决办法可以参考:参照第三部分的问题2。
2.下载spcon1.2版本
下文第一个是spconv1.2版本,也可以下载1.0版本,spconv1.2、spcon1.0版本也在我上文的环境下通过了测试:
#spconv1.2
git clone -b v1.2.1 https://github.com/traveller59/spconv.git --recursive
#spconv1.0  在我配置的环境下运行成功
git clone https://github.com/poodarchu/spconv.git --recursive
3.安装依赖
这里比较坑,我们需要正确的安装cudnn,如果没有正确安装的话会出现问题2,在这里我卡了特别久,而且网上也没有比较好的方法。可以使用下方的命令conda install cudnn。但是conda install cudnn也会有一些问题,比如在CUDA11.1环境下会执行安装CUDA11.3对应的版本,这个版本是不合适的,所以我还是建议直接去官方安装,官方的链接以及cudnn的安装链接如下:
Ubuntu18.04+CUDA10.1+CUDNN7.6.5安装
或者根据下方的指令安装,安装注意它自动安装的版本是否安装正确!!!!
conda install cudnn
安装其他的依赖:
conda install boost
4.anaconda 创建虚拟环境
以下是我测试安装spconv1.x成功的一个环境配置,CUDA版本为10.1
conda create --name spconv python=3.8 pytorch=1.4 torchvision=0.5 cudatoolkit=10.1 cudatoolkit-dev=10.1 cmake --channel pytorch
5.进入虚拟环境
source activate
conda activate spconv
6.之后执行spconv目录中的setup.py,执行如下命令
python setup.py bdist_wheel
7.等待安装完成后,若没有报错。则继续执行如下的操作:
cd ./dist
8.进入到dist文件夹之后可以看到spconv-xxxx.whl文件,安装:
pip install xxx.whl
安装成功后的截图如下:

9.测试spconv库是否会安装成功
python
#然后输入import spconv,未发生报错即说明成功安装spconv了
import spconv
10.速成安装版,当前仅自用
conda create -n SparseKD python=3.8
pip install torch==1.10.1+cu111 torchvision==0.11.2+cu111 torchaudio==0.10.1 -f https://download.pytorch.org/whl/cu113/torch_stable.html
git clone -b v1.2.1 https://github.com/traveller59/spconv.git --recursive
cd spconv/
python setup.py bdist_wheel
cd ./dist
pip install spconv-1.2.1-cp38-cp38-linux_x86_64.whl
cd ..
pip install -r requirements.txt
#openpcdet
python setup.py develop

python prune.py --cfg_file /home/hzc/PythonProject/SparseKD/tools/cfgs/kitti_models/cp-pillars/cp-pillar-v0.32_sparsekd.yaml
三、遇到的问题
1.安装gcc-8报错
报错代码:
Unmet dependencies. Try 'apt --fix-broken install' with no packages (or specify a solution)
报错截图:
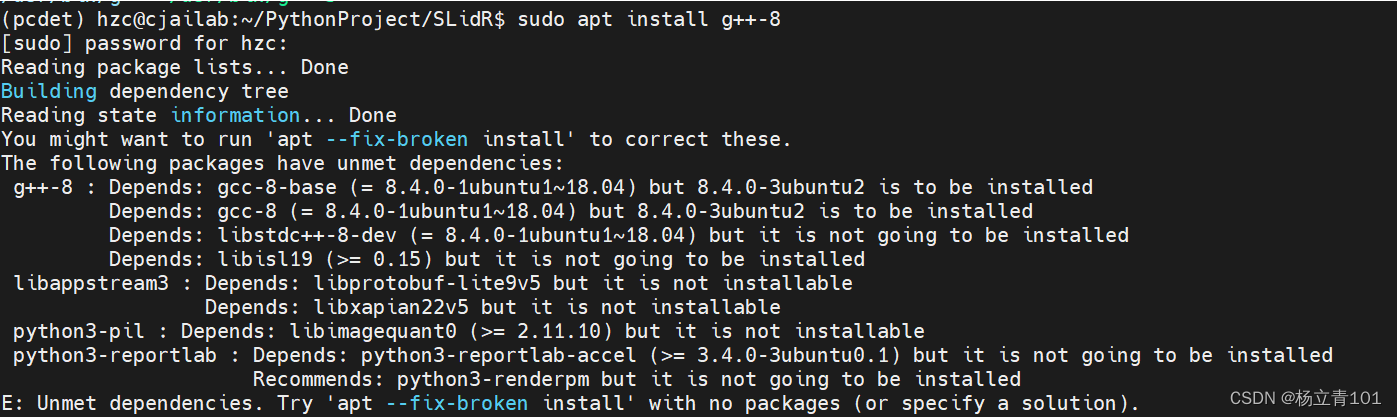
大概意思是:未设置依赖项。尝试“apt–fix broken install”,不使用包(或指定解决方案)根据问题提示信息,是由于所依赖的包linux-image-4.10.0-35-generic并没有被正确安装导致。linux-image-x.x.x是内核文件,从提示信息上看,应该是升级过程中断导致的问题。我们根据提示执行修复命令,并重新执行更新和升级,确保完整修复问题。
sudo apt --fix-broken install
sudo apt-get update
sudo apt-get upgrade
输入第一个指令sudo apt --fix-broken install之后又出现了如下的报错;
https://blog.csdn.net/qq_41035283/article/details/119614932
E: Sub-process /usr/bin/dpkg returned an error code (1)
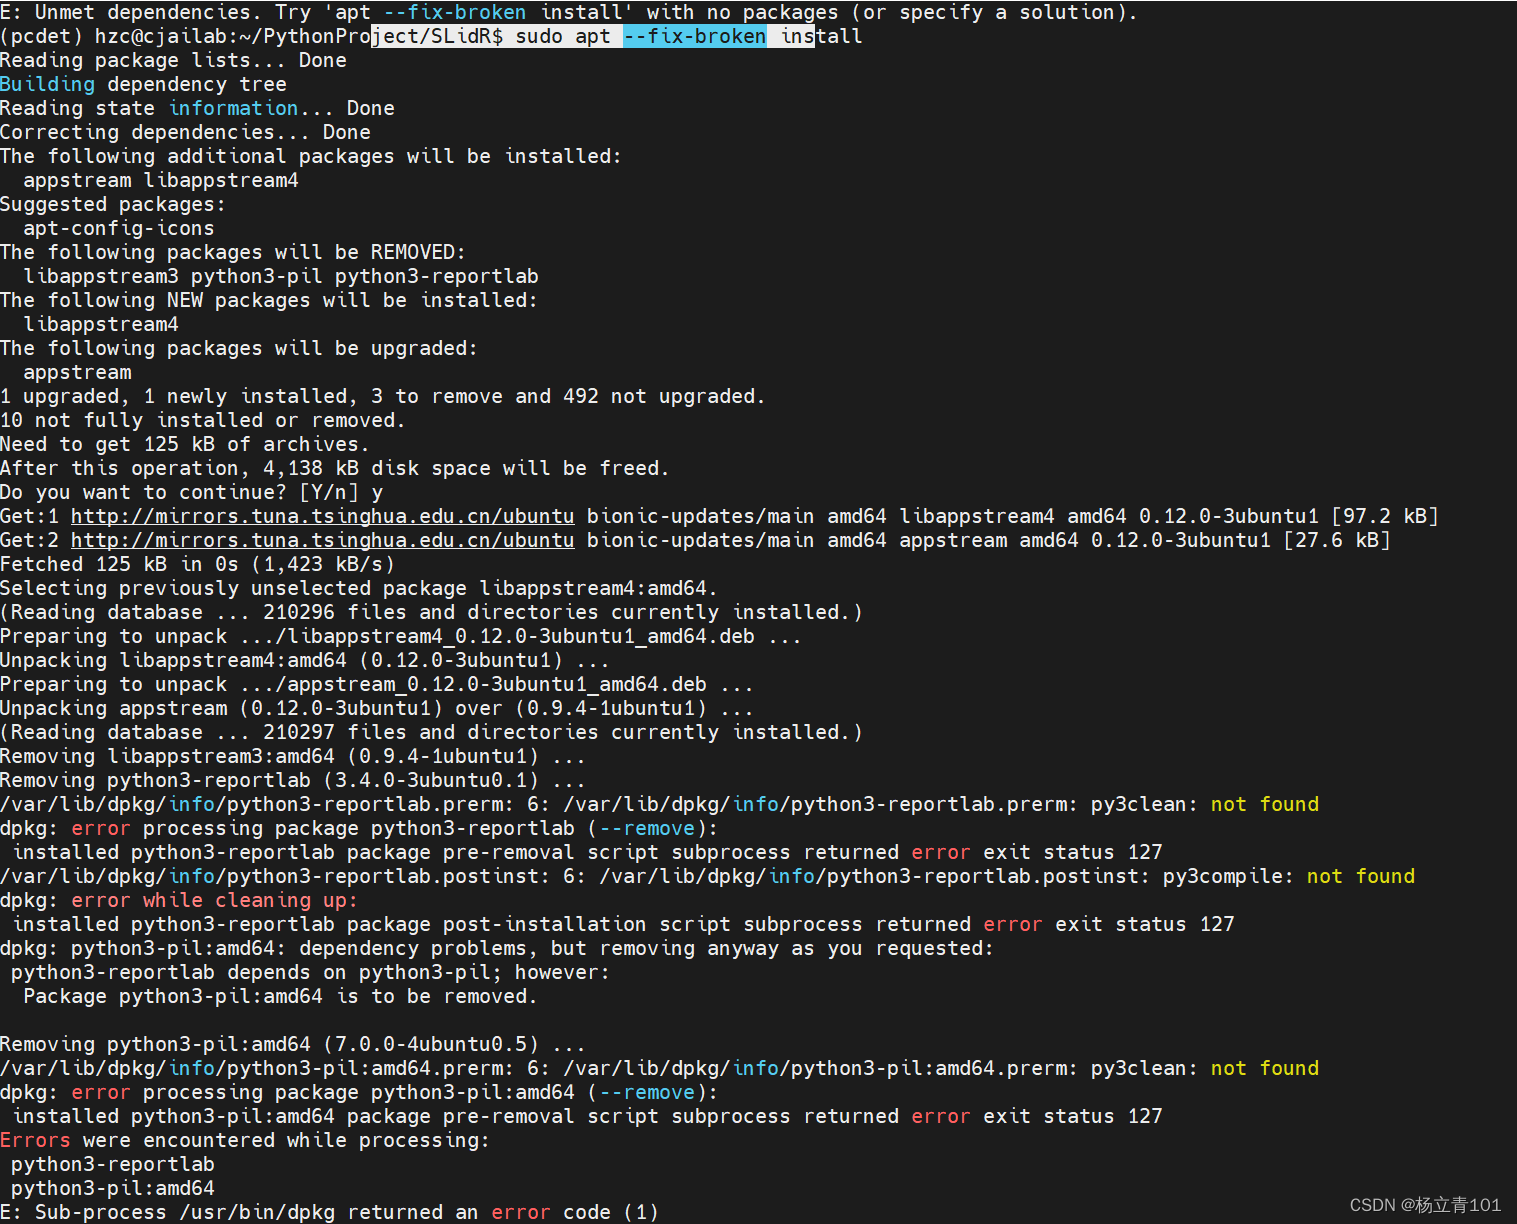
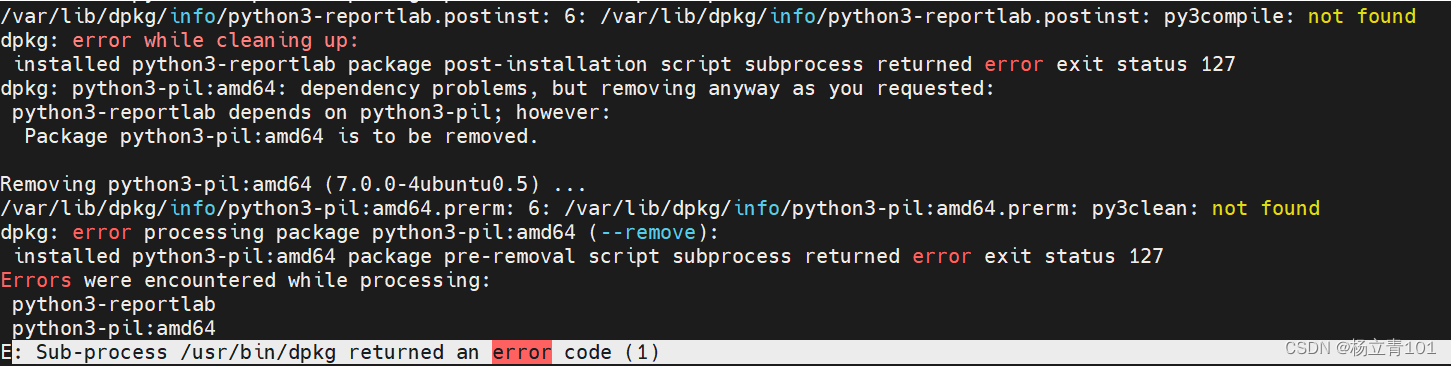
说明dpkg这一package installers 出现了问题。这一错误一般是使用dpkg安装软件失败或者被中断后出现的,解决办法是使用如下的代码:
解决方法引用自解决Sub-process /usr/bin/dpkg returned an error code (1)
cd /var/lib/dpkg/
sudo mv info/ info_bak          # 现将info文件夹更名
sudo mkdir info                 # 再新建一个新的info文件夹
sudo apt-get update             # 更新
sudo apt-get -f install         # 修复
sudo mv info/* info_bak/        # 执行完上一步操作后会在新的info文件夹下生成一些文件,现将这些文件全部移到info_bak文件夹下
sudo rm -rf info                # 把自己新建的info文件夹删掉
sudo mv info_bak info           # 把以前的info文件夹重新改回名
重新安装gcc-8再次报错:
“Unable to correct problems, you have held broken packages”
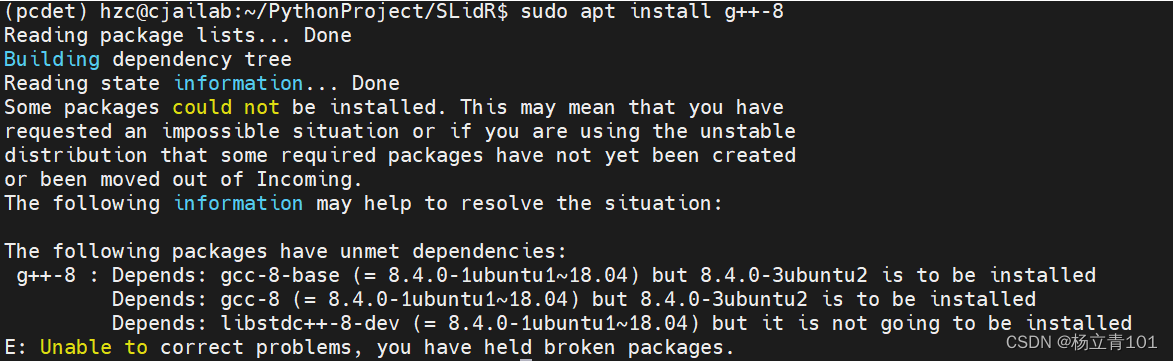
解决办法:我们就需要手动安装这个破损的包,通过一个接一个地尝试安装的依赖包包括依赖包的依赖包。最终我们一定能找到那个最终缺失的那个包。
sudo apt install package_name
其他的方案可参考:解决Unable to Correct Problems ‘You have Held Broken Packages’
2.安装spconv库时遇到:subprocess.CalledProcessError: Command '['cmake',
报错代码:
subprocess.CalledProcessError: Command '['cmake', '/home/xxx/spconv', '-DCMAKE_PREFIX_PATH=/home/hzc/.local/lib/python3.8/site-packages/torch', '-DPYBIND11_PYTHON_VERSION=3.8', '-DSPCONV_BuildTests=OFF', '-DPYTORCH_VERSION=10801', '-DCMAKE_CUDA_FLAGS="--expt-relaxed-constexpr" -D__CUDA_NO_HALF_OPERATORS__ -D__CUDA_NO_HALF_CONVERSIONS__', '-DCMAKE_LIBRARY_OUTPUT_DIRECTORY=/home/xxx/spconv/build/lib.linux-x86_64-3.8/spconv', '-DCMAKE_BUILD_TYPE=Release']' returned non-zero exit status 1.
报错截图:

报错原因:这是CUDA与Cudnn的版本不一致造成的,需要安装正确的Cudnn版本,安装cudnn版本的方法已经在安装spconv1.x的步骤三介绍过了。
3.遇到的gcc、cuda、python等出现版本不兼容的问题
当遇到的gcc、cuda、python等出现版本不兼容需要切换gcc、cuda、python的版本信息时可以参考我的博客:GCC、CUDA、Python的版本不兼容情况下,新版本安装以及多版本切换。
4.源错误——换清华源与恢复官方默认
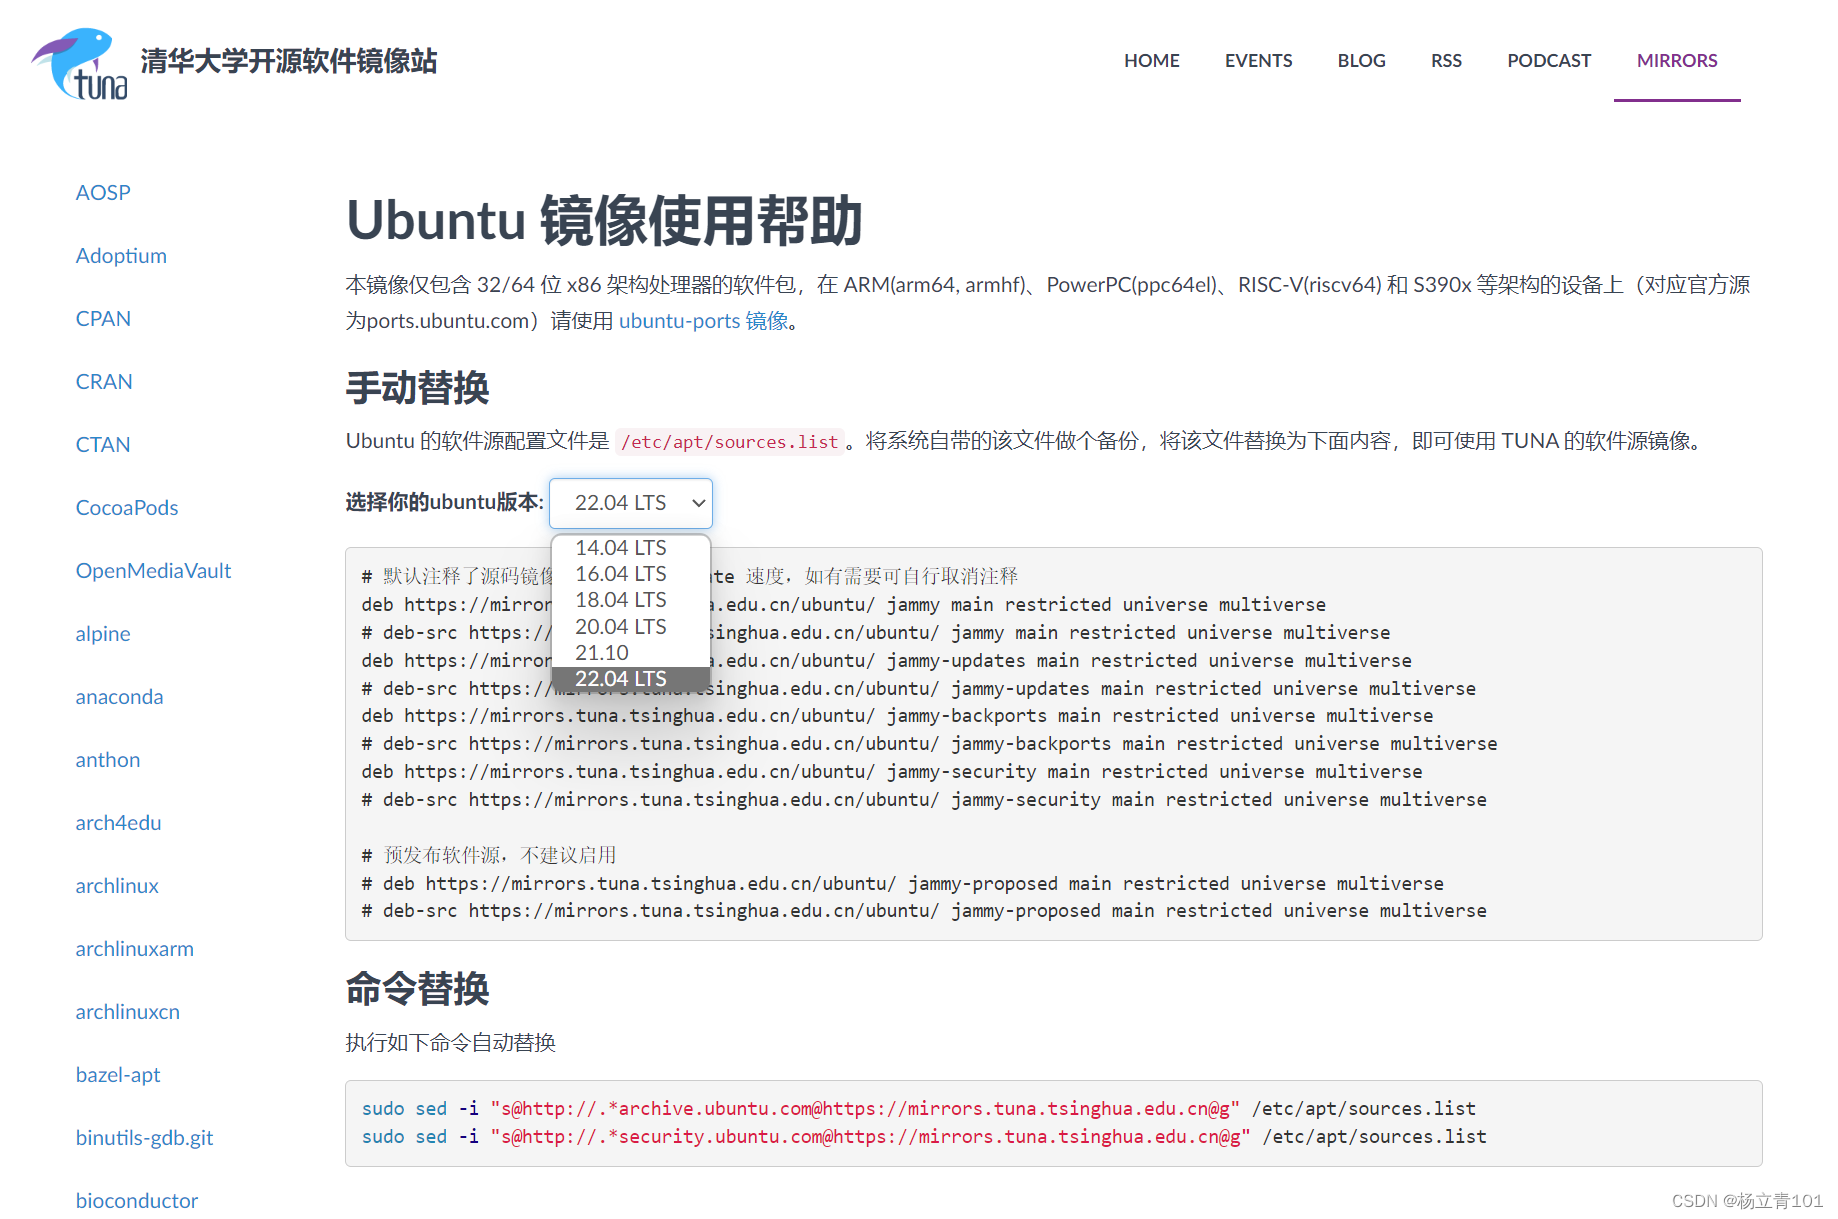
换清华源,注意!!!!换源不是在网上随便找一个清华源都可以成功的,还要考虑到ubunt的版本问题,不同版本换清华源是的内容是不一样的,这里贴一下清华源的网站:https://mirrors.tuna.tsinghua.edu.cn/help/ubuntu/
换源的步骤如下:
- 备份原有的源:
#备份官方更新源文件
cp /etc/apt/sources.list /etc/apt/sources.list.bak
- 修改sources.list配置文件:
sudo vim /etc/apt/sources.list
- 复制上文中清华源的地址,以Ubuntu18.04为例:
# 默认注释了源码镜像以提高 apt update 速度,如有需要可自行取消注释
deb https://mirrors.tuna.tsinghua.edu.cn/ubuntu/ xenial main restricted universe multiverse
# deb-src https://mirrors.tuna.tsinghua.edu.cn/ubuntu/ xenial main restricted universe multiverse
deb https://mirrors.tuna.tsinghua.edu.cn/ubuntu/ xenial-updates main restricted universe multiverse
# deb-src https://mirrors.tuna.tsinghua.edu.cn/ubuntu/ xenial-updates main restricted universe multiverse
deb https://mirrors.tuna.tsinghua.edu.cn/ubuntu/ xenial-backports main restricted universe multiverse
# deb-src https://mirrors.tuna.tsinghua.edu.cn/ubuntu/ xenial-backports main restricted universe multiverse
deb https://mirrors.tuna.tsinghua.edu.cn/ubuntu/ xenial-security main restricted universe multiverse
# deb-src https://mirrors.tuna.tsinghua.edu.cn/ubuntu/ xenial-security main restricted universe multiverse
# 预发布软件源,不建议启用
# deb https://mirrors.tuna.tsinghua.edu.cn/ubuntu/ xenial-proposed main restricted universe multiverse
# deb-src https://mirrors.tuna.tsinghua.edu.cn/ubuntu/ xenial-proposed main restricted universe multiverse
- vim的指令使用方法:
首先按a进入编辑模式,注释掉原先的源,将上述的内容复制粘贴到最下方,然后再按Esc,即可退出编辑模式,最后按一下 冒号:,输入wq代表保存并退出,即可回到主命令行。 - 最后输入更新命令更新源,即可成功实现换源
sudo apt update
恢复官方默认源,由于有些软件的安装或者更新在清华源中没有,可能需要我们使用官方的默认源,这个时候需要把官方的源换回来,步骤和最开始的相同,但是内容需要改为下列的内容:
```bash
#deb cdrom:[Ubuntu 20.04 LTS _Focal Fossa_ - Release amd64 (20200423)]/ focal main restricted

# See http://help.ubuntu.com/community/UpgradeNotes for how to upgrade to
# newer versions of the distribution.
deb http://cn.archive.ubuntu.com/ubuntu/ focal main restricted
# deb-src http://cn.archive.ubuntu.com/ubuntu/ focal main restricted

## Major bug fix updates produced after the final release of the
## distribution.
deb http://cn.archive.ubuntu.com/ubuntu/ focal-updates main restricted
# deb-src http://cn.archive.ubuntu.com/ubuntu/ focal-updates main restricted

## N.B. software from this repository is ENTIRELY UNSUPPORTED by the Ubuntu
## team. Also, please note that software in universe WILL NOT receive any
## review or updates from the Ubuntu security team.
deb http://cn.archive.ubuntu.com/ubuntu/ focal universe
# deb-src http://cn.archive.ubuntu.com/ubuntu/ focal universe
deb http://cn.archive.ubuntu.com/ubuntu/ focal-updates universe
# deb-src http://cn.archive.ubuntu.com/ubuntu/ focal-updates universe

## N.B. software from this repository is ENTIRELY UNSUPPORTED by the Ubuntu
## team, and may not be under a free licence. Please satisfy yourself as to
## your rights to use the software. Also, please note that software in
## multiverse WILL NOT receive any review or updates from the Ubuntu
## security team.
deb http://cn.archive.ubuntu.com/ubuntu/ focal multiverse
# deb-src http://cn.archive.ubuntu.com/ubuntu/ focal multiverse
deb http://cn.archive.ubuntu.com/ubuntu/ focal-updates multiverse
# deb-src http://cn.archive.ubuntu.com/ubuntu/ focal-updates multiverse

## N.B. software from this repository may not have been tested as
## extensively as that contained in the main release, although it includes
## newer versions of some applications which may provide useful features.
## Also, please note that software in backports WILL NOT receive any review
## or updates from the Ubuntu security team.
deb http://cn.archive.ubuntu.com/ubuntu/ focal-backports main restricted universe multiverse
# deb-src http://cn.archive.ubuntu.com/ubuntu/ focal-backports main restricted universe multiverse

## Uncomment the following two lines to add software from Canonical's
## 'partner' repository.
## This software is not part of Ubuntu, but is offered by Canonical and the
## respective vendors as a service to Ubuntu users.
# deb http://archive.canonical.com/ubuntu focal partner
# deb-src http://archive.canonical.com/ubuntu focal partner

deb http://security.ubuntu.com/ubuntu focal-security main restricted
# deb-src http://security.ubuntu.com/ubuntu focal-security main restricted
deb http://security.ubuntu.com/ubuntu focal-security universe
# deb-src http://security.ubuntu.com/ubuntu focal-security universe
deb http://security.ubuntu.com/ubuntu focal-security multiverse
# deb-src http://security.ubuntu.com/ubuntu focal-security multiverse

# This system was installed using small removable media
# (e.g. netinst, live or single CD). The matching "deb cdrom"
# entries were disabled at the end of the installation process.
# For information about how to configure apt package sources,
# see the sources.list(5) manual.
```
5.Ubuntu18.04环境下CMake3.15.3的安装
由于安装spconv对Cmake的版本也有要求,我们需要安装新的Cmake版本,这里我安装的是Cmake 3.15.3
具体的安装命令如下:
-
下载cmake,GitHub链接为:cmake下载链接
-
下载需要的Cmake版本,然后对安装包解压:
tar -xvzf cmake-3.15.3.tar.gz -
进入解压后的安装包
cmake-3.15.3cd cmake-3.15.3 -
执行引导文件,需要等待一段时间:
./bootstrap -
接着依次执行下方的命令进行安装:
make sudo make install -
安装完毕之后,可以查看Cmake的版本信息:
cmake --version
6.安装spconv1.x的时候的third_party中pybind11是空的
如果之前参考别的教程,安装别人提供的git链接下载spconv库会有问题:
1.如果git代码中没有限制spconv版本,比如:
git clone https://github.com/traveller59/spconv spconv_8da6f96 --recursive
那么此时安装的是最新的2.0版本,和我们平常安装的1.x版本不符,安装注定失败。
2.有的版本在中的third_party/pybind11包是空的,也会导致安装失败,我们要检查third_party/pybind11包中是否为空,如果是空的,则需要单独下载其中的文件并放入pybind11。
这里我提供了两个亲测可用的spconv1.x安装链接:
#spconv1.2
git clone -b v1.2.1 https://github.com/traveller59/spconv.git --recursive
#spconv1.0  在我配置的环境下运行成功
git clone https://github.com/poodarchu/spconv.git --recursive
7.spconv版本更迭导致的Bug
bug内容:
AttributeError: module ‘spconv‘ has no attribute ‘SparseModule‘
首先查看spconv库中提到的版本更新内容,主要是针对安装了spconv2.x的用户。
官方对spconv2.x相比于spconv1.x的更改介绍
GitHub上对spconv库版本更新后解决办法
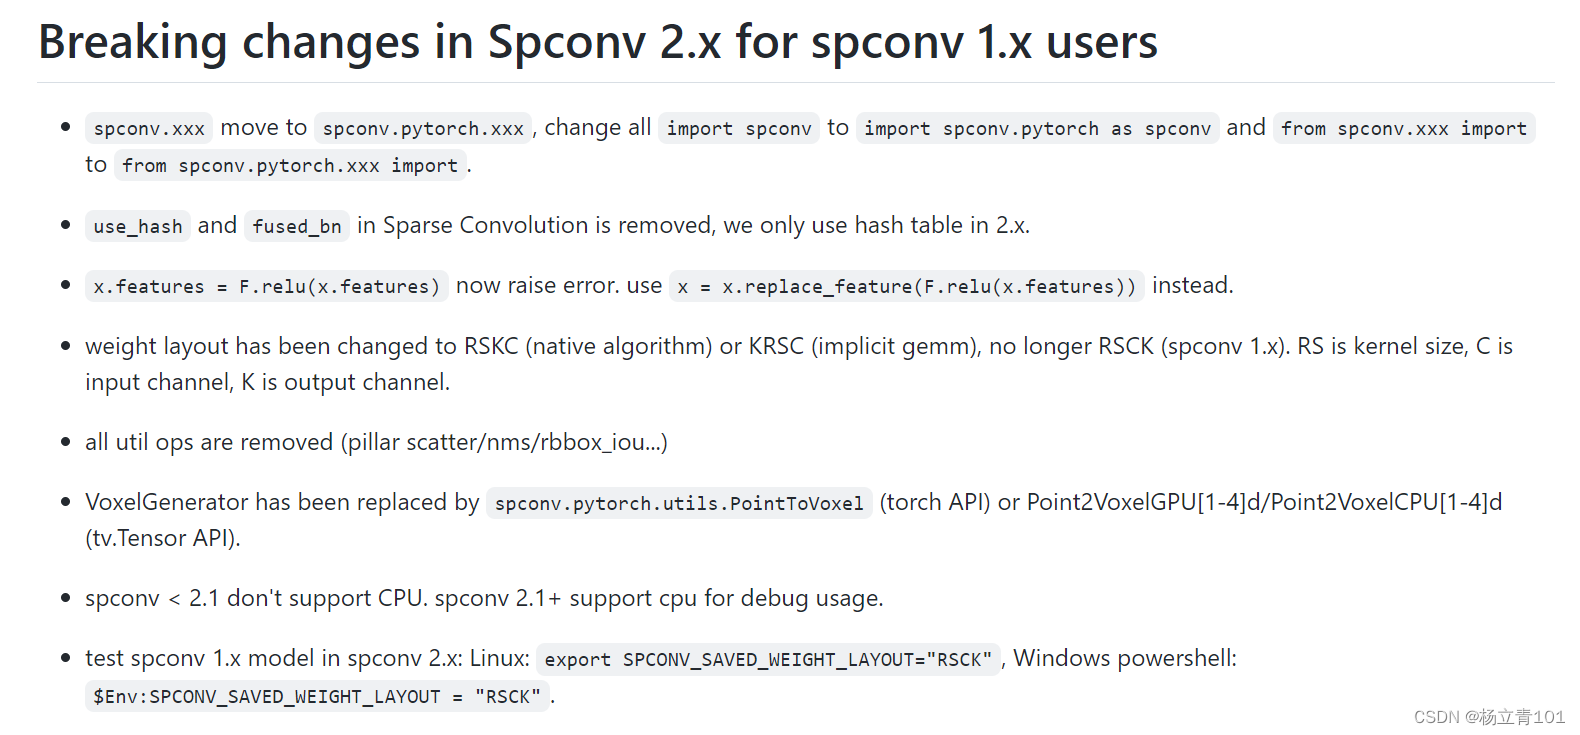
from spconv.pytorch import ops
from spconv.pytorch.conv import (SparseConv2d, SparseConv3d, SparseConvTranspose2d,
                         SparseConvTranspose3d, SparseInverseConv2d,
                         SparseInverseConv3d, SubMConv2d, SubMConv3d)
from spconv.pytorch.core import SparseConvTensor
from spconv.pytorch.identity import Identity
from spconv.pytorch.modules import SparseModule, SparseSequential
from spconv.pytorch.ops import ConvAlgo
from spconv.pytorch.pool import SparseMaxPool2d, SparseMaxPool3d
from spconv.pytorch.tables import AddTable, ConcatTable
解决办法如下:
以SparseModule为例,比如下方的代码会出现AttributeError: module ‘spconv‘ has no attribute ‘SparseModule‘报错,这个时候我们要对spconv库进行修改,将import spconv变为import spconv.pytorch as spconv即可。如下代码所示;
#spconv1.x版本
import spconv
a = spconv.SparseModule()
#spconv2.x版本
import spconv.pytorch as spconv
a = spconv.SparseModule()
8.No CMAKE_CUDA_COMPILER could be found:
报错代码:
-- The CUDA compiler identification is unknown
CMake Error at CMakeLists.txt:3 (enable_language):
  No CMAKE_CUDA_COMPILER could be found.

  Tell CMake where to find the compiler by setting either the environment
  variable "CUDACXX" or the CMake cache entry CMAKE_CUDA_COMPILER to the full path to the compiler, or to the compiler name if it is in the PATH.

-- Configuring incomplete, errors occurred!
See also "/home/aaeon/hzc/yolo-tensorrt/build/CMakeFiles/CMakeOutput.log".
See also "/home/aaeon/hzc/yolo-tensorrt/build/CMakeFiles/CMakeError.log".
报错截图:
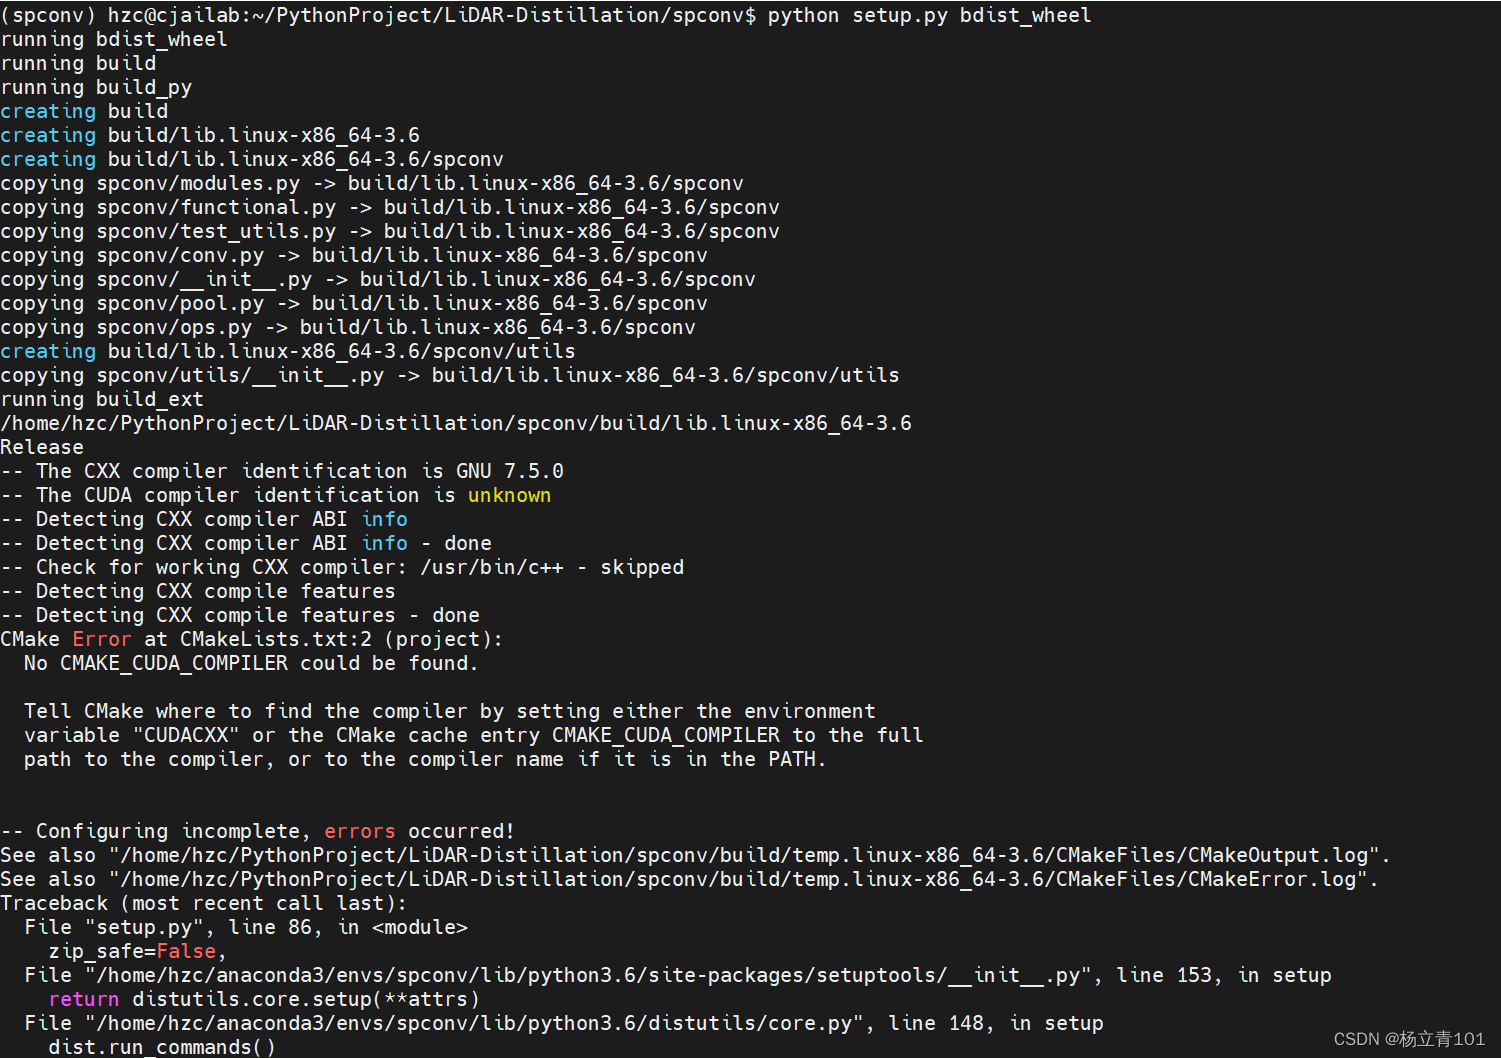
问题原因:
提示信息很明确,找不CUDA编译器,需要设置CUDACXXCMAKE_CUDA_COMPILER变量,或者增加PATH。
解决方法:
-
找到CUDA的位置,一般在/usr/local位置为cuda的安装包。进入该文件下,使用
ls命令即可看到cuda文件夹,如图:

其中cuda-10.1、cuda11.1就是我自己下载的cuda;而cuda则是指向cuda-10.2的软连接文件,有关修改cuda软连接的方法可以看我的博客: -
指定cuda编译器:
export PATH=/usr/local/cuda-10.1/bin/:$PATH或者进入到安装的spconv安装包中,找到CMakeLists.txt,添加自己的cuda的编译路 径:
set(CMAKE_CUDA_COMPILER "/usr/local/cuda-10.1/bin/nvcc")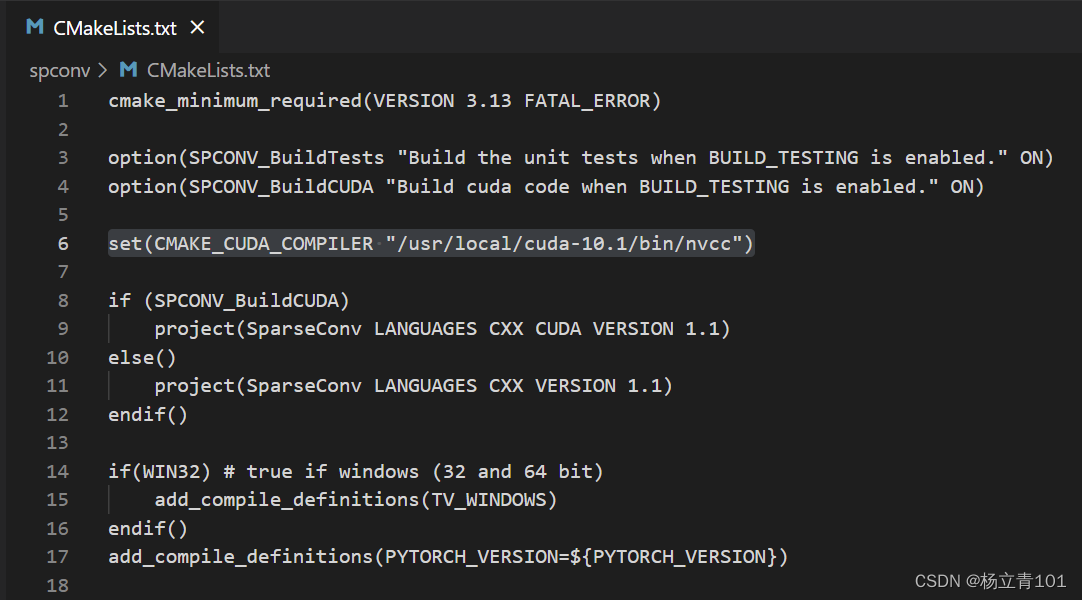
9.anaconda创建和删除环境的命令
这里的py38是我随意起的环境名,可以自己定,后面的python版本也是可以指定的。比如我这里是创建是python3.8版本,名称为py38的环境。在命令行输入下方的指令之后我们即可看到安装的界面输入y,即可实现安装。
conda create -n py38 python=3.8
激活环境命令:
conda activate py38
删除环境命令:
conda remove -n py38 --all
如果发现删除的不是很彻底,我们可以进入anaconda环境下的envs文件夹下,找到py38文件夹,使用以下的命令完全删除:
rm -rf py38
总结
本文就运行OpenPCDet中遇到的spconv安装问题,记录了一下Spconv1.x与Spconv2.x的安装问题及解决方法,在这里安装spconv卡了很久,但是也收获很多,后续我将接着更一期spconv的免编译直接安装方法,敬请期待!!


 711
711


 被折叠的 条评论
为什么被折叠?
被折叠的 条评论
为什么被折叠?
 到【灌水乐园】发言


