


python 科学计算三维可视化笔记 第五周 交互界面
内容来自中国大学MOOC,北京理工大学,python数据分析与展示课程,侵删。
如有错误,烦请指出。
python 科学计算三维可视化笔记 第五周 交互界面
一、Traits 基础
1. Traits 介绍
- Traits 库可以为 python 添加类型定义
- Traits 属性解决 color 类型问题
- 接受能表示颜色的各种类型的值
- 赋值为不能表达颜色的值时,能够立即捕捉到错误,提供一个错误报告,高速用户能够接受什么值
- 提供一个内部、标准的颜色表达方式
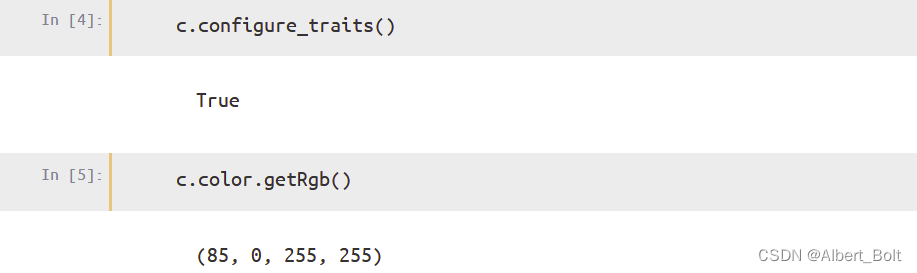
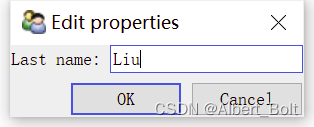
Traits 属性表示颜色的例子,Color 是一个 Trait 类型,在 Circle 类中用它定义了一个 color 属性:
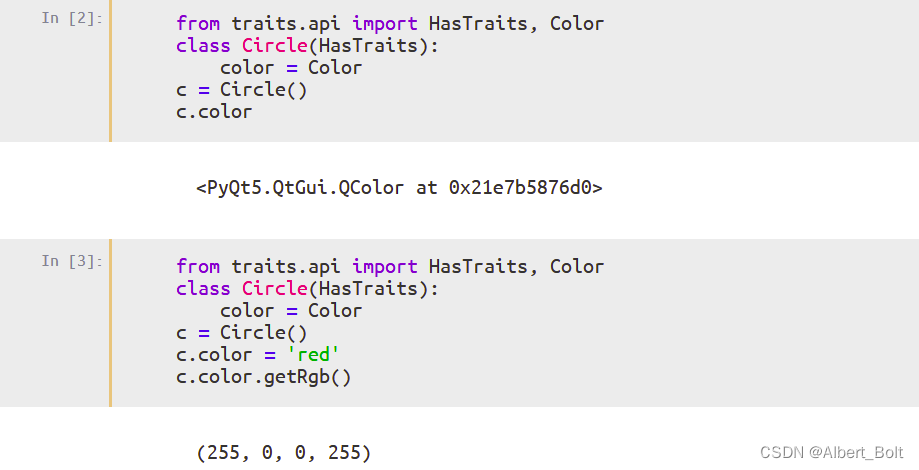
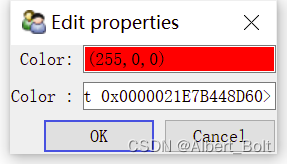
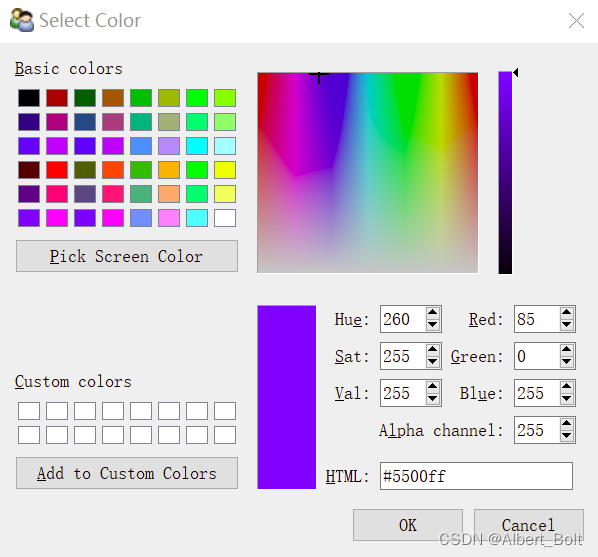
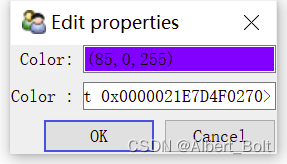
用 c.configure_traits() 实现交互选择颜色,确定新颜色后返回 True:
2. Traits 属性的功能
- Trait 库为 python 对象的属性增加了类型定义功能
- 还提供了功能:
- 初始化:每个 Trait 属性都有自己的默认值
- 验证:Trait 属性有明确的类型定义,满足定义的值才能赋值给属性
- 代理:Trait 属性值可以代理给其他对象的属性。
- 监听:Trait 属性值发生变化时,运行事先指定的函数
- 可视化:拥有 Trait 属性的对象,可生成编辑 Trait 属性的界面
一个实例:
from traits.api import Delegate, HasTraits, Instance, Int, Str
class Parent(HasTraits):
# 初始化:last_name为'Zhang'
last_name = Str('Zhang')
class Child(HasTraits):
age = Int
# 验证:father属性的值必须是Parent类的实例
father = Instance(Parent)
# 代理:Child实例的last_name属性代理给其father属性的last_name
last_name = Delegate('father')
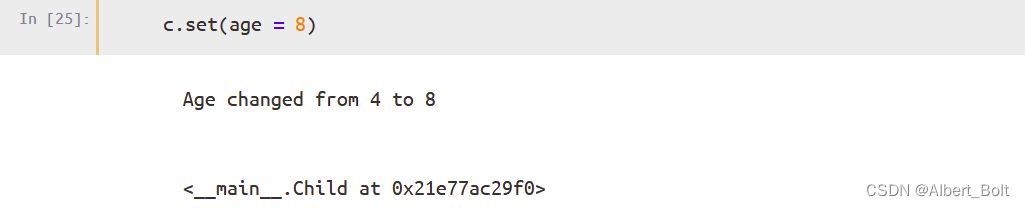
# 监听:当age属性点值被修改时,下面的函数将被运行
def _age_changed(self, old, new):
print('Age changed from %s to %s' % (old,new))
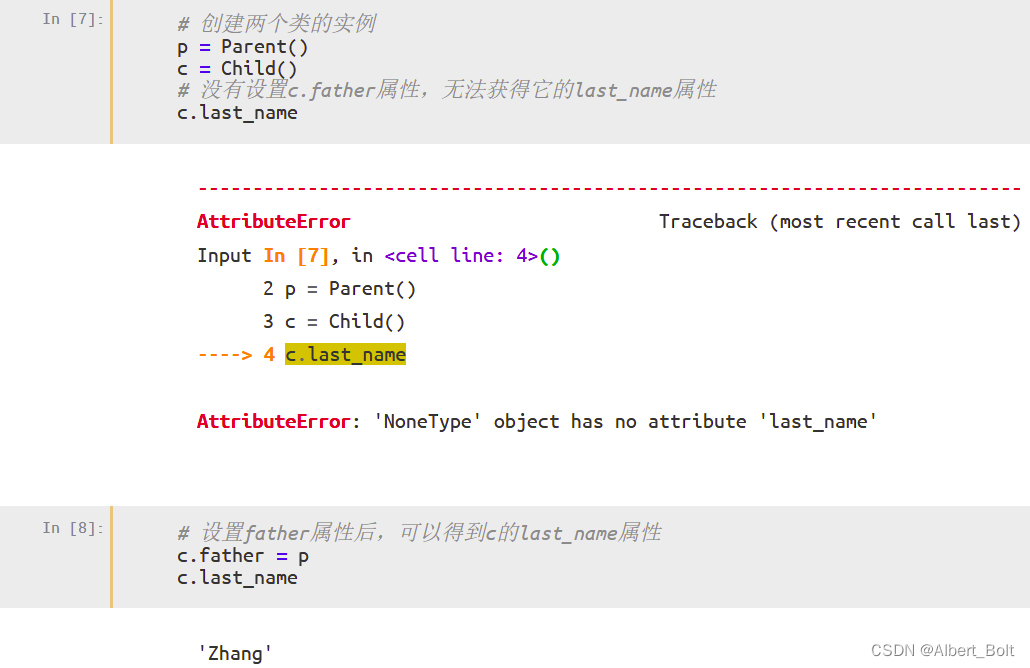

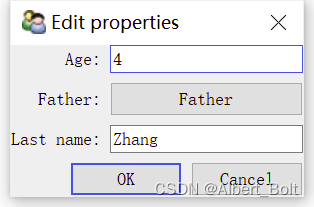
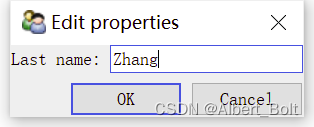
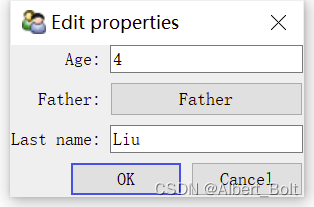
调用 configure_traits() 显示一个修改属性值的对话框,点击并修改 Father 后,Last name 也会随之变化:
调用 print_traits() 方法输出所有 trait 属性与其值:

调用 get() 方法获得描述对象所有 trait 属性的字典:

调用 set() 方法设置 trait 属性的值:
3. Traits 属性监听
两种监听模式:动态监听、静态监听
(1) 一个实例
from traits.api import HasTraits
class Child(HasTraits):
name = Str
age = Int
doing = Str
def __str__(self):
return '%s<%x>' % (self.name, id(self))
# 静态监听age属性的变化
def _age_changed(self, old, new):
print('%s.age changed: from %s to %s' % (self, old, new))
# 静态监听任何Trait属性的变化
def _anytrait_changed(self, name, old, new):
print('angtrait changed: %s.%s from %s to %s' % (self, name, old, new))
def log_trait_changed(obj, name, old, new):
print('log: %s.%s changed from %s to %s' % (obj, name, old, new))
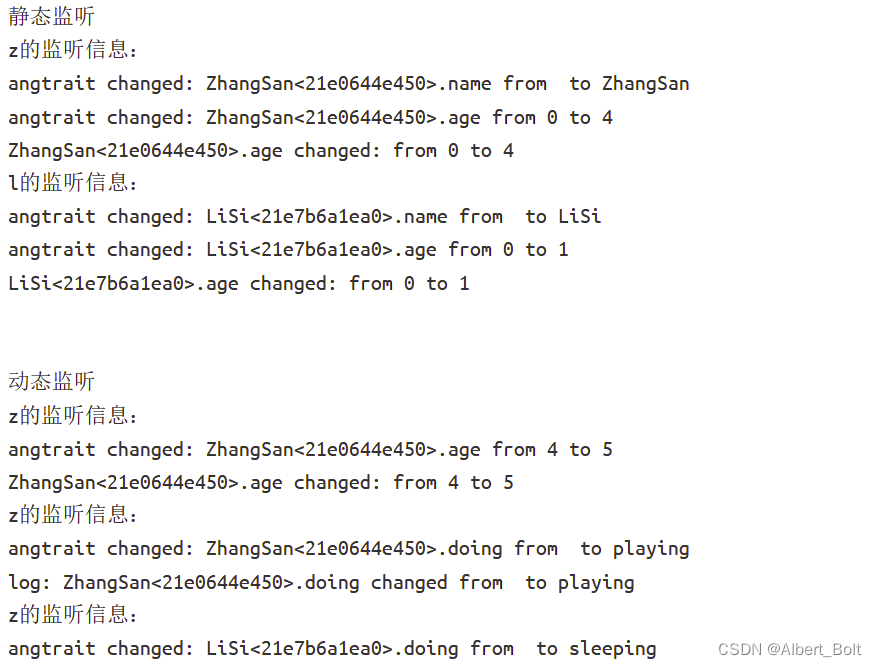
# 静态监听
print('静态监听')
print('z的监听信息:')
z = Child(name = 'ZhangSan', age=4)
print('l的监听信息:')
l = Child(name = 'LiSi', age=1)
print('\n')
# 动态监听doing属性的变化
z.on_trait_change(log_trait_changed, name='doing')
print('动态监听')
print('z的监听信息:') # 未改变z的doing,因此未调用log_trait_changed
z.age = 5
print('z的监听信息:')
z.doing = 'playing'
print('z的监听信息:') # 未改变z的doing,因此未调用log_trait_changed
l.doing = 'sleeping'
输出为:
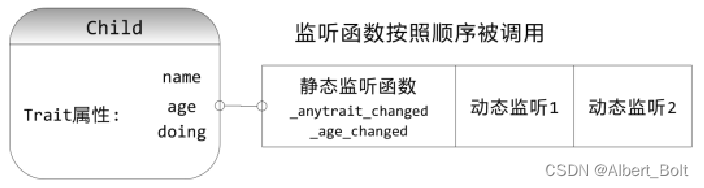
(2) Trait 属性的监听函数调用顺序
(3) 静态监听函数的几种形式
_age_changed(self)_age_changed(self, new)_age_changed(self, old, new)_age_changed(self, name, old, new)
(4) 动态监听函数的几种形式
observer()observer(new)observer(name, new)observer(obj, name, new)observer(obj, name, old, new)
(5) 对多个 trait 属性使用同一个监听函数
@on_trait_change(names)
def any_method_name(self, ...)
    ...
4. Event 和 Button 属性
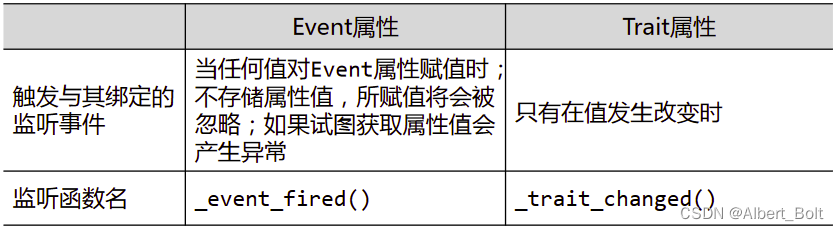
Event 属性与其他 Trait 属性的区别:
Botton 属性:
- 具备 Event 事件处理功能
- 通过 TraitsUI 库,自动生成界面中的按钮控件
一个实例:
from traits.api import HasTraits, Str, Int, Event, on_trait_change
class Child(HasTraits):
name = Str('ZhangSan')
age = Int(4)
InfoUpdated = Event
# 对_info_changed()方法进行修饰
@on_trait_change('name, age')
def _info_changed(self):
self.InfoUpdated = True
# info_updated事件处理方法
def _InfoUpdated_fired(self):
self.reprint()
def reprint(self):
print('reprint information %s, %s' % (self.name, self.age))
child = Child()
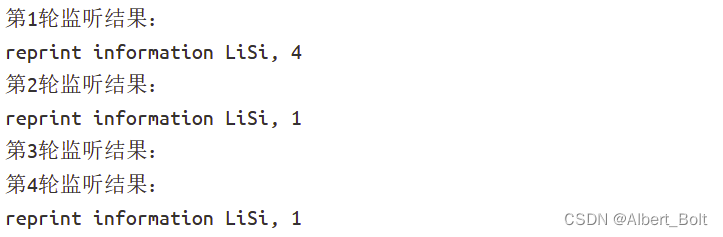
print('第1轮监听结果:')
child.name = 'LiSi'
print('第2轮监听结果:')
child.age = 1
print('第3轮监听结果:')
child.name = "LiSi" # 未改变值,因此无监听结果
print('第4轮监听结果:')
child.InfoUpdated = 0
输出结果:
5. Property 属性
一个实例:
from traits.api import HasTraits, Float, Property, cached_property

class rectangle(HasTraits):
    w = Float(1.0)
    h = Float(2.0)
    area = Property(depends_on = ['w', 'h'])

    @cached_property
    def _get_area(self):
        print("computing...")
        return (self.w * self.h)
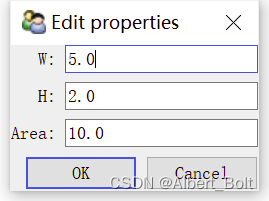
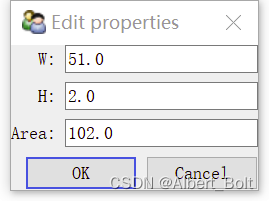
测试过程:
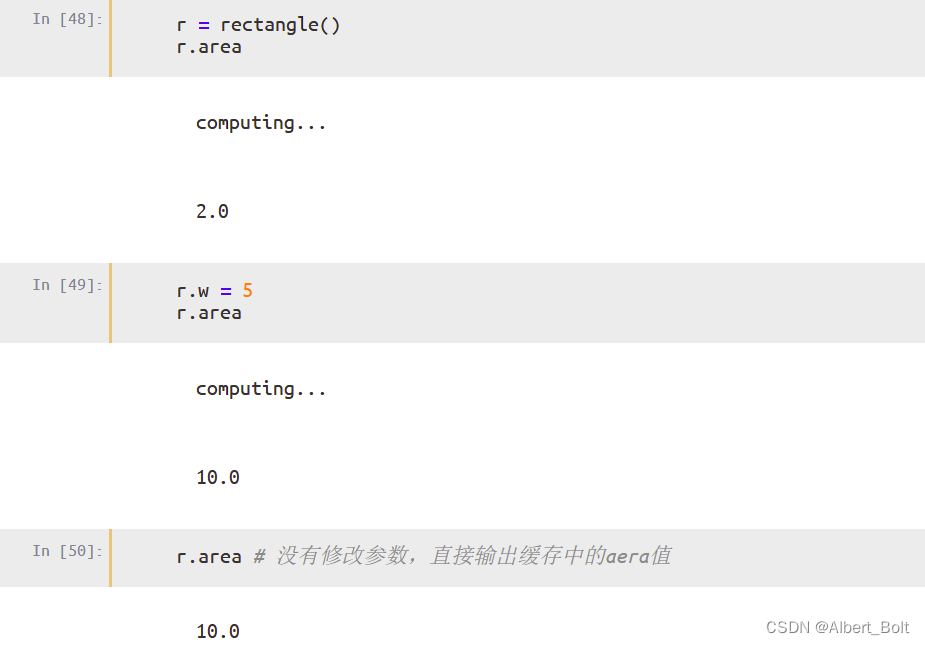
调用 configure_traits() 在可交互窗口改变 property 属性,每更改一次,会重新调用一次 _get_area(),输出一个 computing…

二、TraitsUI 入门
1. TraitsUI 介绍
python 界面开发库:
- Tkinter
- wxPython
- pyQt4
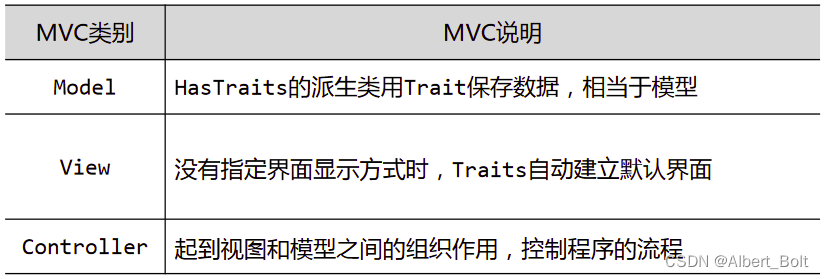
- TraitsUI:以 traits 为基础,以 MVC 为设计思想
Model - View - Controller
- Model:程序中存储数据以及对数据进行处理
- View:程序的界面实现数据的可视化/显示
- Controller:控制程序流程,M/V 之间组织作用
一个实例:
from traits.api import HasTraits, Str, Int
class ModelManager(HasTraits):
model_name = Str
category = Str
model_file = Str
model_number = Int
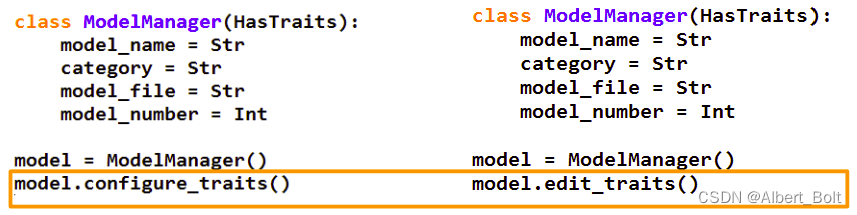
model = ModelManager()
model.configure_traits()
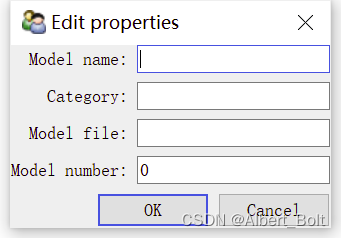
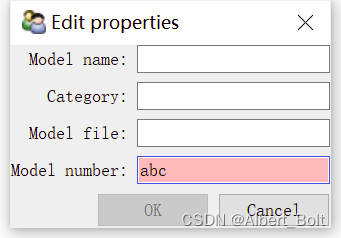
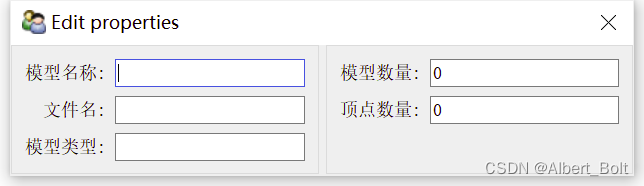
生成model 对话框:
- 文字标签根据 trait 属性名自动生成:第一个字母都会自动大写,下划线用空格替代
- 当输入不符合类型的内容时,对话框会变为红色,OK按钮变为无效
2. View 定义界面
traits.ui 支持的后台界面库:

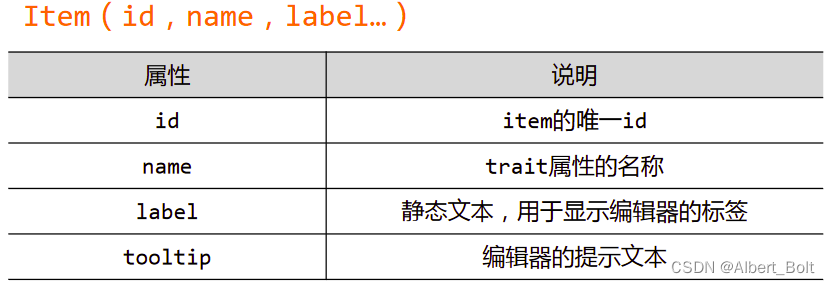
Item 对象属性:
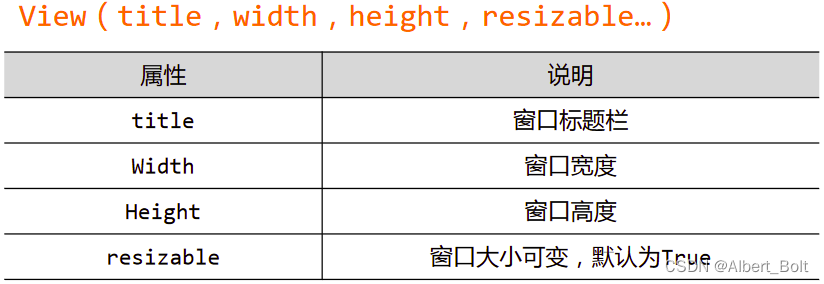
View 对象属性:
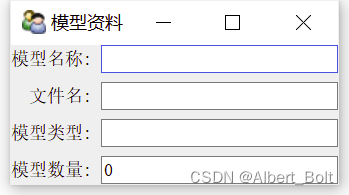
一个实例:
from traits.api import HasTraits, Str, Int
from traitsui.api import View, Item

class ModelManager(HasTraits):
    model_name = Str
    category = Str
    model_file = Str
    model_number = Int

    view = View(
        Item('model_name', label=u"模型名称"),
        Item('model_file', label=u"文件名"),
        Item('category', label=u"模型类型"),
        Item('model_number',label=u"模型数量"),
        title = u"模型资料", width=220, resizable = True)

model = ModelManager()
model.configure_traits()
3. Group 对象组织界面
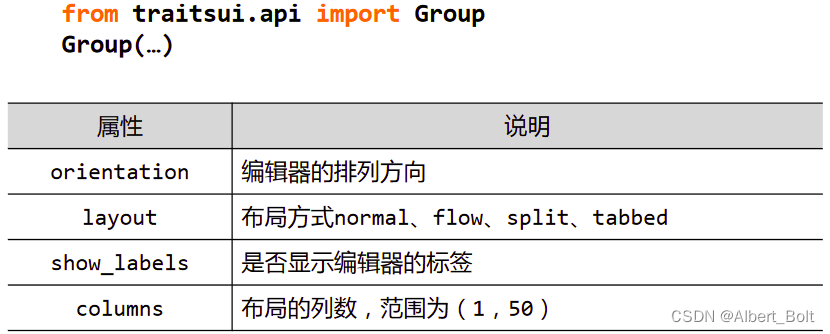
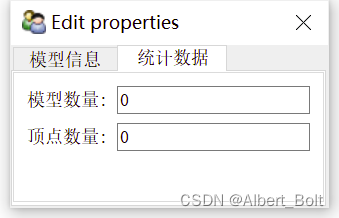
(1) 实例1:不在同一界面,Group 对象并列
from traits.api import HasTraits, Str, Int
from traitsui.api import View, Item, Group

class ModelManager(HasTraits):
    model_name = Str
    category = Str
    model_file = Str
    model_number = Int
    vertices = Int

view1 = View(
    Group(
        Item('model_name', label=u"模型名称"),
        Item('model_file', label=u"文件名"),
        Item('category',   label=u"模型类型"),
        label = u'模型信息',
        show_border = True),
    Group(
        Item('model_number', label=u"模型数量"),
        Item('vertices',     label=u"顶点数量"),
        label = u'统计数据',
        show_border = True),
)

model = ModelManager()
model.configure_traits(view=view1)

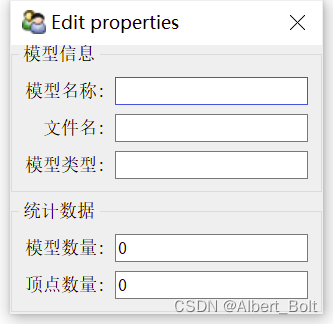
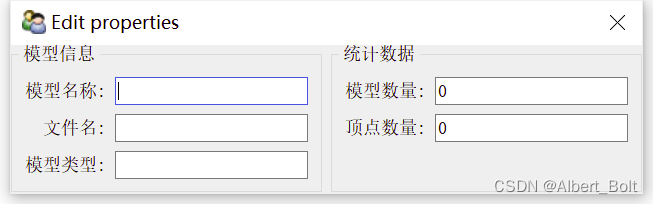
(2) 实例2:在同一界面,Group 对象嵌套。默认竖直排列,使用 orientation = 'horizontal' 水平排列
from traits.api import HasTraits, Str, Int
from traitsui.api import View, Item, Group

class ModelManager(HasTraits):
    model_name = Str
    category = Str
    model_file = Str
    model_number = Int
    vertices = Int

view1 = View(
    Group(
        Group(
            Item('model_name', label=u"模型名称"),
            Item('model_file', label=u"文件名"),
            Item('category',   label=u"模型类型"),
            label = u'模型信息',
            show_border = True),
        Group(
            Item('model_number', label=u"模型数量"),
            Item('vertices',     label=u"顶点数量"),
            label = u'统计数据',
            show_border = True),
        # 两个界面水平排列
        orientation = 'horizontal',
    )
)

model = ModelManager()
model.configure_traits(view=view1)
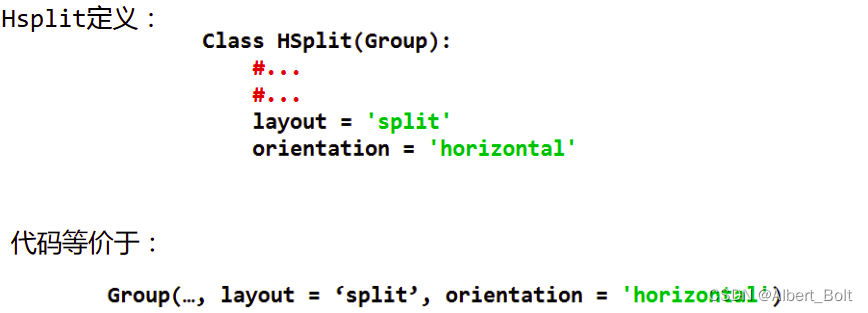
(3) 实例3:使用 HSplit 类
from traits.api import HasTraits, Str, Int
from traitsui.api import View, Item, Group
from traitsui.api import HSplit, VGroup

class ModelManager(HasTraits):
    model_name = Str
    category = Str
    model_file = Str
    model_number = Int
    vertices = Int

view1 = View(
    HSplit(
        VGroup(
            Item('model_name', label=u"模型名称"),
            Item('model_file', label=u"文件名"),
            Item('category',   label=u"模型类型"),
            label = u'模型信息',
            show_border = True),
        VGroup(
            Item('model_number', label=u"模型数量"),
            Item('vertices',     label=u"顶点数量"),
            label = u'统计数据',
            show_border = True),
    )
)

model = ModelManager()
model.configure_traits(view=view1)
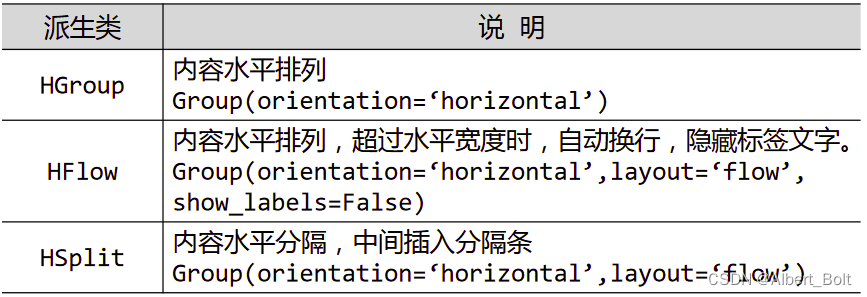
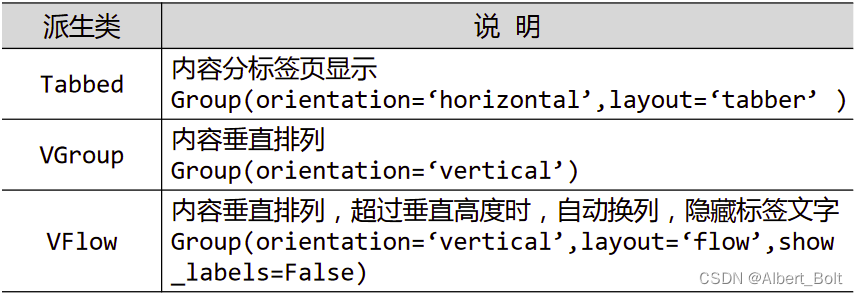
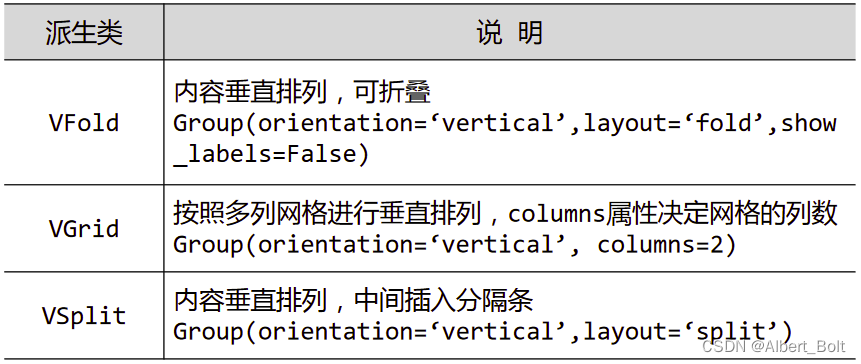
(4) Group的各种派生类
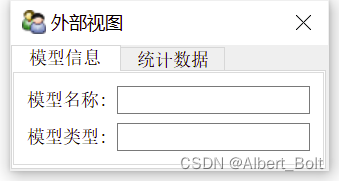
(5) 实例4:使用多个视图对象
from traits.api import HasTraits, Str, Int
from traitsui.api import View, Item, Group
from traitsui.api import HSplit, VGroup

g1 = [Item('model_name',   label=u'模型名称'),
      Item('category',     label=u'模型类型')]
g2 = [Item('model_number', label=u'模型数量'),
      Item('vertices',     label=u'顶点数量')]

class ModelManager(HasTraits):
    model_name = Str
    category = Str
    model_number = Int
    vertices = Int

    traits_view = View(
        Group(*g1, label=u'模型信息', show_border=True),
        Group(*g2, label=u'统计数据', show_border=True),
        title = u'内部视图'
    )

global_view = View(
    Group(*g1, label=u'模型信息', show_border=True),
    Group(*g2, label=u'统计数据', show_border=True),
    title = u'外部视图'
)

model = ModelManager()
model.configure_traits()  # 默认为内部视图
#model.configure_traits(view='traits_view')  # 内部视图
#model.configure_traits(view=global_view)    # 外部视图


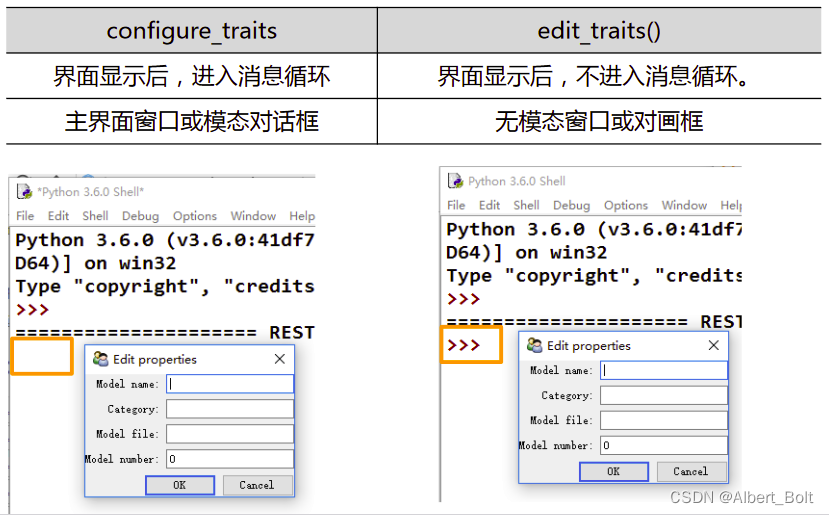
4. 视图配置
- 通过 kind 属性设置 View 显示类型:
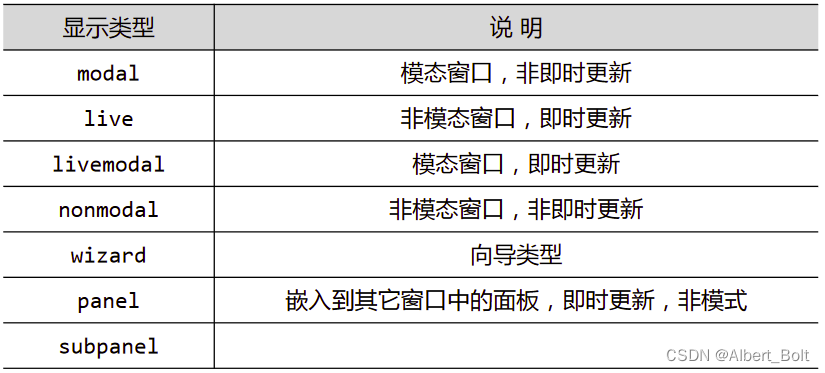
- 模态窗口:在此窗口关闭之前,其他窗口不能激活
- 即时更新:修改控件内容,立即反应到模型数据上
- wizard 是向导窗口、模态窗口、即时更新
模态与非模态的实例:
TraitsUI 按钮配置:
- 标准命令按钮:UndoButton, ApplyButton, RevertButton, OKButton, CancelButton, HelpButto
- traitsui.menu 预定义命令按钮:
- OKCancelButtons = [OKButton, CancelButton]
- ModelButtons = [ApplyButton, RevertButton, OKButton, CancelButton, HelpButton]
- LiveButtons = [UndoButton, RevertButton, OkButton, Cancel]
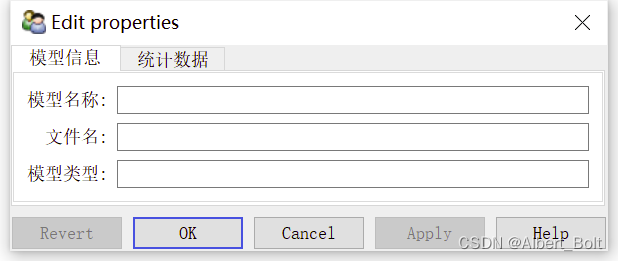
一个实例:
from traits.api import HasTraits, Str, Int
from traitsui.api import View, Item, Group
from traitsui.menu import ModalButtons

class ModelManager(HasTraits):
    model_name = Str
    category = Str
    model_file = Str
    model_number = Int
    vertices = Int

view1 = View(
    Group(
        Item('model_name', label=u"模型名称"),
        Item('model_file', label=u"文件名"),
        Item('category',   label=u"模型类型"),
        label = u'模型信息',
        show_border = True),
    Group(
        Item('model_number', label=u"模型数量"),
        Item('vertices',     label=u"顶点数量"),
        label = u'统计数据',
        show_border = True),
    kind = 'modal',
    buttons = ModalButtons
)

model = ModelManager()
model.configure_traits(view=view1)
5. TraitsUI 控件
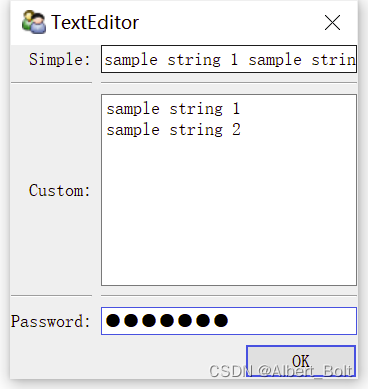
(1) 文本编辑器 TextEditor
from traits.api import HasTraits, Str, Password
from traitsui.api import Item, Group, View

class TextEditor(HasTraits):
    # 定义文本编辑器的变量
    string_trait = Str("sample string")
    password = Password
    # 定义布局,设置文本编辑器的风格
    text_str_group = Group(
        Item('string_trait', style='simple', label='Simple'),
        Item('_'),
        Item('string_trait', style='custom', label='Custom'),
        Item('_'),
        Item('password',     style='simple', label='Password')
        )
    # 定义视图
    traits_view = View(
        text_str_group,
        title = 'TextEditor',
        buttons = ['OK']
        )

text = TextEditor()
text.configure_traits()
Simple 为单行文本输入,Custom 为多行文本输入,Password 为密码样式:
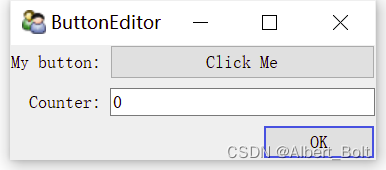
(2) 按钮 Button
监听方法:

一个实例:
'''按钮'''
from traits.api import HasTraits, Button, Int
from traitsui.api import View

class ButtonEditor(HasTraits):
    # 定义按钮变量:
    my_button = Button('Click Me')
    counter = Int
    # 定义监听函数:按钮点击后触发事件
    def _my_button_fired(self):
        self.counter += 1
    # 定义视图
    traits_view = View(
        'my_button',
        'counter',
        title     = 'ButtonEditor',
        buttons   = [ 'OK' ],
        resizable = True)

button = ButtonEditor()
button.configure_traits()
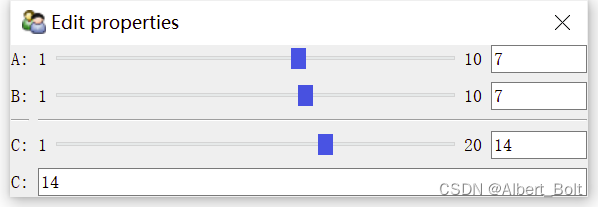
(3) 滑动条 Range
'''滑动条'''
from traits.api import HasTraits, Int, Range, Property, property_depends_on
from traitsui.api import View, Item, RangeEditor

class RangeDemo(HasTraits):
    a = Range(1, 10)
    b = Range(1, 10)
    c = Property(Int)
    view = View(
        Item('a'),
        Item('b'),
        '_',
        Item('c', editor=RangeEditor(low=1, high=20, mode='slider')),
        Item('c'),
        width = 0.3
    )

    @property_depends_on('a,b', settable=True)
    def _get_c(self):
        print("computing ...")
        return (self.a + self.b)

range_ = RangeDemo()
range_.configure_traits()
(4) 菜单、工具栏
from traitsui.menu import Action
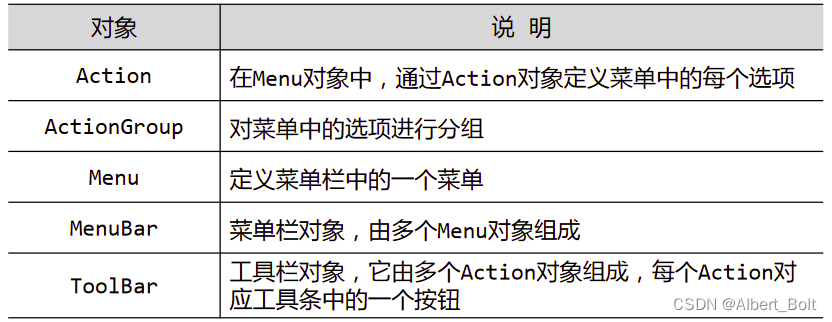
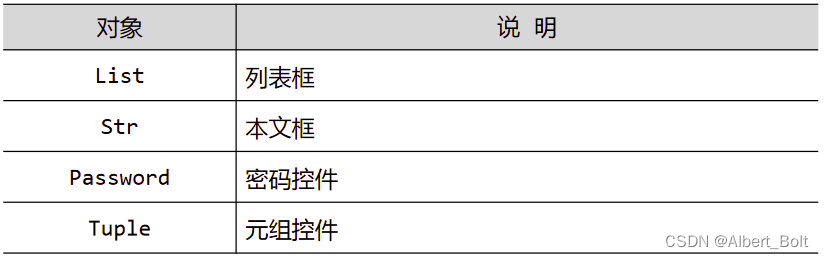
控件列表:
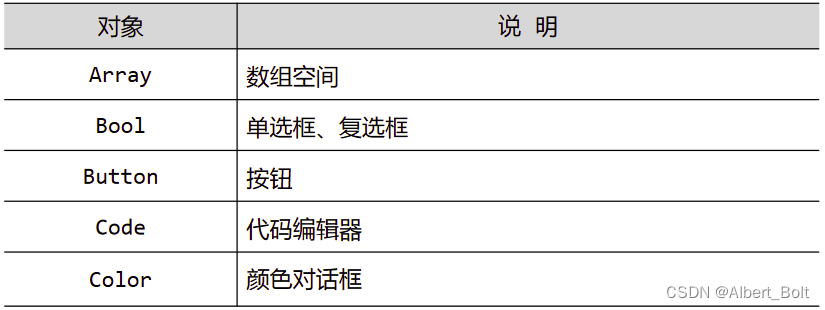
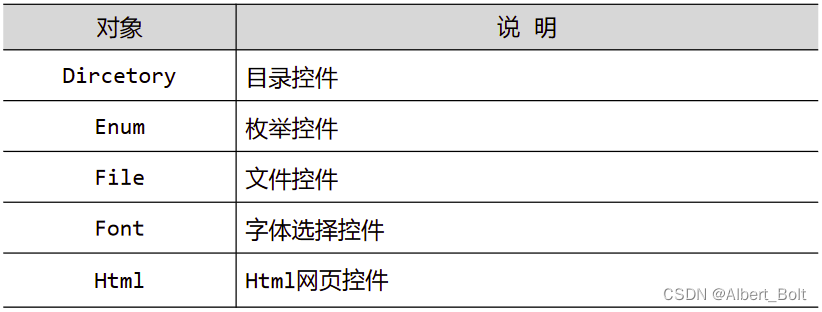
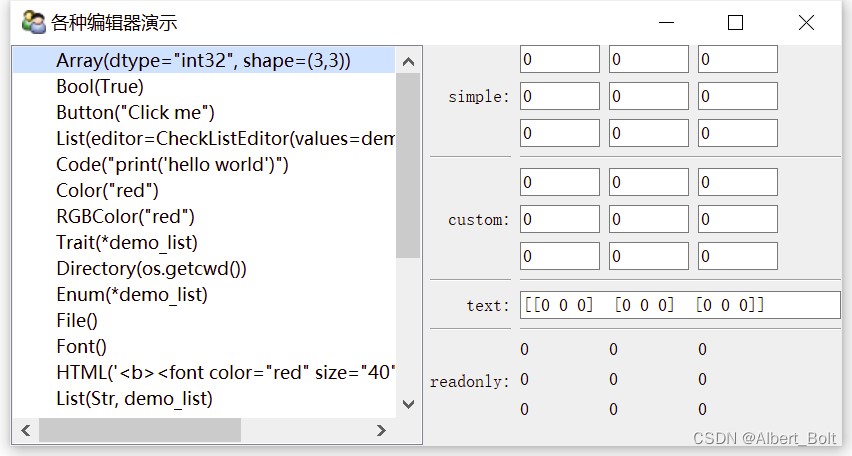
各种编辑器演示:
'''演示TraitsUI的各种编辑器'''

import os
from datetime import time
from traits.api import *
from traitsui.api import *

class EditorDemoItem(HasTraits):
    '''界面右半部分,对于选中的某个Trait属性,使用4种样式创建属性编辑器'''
    code = Code()
    view = View(
        Group(
            # 使用simple编辑器,可尽量减少界面占用空间,width属性可指定编辑器宽度,负数表示强制设置宽度
            Item("item", style="simple", label="simple", width=-300),
            # 下划线字符串表示创建分隔线
            "_",
            # 使用custom编辑器,可尽量呈现更多内容
            Item("item", style="custom", label="custom"),
            "_",
            # 使用text编辑器,只呈现文本内容
            Item("item", style="text", label="text"),
            "_",
            # 使用readonly编辑器,呈现只读文本
            Item("item", style="readonly", label="readonly"),
        ),
    )


class EditorDemo(HasTraits):
    '''创建主界面'''
    # 创建List界面,用来展示各种Trait属性的字符串
    codes = List(Str)
    # 初始化selected_item界面,用来存储被选项的编辑界面
    selected_item = Instance(EditorDemoItem)
    # 初始化selected_code变量,用来存储被选项名称
    selected_code = Str
    view = View(
        # 使用HSplite水平分隔两个界面
        HSplit(
            # 界面左半部分,用来创建各种Trait属性的源程序列表
            Item("codes", style="custom", show_label=False,
                 # 将editor属性设置为ListStrEditor(列表选择框控件),并更新selected_code变量
                 editor=ListStrEditor(editable=False, selected="selected_code")),
            # 界面右半部分
            Item("selected_item", style="custom", show_label=False),
        ),
        resizable = True,
        width     = 800,
        height    = 400,
        title     = u"各种编辑器演示"
    )

    def _selected_code_changed(self):
        '''当selected_code变量改变时触发,更新selected_item界面'''
        item = EditorDemoItem(code=self.selected_code)
        # 使用eval对selected_code字符串进行求值,并将值存储到item中
        item.add_trait("item", eval(str(self.selected_code)))
        self.selected_item = item


class Employee(HasTraits):
    '''创建Employee类,该类为包含四个属性的界面'''
    name       = Unicode(label = u"姓名")
    department = Unicode(label = u"部门")
    salary     = Int(label = u"薪水")
    bonus      = Int(label = u"奖金")
    view       = View("name", "department", "salary", "bonus")


if __name__ == '__main__':
    employee = Employee()
    demo_list = [u"低通", u"高通", u"带通", u"带阻"]
    trait_defines = """
        Array(dtype="int32", shape=(3,3)) # {1}fadsfa
        Bool(True)
        Button("Click me")
        List(editor=CheckListEditor(values=demo_list))
        Code("print('hello world')")
        Color("red")
        RGBColor("red")
        Trait(*demo_list) # 无法用于custom编辑器
        Directory(os.getcwd())
        Enum(*demo_list)  # 无法用于custom编辑器
        File()
        Font()
        HTML('<b><font color="red" size="40">hello world</font></b>')
        List(Str, demo_list)
        Range(1, 10, 5)   # 无法用于custom编辑器
        List(editor=SetEditor(values=demo_list))
        List(demo_list, editor=ListStrEditor())
        Str("hello")
        Password("hello")
        Str("Hello", editor=TitleEditor())
        Tuple(Color("red"), Range(1,4), Str("hello"))
        Instance(EditorDemoItem, employee)
        Instance(EditorDemoItem, employee, editor=ValueEditor())
        Instance(time, time(), editor=TimeEditor())
    """

    demo = EditorDemo()
    trait_list = []
    # 按行分割字符串
    for s in trait_defines.split('\n'):
        # 判断s中是否存在可执行函数
        if s.split('#')[0].strip():
            # 去掉注释
            trait_list.append(s.split('#')[0])
    demo.codes = trait_list
    # 简洁写法
    # demo.codes = [s.split("#")[0] for s in trait_defines.split("\n") if s.split('#')[0].strip()]
    demo.configure_traits()


 3359
3359

 被折叠的 条评论
为什么被折叠?
被折叠的 条评论
为什么被折叠?
 到【灌水乐园】发言


