


 本文讨论了在WCF REST服务中遇到的'Operation GetItems of contract RestService specifies multiple request body parameters...'错误,并解释了BodyStyle属性的重要性。BodyStyle决定了请求和响应消息的格式,包括Bare、Wrapped、WrappedResponse和WrappedRequest四种情况。同时强调了WCF REST服务不允许服务方法重载和UriTemplate重名的问题。
REST风格的Web服务已成为时下软件界的流行款式。REST以其URL作为各种资源的唯一标示,是的客户端的调用变得更加简洁,并且能够充分利用HTTP的GET、PUT、DELETE、POST等命令,使得服务的应用也更加明确。另外,REST服务的开发和部署也是非常简单的。
![]()

![]()
![]()
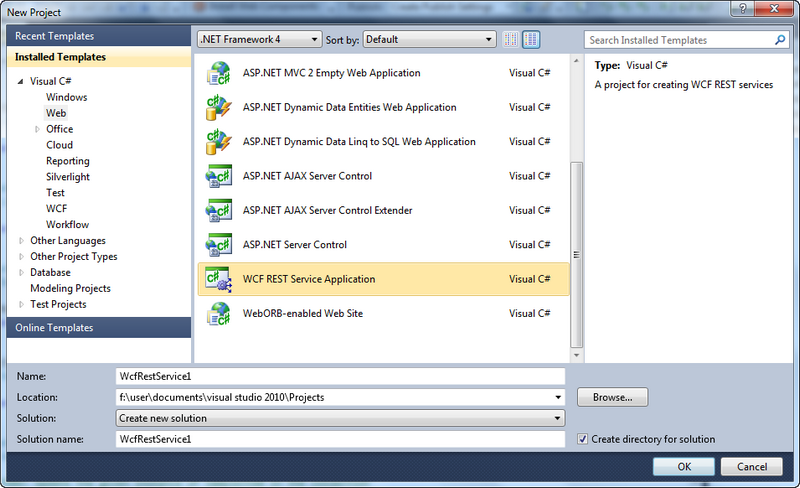
本文以WCF为基础,创建基于WCF的REST风格的服务,并说明其中的一些要点。利用VS2010等开发工具可以方便的创建WCF服务。在VS2010中,Visual Studio的Extension中还有人开发了WCF REST服务的工程模板,借此可以直接创建REST服务。下图向大家展示了VS2010中安装的WCF REST服务项目模板:
图中高亮选中的就是WCF REST服务的模板。通过VS2010的Tools菜单 -> Extension Manager菜单项,打开VS2010插件管理器,在其中找到如下图的插件,点击安装即可:
安装完成后就可以利用工程模板直接创建Web服务了。
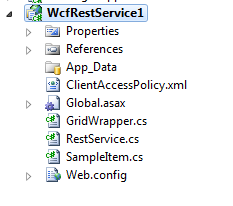
创建好的Web服务的工程将包含部分示例代码以及必要的配置信息。工程目录结构如下图所示:
其中,RestService类是提供服务的类,代码如下:
// Start the service and browse to http://<machine_name>:<port>/Service1/help to view the service's generated help page
// NOTE: By default, a new instance of the service is created for each call; change the InstanceContextMode to Single if you want
// a single instance of the service to process all calls.
[
ServiceContract
]
[
AspNetCompatibilityRequirements
(RequirementsMode =
AspNetCompatibilityRequirementsMode
.Allowed)]
[
ServiceBehavior
(InstanceContextMode =
InstanceContextMode
.PerCall)]
// NOTE: If the service is renamed, remember to update the global.asax.cs file
public
class
RestService
{
private
static
List
<
SampleItem
> items =
new
List
<
SampleItem
>()
{
new
SampleItem
() { Id = 1, StringValue =
"Hello1"
, ItemType = 0, CreateTime =
DateTime
.Now },
new
SampleItem
() { Id = 2, StringValue =
"Hello2"
, ItemType = 1, CreateTime =
DateTime
.Now },
new
SampleItem
() { Id = 3, StringValue =
"Hello3"
, ItemType = 1, CreateTime =
DateTime
.Now },
new
SampleItem
() { Id = 4, StringValue =
"Hello4"
, ItemType = 0, CreateTime =
DateTime
.Now }
};
[
WebGet
(UriTemplate =
"items"
, ResponseFormat =
WebMessageFormat
.Json)]
public
List
<
SampleItem
> GetAllItems()
{
return
items;
}
[
WebInvoke
(UriTemplate =
"queryItems"
, Method
 最低0.47元/天 解锁文章


 256
256

 被折叠的 条评论
为什么被折叠?
被折叠的 条评论
为什么被折叠?
 到【灌水乐园】发言


