


开发板:TQ210 内核版本:2.6.35
#########################################################################################################
这段时间一直在学习linux的驱动,大部分的学习资料都是来自网络论坛、博客。这类资料往往不够系统,全面,且好多资料都是相互拷贝,重复的。因此,学了这么长时间,感觉好没有条理,总是东看一点西看一点,看完也说不出个所以然。不知道大家有没有好的学习方法,或者学习资料可以推荐一下,在此先谢谢各位。
回过头来,看了这么久的驱动,好像还没看GPIO的驱动。控制开发板的IO口应该是嵌入式开发最基础的操作了,那么,如何在应用程序中使用GPIO呢,即如何使用GPIO驱动?网上找资料学习了下,今天就把学到的东西做个总结。
~~~~~~~~~~~~~~~~~~~~~~~~~~~~~~~~~~~~~~~~~~~~~~~~~~~~~~~~~~~~~~~~~~~~~~~~~~~~~~~~~~~~~~~~~~~~~~~~~~~~~~~~~~~~~~~~~~~
如何在应用程序中操作GPIO?这里有两种方法:
方法1:在用户空间操作GPIO。使用/sys/class/gpio目录下的文件。找到你想控制的gpio引脚对应的目录,对该目录下的文件进操作。
方法2:在内核空间使用GPIO。使用内核提供的gpio驱动的接口,自己再写一个驱动,利用自己写的驱动来控制GPIO(后面以LED驱动为例)。
下面详细介绍一下这两种方法。
方法1:详见http://www.tuicool.com/articles/mmaARfu 写的非常详细,很好的文章。
/sys/class/gpio目录下有两类目录:gpioxx和gpiochipxx 两个文件:export和unexport
介绍上面这几个目录和文件之前,先介绍一些s5pv210的GPIO引脚的分组与引脚编号。如下图所示:

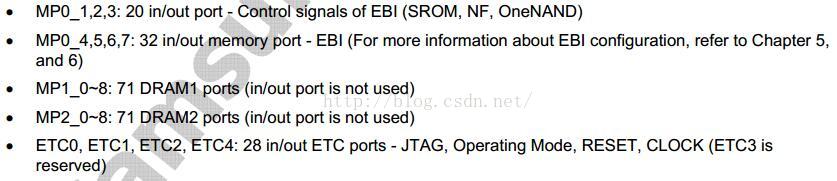
210有好几百个GPIO口,并对这些IO口进行了分组,如属于通用IO组的GPA0、GPA0、GPB、GPC0、GPC1等,属于memory port引脚的MP0_1、MP0_2等。每个引脚都有自己的编号,且引脚编号按着上图的分组递增。在linux系统中,这些编号即在组内线性递增,也是跟随分组线性递增的。即num(GPA0_4) =num(GPA0_3)+1,且num(GPA1_0)=num(GPA0_7)+1。而方法一就是根据引脚在linux系统中的编号来控制引脚。想要控制某个IO口,就必须先知道它在linux系统中的编号。
每个组的第一个引脚的编号称为start 。由此可知,只要知道每组第一个引脚的编号start,加上这个引脚在组内的偏移量,就能得到该引脚的编号。例如,要确定GPB_3引脚的编号,首先得确定GPB_0引脚的编号start,start+3就是GPB_3引脚的编号。说到这里,可知,确定某个引脚的编号的关键是确定该引脚所在组的start。
如何计算每个组的start编号,可以参考内核源码的两个文件:\arch\arm\mach-s5pv210\include\mach\Gpio.h 和arch\arm\mach-s5pv210\Gpiolib.c。
210的GPIO口在linux中的分组情况可以看如下代码:
arch\arm\mach-s5pv210\Gpiolib.c:
/*
 * Following are the gpio banks in v210.
 *
 * The 'config' member when left to NULL, is initialized to the default
 * structure gpio_cfg in the init function below.
 *
 * The 'base' member is also initialized in the init function below.
 * Note: The initialization of 'base' member of s3c_gpio_chip structure
 * uses the above macro and depends on the banks being listed in order here.
 */
static struct s3c_gpio_chip s5pv210_gpio_4bit[] = {
	{
		.chip	= {
			.base	= S5PV210_GPA0(0),
			.ngpio	= S5PV210_GPIO_A0_NR,
			.label	= "GPA0",
			.to_irq = s5p_gpiolib_gpioint_to_irq,
		},
	}, {
		.chip	= {
			.base	= S5PV210_GPA1(0),
			.ngpio	= S5PV210_GPIO_A1_NR,
			.label	= "GPA1",
			.to_irq = s5p_gpiolib_gpioint_to_irq,
		},
	}, {
		.chip	= {
			.base	= S5PV210_GPB(0),
			.ngpio	= S5PV210_GPIO_B_NR,
			.label	= "GPB",
			.to_irq = s5p_gpiolib_gpioint_to_irq,
		},
	}, {
		.chip	= {
			.base	= S5PV210_GPC0(0),
			.ngpio	= S5PV210_GPIO_C0_NR,
			.label	= "GPC0",
			.to_irq = s5p_gpiolib_gpioint_to_irq,
		},
	}, {
		.chip	= {
			.base	= S5PV210_GPC1(0),
			.ngpio	= S5PV210_GPIO_C1_NR,
			.label	= "GPC1",
			.to_irq = s5p_gpiolib_gpioint_to_irq,
}........</span><span style="font-size:14px;">.chip = {
.base = S5PV210_GPA0(0),
.ngpio = S5PV210_GPIO_A0_NR,
</span><pre name="code" class="cpp"><span style="font-size:14px;"><span style="white-space:pre"> </span>.label = "GPA0",</span>重点是如何求出每个组的start编号,即上面chip中的base的值。以上面那个chip来说,就是要搞清楚 S5PV210_GPA0(0)所代表的值,它是一个宏定义。看如下代码:
\arch\arm\mach-s5pv210\include\mach\Gpio.h:
/* S5PV210 GPIO number definitions */
#define S5PV210_GPA0(_nr)	(S5PV210_GPIO_A0_START + (_nr))
#define S5PV210_GPA1(_nr)	(S5PV210_GPIO_A1_START + (_nr))
#define S5PV210_GPB(_nr)	(S5PV210_GPIO_B_START + (_nr))
#define S5PV210_GPC0(_nr)	(S5PV210_GPIO_C0_START + (_nr))
#define S5PV210_GPC1(_nr)	(S5PV210_GPIO_C1_START + (_nr))
#define S5PV210_GPD0(_nr)	(S5PV210_GPIO_D0_START + (_nr))
#define S5PV210_GPD1(_nr)	(S5PV210_GPIO_D1_START + (_nr))
#define S5PV210_GPE0(_nr)	(S5PV210_GPIO_E0_START + (_nr))
#define S5PV210_GPE1(_nr)	(S5PV210_GPIO_E1_START + (_nr))
#define S5PV210_GPF0(_nr)	(S5PV210_GPIO_F0_START + (_nr))
#define S5PV210_GPF1(_nr)	(S5PV210_GPIO_F1_START + (_nr))
#define S5PV210_GPF2(_nr)	(S5PV210_GPIO_F2_START + (_nr))
#define S5PV210_GPF3(_nr) (S5PV210_GPIO_F3_START + (_nr))/* GPIO bank numbers */
/* CONFIG_S3C_GPIO_SPACE allows the user to select extra
* space for debugging purposes so that any accidental
* change from one gpio bank to another can be caught.
*/
<span style="color:#ff0000;">#define S5PV210_GPIO_NEXT(__gpio) \
((__gpio##_START) + (__gpio##_NR) + CONFIG_S3C_GPIO_SPACE + 1)
</span>
enum s5p_gpio_number {
S5PV210_GPIO_A0_START = 0,
S5PV210_GPIO_A1_START = S5PV210_GPIO_NEXT(S5PV210_GPIO_A0),
S5PV210_GPIO_B_START = S5PV210_GPIO_NEXT(S5PV210_GPIO_A1),
S5PV210_GPIO_C0_START = S5PV210_GPIO_NEXT(S5PV210_GPIO_B),
S5PV210_GPIO_C1_START = S5PV210_GPIO_NEXT(S5PV210_GPIO_C0),
S5PV210_GPIO_D0_START = S5PV210_GPIO_NEXT(S5PV210_GPIO_C1),
S5PV210_GPIO_D1_START = S5PV210_GPIO_NEXT(S5PV210_GPIO_D0),
S5PV210_GPIO_E0_START = S5PV210_GPIO_NEXT(S5PV210_GPIO_D1),
S5PV210_GPIO_E1_START = S5PV210_GPIO_NEXT(S5PV210_GPIO_E0),
S5PV210_GPIO_F0_START = S5PV210_GPIO_NEXT(S5PV210_GPIO_E1),
S5PV210_GPIO_F1_START = S5PV210_GPIO_NEXT(S5PV210_GPIO_F0),
S5PV210_GPIO_F2_START = S5PV210_GPIO_NEXT(S5PV210_GPIO_F1),
S5PV210_GPIO_F3_START = S5PV210_GPIO_NEXT(S5PV210_GPIO_F2),
S5PV210_GPIO_G0_START = S5PV210_GPIO_NEXT(S5PV210_GPIO_F3),
S5PV210_GPIO_G1_START = S5PV210_GPIO_NEXT(S5PV210_GPIO_G0),
...........
而S5PV210_GPIO_NEXT是宏定义:
#define S5PV210_GPIO_NEXT(__gpio) ((__gpio##_START) + (__gpio##_NR) +CONFIG_S3C_GPIO_SPACE+ 1)
CONFIG_S3C_GPIO_SPACE是一个宏定义,它的值为0 。上面这句意思是:
该组的start编号 = 上一组的start编号 + 上一组的引脚数量 + 0 + 1。这也就印证了上文说的“引脚编号随着分组线性递增”。
讲完了引脚的分组与编号,接着分析/sys/class/gpio目录下的文件:
两类目录:gpioxx和gpiochipxx 两个文件:export和unexport
(1)gpioxx目录
gpioxx是第xx号引脚对应的文件夹,即代表第xx号引脚,xx是引脚编号。目录里是该引脚的一些属性文件,比如active_low、
value、direction、edge等文件,从文件名也能大概知道文件含义。下面详细介绍一下这些属性文件的含义与使用方法:
direction属性文件: 该文件可读可写。该文件只能存放"in"或"out"二者之一,代表该引脚的的输入输出工作模式(通常对该文件进行写操作,配置成你
期望的模式)。当往该文件写入“out”时,该引脚会首先默认输出低电平,即value文件里的值是0,这点需要注意。当内核不支持改变该引脚工作方向时,
该文件会消失。
value属性文件:可读可写。其值通常为0或1,表示引脚电平的高低。当该引脚配置成输出模式时,写入该属性文件的任何非零值,都会使引脚输出高
电平。
如果该引脚能被配置成中断引脚且已经被配置成产生中断(请看edge属性文件),可以对该文件使用poll操作,无论中断什么时候被出发,poll函数都会返回。
如果要对该文件使用poll操作,设置events 为POLLPRI 和POLLERR。如果要对该文件使用select操作,set the file descriptor in exceptfds。当poll函数返
回后,要么使用lseek函数重定位到该文件开头来读取新的值,要么关闭该文件并重新打开该文件,来读取新的值。
edge属性文件:可读可写。读取出来的值通常为"none"、“rising”、"falling"、"both"。通过写入这些字符串,来设定对value属性文件进行poll操作时,
返回的信号沿。只要放该引脚可以被配置成中断引脚时,该属性文件才存在。
active_low属性文件:reads as either 0 (false) or 1 (true). Write any nonzero value to invert the value attribute both for reading and writing.
Existing and subsequent poll(2) support configuration via the edge attribute for "rising" and "falling" edges will follow this setting.(并不是很理解这
段话,但是我测试时,往active_low写入1,value文件的值也变成1,写0时也一样)。
若要操作该引脚,只要对这些属性文件进行相应的读写即可。
比如要控制3号引脚(假设为GPA0_3),找到gpio3目录,对该目录下的相关文件进行读写。例如要配置3号引脚为输出模式,则
向目录下的direction文件写"out",若要让3号引脚输出高电平,则向value文件写1。
(2)gpiochipxx目录
xx是组号,也等于该组第一个引脚的编号,即start编号。该目录是第xx组引脚的目录,里面含有第xx组引脚的一些属性文件。
比如:base、label、ngpio等。base文件里存放的是该组的组号,即该组第一个引脚的编号(GPX_0的编号);label文件里存放的是该组的名称;ngpio文件里存放的是该组的引脚数量。这些文件里的内容都能读出来。如下图所示,我在串口中断用cat 命令读出gpiochip0目录下的这些文件的内容
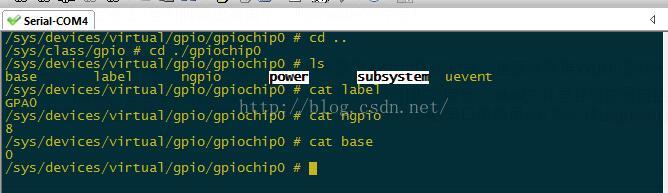
从上图可知,该组引脚时GPA0组引脚,GPA0组有8个引脚,GPA0_0的引脚编号是0。
(3)export文件
一个GPIO引脚,若要让他能在用户空间使用,必须先将其导出。如何导出?将该引脚编号写入导出文件即可。顾名思义,export就是这个导出文件。将引脚编号xx写入export文件后,/sys/class/gpio目录下会自动生成该引脚的目录gpioxx。
(4) unexport文件
该文件功能与export相反。若将引脚编号写入ubexport文件,则该引脚将无法在用户空间使用。将引脚编号xx写入unexport之后,/sys/class/gpio目录下的gpioxx目录会被自动删除。
注意:
有可能你的/sys/class/gpio目录下没有gpioxx目录,只有gpiochipxx目录、export文件、unexport文件。那是因为事先没有导出引脚编号,只要将要控制的引脚编号写入unexport文件,就会自动生成gpioxx目录。如下图,我在串口中断使用echo命令来导出0号引脚:
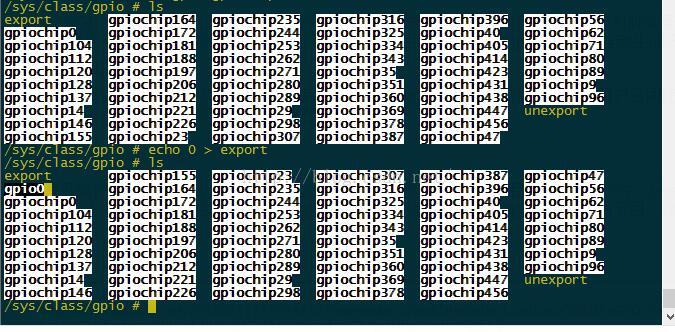
原本没有gpioxx目录,只有gpiochipxx目录。导出之后,出现了gpio0目录,只要读写该目录下的相关文件,就能控制第0号引脚。
也有可能出现这种情况:你将某引脚的编号xx写入了export文件,但是却没有出现gpioxx目录,多半因为这个引脚已经在驱动中被占用了。使用下面指令可以查询驱动中占用了哪些GPIO口:
cat /sys/kernel/debug/gpio
碰到这种情况,通常要换一个引脚。或者当你用gpio_free(...)函数释放该引脚后,再将引脚编号写入export文件即可。
总结方法一:
(1)根据你要控制的引脚名称,确定该引脚编号。可以先确定所属组号,然后加上组内偏移量。
(2)确保你要控制的引脚已经导出了。若没有,将引脚编号写入/sys/class/gpio目录下的export文件。
(3)进入/sys/class/gpio/gpioxx目录,根据你的目的,打开相关文件,读写相关文件。
范例代码如下:
/* Copyright (c) 2011, RidgeRun
 * All rights reserved.
 *
 * Redistribution and use in source and binary forms, with or without
 * modification, are permitted provided that the following conditions are met:
 * 1. Redistributions of source code must retain the above copyright
 *    notice, this list of conditions and the following disclaimer.
 * 2. Redistributions in binary form must reproduce the above copyright
 *    notice, this list of conditions and the following disclaimer in the
 *    documentation and/or other materials provided with the distribution.
 * 3. All advertising materials mentioning features or use of this software
 *    must display the following acknowledgement:
 *    This product includes software developed by the RidgeRun.
 * 4. Neither the name of the RidgeRun nor the
 *    names of its contributors may be used to endorse or promote products
 *    derived from this software without specific prior written permission.
 *
 * THIS SOFTWARE IS PROVIDED BY RIDGERUN ''AS IS'' AND ANY
 * EXPRESS OR IMPLIED WARRANTIES, INCLUDING, BUT NOT LIMITED TO, THE IMPLIED
 * WARRANTIES OF MERCHANTABILITY AND FITNESS FOR A PARTICULAR PURPOSE ARE
 * DISCLAIMED. IN NO EVENT SHALL RIDGERUN BE LIABLE FOR ANY
 * DIRECT, INDIRECT, INCIDENTAL, SPECIAL, EXEMPLARY, OR CONSEQUENTIAL DAMAGES
 * (INCLUDING, BUT NOT LIMITED TO, PROCUREMENT OF SUBSTITUTE GOODS OR SERVICES;
 * LOSS OF USE, DATA, OR PROFITS; OR BUSINESS INTERRUPTION) HOWEVER CAUSED AND
 * ON ANY THEORY OF LIABILITY, WHETHER IN CONTRACT, STRICT LIABILITY, OR TORT
 * (INCLUDING NEGLIGENCE OR OTHERWISE) ARISING IN ANY WAY OUT OF THE USE OF THIS
 * SOFTWARE, EVEN IF ADVISED OF THE POSSIBILITY OF SUCH DAMAGE.
 */

#include <stdio.h>
#include <stdlib.h>
#include <string.h>
#include <errno.h>
#include <unistd.h>
#include <fcntl.h>
#include <poll.h>

 /****************************************************************
 * Constants
 ****************************************************************/

#define SYSFS_GPIO_DIR "/sys/class/gpio"
#define POLL_TIMEOUT (3 * 1000) /* 3 seconds */
#define MAX_BUF 64

/****************************************************************
 * gpio_export
 ****************************************************************/
int gpio_export(unsigned int gpio)
{
  int fd, len;
  char buf[MAX_BUF];

  fd = open(SYSFS_GPIO_DIR "/export", O_WRONLY);
  if (fd < 0) {
    perror("gpio/export");
    return fd;
  }

  len = snprintf(buf, sizeof(buf), "%d", gpio);
  write(fd, buf, len);
  close(fd);

  return 0;
}

/****************************************************************
 * gpio_unexport
 ****************************************************************/
int gpio_unexport(unsigned int gpio)
{
  int fd, len;
  char buf[MAX_BUF];

  fd = open(SYSFS_GPIO_DIR "/unexport", O_WRONLY);
  if (fd < 0) {
    perror("gpio/export");
    return fd;
  }

  len = snprintf(buf, sizeof(buf), "%d", gpio);
  write(fd, buf, len);
  close(fd);
  return 0;
}

/****************************************************************
 * gpio_set_dir
 ****************************************************************/
int gpio_set_dir(unsigned int gpio, unsigned int out_flag)
{
  int fd, len;
  char buf[MAX_BUF];

  len = snprintf(buf, sizeof(buf), SYSFS_GPIO_DIR  "/gpio%d/direction", gpio);

  fd = open(buf, O_WRONLY);
  if (fd < 0) {
    perror("gpio/direction");
    return fd;
  }

  if (out_flag)
    write(fd, "out", 4);
  else
    write(fd, "in", 3);

  close(fd);
  return 0;
}

/****************************************************************
 * gpio_set_value
 ****************************************************************/
int gpio_set_value(unsigned int gpio, unsigned int value)
{
  int fd, len;
  char buf[MAX_BUF];

  len = snprintf(buf, sizeof(buf), SYSFS_GPIO_DIR "/gpio%d/value", gpio);

  fd = open(buf, O_WRONLY);
  if (fd < 0) {
    perror("gpio/set-value");
    return fd;
  }

  if (value)
    write(fd, "1", 2);
  else
    write(fd, "0", 2);

  close(fd);
  return 0;
}

/****************************************************************
 * gpio_get_value
 ****************************************************************/
int gpio_get_value(unsigned int gpio, unsigned int *value)
{
  int fd, len;
  char buf[MAX_BUF];
  char ch;

  len = snprintf(buf, sizeof(buf), SYSFS_GPIO_DIR "/gpio%d/value", gpio);

  fd = open(buf, O_RDONLY);
  if (fd < 0) {
    perror("gpio/get-value");
    return fd;
  }

  read(fd, &ch, 1);

  if (ch != '0') {
    *value = 1;
  } else {
    *value = 0;
  }

  close(fd);
  return 0;
}


/****************************************************************
 * gpio_set_edge
 ****************************************************************/

int gpio_set_edge(unsigned int gpio, char *edge)
{
  int fd, len;
  char buf[MAX_BUF];

  len = snprintf(buf, sizeof(buf), SYSFS_GPIO_DIR "/gpio%d/edge", gpio);

  fd = open(buf, O_WRONLY);
  if (fd < 0) {
    perror("gpio/set-edge");
    return fd;
  }

  write(fd, edge, strlen(edge) + 1);
  close(fd);
  return 0;
}

/****************************************************************
 * gpio_fd_open
 ****************************************************************/

int gpio_fd_open(unsigned int gpio)
{
  int fd, len;
  char buf[MAX_BUF];

  len = snprintf(buf, sizeof(buf), SYSFS_GPIO_DIR "/gpio%d/value", gpio);

  fd = open(buf, O_RDONLY | O_NONBLOCK );
  if (fd < 0) {
    perror("gpio/fd_open");
  }
  return fd;
}

/****************************************************************
 * gpio_fd_close
 ****************************************************************/

int gpio_fd_close(int fd)
{
  return close(fd);
}

/****************************************************************
 * Main
 ****************************************************************/
int main(int argc, char **argv, char **envp)
{
  struct pollfd fdset[2];
  int nfds = 2;
  int gpio_fd, timeout, rc;
  char *buf[MAX_BUF];
  unsigned int gpio;
  int len;


  if (argc < 2) {
    printf("Usage: gpio-int <gpio-pin>\n\n");
    printf("Waits for a change in the GPIO pin voltage level or input on stdin\n");
    exit(-1);
  }

  gpio = atoi(argv[1]);

  gpio_export(gpio);
  gpio_set_dir(gpio, 0);
  gpio_set_edge(gpio, "rising");
  gpio_fd = gpio_fd_open(gpio);

  timeout = POLL_TIMEOUT;

  while (1) {
    memset((void*)fdset, 0, sizeof(fdset));

    fdset[0].fd = STDIN_FILENO;
    fdset[0].events = POLLIN;

    fdset[1].fd = gpio_fd;
    fdset[1].events = POLLPRI;

    rc = poll(fdset, nfds, timeout);

    if (rc < 0) {
      printf("\npoll() failed!\n");
      return -1;
    }

    if (rc == 0) {
      printf(".");
    }

    if (fdset[1].revents & POLLPRI) {
      len = read(fdset[1].fd, buf, MAX_BUF);
      printf("\npoll() GPIO %d interrupt occurred\n", gpio);
    }

    if (fdset[0].revents & POLLIN) {
      (void)read(fdset[0].fd, buf, 1);
      printf("\npoll() stdin read 0x%2.2X\n", (unsigned int) buf[0]);
    }

    fflush(stdout);
  }

  gpio_fd_close(gpio_fd);
  return 0;
}
参考文章:
http://www.tuicool.com/articles/mmaARfu 这里讲的很清楚,也很全面。严重推荐。
linux内核文档
关于方法二,下篇文章介绍。
###################################################################################################################转载请注明出处:
地址:http://blog.csdn.net/andoubi/article/details/51872781
作者:Andoubi


 4692
4692

 被折叠的 条评论
为什么被折叠?
被折叠的 条评论
为什么被折叠?
 到【灌水乐园】发言


