


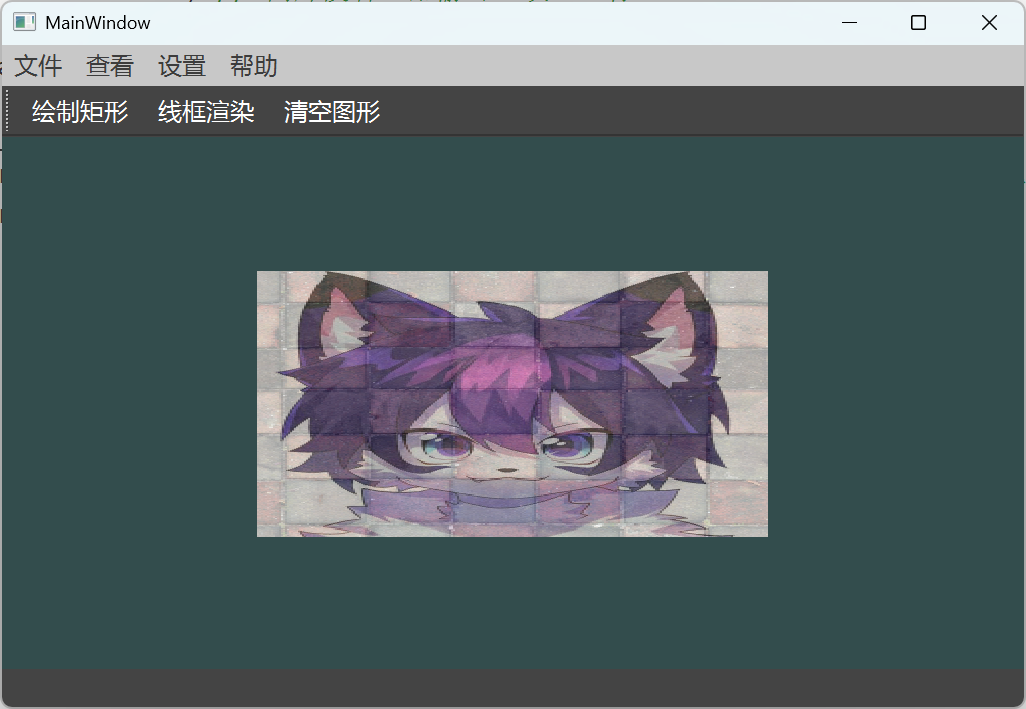
一、概述
引入纹理,添加了图片作为纹理,并将两张图片进行融合,实现贴图效果,如下:
二、前置知识
什么是纹理
- 纹理(Texture) 就是 “贴在 3D 物体表面的图片”。
- 比如:给立方体贴一张 “砖块图”,它就会看起来像砖墙。
- 作用:让物体表面更真实,避免纯色单调。
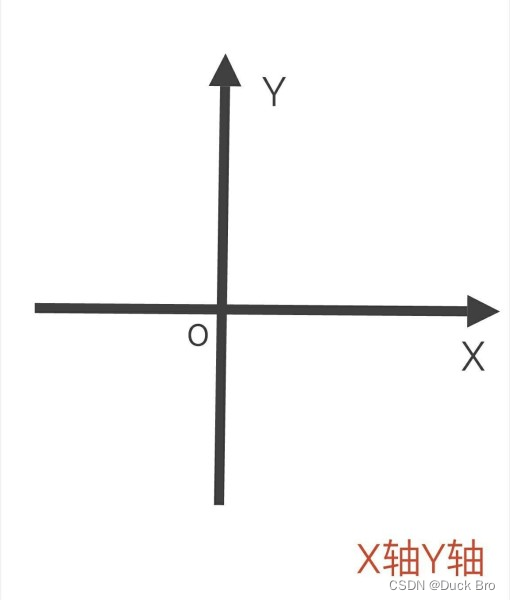
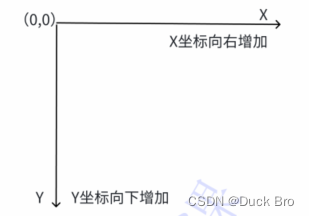
QT坐标系与OpenGL坐标系
QT坐标系与OpenGL坐标系是相反的,因此读取图片后需要镜像翻转一下
-
QT坐标系
-
OpenGL坐标系
三、实现流程
实现GLSL代码
- 顶点着色器
顶点着色器需要接受CPU端传进来的纹理坐标,并且向片段着色器输出同样的纹理坐标:
#version 330 core
layout (location = 0) in vec3 aPos;   // 位置变量的属性位置值为 0
layout (location = 1) in vec3 aColor; // 颜色变量的属性位置值为 1
layout (location = 2) in vec2 aTexel; // 存储2D纹理坐标s、t

out vec3 ourColor; // 向片段着色器输出一个颜色
out vec2 ourTexel; // 向片段着色器输出2D纹理坐标s、t

void main()
{
    gl_Position = vec4(aPos, 1.0);
    ourColor = aColor; // 将ourColor设置为我们从顶点数据那里得到的输入颜色
    ourTexel = aTexel;
}
- 片段着色器
在片段着色器中,接收来自顶点着色器的纹理坐标,并且设置unifrom的纹理坐标,在CPU端设置这个纹理。texture函数传入二维纹理坐标和纹理数据就可以生成片段颜色,因此直接作为颜色输出即可。
sampler2D 是二维类型的采样器变量,用于给定的纹理坐标提取出颜色。
#version 330 core
out vec4 FragColor;

in vec3 ourColor;
in vec2 ourTexel;

// (纹理单元)其实自己不用写,默认是有的,用于传入纹理数据;【sampler是采样器】
uniform sampler2D texture0;
uniform sampler2D texture1;

void main()
{
	//FragColor = vec4(ourColor, 1.0);
	//FragColor = texture(texture0, ourTexel) * vec4(0.5, 0.7, 0.0, 0.2);  // 可以使用乘法改变颜色
	FragColor = mix(texture(texture0, ourTexel),
                    texture(texture1, ourTexel),
                    0.5);

}
- 纹理计算
如果有需要,可以对传进来的纹理进行变化:
-
纹理乘法:实际上是分量相除,
texture(texture0, ourTexel) * vec4(0.5, 0.7, 0.0, 0.2)结果为:
FragColor.r = 1.0 * 0.5 = 0.5
FragColor.g = 0.8 * 0.7 = 0.56
FragColor.b = 0.6 * 0.0 = 0.0
FragColor.a = 1.0 * 0.2 = 0.2 -
纹理融合:使用
mix(texture(texture0, ourTexel), texture(texture1, ourTexel), 0.5)融合两个纹理,0.5表示前者的透明度为0.5
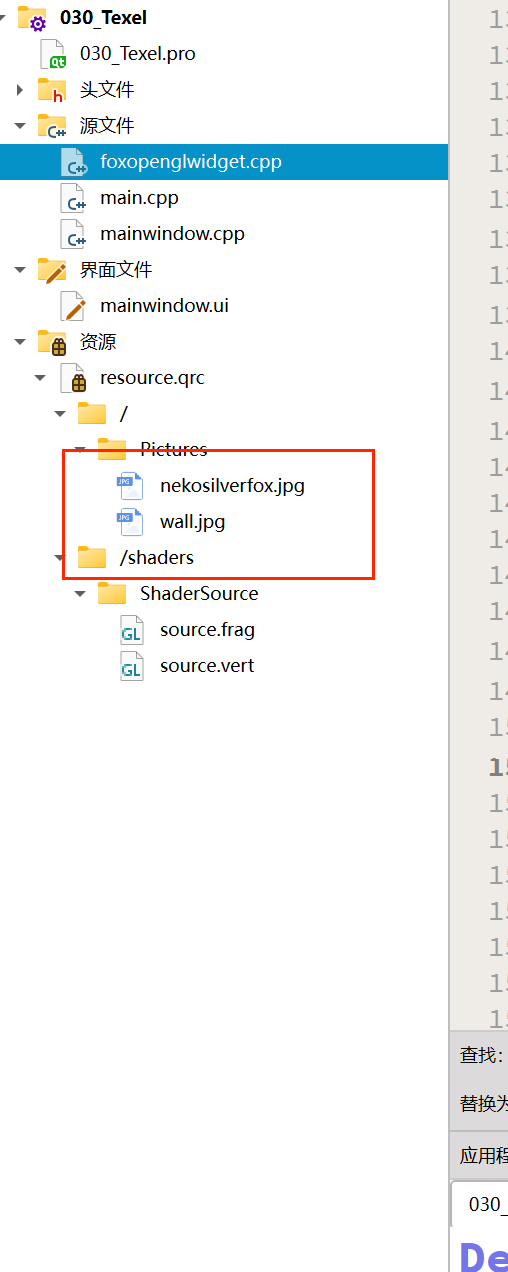
准备图片
导入所需的图片素材:
准备顶点数据
新增纹理坐标,因此现在的顶点数据为:
// 顶点数据
float vertices[] = {
    // 最后是纹理的st坐标
     0.5f,  0.5f, 0.0f,    1.0f, 0.0f, 0.0f,    1.0f, 1.0f,   // 右上角 0
     0.5f, -0.5f, 0.0f,    0.0f, 1.0f, 0.0f,    1.0f, 0.0f,  // 右下角 1
    -0.5f, -0.5f, 0.0f,    0.0f, 0.0f, 1.0f,    0.0f, 0.0f, // 左下角 2
    -0.5f,  0.5f, 0.0f,    0.5f, 0.5f, 0.5f,    0.0f, 1.0f,   // 左上角 3
};
CPU端设置GLSL变量
- 顶点着色器的变量
注意设置size大小和stride偏移:
    this->shader_program_.bind();  // 如果使用 QShaderProgram,那么最好在获取顶点属性位置前,先 bind()
    GLint aPosLocation = this->shader_program_.attributeLocation("aPos");  // 获取顶点着色器中顶点属性 aPos 的位置
    glVertexAttribPointer(aPosLocation, 3, GL_FLOAT, GL_FALSE, 8 * sizeof(float), (void*)0);  // 手动传入第几个属性
    glEnableVertexAttribArray(aPosLocation); // 开始 VAO 管理的第一个属性值

    this->shader_program_.bind();
    GLint aColorLocation = this->shader_program_.attributeLocation("aColor");
    glVertexAttribPointer(aColorLocation, 3, GL_FLOAT, GL_FALSE, 8 * sizeof(float), (void*)(3 * sizeof(float)));
    glEnableVertexAttribArray(aColorLocation);

    this->shader_program_.bind();
    GLint aTexelLocation = this->shader_program_.attributeLocation("aTexel");
    glVertexAttribPointer(aTexelLocation, 2, GL_FLOAT, GL_FALSE, 8 * sizeof(float), (void*)(6 * sizeof(float)));
    glEnableVertexAttribArray(aTexelLocation);
- 片段着色器的变量
这里直接使用QOpenGLTexture,让QT直接管理纹理对象的生命周期,就像之前的着色器程序对象一样,QOpenGLTexture封装了纹理对象的操作:[[QOpenGLTexture]]
this->shader_program_.bind();
this->shader_program_.setUniformValue("texture0", 0);  // 【重点】当涉及到多个纹理使,一定要为 uniform 设置纹理单元的编号
this->texture_wall_ = new QOpenGLTexture(QImage(":/Pictures/wall.jpg").mirrored());  // 因为QOpenGL的y轴是反的(镜像),所以需要mirrored翻转一下

this->shader_program_.bind();
this->shader_program_.setUniformValue("texture1", 1);
this->texture_nekosilverfox_ = new QOpenGLTexture(QImage(":/Pictures/nekosilverfox.jpg").mirrored());
API:
- [[mirrored]]
启用纹理对象
与着色器程序对象一样,在paintGL函数中,需要手动启动,这里使用的是bind
this->texture_wall_->bind(0);  // 绑定纹理单元0的数据,并激活对应区域
this->texture_nekosilverfox_->bind(1);
API:
- [[void QOpenGLTexture::bind]]
四、整体代码
foxopenglwidget.h
#ifndef FOXOPENGLWIDGET_H
#define FOXOPENGLWIDGET_H

#include <QOpenGLWidget>  // 相当于GLFW
#include <QOpenGLFunctions_4_5_Core>  // 相当于 GLAD
#include <QOpenGLShaderProgram>
#include <QTimer>
#include <QOpenGLTexture>

class FoxOpenGLWidget : public QOpenGLWidget, QOpenGLFunctions_4_5_Core
{
    Q_OBJECT
public:
    enum Shape
    {
        None,
        Rect,
        Circle,
        Triangle
    };

    explicit FoxOpenGLWidget(QWidget *parent = nullptr);
    ~FoxOpenGLWidget();

    void drawShape(Shape shape);
    void setWirefame(bool wirefame);


protected:
    /* 需要重载的 QOpenGLWidget 中的三个函数 */
    virtual void initializeGL();
    virtual void resizeGL(int w, int h);
    virtual void paintGL();

signals:

public slots:
    void changeColorWithTime();

private:
    Shape current_shape_;  // 记录当前绘制的图形
    QOpenGLShaderProgram shader_program_;  // 【重点】使用 Qt 提供的对象进行编译和链接
    QTimer timer_;
    QOpenGLTexture* texture_wall_;  // 存储砖墙那张图片数据
    QOpenGLTexture* texture_nekosilverfox_;
};

#endif // FOXOPENGLWIDGET_H
foxopenglwidget.cpp
#include <QDebug>
#include <QTime>
#include "foxopenglwidget.h"

// 顶点数据
float vertices[] = {
    // 最后是纹理的st坐标
     0.5f,  0.5f, 0.0f,    1.0f, 0.0f, 0.0f,    1.0f, 1.0f,   // 右上角 0
     0.5f, -0.5f, 0.0f,    0.0f, 1.0f, 0.0f,    1.0f, 0.0f,  // 右下角 1
    -0.5f, -0.5f, 0.0f,    0.0f, 0.0f, 1.0f,    0.0f, 0.0f, // 左下角 2
    -0.5f,  0.5f, 0.0f,    0.5f, 0.5f, 0.5f,    0.0f, 1.0f,   // 左上角 3
};

unsigned int indices[] = {
    // 注意索引从0开始!
    // 此例的索引(0,1,2,3)就是顶点数组vertices的下标,
    // 这样可以由下标代表顶点组合成矩形
    0, 1, 3, // 第一个三角形
    1, 2, 3  // 第二个三角形
};

// 创建 VAO 和 VBO 对象并且赋予 ID
unsigned int VBO, VAO;

// 创建 EBO 元素缓冲对象
unsigned int EBO;


FoxOpenGLWidget::FoxOpenGLWidget(QWidget *parent) : QOpenGLWidget(parent)
{
    this->current_shape_ = Shape::None;

    /* 每隔1ms取一次时间(发送一次信号) */
//    this->timer_.start(1);
//    connect(&this->timer_, SIGNAL(timeout()),
//            this, SLOT(changeColorWithTime()));

}

FoxOpenGLWidget::~FoxOpenGLWidget()
{
    if (!isValid()) return;  // 如果 paintGL 没有执行,下面的代码不存在(着色器 VAO VBO之类的),所以避免出错。如果他们没有执行就直接 return

    makeCurrent();

    /* 对象的回收 */
    glDeleteVertexArrays(1, &VAO);
    glDeleteBuffers(1, &VBO);
    glDeleteBuffers(1, &EBO);

    doneCurrent();
    update();
}


/* 首要要执行初始化过程,将函数指针指向显卡内的函数 */
void FoxOpenGLWidget::initializeGL()
{
    initializeOpenGLFunctions();  // 【重点】初始化OpenGL函数,将 Qt 里的函数指针指向显卡的函数(头文件 QOpenGLFunctions_X_X_Core)


    // ===================== 顶点着色器 =====================
    this->shader_program_.addShaderFromSourceFile(QOpenGLShader::Vertex, ":/shaders/ShaderSource/source.vert");  // 通过资源文件

    // ===================== 片段着色器 =====================
    this->shader_program_.addShaderFromSourceFile(QOpenGLShader::Fragment, ":/shaders/ShaderSource/source.frag");

    // ===================== 链接着色器 =====================
    bool success = this->shader_program_.link();
    if (!success)
    {
        qDebug() << "ERROR: " << this->shader_program_.log();
    }


    // ===================== VAO | VBO =====================
    // VAO 和 VBO 对象赋予 ID
    glGenVertexArrays(1, &VAO);
    glGenBuffers(1, &VBO);

    // 绑定 VAO、VBO 对象
    glBindVertexArray(VAO);
    glBindBuffer(GL_ARRAY_BUFFER, VBO);

    /* 为当前绑定到 target 的缓冲区对象创建一个新的数据存储(在 GPU 上创建对应的存储区域,并将内存中的数据发送过去)
        如果 data 不是 NULL,则使用来自此指针的数据初始化数据存储
        void glBufferData(GLenum target,  // 需要在 GPU 上创建的目标
                                            GLsizeipter size,  // 创建的显存大小
                                            const GLvoid* data,  // 数据
                                            GLenum usage)  // 创建在 GPU 上的哪一片区域(显存上的每个区域的性能是不一样的)https://registry.khronos.org/OpenGL-Refpages/es3.0/
    */
    glBufferData(GL_ARRAY_BUFFER, sizeof(vertices), vertices, GL_STATIC_DRAW);

#if     /* 告知显卡如何解析缓冲区里面的属性值
        void glVertexAttribPointer(
                                    GLuint index,  // VAO 中的第几个属性(VAO 属性的索引)
                                    GLint size,  // VAO 中的第几个属性中对应的位置放几份数据
                                    GLEnum type,  // 存放数据的数据类型
                                    GLboolean normalized,  // 是否标准化
                                    GLsizei stride,  // 步长
                                    const void* offset  // 偏移量
        )
    */
    this->shader_program_.bind();  // 如果使用 QShaderProgram,那么最好在获取顶点属性位置前,先 bind()
    GLint aPosLocation = this->shader_program_.attributeLocation("aPos");  // 获取顶点着色器中顶点属性 aPos 的位置
    glVertexAttribPointer(aPosLocation, 3, GL_FLOAT, GL_FALSE, 8 * sizeof(float), (void*)0);  // 手动传入第几个属性
    glEnableVertexAttribArray(aPosLocation); // 开始 VAO 管理的第一个属性值

    this->shader_program_.bind();
    GLint aColorLocation = this->shader_program_.attributeLocation("aColor");
    glVertexAttribPointer(aColorLocation, 3, GL_FLOAT, GL_FALSE, 8 * sizeof(float), (void*)(3 * sizeof(float)));
    glEnableVertexAttribArray(aColorLocation);

    this->shader_program_.bind();
    GLint aTexelLocation = this->shader_program_.attributeLocation("aTexel");
    glVertexAttribPointer(aTexelLocation, 2, GL_FLOAT, GL_FALSE, 8 * sizeof(float), (void*)(6 * sizeof(float)));
    glEnableVertexAttribArray(aTexelLocation);

#endif

#if 0
    /* 当我们在顶点着色器中没有写 layout 时,也可以在此处代码根据名字手动指定某个顶点属性的位置 */
    this->shader_program_.bind();
    GLint aPosLocation = 2;
    this->shader_program_.bindAttributeLocation("aPos", aPosLocation);
    glVertexAttribPointer(aPosLocation, 3, GL_FLOAT, GL_FALSE, 3 * sizeof(float), (void*)0);
    glEnableVertexAttribArray(aPosLocation);

#endif


    // ===================== EBO =====================
    glGenBuffers(1, &EBO);
    glBindBuffer(GL_ELEMENT_ARRAY_BUFFER, EBO);
    glBufferData(GL_ELEMENT_ARRAY_BUFFER, sizeof(indices), indices, GL_STATIC_DRAW);  // EBO/IBO 是储存顶点【索引】的

    // ===================== 纹理 =====================
    this->shader_program_.bind();
    this->shader_program_.setUniformValue("texture0", 0);  // 【重点】当涉及到多个纹理使,一定要为 uniform 设置纹理单元的编号
    this->texture_wall_ = new QOpenGLTexture(QImage(":/Pictures/wall.jpg").mirrored());  // 因为QOpenGL的y轴是反的(镜像),所以需要mirrored翻转一下

    this->shader_program_.bind();
    this->shader_program_.setUniformValue("texture1", 1);
    this->texture_nekosilverfox_ = new QOpenGLTexture(QImage(":/Pictures/nekosilverfox.jpg").mirrored());

    // ===================== 解绑 =====================
    // 解绑 VAO 和 VBO,注意先解绑 VAO再解绑EBO
    glBindVertexArray(0);
    glBindBuffer(GL_ARRAY_BUFFER, 0);  // 注意 VAO 不参与管理 VBO
    glBindBuffer(GL_ELEMENT_ARRAY_BUFFER, 0);
}

void FoxOpenGLWidget::resizeGL(int w, int h)
{
    Q_UNUSED(w);
    Q_UNUSED(h);
}

void FoxOpenGLWidget::paintGL()
{
    /* 设置 OpenGLWidget 控件背景颜色为深青色 */
    glClearColor(0.2f, 0.3f, 0.3f, 1.0f);  // set方法【重点】如果没有 initializeGL,目前是一个空指针状态,没有指向显卡里面的函数,会报错
    glClear(GL_COLOR_BUFFER_BIT);  // use方法

    /* 重新绑定 VAO */
    glBindVertexArray(VAO);

    /* 【重点】使用 QOpenGLShaderProgram 进行着色器绑定 */
    this->shader_program_.bind();

    /* 绘制三角形 */
//    glDrawArrays(GL_TRIANGLES, 0, 6);
//    glDrawElements(GL_TRIANGLES, 6, GL_UNSIGNED_INT, 0);  // 6 代表6个点,因为一个矩形是2个三角形构成的,一个三角形有3个点
//    glDrawElements(GL_TRIANGLES, 6, GL_UNSIGNED_INT, &indices);  // 直接到索引数组里去绘制,如果VAO没有绑定EBO的话

    // 通过 this->current_shape_ 确定当前需要绘制的图形
    switch (this->current_shape_)
    {
    case Shape::None:
        break;

    case Shape::Rect:
        this->texture_wall_->bind(0);  // 绑定纹理单元0的数据,并激活对应区域
        this->texture_nekosilverfox_->bind(1);
        glDrawElements(GL_TRIANGLES, 6, GL_UNSIGNED_INT, 0);
        break;

    case Shape::Circle:
        break;

    case Shape::Triangle:
        break;

    default:
        break;

    }

}

void FoxOpenGLWidget::drawShape(FoxOpenGLWidget::Shape shape)
{
    this->current_shape_ = shape;
    update();  // 【重点】注意使用 update() 进行重绘,也就是这条语句会重新调用 paintGL()
}

void FoxOpenGLWidget::setWirefame(bool wirefame)
{
    makeCurrent();

     /* 用线条填充,默认是 GL_FILL */
    if (true == wirefame)
    {
        glPolygonMode(GL_FRONT_AND_BACK, GL_LINE);
    }
    else
    {
        glPolygonMode(GL_FRONT_AND_BACK, GL_FILL);
    }

    doneCurrent();
    update();  // 【重点】注意使用 update() 进行重绘,也就是这条语句会重新调用 paintGL()
}

void FoxOpenGLWidget::changeColorWithTime()
{
    if (this->current_shape_ == Shape::None) return;

    makeCurrent();

    int current_sec = QTime::currentTime().second();  // 取到秒
    float greenValue = sin(current_sec);
    this->shader_program_.setUniformValue("ourColor", 0.0f, greenValue, 0.0f, 1.0f);

    doneCurrent();
    update();
}
- List item
API
mirrored
QImage QImage::mirrored(bool horizontal = false, bool vertical = true) const &
Description
Returns a mirror of the image, mirrored in the horizontal and/or the vertical direction depending on whether horizontal and vertical are set to true or false.
Note that the original image is not changed.
See also mirror() and Image Transformations.
void QOpenGLTexture::bind
void QOpenGLTexture::bind(uint unit, QOpenGLTexture::TextureUnitReset reset = DontResetTextureUnit)
Description
Binds this texture to texture unit unit ready for rendering. Note that you do not need to bind QOpenGLTexture objects in order to modify them as the implementation makes use of the EXT_direct_state_access extension where available and simulates it where it is not.
If parameter reset is true then this function will restore the active unit to the texture unit that was active upon entry.
See also release().


 1363
1363

 被折叠的 条评论
为什么被折叠?
被折叠的 条评论
为什么被折叠?
 到【灌水乐园】发言


