


用OpenInventor实现的NeHe OpenGL教程-第十七课
这节课我们将讨论使用纹理贴图的技术来显示文字。使用这种技术显示文字的好处在于程序的效果在任何机器上都是相同的。而我们前面讨论的显示文字的方法都是依赖于当前系统中所包含的字体,所以前面讨论的技术在不同的机器上有可能会有不同的显示效果。
使用纹理贴图来显示文字的原理很简单,首先需要制作一个包含所有需要显示的文字的图片,将这个图片作为纹理加载到内存中,然后根据要显示的文字,找到其所对应的纹理坐标,最后显示一个矩形平面,对平面的四个顶点赋值上纹理坐标,这样就完成了文字的显示。
我们首先要仿照NeHe教程,创建一个旋转的“墙”场景。
SoSeparator* BuildWall(void)
{
SoSeparator *pWallScene = new SoSeparator;
//向Z轴负方向,即屏幕向里方向移动5个单位,和NeHe教程相同。
SoTranslation *pZTrans = new SoTranslation;
pZTrans->translation.setValue(0.0f,0.0f,- 5.0f);
pWallScene->addChild(pZTrans);
//绕Z轴旋转45度
SoRotation *pZRotation = new SoRotation;
pZRotation->rotation.setValue(SbVec3f(0,0,1),3.1415 / 4.0);
pWallScene->addChild(pZRotation);
//让物体同时绕x轴和y轴旋转,这样物体就象在一个点上旋转的钻石那样旋转
SoRotor *pRotor = new SoRotor;
pRotor->rotation.setValue(SbVec3f(1,1,0),1);
pRotor->speed = 0.1;
pWallScene->addChild(pRotor);
//加载纹理位图
SoTexture2 *pBumpTexture = new SoTexture2;
pBumpTexture->filename.setValue("../Data/Bumps.png");
pBumpTexture->model = SoTexture2::DECAL;
pWallScene->addChild(pBumpTexture);
//定义墙的位置坐标数据
float vecWallCoord[][3] = { {-100.0f, 100.0f, 0.0f},
{100.0f, 100.0f, 0.0f},
{100.0f, -100.0f, 0.0f},
{-100.0f, -100.0f, 0.0f} };
SoCoordinate3 *pWallCoords = new SoCoordinate3;
pWallCoords->point.setValues(0,4,vecWallCoord);
pWallScene->addChild(pWallCoords);
SoFaceSet *pWallFaceSet = new SoFaceSet;
pWallScene->addChild(pWallFaceSet);
//旋转坐标系
SoRotation *pRotation = new SoRotation;
pRotation->rotation.setValue(SbVec3f(1,1,0),3.1415 / 2.0);
pWallScene->addChild(pRotation);
//添加另外一个“墙”
pWallScene->addChild(pWallFaceSet);
return pWallScene;
}
下面的函数根据输入的字符串,使用纹理来创建字符串的场景,纹理坐标的计算方法和NeHe教程中相同。
SoSeparator* OivPrint(char *string,int set)
{
if(lstrlen(string) <= 0)
return NULL;
float cx,cy;
SoCoordinate3 *pStringCoords = new SoCoordinate3;
SoTextureCoordinate2 *pTexCoord = new SoTextureCoordinate2;
for(int i = 0; i < lstrlen(string); i++)
{
pStringCoords->point.set1Value( i * 4 + 0, i * 16, 0, 0 );
pStringCoords->point.set1Value( i * 4 + 1, (i + 1) * 16, 0, 0 );
pStringCoords->point.set1Value( i * 4 + 2, (i + 1) * 16, 16, 0 );
pStringCoords->point.set1Value( i * 4 + 3, i * 16, 16, 0 );
cx = float((string[i] - 32 + 128 * set) % 16) / 16.0f;
cy = float((string[i] - 32 + 128 * set) / 16) / 16.0f;
pTexCoord->point.set1Value( i * 4 + 0,cx,1 - cy - 0.0625f);
pTexCoord->point.set1Value( i * 4 + 1,cx + 0.0625f,1 - cy - 0.0625f);
pTexCoord->point.set1Value( i * 4 + 2,cx + 0.0625f,1 - cy);
pTexCoord->point.set1Value( i * 4 + 3,cx,1 - cy);
}
int iIndex = 0;
SoIndexedFaceSet *pTextFaceSet = new SoIndexedFaceSet;
for(int i = 0; i < lstrlen(string); i++)
{
pTextFaceSet->coordIndex.set1Value(iIndex,i * 4);
pTextFaceSet->textureCoordIndex.set1Value(iIndex++,i * 4);
pTextFaceSet->coordIndex.set1Value(iIndex,i * 4 + 1);
pTextFaceSet->textureCoordIndex.set1Value(iIndex++,i * 4 + 1);
pTextFaceSet->coordIndex.set1Value(iIndex,i * 4 + 2);
pTextFaceSet->textureCoordIndex.set1Value(iIndex++,i * 4 + 2);
pTextFaceSet->coordIndex.set1Value(iIndex,i * 4 + 3);
pTextFaceSet->textureCoordIndex.set1Value(iIndex++,i * 4 + 3);
pTextFaceSet->coordIndex.set1Value(iIndex,SO_END_FACE_INDEX);
pTextFaceSet->textureCoordIndex.set1Value(iIndex++,-1);
}
SoSeparator *pStringScene = new SoSeparator;
pStringScene->addChild(pStringCoords);
pStringScene->addChild(pTexCoord);
pStringScene->addChild(pTextFaceSet);
return pStringScene;
}
下面的函数将创建三个运动的字符串,字符串运动轨迹是通过OpenInventor的数学引擎计算出来的。
SoSeparator* BuildFont(void)
{
SoSeparator *pFontScene = new SoSeparator;
SoCallback *pGlCallback = new SoCallback();
pGlCallback->setCallback(GlCB, 0);
pFontScene->addChild(pGlCallback);
SoTexture2 *pFontTexture = new SoTexture2;
pFontTexture->filename.setValue("../Data/Font.png");
pFontTexture->model = SoTexture2::MODULATE;
pFontScene->addChild(pFontTexture);
SoTimeCounter *pCnt1Counter = new SoTimeCounter;
pCnt1Counter->max = 360;
pCnt1Counter->step = 1;
pCnt1Counter->frequency = .2;
SoTimeCounter *pCnt2Counter = new SoTimeCounter;
pCnt2Counter->max = 360;
pCnt2Counter->step = 1;
pCnt2Counter->frequency = .4;
SoSeparator *pText1Sep = OivPrint("NeHe",0);
if(pText1Sep != NULL)
{
SoTranslation *pTransl1 = new SoTranslation;
pText1Sep->insertChild(pTransl1,0);
SoMaterial *pText1Material = new SoMaterial;
pText1Material->diffuseColor.setValue(1.0,0.0,0.0);
pText1Material->transparency = 0.1;
pText1Sep->insertChild(pText1Material,0);
SoCalculator *pText1PosCalc = new SoCalculator;
pText1PosCalc->a.connectFrom(&pCnt1Counter->output);
pText1PosCalc->b.connectFrom(&pCnt2Counter->output);
pText1PosCalc->expression.set1Value(0, "ta = a * M_PI / 180");
pText1PosCalc->expression.set1Value(1, "tb = 28 + 120 * cos(ta)");
pText1PosCalc->expression.set1Value(2, "td = b * M_PI / 180");
pText1PosCalc->expression.set1Value(3, "te = 23.5 + 100 * sin(td)");
pText1PosCalc->expression.set1Value(4, "oA = vec3f(tb,te,0)");
pTransl1->translation.connectFrom(&pText1PosCalc->oA);
SoCalculator *pText1ColorCalc = new SoCalculator;
pText1ColorCalc->a.connectFrom(&pCnt1Counter->output);
pText1ColorCalc->b.connectFrom(&pCnt2Counter->output);
pText1ColorCalc->expression.set1Value(0, "ta = a * M_PI / 180");
pText1ColorCalc->expression.set1Value(1, "tb = cos(ta)");
pText1ColorCalc->expression.set1Value(2, "td = b * M_PI / 180");
pText1ColorCalc->expression.set1Value(3, "te = sin(td)");
pText1ColorCalc->expression.set1Value(4, "tf = 1.0 - 0.5 * cos(ta + td)");
pText1ColorCalc->expression.set1Value(5, "oA = vec3f(tb,te,tf)");
pText1Material->diffuseColor.connectFrom(&pText1ColorCalc->oA);
pFontScene->addChild(pText1Sep);
}
SoSeparator *pText2Sep = OivPrint("OpenGL",1);
if(pText2Sep != NULL)
{
SoTranslation *pTransl2 = new SoTranslation;
pText2Sep->insertChild(pTransl2,0);
SoMaterial *pText2Material = new SoMaterial;
pText2Material->diffuseColor.setValue(1.0,0.0,0.0);
pText2Material->transparency = 0.1;
pText2Sep->insertChild(pText2Material,0);
SoCalculator *pText2PosCalc = new SoCalculator;
pText2PosCalc->a.connectFrom(&pCnt1Counter->output);
pText2PosCalc->b.connectFrom(&pCnt2Counter->output);
pText2PosCalc->expression.set1Value(0, "ta = a * M_PI / 180");
pText2PosCalc->expression.set1Value(1, "tb = 23.5 + 100 * sin(ta)");
pText2PosCalc->expression.set1Value(2, "td = b * M_PI / 180");
pText2PosCalc->expression.set1Value(3, "te = 28 + 100 * cos(td)");
pText2PosCalc->expression.set1Value(4, "oA = vec3f(te,tb,0)");
pTransl2->translation.connectFrom(&pText2PosCalc->oA);
SoCalculator *pText2ColorCalc = new SoCalculator;
pText2ColorCalc->a.connectFrom(&pCnt1Counter->output);
pText2ColorCalc->b.connectFrom(&pCnt2Counter->output);
pText2ColorCalc->expression.set1Value(0, "ta = a * M_PI / 180");
pText2ColorCalc->expression.set1Value(1, "tb = cos(ta)");
pText2ColorCalc->expression.set1Value(2, "td = b * M_PI / 180");
pText2ColorCalc->expression.set1Value(3, "te = sin(td)");
pText2ColorCalc->expression.set1Value(4, "tf = 1.0 - 0.5 * cos(ta + td)");
pText2ColorCalc->expression.set1Value(5, "oA = vec3f(te,tf,tb)");
pText2Material->diffuseColor.connectFrom(&pText2ColorCalc->oA);
pFontScene->addChild(pText2Sep);
}
SoSeparator *pText3Sep = OivPrint("Giuseppe D'Agata",0);
if(pText3Sep != NULL)
{
SoSeparator *pText34Sep = new SoSeparator;
SoShuttle *pText3Shuttle = new SoShuttle;
pText3Shuttle->translation0.setValue(-270,-180,0);
pText3Shuttle->translation1.setValue(25,-180,0);
pText3Shuttle->speed = 0.1;
pText34Sep->addChild(pText3Shuttle);
SoMaterial *pText3Material = new SoMaterial;
pText3Material->diffuseColor.setValue(0.0,0.0,1.0);
pText3Material->transparency = 0.1;
pText34Sep->addChild(pText3Material);
pText34Sep->addChild(pText3Sep);
SoTranslation *pTransl4 = new SoTranslation;
pTransl4->translation.setValue(1,0,0);
pText34Sep->addChild(pTransl4);
SoMaterial *pText4Material = new SoMaterial;
pText4Material->diffuseColor.setValue(1.0,1.0,1.0);
pText4Material->transparency = 0.1;
pText34Sep->addChild(pText4Material);
pText34Sep->addChild(pText3Sep);
pFontScene->addChild(pText34Sep);
}
pGlCallback = new SoCallback();
pGlCallback->setCallback(GlCB, (void *)1);
pFontScene->addChild(pGlCallback);
return pFontScene;
}
分别加载墙和文字场景。
void BuildScene(void)
{
g_pOivSceneRoot->addChild(BuildWall());
g_pOivSceneRoot->addChild(BuildFont());
}
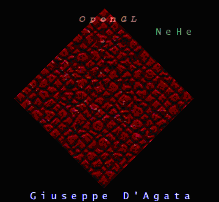
现在编译运行我们程序,屏幕上显示一个旋转的叶片。三个字符串以自己的轨迹不断运动。效果和NeHe第十七课是相同的。
本课的完整代码下载。(VC 2003 + Coin2.5)
后记
OpenInventor是一种基于OpenGL的面向对象的三维图形软件开发包。使用这个开发包,程序员可以快速、简洁地开发出各种类型的交互式三维图形软件。这里不对OpenInventor做详细的介绍,读者如果感兴趣,可以阅读我的blog中的这篇文章《OpenInventor 简介》。
NeHe教程是目前针对初学者来说最好的OpenGL教程,它可以带领读者由浅入深,循序渐进地掌握OpenGL编程技巧。到目前为止(2007年11月),NeHe教程一共有48节。我的计划是使用OpenInventor来实现所有48节课程同样的效果。目的是复习和巩固OpenGL的知识,同时与各位读者交流OpenInventor的使用技巧。
因为篇幅的限制,我不会介绍NeHe教程中OpenGL的实现过程,因为NeHe的教程已经讲解的很清楚了,目前网络中也有NeHe的中文版本。我将使用VC 2003作为主要的编译器。程序框架采用和NeHe一样的Win32程序框架,不使用MFC。程序也可以在VC Express,VC 2005/2008中编译。我采用的OpenInventor开发环境是Coin,这是一个免费开源的OpenInventor开发库。文章 《OpenInventor-Coin3D开发环境》 介绍了如何在VC中使用Coin。我使用的Coin版本是2.5。读者可以到 www.coin3d.org 中免费下载。
读者可以在遵循GNU协议的条件下自由使用、修改本文的代码。水平的原因,代码可能不是最优化的,我随时期待读者的指正和交流。转载请注明。谢谢。
我的联系方式:
E-mail: < openinventor@gmail.com > < openinventor@126.com >
Blog: < http://blog.csdn.net/RobinHao >
Site: < http://www.openinventor.cn >


 5468
5468

 被折叠的 条评论
为什么被折叠?
被折叠的 条评论
为什么被折叠?
 到【灌水乐园】发言


