


对于AMS来讲,Activity管理是它的核心工作,前面两篇文章都是讲AMS的启动流程和进程的管理,这两篇文章其实是为本文做铺垫的,只有理解了前面两篇文章才能更好地理解AMS的activity管理。在谈到Activity的管理的时候,就不得不说一下Activity的启动流程,说道activity的启动流程就要说一下进程启动的问题了,前面一片文章中我们已经分析了AMS的进程管理,这里需要补充的一点就是在Android中并没有针对app开放进程的启动接口,只是在启动activity或者service等组件的时候,我们的AMS会根据需要来启动相应的进程。
好了,下面我们开始分析AMS的activity的启动流程吧。
Activity的启动:

AMS的activity的启动流程
Activity的启动是从app端开始的,在AMS实际启动完成后结束的,这里就涉及到了Binder的C/S通讯,因此这里我们分为两个部分分析:客户端和服务端的实现。

activity启动之客户端
这里我们以在app中通过调用activity的startActivity方法启动目标activity来分析一个典型的activity启动流程。首先我们需要看一下Activity的startActivity方法的实现,Activity的startActivity实现了多态,一共两个实现:一个参数(intent)的,两个参数的(一个intent和一个bundle)的,不过通常我们都是调用一个参数的,下面是一个参数的实现:
frameworks\base\core\java\android\app\activity.java
    @Override
    public void startActivity(Intent intent) {
        this.startActivity(intent, null);
    }
可以看到这里还是调用了两个参数的:
    @Override
    public void startActivity(Intent intent, @Nullable Bundle options) {
        if (options != null) {
            startActivityForResult(intent, -1, options);
        } else {
            // Note we want to go through this call for compatibility with
            // applications that may have overridden the method.
            startActivityForResult(intent, -1);
        }
    }
    public void startActivityForResult(@RequiresPermission Intent intent, int requestCode,
            @Nullable Bundle options) {
        if (mParent == null) {
            Instrumentation.ActivityResult ar =
                mInstrumentation.execStartActivity(
                    this, mMainThread.getApplicationThread(), mToken, this,
                    intent, requestCode, options);
            // ar表示activity启动结果,如果结果OK, 就调用ActivityThread的sendActivityResult通知启动结果,
            // 这里会回调到请求activity的onActivityResult方法

            if (ar != null) {
                mMainThread.sendActivityResult(
                    mToken, mEmbeddedID, requestCode, ar.getResultCode(),
                    ar.getResultData());
            }
            if (requestCode >= 0) {
                // If this start is requesting a result, we can avoid making
                // the activity visible until the result is received.  Setting
                // this code during onCreate(Bundle savedInstanceState) or onResume() will keep the
                // activity hidden during this time, to avoid flickering.
                // This can only be done when a result is requested because
                // that guarantees we will get information back when the
                // activity is finished, no matter what happens to it.
                mStartedActivity = true;
            }

            cancelInputsAndStartExitTransition(options);
            // TODO Consider clearing/flushing other event sources and events for child windows.
        } else {
            if (options != null) {
                mParent.startActivityFromChild(this, intent, requestCode, options);
            } else {
                // Note we want to go through this method for compatibility with
                // existing applications that may have overridden it.
                mParent.startActivityFromChild(this, intent, requestCode);
            }
        }
    }
execStartActivity@Instrumentation.java:
    public ActivityResult execStartActivity(
            Context who, IBinder contextThread, IBinder token, Activity target,
            Intent intent, int requestCode, Bundle options) {
        IApplicationThread whoThread = (IApplicationThread) contextThread;
        Uri referrer = target != null ? target.onProvideReferrer() : null;
        if (referrer != null) {
            intent.putExtra(Intent.EXTRA_REFERRER, referrer);
        }
        if (mActivityMonitors != null) {
            synchronized (mSync) {
                final int N = mActivityMonitors.size();
                for (int i=0; i<N; i++) {
                    final ActivityMonitor am = mActivityMonitors.get(i);
                    if (am.match(who, null, intent)) {
                        am.mHits++;
                        if (am.isBlocking()) {
                            return requestCode >= 0 ? am.getResult() : null;
                        }
                        break;
                    }
                }
            }
        }
        try {
            intent.migrateExtraStreamToClipData();
            intent.prepareToLeaveProcess(who);

            // 通过调用ActivityManagerNative的startActivity来实际启动activity
            int result = ActivityManagerNative.getDefault()
                .startActivity(whoThread, who.getBasePackageName(), intent,
                        intent.resolveTypeIfNeeded(who.getContentResolver()),
                        token, target != null ? target.mEmbeddedID : null,
                        requestCode, 0, null, options);
            checkStartActivityResult(result, intent);
        } catch (RemoteException e) {
            throw new RuntimeException("Failure from system", e);
        }
        return null;
    }
startActivity@ActivityManagerProxy
class ActivityManagerProxy implements IActivityManager
{
    public ActivityManagerProxy(IBinder remote)
    {
        mRemote = remote;
    }

    public IBinder asBinder()
    {
        return mRemote;
    }

    public int startActivity(IApplicationThread caller, String callingPackage, Intent intent,
            String resolvedType, IBinder resultTo, String resultWho, int requestCode,
            int startFlags, ProfilerInfo profilerInfo, Bundle options) throws RemoteException {
        Parcel data = Parcel.obtain();
        Parcel reply = Parcel.obtain();
        data.writeInterfaceToken(IActivityManager.descriptor);
        data.writeStrongBinder(caller != null ? caller.asBinder() : null);
        data.writeString(callingPackage);
        intent.writeToParcel(data, 0);
        data.writeString(resolvedType);
        data.writeStrongBinder(resultTo);
        data.writeString(resultWho);
        data.writeInt(requestCode);
        data.writeInt(startFlags);
        if (profilerInfo != null) {
            data.writeInt(1);
            profilerInfo.writeToParcel(data, Parcelable.PARCELABLE_WRITE_RETURN_VALUE);
        } else {
            data.writeInt(0);
        }
        if (options != null) {
            data.writeInt(1);
            options.writeToParcel(data, 0);
        } else {
            data.writeInt(0);
        }

        // 通过Binder的transact方法开始和AMS通讯。
        mRemote.transact(START_ACTIVITY_TRANSACTION, data, reply, 0);
        reply.readException();
        int result = reply.readInt();
        reply.recycle();
        data.recycle();
        return result;
    }
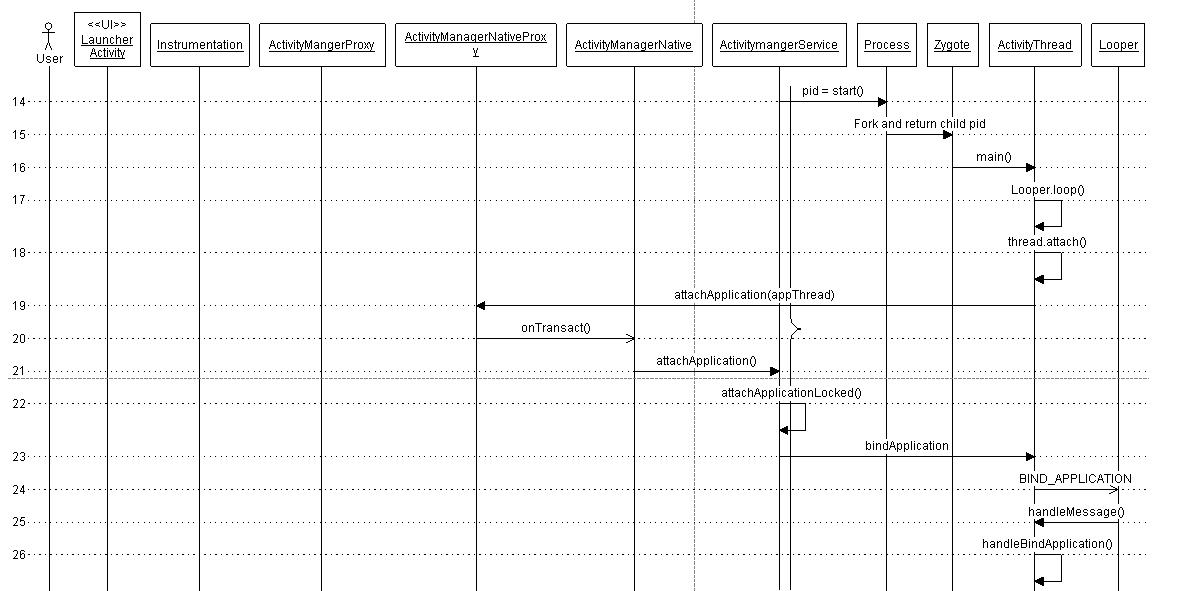
我们的ActivityManagerNative是一个强大的Binder实现类,这个类是一个既面向客户有面向服务端的类,它封装了Binder的通讯实现,减少客户端和服务端通讯的困难度。刚才我们说的ActivityManagerProxy内部类是运行在客户端的一个代理,他只是提供接口,真正的实现还是在服务端的,那么ActivityManagerNative就是运行在服务端的,他就是负责从Binder监听来自proxy代理的通讯请求,使用transaction code区别不同的信息,上面我们的transaction code就是START_ACTIVITY_TRANSACTION。在继续分析server端的实现之前,我们先来梳理一下client这边的操作,整体上如下面这个时序图:
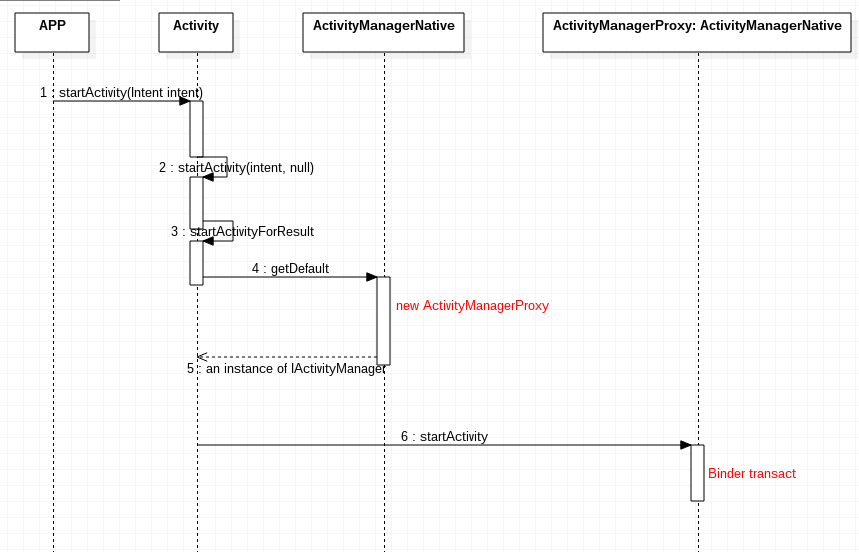
同时我们还要弄清楚ActivityManagerNative,ActivityManagerProxy,AMS,IActivityManager以及我们后面要说道面向app的管理类:ActivityManager之间是什么关系,下面我们给出它的类图关系:
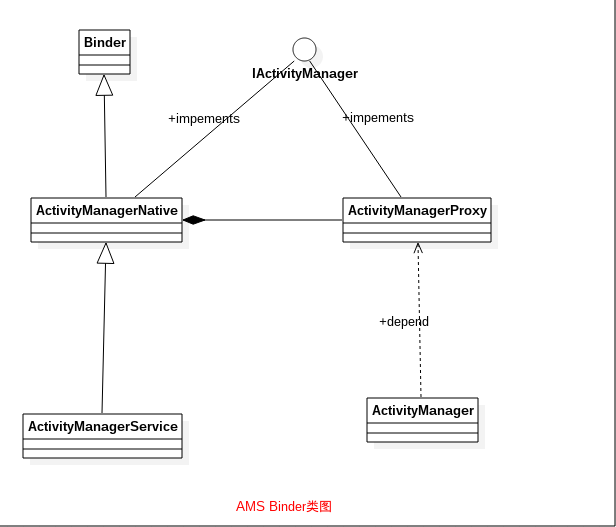
这张图描述了上面说到的一堆类和Binder之间的关系,看代码的话感觉关系比较乱,但是看这个图的话就基本明白了。下面我们就可以分析服务端的实现了。
activity启动之服务端
上面我们分析完了activity客户端的启动流程,下面我们继续看看服务端收到客户端的启动请求后是怎么处理的。上面我们说道ActivityManagerNative是运行在服务端的,专门用来处理客户端的通讯请求的,我们知道Binder驱动在收到数据后会返回给上层,上层的Binder会回调具体接受者的onTransact方法(如果你对Binder不熟悉的话,可以先学习一下Binder的知识,这在android世界里是很核心的一个东西,如果这个东西你不懂的话,那么android的大门永远你都进不了),
下面我们看下ActivityManagerNative的onTransact实现:
onTransact@ActivityManagerNative.java
    public boolean onTransact(int code, Parcel data, Parcel reply, int flags)
            throws RemoteException {
        switch (code) {
        case START_ACTIVITY_TRANSACTION:
        {
            data.enforceInterface(IActivityManager.descriptor);
            IBinder b = data.readStrongBinder();
            IApplicationThread app = ApplicationThreadNative.asInterface(b);
            String callingPackage = data.readString();
            Intent intent = Intent.CREATOR.createFromParcel(data);
            String resolvedType = data.readString();
            IBinder resultTo = data.readStrongBinder();
            String resultWho = data.readString();
            int requestCode = data.readInt();
            int startFlags = data.readInt();
            ProfilerInfo profilerInfo = data.readInt() != 0
                    ? ProfilerInfo.CREATOR.createFromParcel(data) : null;
            Bundle options = data.readInt() != 0
                    ? Bundle.CREATOR.createFromParcel(data) : null;


            int result = startActivity(app, callingPackage, intent, resolvedType,
                    resultTo, resultWho, requestCode, startFlags, profilerInfo, options);


            reply.writeNoException();
            reply.writeInt(result);
            return true;
}startActivity@ActivityManagerService.java
    @Override
    public final int startActivity(IApplicationThread caller, String callingPackage,
            Intent intent, String resolvedType, IBinder resultTo, String resultWho, int requestCode,
            int startFlags, ProfilerInfo profilerInfo, Bundle bOptions) {
        return startActivityAsUser(caller, callingPackage, intent, resolvedType, resultTo,
                resultWho, requestCode, startFlags, profilerInfo, bOptions,
                UserHandle.getCallingUserId());
}startActivityAsUser@ActivityManagerService.java
    @Override
    public final int startActivityAsUser(IApplicationThread caller, String callingPackage,
            Intent intent, String resolvedType, IBinder resultTo, String resultWho, int requestCode,
            int startFlags, ProfilerInfo profilerInfo, Bundle bOptions, int userId) {

        //判断是否独立进程,独立进程是不允许调用startActivity方法的
        enforceNotIsolatedCaller("startActivity");

        // 判断当前UID是否允许启动Activity
        userId = mUserController.handleIncomingUser(Binder.getCallingPid(), Binder.getCallingUid(),
                userId, false, ALLOW_FULL_ONLY, "startActivity", null);
        // TODO: Switch to user app stacks here.

        // 调用
        return mActivityStarter.startActivityMayWait(caller, -1, callingPackage, intent,
                resolvedType, null, null, resultTo, resultWho, requestCode, startFlags,
                profilerInfo, null, null, bOptions, false, userId, null, null);
} final int startActivityMayWait(IApplicationThread caller, int callingUid,
String callingPackage, Intent intent, String resolvedType,
IVoiceInteractionSession voiceSession, IVoiceInteractor voiceInteractor,
IBinder resultTo, String resultWho, int requestCode, int startFlags,
ProfilerInfo profilerInfo, IActivityManager.WaitResult outResult, Configuration config,
Bundle bOptions, boolean ignoreTargetSecurity, int userId,
IActivityContainer iContainer, TaskRecord inTask) {
// Refuse possible leaked file descriptors
if (intent != null && intent.hasFileDescriptors()) {
throw new IllegalArgumentException("File descriptors passed in Intent");
}
mSupervisor.mActivityMetricsLogger.notifyActivityLaunching();
boolean componentSpecified = intent.getComponent() != null;
// Save a copy in case ephemeral needs it
final Intent ephemeralIntent = new Intent(intent);
// Don't modify the client's object!
intent = new Intent(intent);
ResolveInfo rInfo = mSupervisor.resolveIntent(intent, resolvedType, userId);接下来的操作全部都是原子操作,我们继续看这个原子操作内部的代码:
            if (container != null && container.mParentActivity != null &&
                    container.mParentActivity.state != RESUMED) {
                // Cannot start a child activity if the parent is not resumed.
                return ActivityManager.START_CANCELED;
} final int realCallingPid = Binder.getCallingPid();
final int realCallingUid = Binder.getCallingUid();
int callingPid;
if (callingUid >= 0) {
callingPid = -1;
} else if (caller == null) {
callingPid = realCallingPid;
callingUid = realCallingUid;
} else {
callingPid = callingUid = -1;
} if (aInfo != null &&
(aInfo.applicationInfo.privateFlags
& ApplicationInfo.PRIVATE_FLAG_CANT_SAVE_STATE) != 0) {
// This may be a heavy-weight process! Check to see if we already
// have another, different heavy-weight process running.
if (aInfo.processName.equals(aInfo.applicationInfo.packageName)) {
final ProcessRecord heavy = mService.mHeavyWeightProcess;
if (heavy != null && (heavy.info.uid != aInfo.applicationInfo.uid
|| !heavy.processName.equals(aInfo.processName))) {
int appCallingUid = callingUid;
if (caller != null) {
ProcessRecord callerApp = mService.getRecordForAppLocked(caller);
if (callerApp != null) {
appCallingUid = callerApp.info.uid;
} else {
Slog.w(TAG, "Unable to find app for caller " + caller
+ " (pid=" + callingPid + ") when starting: "
+ intent.toString());
ActivityOptions.abort(options);
return ActivityManager.START_PERMISSION_DENIED;
}
}
接下来的工作就是通过调用startActivityLocked方法来进一步完成启动工作,后面的outResult因为我们给的是null,因此不会执行。
            final ActivityRecord[] outRecord = new ActivityRecord[1];
            int res = startActivityLocked(caller, intent, ephemeralIntent, resolvedType,
                    aInfo, rInfo, voiceSession, voiceInteractor,
                    resultTo, resultWho, requestCode, callingPid,
                    callingUid, callingPackage, realCallingPid, realCallingUid, startFlags,
                    options, ignoreTargetSecurity, componentSpecified, outRecord, container,
                    inTask);
现在我们来详细分析一下startActivityLocked的实现,由于这个函数比较长,我们就只关注重点部分的操作,同样的我们分步分析:
startActivityLocked@activityStarter.java
    final int startActivityLocked(IApplicationThread caller, Intent intent, Intent ephemeralIntent,
            String resolvedType, ActivityInfo aInfo, ResolveInfo rInfo,
            IVoiceInteractionSession voiceSession, IVoiceInteractor voiceInteractor,
            IBinder resultTo, String resultWho, int requestCode, int callingPid, int callingUid,
            String callingPackage, int realCallingPid, int realCallingUid, int startFlags,
            ActivityOptions options, boolean ignoreTargetSecurity, boolean componentSpecified,
            ActivityRecord[] outActivity, ActivityStackSupervisor.ActivityContainer container,
            TaskRecord inTask) {
        int err = ActivityManager.START_SUCCESS;

        ProcessRecord callerApp = null;
        if (caller != null) {
            callerApp = mService.getRecordForAppLocked(caller);
            if (callerApp != null) {
                callingPid = callerApp.pid;
                callingUid = callerApp.info.uid;
            } else {
                Slog.w(TAG, "Unable to find app for caller " + caller
                        + " (pid=" + callingPid + ") when starting: "
                        + intent.toString());
                err = ActivityManager.START_PERMISSION_DENIED;
            }
} if ((launchFlags & Intent.FLAG_ACTIVITY_FORWARD_RESULT) != 0 && sourceRecord != null) {
// Transfer the result target from the source activity to the new
// one being started, including any failures.
if (requestCode >= 0) {
ActivityOptions.abort(options);
return ActivityManager.START_FORWARD_AND_REQUEST_CONFLICT;
}
resultRecord = sourceRecord.resultTo;
if (resultRecord != null && !resultRecord.isInStackLocked()) {
resultRecord = null;
}
resultWho = sourceRecord.resultWho;
requestCode = sourceRecord.requestCode;
sourceRecord.resultTo = null;
if (resultRecord != null) {
resultRecord.removeResultsLocked(sourceRecord, resultWho, requestCode);
}
if (sourceRecord.launchedFromUid == callingUid) {
// The new activity is being launched from the same uid as the previous
// activity in the flow, and asking to forward its result back to the
// previous. In this case the activity is serving as a trampoline between
// the two, so we also want to update its launchedFromPackage to be the
// same as the previous activity. Note that this is safe, since we know
// these two packages come from the same uid; the caller could just as
// well have supplied that same package name itself. This specifially
// deals with the case of an intent picker/chooser being launched in the app
// flow to redirect to an activity picked by the user, where we want the final
// activity to consider it to have been launched by the previous app activity.
callingPackage = sourceRecord.launchedFromPackage;
}
}
接下来就会检查目标intent中的component是否为空,如果为空的话,就说明这个intent当目前为止还没有相应的class来handle它,这个时候需要退出;同样的,如果通过PMS解析还不能找到对应的类来处理的话,也是要终止操作的:
        if (err == ActivityManager.START_SUCCESS && intent.getComponent() == null) {
            // We couldn't find a class that can handle the given Intent.
            // That's the end of that!
            err = ActivityManager.START_INTENT_NOT_RESOLVED;
        }

        if (err == ActivityManager.START_SUCCESS && aInfo == null) {
            // We couldn't find the specific class specified in the Intent.
            // Also the end of the line.
            err = ActivityManager.START_CLASS_NOT_FOUND;
        }
接下来就执行权限判断,看下调用者是不是有权限启动任何activity:
        boolean abort = !mSupervisor.checkStartAnyActivityPermission(intent, aInfo, resultWho,
                requestCode, callingPid, callingUid, callingPackage, ignoreTargetSecurity, callerApp,
                resultRecord, resultStack, options);
如果权限不允许的话,就继续看是不是有权限启动intent中对应的组件(此时是activity)和目标app中对这个组件的权限是不是满足,如果两个都不满足就直接抛出SecurityException异常,终止操作。如果是目标进程不允许当前的操作的话,那么就把abort置为true。
我们继续看下面的代码:
        abort |= !mService.mIntentFirewall.checkStartActivity(intent, callingUid,
                callingPid, resolvedType, aInfo.applicationInfo);
这段代码通过intent防火墙来检查该intent是否可通过,intent防火墙是android 4.4.2中加入的一个安全机制,这个机制设计的目的就是要检查android中的intent的权限问题,可以通过配置位于/data/system/ifw/下的策略文件来阻止一些intent的发送。
        ActivityRecord r = new ActivityRecord(mService, callerApp, callingUid, callingPackage,
                intent, resolvedType, aInfo, mService.mConfiguration, resultRecord, resultWho,
                requestCode, componentSpecified, voiceSession != null, mSupervisor, container,
                options, sourceRecord);
        final ActivityStack stack = mSupervisor.mFocusedStack;
        if (voiceSession == null && (stack.mResumedActivity == null
                || stack.mResumedActivity.info.applicationInfo.uid != callingUid)) {
            if (!mService.checkAppSwitchAllowedLocked(callingPid, callingUid,
                    realCallingPid, realCallingUid, "Activity start")) {
                PendingActivityLaunch pal =  new PendingActivityLaunch(r,
                        sourceRecord, startFlags, stack, callerApp);
                mPendingActivityLaunches.add(pal);
                ActivityOptions.abort(options);
                return ActivityManager.START_SWITCHES_CANCELED;
            }
} doPendingActivityLaunchesLocked(false);
try {
mService.mWindowManager.deferSurfaceLayout();
err = startActivityUnchecked(r, sourceRecord, voiceSession, voiceInteractor, startFlags,
true, options, inTask);
} finally {
mService.mWindowManager.continueSurfaceLayout();
}
postStartActivityUncheckedProcessing(r, err, stack.mStackId, mSourceRecord, mTargetStack);
return err;
}
现在我们来分析一下这个方法,这个方法比较长,我们分段分析:
    private int startActivityUnchecked(final ActivityRecord r, ActivityRecord sourceRecord,
            IVoiceInteractionSession voiceSession, IVoiceInteractor voiceInteractor,
            int startFlags, boolean doResume, ActivityOptions options, TaskRecord inTask) {

        setInitialState(r, options, inTask, doResume, startFlags, sourceRecord, voiceSession,
                voiceInteractor);

        computeLaunchingTaskFlags();

        computeSourceStack();

        mIntent.setFlags(mLaunchFlags);

        mReusedActivity = getReusableIntentActivity();
这是前期准备阶段,主要是获取activity的启动模式和启动标记信息,关于activity的启动模式可以参考我的博客 Android升华之路——activity的启动模式关于activity启动标记,可以参考google的android api文档中的描述:
https://developer.android.com/reference/android/content/Intent.html
这个文档中主要讲解了所有的android中会用的启动flag,我们这里只关心activity启动相关的标记位,这些标记是以“FLAG_ACTIVITY”开头的,大家可以可以看看。如果大家对E文没有感觉的话,可以看热心网友翻译的(翻译中有个人理解):
http://blog.csdn.net/javensun/article/details/8700265
其中我们需要重点说明的几个标记位如下:
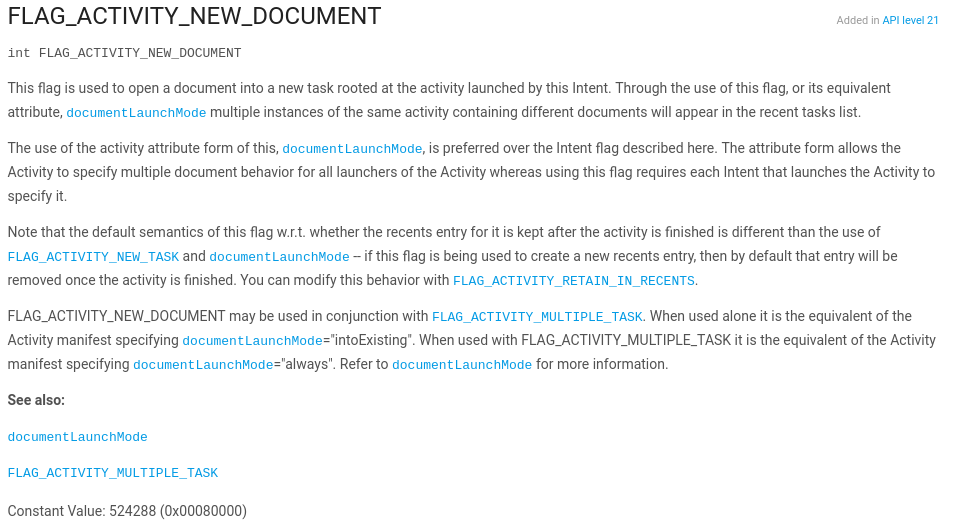
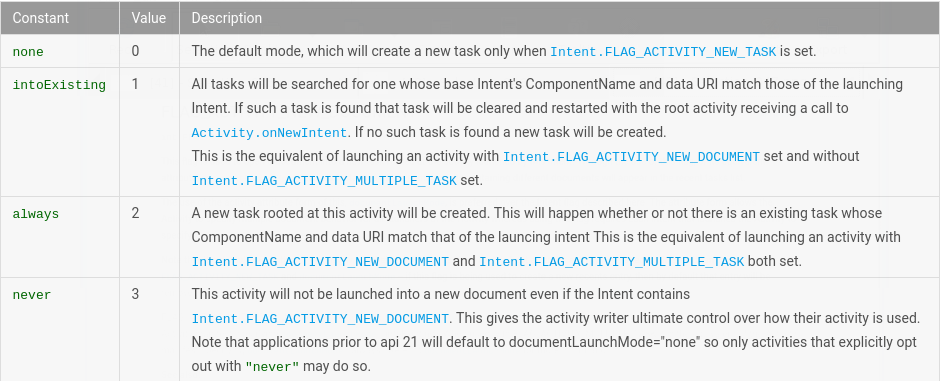
FLAG_ACTIVITY_NEW_DOCUMENT:我们的代码下面就要用到的,这个标记官网描述如下:
从描述中可以看出,这个标记位最好和documentLaunchMode启动一起使用,那么什么是 documentLaunchMode呢?大家可以查看这个官网链接:
https://developer.android.com/reference/android/R.attr.html#documentLaunchMode
这里就不详细解释了。大家只要知道这个标记是在android 5.0中引入的,专门用于控制处于overview screen的任务总览使用的,overview screen是在android 5.0界面的导航栏最右边的方形按钮按下会弹出的界面。这个界面将最近的任务以快照的形式呈现出来。
FLAG_ACTIVITY_NEW_TASK:这个是single task对应的标记位,表示activity启动后需要放在一个新的task栈中
剩下的标记位大家最好在分析代码的时候,一边查看api手册。
继续我们上面的代码分析,上面的代码获取了当前activity的启动模式和标记位,以方便后面的处理。Android中的众多启动标记位和启动模式都是在这个方法中处理的。
    private int adjustLaunchFlagsToDocumentMode(ActivityRecord r, boolean launchSingleInstance,
            boolean launchSingleTask, int launchFlags) {
        if ((launchFlags & Intent.FLAG_ACTIVITY_NEW_DOCUMENT) != 0 &&
                (launchSingleInstance || launchSingleTask)) {
            // We have a conflict between the Intent and the Activity manifest, manifest wins.
            Slog.i(TAG, "Ignoring FLAG_ACTIVITY_NEW_DOCUMENT, launchMode is " +
                    "\"singleInstance\" or \"singleTask\"");
            launchFlags &=
                    ~(Intent.FLAG_ACTIVITY_NEW_DOCUMENT | FLAG_ACTIVITY_MULTIPLE_TASK);
        } else {
            switch (r.info.documentLaunchMode) {
                case ActivityInfo.DOCUMENT_LAUNCH_NONE:
                    break;
                case ActivityInfo.DOCUMENT_LAUNCH_INTO_EXISTING:
                    launchFlags |= Intent.FLAG_ACTIVITY_NEW_DOCUMENT;
                    break;
                case ActivityInfo.DOCUMENT_LAUNCH_ALWAYS:
                    launchFlags |= Intent.FLAG_ACTIVITY_NEW_DOCUMENT;
                    break;
                case ActivityInfo.DOCUMENT_LAUNCH_NEVER:
                    launchFlags &= ~FLAG_ACTIVITY_MULTIPLE_TASK;
                    break;
            }
        }
        return launchFlags;
    }
//blabla
        mTargetStack.mLastPausedActivity = null;
        mTargetStack.startActivityLocked(mStartActivity, newTask, mKeepCurTransition, mOptions);
我们的startActivityUncheckedLocked方法就是最后是通过ActivityStack的startActivityLocked方法实际启动了一个activity。这个方法不仅是AMS启动activity的关键,同时也是Activity后续能否再WMS中得到正常处理的关键。
startActivityLocked是启动activity的最后一站,现在我们梳理一下它的工作。
1). 首先,如果目标activity不是在新的task中启动的,也就是newTask为false的情况下,那么程序要找到目标activity位于那个老的task中,这个需要遍历mTaskHistory才能找到。找到后,如果这个task当前对用户是不可见的,那么只需要将它放到历史记录中,并且再WMS中做好注册,但是不要启动它。
2). 将这个activity放到task的最顶层,这样用户才能和它交互,代码如下:
    final void startActivityLocked(ActivityRecord r, boolean newTask, boolean keepCurTransition,
            ActivityOptions options) {
        TaskRecord rTask = r.task;
        final int taskId = rTask.taskId;
        // mLaunchTaskBehind tasks get placed at the back of the task stack.
        if (!r.mLaunchTaskBehind && (taskForIdLocked(taskId) == null || newTask)) {
            // Last activity in task had been removed or ActivityManagerService is reusing task.
            // Insert or replace.
            // Might not even be in.
            insertTaskAtTop(rTask, r);
            mWindowManager.moveTaskToTop(taskId);
}4). 一个activity的UI界面要想再终端屏幕上显示出来,很重要的一点就是他必须向WMS中添加token,以便于WMS在启动窗口的时候能够找到它。代码如下:
    void addConfigOverride(ActivityRecord r, TaskRecord task) {
        final Rect bounds = task.updateOverrideConfigurationFromLaunchBounds();
        // TODO: VI deal with activity
        mWindowManager.addAppToken(task.mActivities.indexOf(r), r.appToken,
                r.task.taskId, mStackId, r.info.screenOrientation, r.fullscreen,
                (r.info.flags & FLAG_SHOW_FOR_ALL_USERS) != 0, r.userId, r.info.configChanges,
                task.voiceSession != null, r.mLaunchTaskBehind, bounds, task.mOverrideConfig,
                task.mResizeMode, r.isAlwaysFocusable(), task.isHomeTask(),
                r.appInfo.targetSdkVersion);
        r.taskConfigOverride = task.mOverrideConfig;
    }
            if (newTask) {
                // Even though this activity is starting fresh, we still need
                // to reset it to make sure we apply affinities to move any
                // existing activities from other tasks in to it.
                // If the caller has requested that the target task be
                // reset, then do so.
                if ((r.intent.getFlags() & Intent.FLAG_ACTIVITY_RESET_TASK_IF_NEEDED) != 0) {
                    resetTaskIfNeededLocked(r, r);
                    doShow = topRunningNonDelayedActivityLocked(null) == r;
                }
            } else if (options != null && options.getAnimationType()
                    == ActivityOptions.ANIM_SCENE_TRANSITION) {
                doShow = false;
}resumeTopActivitiesLocked是AMS中很多地方都会调用到的方法,主要作用是将位于栈顶的activity显示出来,这时,当前的activity(就是mResumedActivity指向的那个activity)还显示在前端。这里的操作就要将这个activity pause掉放到后端。下面我们看一下resumeTopActivitiesLocked方法的处理逻辑。
上面我们提到了如果activity所在的进程不存在的话,那么我们会调用startSpecificActivityLocked方法来启动相应进程:
上面程序的逻辑很清楚,就是如果进程存在并且已经启动完毕,那么就直接启动activity,否则就先启动进程,然后在启动对应的activity。这里的startProcessLocked方法就是用于启动对应的进程的.
下面我们把重点放在realStartActivityLocked这个方法上,这个方法中核心就是调用了ApplicationThread的scheduleLaunchActivity方法启动activity:
realStartActivityLocked@ActivityStackSupervisor.java
    final boolean realStartActivityLocked(ActivityRecord r, ProcessRecord app,
            boolean andResume, boolean checkConfig) throws RemoteException {

        if (!allPausedActivitiesComplete()) {
            // While there are activities pausing we skipping starting any new activities until
            // pauses are complete. NOTE: that we also do this for activities that are starting in
            // the paused state because they will first be resumed then paused on the client side.
            if (DEBUG_SWITCH || DEBUG_PAUSE || DEBUG_STATES) Slog.v(TAG_PAUSE,
                    "realStartActivityLocked: Skipping start of r=" + r
                    + " some activities pausing...");
            return false;
        }

         //blabla
        mService.updateLruProcessLocked(app, true, null);
        mService.updateOomAdjLocked();

        //blabla

            app.thread.scheduleLaunchActivity(new Intent(r.intent), r.appToken,
                    System.identityHashCode(r), r.info, new Configuration(mService.mConfiguration),
                    new Configuration(task.mOverrideConfig), r.compat, r.launchedFromPackage,
                    task.voiceInteractor, app.repProcState, r.icicle, r.persistentState, results,
                    newIntents, !andResume, mService.isNextTransitionForward(), profilerInfo);
frameworks\base\core\java\android\app:
scheduleLaunchActivity@ActivityThread.java
        // we use token to identify this activity without having to send the
        // activity itself back to the activity manager. (matters more with ipc)
        @Override
        public final void scheduleLaunchActivity(Intent intent, IBinder token, int ident,
                ActivityInfo info, Configuration curConfig, Configuration overrideConfig,
                CompatibilityInfo compatInfo, String referrer, IVoiceInteractor voiceInteractor,
                int procState, Bundle state, PersistableBundle persistentState,
                List<ResultInfo> pendingResults, List<ReferrerIntent> pendingNewIntents,
                boolean notResumed, boolean isForward, ProfilerInfo profilerInfo) {

            updateProcessState(procState, false);

            ActivityClientRecord r = new ActivityClientRecord();

            r.token = token;
            r.ident = ident;
            r.intent = intent;
            r.referrer = referrer;
            r.voiceInteractor = voiceInteractor;
            r.activityInfo = info;
            r.compatInfo = compatInfo;
            r.state = state;
            r.persistentState = persistentState;

            r.pendingResults = pendingResults;
            r.pendingIntents = pendingNewIntents;

            r.startsNotResumed = notResumed;
            r.isForward = isForward;

            r.profilerInfo = profilerInfo;

            r.overrideConfig = overrideConfig;
            updatePendingConfiguration(curConfig);

            sendMessage(H.LAUNCH_ACTIVITY, r);
        }
实际消息处理由ActivityThread中的Handler处理:
        public void handleMessage(Message msg) {
            if (DEBUG_MESSAGES) Slog.v(TAG, ">>> handling: " + codeToString(msg.what));
            switch (msg.what) {
                case LAUNCH_ACTIVITY: {
                    Trace.traceBegin(Trace.TRACE_TAG_ACTIVITY_MANAGER, "activityStart");
                    final ActivityClientRecord r = (ActivityClientRecord) msg.obj;

                    r.packageInfo = getPackageInfoNoCheck(
                            r.activityInfo.applicationInfo, r.compatInfo);
                    handleLaunchActivity(r, null, "LAUNCH_ACTIVITY");
                    Trace.traceEnd(Trace.TRACE_TAG_ACTIVITY_MANAGER);
} break; private void handleLaunchActivity(ActivityClientRecord r, Intent customIntent, String reason) {
// If we are getting ready to gc after going to the background, well
// we are back active so skip it.
unscheduleGcIdler();
mSomeActivitiesChanged = true;
if (r.profilerInfo != null) {
mProfiler.setProfiler(r.profilerInfo);
mProfiler.startProfiling();
}
// Make sure we are running with the most recent config.
handleConfigurationChanged(null, null);
if (localLOGV) Slog.v(
TAG, "Handling launch of " + r);
// Initialize before creating the activity
WindowManagerGlobal.initialize();
// 这里实际启动了Activity, 会回调OnCreate()方法
Activity a = performLaunchActivity(r, customIntent);
if (a != null) {
r.createdConfig = new Configuration(mConfiguration);
reportSizeConfigurations(r);
Bundle oldState = r.state;
handleResumeActivity(r.token, false, r.isForward,
!r.activity.mFinished && !r.startsNotResumed, r.lastProcessedSeq, reason);
if (!r.activity.mFinished && r.startsNotResumed) {
// The activity manager actually wants this one to start out paused, because it
// needs to be visible but isn't in the foreground. We accomplish this by going
// through the normal startup (because activities expect to go through onResume()
// the first time they run, before their window is displayed), and then pausing it.
// However, in this case we do -not- need to do the full pause cycle (of freezing
// and such) because the activity manager assumes it can just retain the current
// state it has.
performPauseActivityIfNeeded(r, reason);
// We need to keep around the original state, in case we need to be created again.
// But we only do this for pre-Honeycomb apps, which always save their state when
// pausing, so we can not have them save their state when restarting from a paused
// state. For HC and later, we want to (and can) let the state be saved as the
// normal part of stopping the activity.
if (r.isPreHoneycomb()) {
r.state = oldState;
}
}
} else {
// If there was an error, for any reason, tell the activity manager to stop us.
try {
ActivityManagerNative.getDefault()
.finishActivity(r.token, Activity.RESULT_CANCELED, null,
Activity.DONT_FINISH_TASK_WITH_ACTIVITY);
} catch (RemoteException ex) {
throw ex.rethrowFromSystemServer();
}
}
}
    private Activity performLaunchActivity(ActivityClientRecord r, Intent customIntent) {
        // System.out.println("##### [" + System.currentTimeMillis() + "] ActivityThread.performLaunchActivity(" + r + ")");

        ActivityInfo aInfo = r.activityInfo;
        if (r.packageInfo == null) {
            r.packageInfo = getPackageInfo(aInfo.applicationInfo, r.compatInfo,
                    Context.CONTEXT_INCLUDE_CODE);
        }

        ComponentName component = r.intent.getComponent();
        if (component == null) {
            component = r.intent.resolveActivity(
                mInitialApplication.getPackageManager());
            r.intent.setComponent(component);
        }

        if (r.activityInfo.targetActivity != null) {
            component = new ComponentName(r.activityInfo.packageName,
                    r.activityInfo.targetActivity);
        }

        Activity activity = null;

        // 实例化Acitivity对象
        try {
            java.lang.ClassLoader cl = r.packageInfo.getClassLoader();
            activity = mInstrumentation.newActivity(
                    cl, component.getClassName(), r.intent);
            StrictMode.incrementExpectedActivityCount(activity.getClass());
            r.intent.setExtrasClassLoader(cl);
            r.intent.prepareToEnterProcess();
            if (r.state != null) {
                r.state.setClassLoader(cl);
            }
        } catch (Exception e) {
            if (!mInstrumentation.onException(activity, e)) {
                throw new RuntimeException(
                    "Unable to instantiate activity " + component
                    + ": " + e.toString(), e);
            }
        }

        try {
            Application app = r.packageInfo.makeApplication(false, mInstrumentation);

            if (localLOGV) Slog.v(TAG, "Performing launch of " + r);
            if (localLOGV) Slog.v(
                    TAG, r + ": app=" + app
                    + ", appName=" + app.getPackageName()
                    + ", pkg=" + r.packageInfo.getPackageName()
                    + ", comp=" + r.intent.getComponent().toShortString()
                    + ", dir=" + r.packageInfo.getAppDir());

            if (activity != null) {

                // 实例化context对象
                Context appContext = createBaseContextForActivity(r, activity);
                CharSequence title = r.activityInfo.loadLabel(appContext.getPackageManager());
                Configuration config = new Configuration(mCompatConfiguration);
                if (r.overrideConfig != null) {
                    config.updateFrom(r.overrideConfig);
                }
                if (DEBUG_CONFIGURATION) Slog.v(TAG, "Launching activity "
                        + r.activityInfo.name + " with config " + config);
                Window window = null;
                if (r.mPendingRemoveWindow != null && r.mPreserveWindow) {
                    window = r.mPendingRemoveWindow;
                    r.mPendingRemoveWindow = null;
                    r.mPendingRemoveWindowManager = null;
                }

                // 将acitivity和进程进行关联
                activity.attach(appContext, this, getInstrumentation(), r.token,
                        r.ident, app, r.intent, r.activityInfo, title, r.parent,
                        r.embeddedID, r.lastNonConfigurationInstances, config,
                        r.referrer, r.voiceInteractor, window);

                if (customIntent != null) {
                    activity.mIntent = customIntent;
                }
                r.lastNonConfigurationInstances = null;
                activity.mStartedActivity = false;
                int theme = r.activityInfo.getThemeResource();
                if (theme != 0) {
                    activity.setTheme(theme);
                }

                activity.mCalled = false;
                if (r.isPersistable()) {

<pre class="prettyprint" name="code"><code class="hljs avrasm has-numbering">将启动这个activity的请求者记录放到mActivities中,统一调度管理</code>// 将启动这个activity的请求者记录放到mActivities中,统一调度管理 mActivities.put(r.token, r); } catch (SuperNotCalledException e) { throw e; } catch (Exception e) { if (!mInstrumentation.onException(activity, e)) { throw new RuntimeException( "Unable to start activity " + component + ": " + e.toString(), e); } } return activity; }
这里我们看到了对activity启动初期的各种生命周期方法的回调。经过这个方法之后activity基本就创建完毕了,当时还没有显示出来,还需要在上面我们提到的handleLaunchActivity方法中继续调用handleResumeActivity去回调activity的onResume,并且做好显示前的最后准备工作才行。handleResumeActivity这个方法比较简单,大家可以自行看一下。
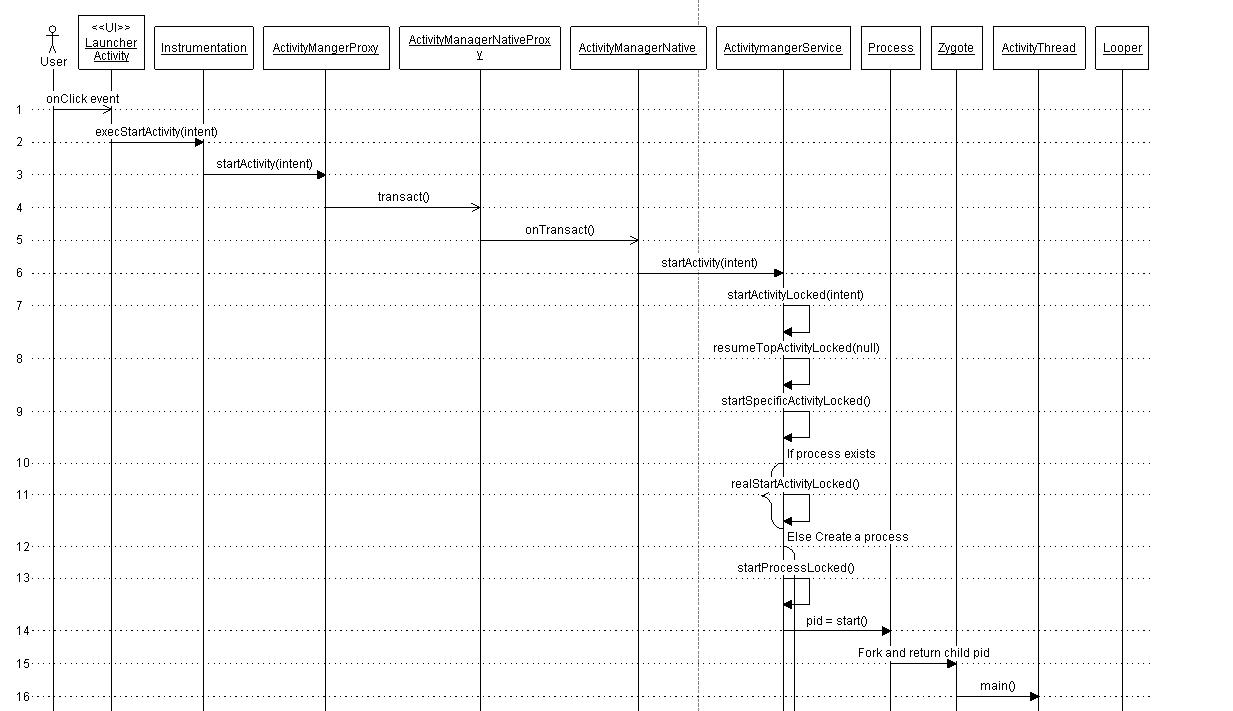
上面的过程,用时序图表示:
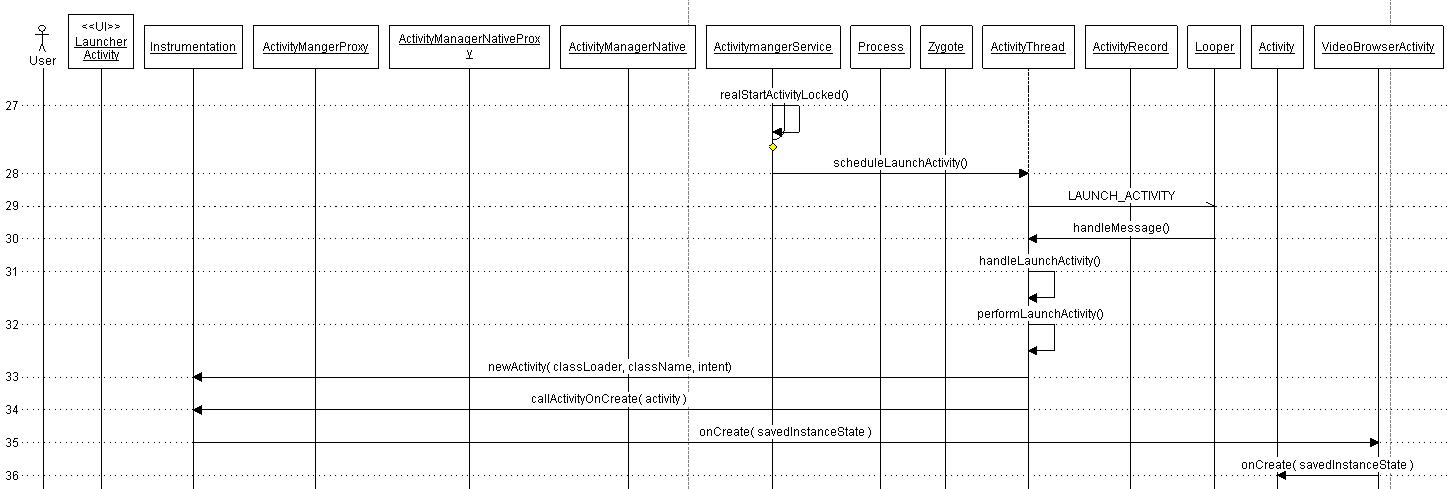
考虑从Launcher启动应用程序时,ActivityManagerService,Launcher,MainActivity之间的执行与通信序列如下图。在源码中相应的过程调用或进程通信处加入日志信息,用于分析启动时各部分的耗时。


 255
255

 被折叠的 条评论
为什么被折叠?
被折叠的 条评论
为什么被折叠?
 到【灌水乐园】发言


