


一、虚拟主机
虚拟主机使用的是特殊的软硬件技术,它把一台运行在因特网上的服务器主机分成一台台“虚拟”的主机,每台虚拟主机都可以是一个独立的网站,可以具有独立的域名,具有完整的Intemet服务器功能(WWW、FTP、Email等),同一台主机上的虚拟主机之间是完全独立的。从网站访问者来看,每一台虚拟主机和一台独立的主机完全一样。
利用虚拟主机,不用为每个要运行的网站提供一台单独的Nginx服务器或单独运行一组Nginx进程。虚拟主机提供了在同一台服务器、同一组Nginx进程上运行多个网站的功能。
实现nginx虚拟主机管理主要是通过配置文件nginx.conf
使用命令去掉配置文件中的注释,这样看着清爽一点
egrep -v "#|^$" nginx.conf.default >nginx.conf
基于域名的虚拟主机
1.修改nginx配置文件
worker_processes  1;
events {
    worker_connections  1024;
}
http {
    include       mime.types;
    default_type  application/octet-stream;
    sendfile        on;
    keepalive_timeout  65;
    server {
        listen       80;
        server_name  localhost;
        location / {
            root   html;
            index  www.html index.html index.htm;
        }
    }

    server {
        listen       80;
        server_name  gf.gaofan.com;
        location / {
            root   html/;
            index  www.html index.html index.htm;
        }
    }
}
2.重启ngins
./nginx -t
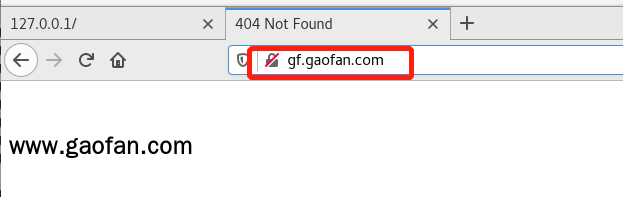
./nginx -s reload3.在/opt/nginx/html下新建页面www.html
<html>
    <head>
        <meta http-equiv="Content-Type" content="text/html; charset=UTF-8" />
    </head>
    <body>
        <h2>www.gaofan.com</h2>
    </body>
</html>
4.修改/etc/hosts文件

5.重启网络
/etc/init.d/network restart6.重地址栏输入域名,显示实现准备好的页面
基于端口的虚拟主机
1.修改nginx.conf配置文件
域名不变,修改端口
这里可以用vim编辑器::19,26 copy 27,可以一次复制8行
worker_processes  1;
events {
    worker_connections  1024;
}
http {
    include       mime.types;
    default_type  application/octet-stream;
    sendfile        on;
    keepalive_timeout  65;
    server {
        listen       80;
        server_name  localhost;
        location / {
            root   html;
            index  www.html index.html index.htm;
        }
    }

    server {
        listen       8001;
        server_name  gf.gaofan.com;
        location / {
            root   html/;
            index  www.html index.html index.htm;
        }
    }

    server {
        listen       8002;
        server_name  gf.gaofan.com;
        location / {
            root   html/;
            index  www_8002.html index.html index.htm;
        }
    }
}
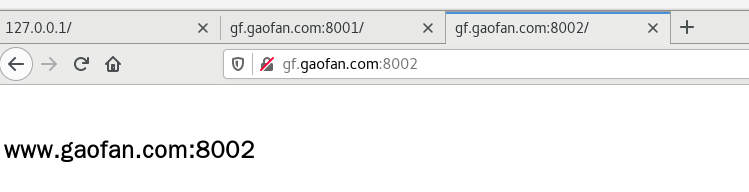
2.在/opt/nginx/html下添加www_8002.html
<html>
    <head>
        <meta http-equiv="Content-Type" content="text/html; charset=UTF-8" />
    </head>
    <body>
        <h2>www.gaofan.com:8002</h2>
    </body>
</html>
3.重启nginx
4.在地址栏输入域名加上端口
基于ip地址的虚拟主机
1.添加ip,打开/etc/sysconfig/network-scripts
编辑ifcfg-eno16777736添加一个ip用来测试
TYPE=Ethernet
BOOTPROTO=static
DEFROUTE=yes
PEERDNS=yes
PEERROUTES=yes
IPV4_FAILURE_FATAL=no
IPV6INIT=yes
IPV6_AUTOCONF=yes
IPV6_DEFROUTE=yes
IPV6_PEERDNS=yes
IPV6_PEERROUTES=yes
IPV6_FAILURE_FATAL=no
NAME=eno16777736
UUID=f1035fe9-96b6-4ce3-a1ea-09d67861e1ae
DEVICE=eno16777736
ONBOOT=yes
IPADDR=192.168.174.12
NETMASK=255.255.255.0
GATEWAY=192.168.174.2
DNS1=114.114.114.114
DNS2=114.114.114.115
2.重启网络使之生效
/etc/init.d/network restart
3.修改nginx.conf
worker_processes  1;
events {
    worker_connections  1024;
}
http {
    include       mime.types;
    default_type  application/octet-stream;
    sendfile        on;
    keepalive_timeout  65;
    server {
        listen       80;
        server_name  localhost;
        location / {
            root   html;
            index  www.html index.html index.htm;
        }
    }

    server {
        listen       8001;
        server_name  gf.gaofan.com;
        location / {
            root   html/;
            index  www.html index.html index.htm;
        }
    }

    server {
        listen       8002;
        server_name  gf.gaofan.com;
        location / {
            root   html/;
            index  www_8002.html index.html index.htm;
        }
    }

    server {
        listen       80;
        server_name  192.168.174.12;
        location / {
            root   html/;
            index  ip.html index.html index.htm;
        }
    }
}
4.新建ip.html
<html>
    <head>
        <meta http-equiv="Content-Type" content="text/html; charset=UTF-8" />
    </head>
    <body>
        <h2>http://192.168.174.12/</h2>
    </body>
</html>
5.重启nginx
6.地址栏输入ip

二、反向代理
什么是代理服务器
代理服务器,客户机在发送请求时,不会直接发送给目的主机,而是先发送给代理服务器,代理服务接受客户机请求之后,再向主机发出,并接收目的主机返回的数据,存放在代理服务器的硬盘中,再发送给客户机。

为什么要使用代理服务器
1)提高访问速度
由于目标主机返回的数据会存放在代理服务器的硬盘中,因此下一次客户再访问相同的站点数据时,会直接从代理服务器的硬盘中读取,起到了缓存的作用,尤其对于热门站点能明显提高请求速度。
2)防火墙作用
由于所有的客户机请求都必须通过代理服务器访问远程站点,因此可在代理服务器上设限,过滤某些不安全信息。
3)通过代理服务器访问不能访问的目标站点
互联网上有许多开发的代理服务器,客户机在访问受限时,可通过不受限的代理服务器访问目标站点,通俗说,我们使用的FQ浏览器就是利用了代理服务器,虽然不能出国,但也可直接访问外网。
什么是正向代理?什么是反向代理?
正向代理,架设在客户机与目标主机之间,只用于代理内部网络对Internet的连接请求,客户机必须指定代理服务器,并将本来要直接发送到Web服务器上的http请求发送到代理服务器中。

反向代理服务器架设在服务器端,通过缓冲经常被请求的页面来缓解服务器的工作量,将客户机请求转发给内部网络上的目标服务器;并将从服务器上得到的结果返回给Internet上请求连接的客户端,此时代理服务器与目标主机一起对外表现为一个服务器。
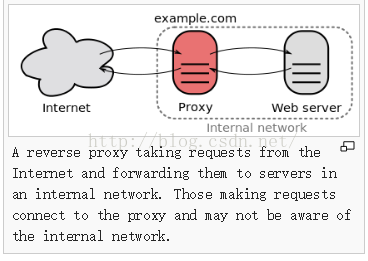
反向代理有哪些主要应用
现在许多大型web网站都用到反向代理。除了可以防止外网对内网服务器的恶性攻击、缓存以减少服务器的压力和访问安全控制之外,还可以进行负载均衡,将用户请求分配给多个服务器。
配置nginx实现反向代理
1.安装jdk,安装tomcat,修改server.html文件添加端口8081
2.修改nginx.conf文件
worker_processes  1;
events {
    worker_connections  1024;
}
http {
    include       mime.types;
    default_type  application/octet-stream;
    sendfile        on;
    keepalive_timeout  65;

    upstream server_tomcat1{
        server 192.168.174.12:8080 weight=2;
        }

    upstream server_tomcat2{
        server 192.168.174.12:8081 weight=8;
        }

    server {
        listen       80;
        server_name  localhost;
        location / {
            root   html;
            index  www.html index.html index.htm;
        }
    }

    server {
        listen       8001;
        server_name  gf.gaofan.com;
        location / {
            root   html/;
            index  www.html index.html index.htm;
        }
    }

    server {
        listen       8002;
        server_name  gf.gaofan.com;
        location / {
            root   html/;
            proxy_pass http://server_tomcat2;
            proxy_set_header Host $host;
            index  www_8002.html index.html index.htm;
        }
    }

    server {
        listen       80;
        server_name  192.168.174.12;
        location / {
            root   html/;
            proxy_pass http://server_tomcat1;
            proxy_set_header Host $host;
            index  ip.html index.html index.htm;
        }
    }

}
3.重启nginx
4.浏览器输入IP地址192.168.174.12或域名gf.gaofan.com:8002

1.访问域名gf.gaofan.com:8002,通过hosts文件解析,找到192.168.174.12服务器
2.根据nginx反向代理,找到server_name:gf.gaofan.com的节点,然后根据proxy_pass:http://server_tomcat2将其请求转发到server_tomcat2上,即192.168.174.12:8081服务器


 5649
5649


 被折叠的 条评论
为什么被折叠?
被折叠的 条评论
为什么被折叠?
 到【灌水乐园】发言


