


导出数据库表文档到word。
使用pyhton的python-docx框架实现导出数据库表结构为word格式。
前言:
本人自学python,语法不精通,参考人员注意甄别。
问题:
由于近期甲方项目需要验收,需要完成数据库er,和数据库文档,由于没有搜索到需要的插件/方案(网上只有半自动化,每次只能自己手动操作一个个导出,效率太低)故自己尝试手写了一个。
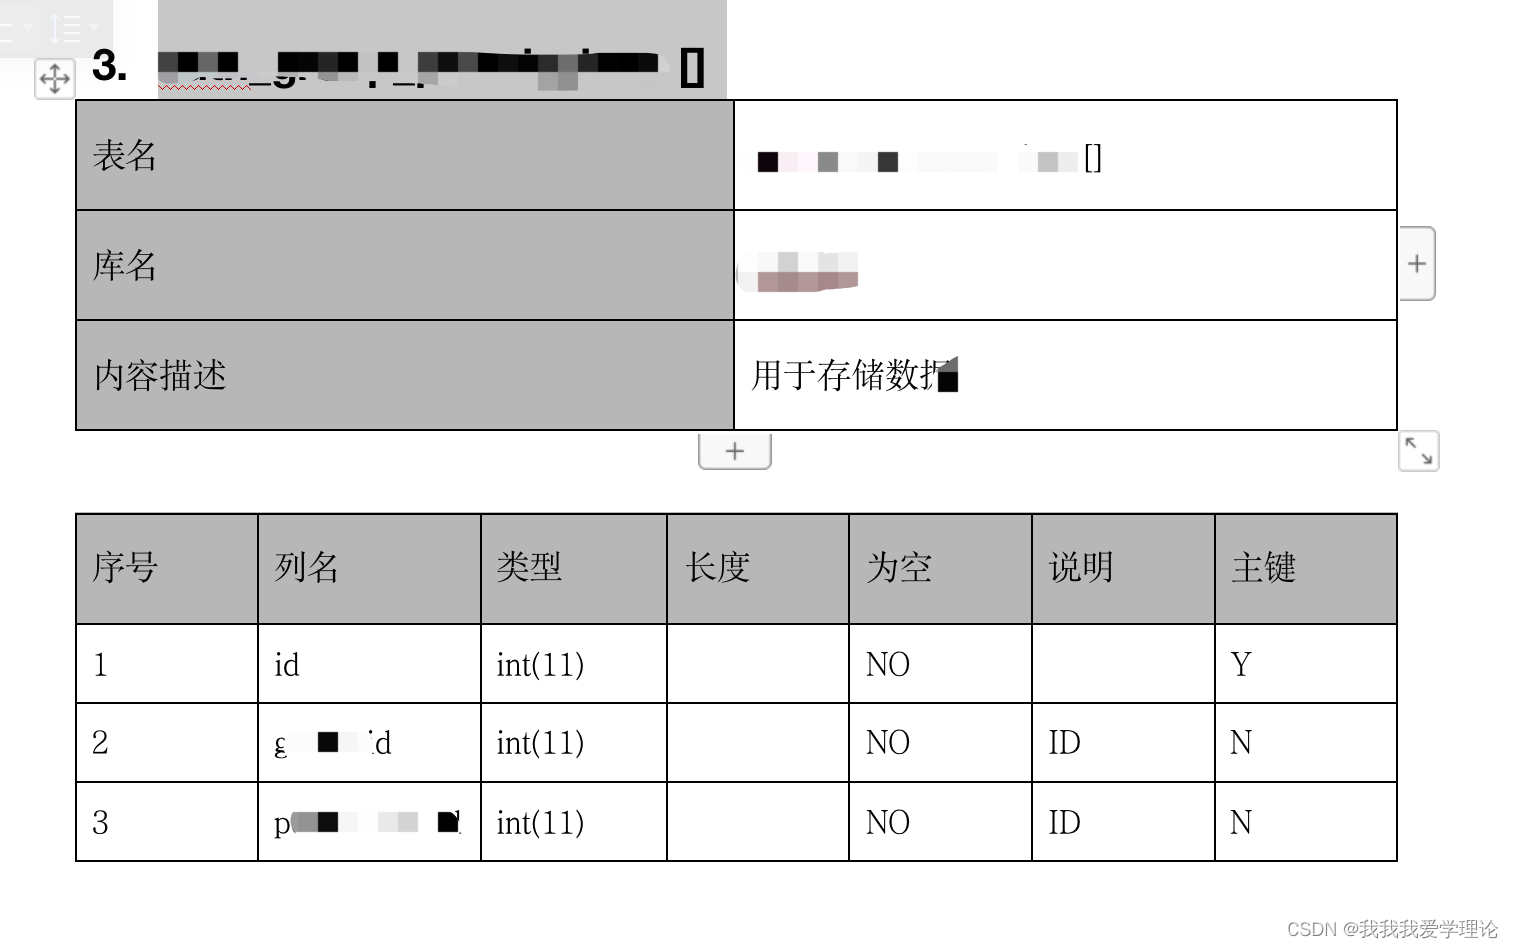
实现样式如下:
下面是单个的样式,代码内部会遍历所有的表,有多少个表就会往word内写入多少个表格
后面只需要自己配置头部的公司信息,和其他自己所需要的文件即可,最后手动生成目录
上python代码:
部分代码是写死的,例如(上图)表左,表头
# -*- coding:utf-8 -*-
# 数据库验收文档导出er关系表信息
import sys
import os
from docx.opc.oxml import parse_xml
from docx.oxml.ns import nsdecls
from docx.shared import RGBColor, Cm, Pt
curPath = os.path.abspath(os.path.dirname(__file__))
rootPath = os.path.split(curPath)[0]
sys.path.append(rootPath)
import pymysql
from pymysql.cursors import DictCursor
from docx import Document

# mysql超时时间设置
connect_timeout = 10

# 创建mysql链接
def connMysql():
    return pymysql.connect(host="url地址", port=数据库端口, user="数据库用户名",password="数据库密码", db="库名称", charset="utf8")


# 获取数据库所有表名称
def getAllDBName():
    conn = connMysql()
    # 建立游标,制定游标类型,返回字典
    cur = conn.cursor(DictCursor);
    # 执行sql语句
    cur.execute("select table_name,table_comment from information_schema.tables where table_schema='数据库名称'")  # param
    # 返回查询所有
    res = cur.fetchall()
    # 关闭游标
    cur.close()
    # 关闭连接
    conn.close()
    # print("当前库下所有表的名称")
    # for i in res:
    #     print(i["table_name"])
    return res


# 获取当前表描述
def getAllDBDDL(dbName, dbComment):
    conn = connMysql()
    # 建立游标,制定游标类型,返回字典
    cur = conn.cursor(DictCursor);
    # 执行sql语句
    cur.execute(
        "SELECT COLUMN_NAME 列名, COLUMN_TYPE 数据类型,DATA_TYPE 字段类型,IS_NULLABLE 是否为空,COLUMN_DEFAULT 默认值,COLUMN_COMMENT 备注 FROM INFORMATION_SCHEMA.COLUMNS WHERE table_schema = 'zhongtie' AND table_name = '%s'" % (
            dbName))  # param
    # 返回查询所有
    res = cur.fetchall()
    # 关闭游标
    cur.close()
    # 关闭连接
    conn.close()
    print(dbName + "[%s]" % (dbComment))
    for i in res:
        print(i)
    return res


shading_list = locals()


def leftComment(doc):
    # 获取第一行第二列单元格
    cell = doc.cell(0, 0)
    # 设置单元格文本
    cell.text = "表名"
    cell = doc.cell(1, 0)
    # 设置单元格文本
    cell.text = "库名"
    cell = doc.cell(2, 0)
    # 设置表格背景色
    for rgbsIndex in range(0, 3):
        shading_list['shading_elm_' + str(i)] = parse_xml(
            r'<w:shd {} w:fill="{bgColor}"/>'.format(nsdecls('w'), bgColor="#C0C0C0"))
        doc.rows[rgbsIndex].cells[0]._tc.get_or_add_tcPr().append(shading_list['shading_elm_' + str(i)])
    # 设置单元格文本
    cell.text = "内容描述"


def rightComment(doc, dbname):
    cell = doc.cell(0, 1)
    # 设置单元格文本
    cell.text = dbname
    cell = doc.cell(1, 1)
    # 设置单元格文本
    cell.text = "zhongtie"
    cell = doc.cell(2, 1)
    # 设置单元格文本
    cell.text = "用于存储组数据。"


def topComment(doc):
    cell = doc.cell(0, 0)
    # 设置单元格文本
    cell.text = "序号"
    cell = doc.cell(0, 1)
    # 设置单元格文本
    cell.text = "列名"
    cell = doc.cell(0, 2)
    # 设置单元格文本
    cell.text = "类型"
    cell = doc.cell(0, 3)
    # 设置单元格文本
    cell.text = "长度"
    cell = doc.cell(0, 4)
    # 设置单元格文本
    cell.text = "为空"
    cell = doc.cell(0, 5)
    # 设置单元格文本
    cell.text = "说明"
    cell = doc.cell(0, 6)
    # 设置单元格文本
    cell.text = "主键"
    # 设置表格背景色
    for rgbsIndex in range(0, 7):
        shading_list['shading_elm_' + str(i)] = parse_xml(
            r'<w:shd {} w:fill="{bgColor}"/>'.format(nsdecls('w'), bgColor="#C0C0C0"))
        doc.rows[0].cells[rgbsIndex]._tc.get_or_add_tcPr().append(shading_list['shading_elm_' + str(i)])

# 添加一级标题
# document.add_heading('我是一级标题')
#
# decument.add_heading('我是二级标题', level=2)
#
# decument.add_heading('我是段落标题', level=0)

if __name__ == "__main__":
    # 如果需要在完成的数据内插入多个标题则这里就往后移动 例如插入三个下面就从4下标开始,方便后期完成目录的生成
    levelLine = 2
    # 获取所有的数据库表名
    res = getAllDBName()
    # word文档
    document = Document()
    # 这里遍历获取到的所有的表名 和 注释 信息
    for i in res:
        # 组装名称 例 : tableName[注释]
        tableAndComment = "{0}[{1}]".format(i['table_name'], i['table_comment'])
        # 组装名称 例 : 1.tableName[注释] 方便插入标题使用
        str1 = "{0}.{1}".format(levelLine, tableAndComment)
        # 这里写入一级标题
        T1_1 = document.add_heading('', level=1)
        # 获取run 来操作其他参数
        run_T1_1 = T1_1.add_run(str1)
        # 设置字体格式 一级标题不适合设置字体样式 会导致难看? ps:中文字体设置样式需要修改其他参数
        # run_T1_1.font.name = '宋体'
        # 设置标题颜色
        # 通过run修改 字体颜色
        run_T1_1.font.color.rgb = RGBColor(0, 0, 0)
        run_T1_1.font.bold = True
        # 获取表的DDL描述信息
        dbAll = getAllDBDDL(i['table_name'], i['table_comment'])
        # 创建表描述表格 3行 2列 实线
        table = document.add_table(rows=3, cols=2, style="Table Grid")
        # table.style.bg.color.rgb = RGBColor(255, 0, 0)
        # 开启高度不匹配
        table.rows[0].hight_mismatch = True
        # 开启宽度不匹配
        table.cell(0, 0).width_mismatch = True
        # 设置列 高 宽 注释:有时有用有时候又没用 不需要自行注释
        for topIndex in range(0, 3):
            # table.rows[topIndex].hight = Cm(100000.23)
            table.cell(topIndex, 0).width = Cm(7.53)
            table.cell(topIndex, 1).hight = Cm(1.23)
        # 填充表描述 左侧数据
        leftComment(table)
        # 填充表描述 右侧数据
        rightComment(table, tableAndComment)
        # 设置字体 大小
        table.style.font.size = Pt(11)
        # 中间插入空字符串防止两个表组合在一起
        document.add_paragraph("")
        # 创建表 根据获取的数据长度+1行 7列 实线
        table1 = document.add_table(rows=len(dbAll) + 1, cols=7, style="Table Grid")
        # 开启高度不匹配
        table1.rows[0].hight_mismatch = True
        # 开启宽度不匹配
        table1.cell(0, 0).width_mismatch = True
        # 设置列 高 宽 注释:有时有用有时候又没用
        for indexs in range(0, len(dbAll) + 1):
            # table1.rows[indexs].hight = Cm(10.88)
            for x in range(0, 7):
                table1.cell(indexs, x).width = Cm(2.11)
                table1.cell(indexs, x).hight = Cm(1.33)
        # 表头填充
        topComment(table1)
        # 游标来记录操作行
        dbLine = 1
        for db1 in dbAll:
            cell = table1.cell(dbLine, 0)
            # 设置单元格文本
            cell.text = str(dbLine)
            cell = table1.cell(dbLine, 1)
            # 设置单元格文本
            cell.text = db1["列名"]

            cell = table1.cell(dbLine, 2)
            # 设置单元格文本
            text1 = db1["数据类型"]
            cell.text = db1["数据类型"]
            splitStr = text1.split('(')
            # 拆分数据长度注释
            lenStr = ""
            if len(splitStr) > 1:
                lenStr = splitStr[1].split(")")
            cell = table1.cell(dbLine, 3)
            # 设置单元格文本
            cell.text = lenStr

            cell = table1.cell(dbLine, 4)
            # 设置单元格文本
            cell.text = db1["是否为空"]

            cell = table1.cell(dbLine, 5)
            # 设置单元格文本
            cell.text = db1["备注"]

            cell = table1.cell(dbLine, 6)
            # 设置单元格文本
            # 是否是主键判断 这里只适合每个表的第一列都是主键的操作,可以自行修改
            isKey = "Y" if dbLine == 1 else "N"
            cell.text = isKey
            table1.style.font.name = '宋体'
            table1.style.font.size = Pt(11)
            dbLine += 1
        levelLine += 1
    # 目录地址根据需要自行修改,这里是导入到脚本统计目录下
    document.save(r"filename.docx")


 945
945


 被折叠的 条评论
为什么被折叠?
被折叠的 条评论
为什么被折叠?
 到【灌水乐园】发言


