


 本文介绍了如何使用Python自动化处理Word文档,包括内容控件的删除、表格的顺序提取,以及将内容转换为Excel,同时实现章节拆分和创建目录的超链接功能。
本文的目的仅用于记录在用python自动化处理word文档,将文档中文本以及表格提取到excel中的相关操作以及问题。
问题描述:由于word文档篇幅较多,格式复杂,后续查看与修改工作不方便,因此考虑将其中的表格提取出来,根据表格的名称设置sheet提取到excel中。由于格式不同,且数据量很大,故采用自动化的方式进行处理
问题解析:原word文档包含大量的软件测试test case,首先提取word中该test case的ID或名称作为excel工作表的sheetname,其次将对应的表格放入sheetname中。考虑到sheet过多,因此建立目录sheet,设置相关超链接便于索引,在相应的页面建立返回目录的超链接。
0. 解除word编辑限制
将文档.docx文件用word打开,另存为.xml文件
用记事本打开.xml文件修改内容。
找到documentProtection字段,将"DocumentProtection"改为"unDocumentProtection",保存即可。
如这个例子 <w:documentProtection w:edit=“forms” w:formatting=“1” w:enforcement=“0”/>
或者另外不同xml版本显示有可能是这样的:<w:DocumentProtection>forms</w:DocumentProtection>
word打开xml文件,另存为.docx文件。
1. 解析word文档
首先需要采用python读取word文档,需要安装python相关库
pip install python-docx
通过如下命令对word文档中的段落以及表格进行读取
import docx
# 建立word对象,其成员变量和成员函数参考如下官方链接
# https://python-docx.readthedocs.io/en/latest/api/document.html#document-constructor
doc = docx.Document('your word file.docx')

# 读取段落并打印段落文本
paragraphs = doc.paragraphs
for paragraph in paragraphs:
    print(paragraph.text)        # 打印段落文本
    print(paragraph.style.name)  # 打印段落的类型,是属于几级标题(Heading x)还是正文(Normal)

# 读取所有表格并依次打印
tables = doc.tables
for table in tables:
    print(f"Table: {table}")
    for row in table.rows:
        for cell in row.cells:
            print(cell.text)
        print("")
    print("=" * 20)
问题:
word文件是由其它软件导出,设置有内容控件,python无法读取这些有内容控件段落和文本(暂时没有找到直接通过python解决的方案)
只能一次性提取表格或者段落,无法按照word文件的原本顺序对段落和表格进行依次提取。
解决方案:
问题1:删除内容控件
内容控件理解为一个个的模块,将word中的相关信息封装成一个模块。
如下图所示,当你选中’work_item’,这个模块里面的段落和表格都会被选中,却可以整体移动。
内容控件可以进行嵌套,就像函数一样。

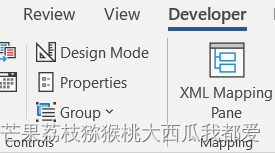
- 打开word的开发者模式
点击word左上角’File’–>左下角’Options’,进入如下页面:
勾选Developer,返回主页面即可看到Developer菜单栏。


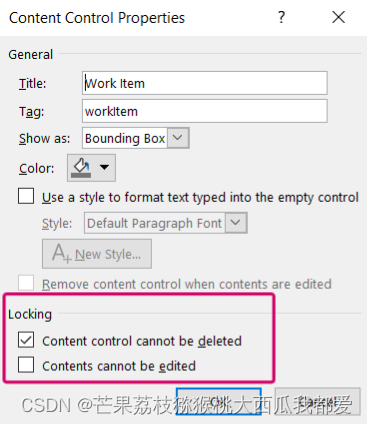
选择一个content control,点击Developer–>Properties
查看’Locking’是否都被勾选,
第一个被勾选:内容控件无法被删除
第二个被勾选:内容控件无法被编辑
此时就算取消勾选,也只能删除一个内容控件,无法全部删除
若要删除文本所有的内容控件,先选中你要处理的word文档内容。
点击Developer–>Design Mode–>Properties
点击Design Mode后出现了所有内容控件,此时再将Properties的Locking全部取消勾选
然后选中要删除内容控件,右击鼠标,点击’Remove Content Control’. 即可删除所有内容控件,包括嵌套的。

问题2:顺序提取word文档中段落和表格
要将段落与表格顺序提取,参考
顺序提取word
原理大概就是提取paragraphs和tables的父类然后进行一堆什么判断,不管这么多,能用就行。
import docx
from docx.document import Document
from docx.text.paragraph import Paragraph
from docx.table import _Cell, Table
from docx.oxml.table import CT_Tbl
from docx.oxml.text.paragraph import CT_P

def iter_block_items(parent):
    """
    Generate a reference to each paragraph and table child within *parent*,
    in document order. Each returned value is an instance of either Table or
    Paragraph. *parent* would most commonly be a reference to a main
    Document object, but also works for a _Cell object, which itself can
    contain paragraphs and tables.
    """
    if isinstance(parent, _Document):
        parent_elm = parent.element.body
        # print(parent_elm.xml)
    elif isinstance(parent, _Cell):
        parent_elm = parent._tc
    else:
        raise ValueError("something's not right")

    for child in parent_elm.iterchildren():
        if isinstance(child, CT_P):
            yield Paragraph(child, parent)
        elif isinstance(child, CT_Tbl):
            yield Table(child, parent)
使用案例参考:
doc = docx.Document("/path/to/your/word.docx")

for block in iter_block_items(doc):
    if isinstance(block,Table):
        #this is a table
        #do something here
    else:
        #this is a paragraph
        #do something else here
如果增加print可以看到,段落和表格会按照word原文顺序进行输出
2. 根据章节拆分word
为了减少操作出错,且便于文件查看,根据word的章节标题将word拆分为多个子文件,子文件名为对应的章节名称,文档内其余保持不变。
word文档拆为子文件
import os
import docx
import pandas as pd

from docx.document import Document
from docx.oxml.table import CT_Tbl
from docx.oxml.text.paragraph import CT_P
from docx.table import _Cell, Table
from docx.text.paragraph import Paragraph
from docx.enum.text import WD_PARAGRAPH_ALIGNMENT
from docx.enum.table import WD_CELL_VERTICAL_ALIGNMENT

from cell_board_set import *

def iter_block_items(parent):
    if isinstance(parent, Document):
        parent_elm = parent.element.body
    elif isinstance(parent, _Cell):
        parent_elm = parent._tc
    else:
        raise ValueError("something's not right")

    for child in parent_elm.iterchildren():
        if isinstance(child, CT_P):
            yield Paragraph(child, parent)
        elif isinstance(child, CT_Tbl):
            yield Table(child, parent)

def read_table(table):
    table_data = []
    for row in table.rows:
        row_data = [cell.text for cell in row.cells]
        table_data.append(row_data)
        # table_df = pd.DataFrame(table_data)
        # print(table_df)
    return table_data


def create_new_document(title, content):
    new_doc = docx.Document()
    new_doc.add_heading(title, level=1)

    for para in content:
        if isinstance(para, Paragraph):
            if 'Heading' in para.style.name:
                level = int(para.style.name.split()[-1])
                new_doc.add_heading(para.text, level=level)
            else:
                new_doc.add_paragraph(para.text)

        elif isinstance(para, list):
            table_df = pd.DataFrame(para)
            table = new_doc.add_table(rows=len(para), cols=len(para[0]))

            # 设置表头样式
            header_row = para[0]

            # 设置表头样式
            for j, cell_value in enumerate(header_row):

                cell = table.cell(0, j)
                cell.text = str(cell_value)
                cell.paragraphs[0].alignment = WD_PARAGRAPH_ALIGNMENT.CENTER  # 设置居中对齐
                cell.vertical_alignment = WD_CELL_VERTICAL_ALIGNMENT.CENTER  # 设置垂直居中
                cell.paragraphs[0].runs[0].bold = True  # 设置粗体

                set_cell_border(cell,
                    top={"sz": 12, "val": "single", "color": "#000000", "space": "0"},
                    bottom={"sz": 12, "val": "single", "color": "#000000", "space": "0"},
                    start={"sz": 12, "val": "single", "color": "#000000", "space": "0"},
                    end={"sz": 12, "val": "single", "color": "#000000", "space": "0"},)

            # 设置表格内容样式
            for i, row in enumerate(para[1:], 1):
                for j, cell_value in enumerate(row):
                    cell = table.cell(i, j)
                    cell.text = str(cell_value)
                    set_cell_border(cell,
                        top={"sz": 12, "val": "single", "color": "#000000", "space": "0"},
                        bottom={"sz": 12, "val": "single", "color": "#000000", "space": "0"},
                        start={"sz": 12, "val": "single", "color": "#000000", "space": "0"},
                        end={"sz": 12, "val": "single", "color": "#000000", "space": "0"},)
    return new_doc

def read_word(word_path):
    doc = docx.Document(word_path)
    current_title = None
    current_content = []

    for block in iter_block_items(doc):
        if isinstance(block, Paragraph):
            if block.style.name == "Heading 1":
                print('Current Chapter: ', block.text)

                # 新一级标题出现,保存上一个标题的内容为新的 docx 文件
                if current_title:
                    # print('current_content: \n', current_content)
                    new_doc = create_new_document(current_title, current_content)
                    new_file_name = f"{current_title}.docx"
                    new_doc.save(os.path.join(output_folder, new_file_name))

                # 更新当前标题和内容列表
                # print('Update title: ', block.text)
                current_title = block.text
                current_content = []
            else:
                # 如果这一段不是空的,就加入content中
                if len(block.text) != 0:
                    current_content.append(block)
        elif isinstance(block, Table):
            table = read_table(block)
            # print('This is table:\n', table)
            current_content.append(table)

    # 保存最后一个标题的内容为新的 docx 文件
    if current_title:
        new_doc = create_new_document(current_title, current_content)
        new_file_name = f"{current_title}.docx"
        new_doc.save(os.path.join(output_folder, new_file_name))
        print('转换完毕')

if __name__ == '__main__':
    input_folder = r'path\your_document.docx'
    output_folder = r'path_to_save\folder'

    # 创建保存子文档的文件夹
    os.makedirs(output_folder, exist_ok=True)
    read_word(input_folder)
设置表格边界框
直接分割后的表格没有边界线,很不美观,参考其他博主给出word边界框的设置
对应上面的set_cell_border函数。
from docx.table import _Cell
from docx.oxml import OxmlElement
from docx.oxml.ns import qn

def set_cell_border(cell: _Cell, **kwargs):
    """
    Set cell`s border
    Usage:
    set_cell_border(
        cell,
        top={"sz": 12, "val": "single", "color": "#FF0000", "space": "0"},
        bottom={"sz": 12, "color": "#00FF00", "val": "single"},
        start={"sz": 24, "val": "dashed", "shadow": "true"},
        end={"sz": 12, "val": "dashed"},
    )
    """
    tc = cell._tc
    tcPr = tc.get_or_add_tcPr()

    # check for tag existnace, if none found, then create one
    tcBorders = tcPr.first_child_found_in("w:tcBorders")
    if tcBorders is None:
        tcBorders = OxmlElement('w:tcBorders')
        tcPr.append(tcBorders)

    # list over all available tags
    for edge in ('start', 'top', 'end', 'bottom', 'insideH', 'insideV'):
        edge_data = kwargs.get(edge)
        if edge_data:
            tag = 'w:{}'.format(edge)

            # check for tag existnace, if none found, then create one
            element = tcBorders.find(qn(tag))
            if element is None:
                element = OxmlElement(tag)
                tcBorders.append(element)

            # looks like order of attributes is important
            for key in ["sz", "val", "color", "space", "shadow"]:
                if key in edge_data:
                    element.set(qn('w:{}'.format(key)), str(edge_data[key]))
通过修改要分割的word文件路径以及分割后文件的保存路径,即可将文件分隔输出,且表格有边界框较为美观。
3. 提取word文本与表格信息到excel并调整
目前分割后的子文件docx已经保存到目标文件夹中,此时需对这些文本进行批量转化。
1)读取当前路径下所有的docx文件
folder_path = r'docx_folder'
output_folder = r'excel_folder'

docx_files = glob(os.path.join(folder_path, "*.docx"))
file_lists = []
for file in docx_files:
    file = file.split('\\')[-1]
    sheet_names = list()
    print(file)
    doc = docx.Document(file)
    excel_name = os.path.splitext(os.path.basename(file))[0]
    write_word2excel(doc, excel_name, output_folder)
2)转化word到excel
创建Excel工作簿
需要用到处理Excel的xlwings库
pip install xlwings
创建一个Excel文件
excel_file = excel_name + '.xlsx'
excel_path = os.path.join(output_folder, excel_file)
app = xw.App(visible=True, add_book=False)
workbook = app.books.add()
worksheet = None  # 初始化为 None
创建Excel的WorkSheet
sheet_name是自己设置的,不能超过31个字符
worksheet = workbook.sheets.add(sheet_name)
如果sheet_name超过长度限制,可以通过下面的函数对sheet_name进行处理
import re
def truncate_sheet_name(sheet_name):
    max_length = 31  # 最大长度为31个字符
    # 删除非法字符
    sheet_name = re.sub(r'[\\/*?:[\]]()', '', sheet_name)
    if len(sheet_name) > max_length:
        # 缩短名称以适应最大长度
        sheet_name = sheet_name[:max_length]
    # 将单边的括号用 "-" 代替
    sheet_name = re.sub(r'\(', '-', sheet_name)
    sheet_name = re.sub(r'\)', '', sheet_name)
    return sheet_name
读取文本到excel指定worksheet的单元格
worksheet = workbook.sheets[sheet_name] # 打开指定sheet_name的work sheet
worksheet.range('A1').value = 'anything your what input' # 如果是word中的文本,则为 'block.text'
读取表格到Excel
df = pd.DataFrame([[cell.text for cell in row.cells] for row in block.rows],
                columns=[cell.text for cell in block.rows[0].cells])
寻找空白单元格进行填充
row_offset = 0
while True:
    range_address = f'A{row_offset+3}'
    if worksheet.range(range_address).value is None:
        break
    row_offset += 1
if row_offset > 0:
    row_offset += 1  # 在已有表格后空一行
worksheet.range(f'A{row_offset+3}').options(index=False).value = df
调整单元格大小以适应内容长度
column_range = worksheet.range(f'A{row_offset+3}').expand('table')
column_range.columns.autofit()
设置超链接便于查看,同样可以建立超链接返回目录页,非常方便
创建目录工作表
catalog_name = 'Catalogs'
directory_ws = workbook.sheets.add(catalog_name)
offset = 0
directory_ws.range(f'A{1}').value = 'Catalog'
directory_ws.range(f'A{offset+3}').value = sheet_name
设置超链接
directory_ws.range(f'A{offset+3}').api.Hyperlinks.Add(
    Anchor=directory_ws.range(f'A{offset+3}').api,
    Address='',
    SubAddress=f"'{sheet_name}'!A1",
    TextToDisplay=sheet_name  # 这个超链接的显示的文本
)
offset += 1
3) 调整单元格以及表格
对单元格进行调整,使得Excel文件更加美观,直观
def adjust_worksheet(worksheet):
    if worksheet is not None:
        title_range = worksheet.range('A1')
        title_range.api.Font.Bold = True
        title_range.api.Font.Size = 14
        title_range.column_width = 20

        # 设置单元格垂直居中和水平居中
        worksheet.range('A1').vertical_alignment = 'center'
        worksheet.range('A1').horizontal_alignment = 'center'
# 表格的调节参考
# 调整单元格大小以适应内容长度
column_range = worksheet.range(f'A{row_offset+3}').expand('table')
column_range.columns.autofit()
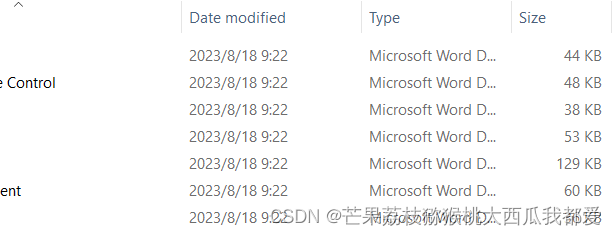
结果预览
word分割后子文件
对应转换为Excel的结果

目录页超链接示例
点击超链接即可跳转到指定的test case

对应sheet 超链接示例,点击超链接即可返回目录页


 1262
1262

 被折叠的 条评论
为什么被折叠?
被折叠的 条评论
为什么被折叠?
 到【灌水乐园】发言


