


 本文介绍Qt界面美化技巧,通过QSS样式表实现界面元素的美化,包括背景图、边框及圆角等效果,并提供了完整的代码示例。
qss的简单使用
1、前言
这是一个系列博客,我将我学习qt的过程已经整理的代码都会放到博客上去,希望能够帮助到大家~
Github网址:https://github.com/cssdcc1997/qt_learning
python版博客:还未更新
废话少说,线上简单qss使用的效果图:
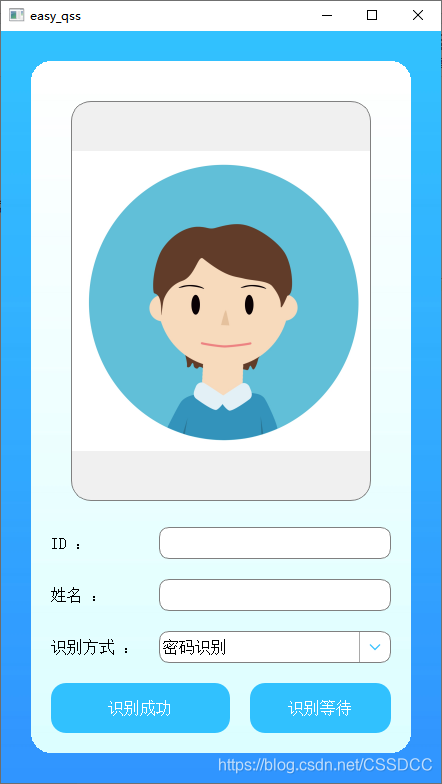
其中包括了使用背景图background-image,边框参数border以及border-radius(用于设置控件的圆角,使得界面更加圆滑、好看)。
Gif:

接下来上代码
2、代码C++
#include "mainwindow.h"

//

MainWindow::MainWindow(QWidget *parent)
    : QMainWindow(parent)
{

    initUI();

    //init gpio
    //wiringPiSetupSys();
}

MainWindow::~MainWindow()
{
    //wiringPiTerminateSys();
}

void MainWindow::on_identify_succeed()
{
    QSound::play(":sounds/sbcg.wav");
    identify_succeed_btn->setEnabled(false);
    identify_waiting_btn->setEnabled(true);
    door_control(true);
}

void MainWindow::on_identify_waiting()
{
    QSound::play(":sounds/ksdl.wav");
    identify_succeed_btn->setEnabled(true);
    identify_waiting_btn->setEnabled(false);
    door_control(false);
}

void MainWindow::door_control(bool open_or_not)
{
//    //pinmode, which pin,input or output
//    pinMode(7, OUTPUT);
//    //set value, high or low
//    if(open_or_not){
//       digitalWrite(7, HIGH);
//    }else{
//       digitalWrite(7, LOW);
//    }
}

void MainWindow::initUI()
{
    resize(400,700);

    personal_photo_label = new QLabel;
    personal_photo_label->setObjectName("personal_photo_label");
    personal_photo_label->setFixedSize(300,400);
    QPixmap photo_pixmap = QPixmap(":/image/personal_photo.jpg").scaledToWidth(personal_photo_label->width(), Qt::SmoothTransformation);
    personal_photo_label->setPixmap(photo_pixmap);

    id_label = new QLabel(tr("ID :"));
    id_lineedit = new QLineEdit;
    name_label = new QLabel(tr("姓名 :"));
    name_lineedit = new QLineEdit;
    identify_type_label = new QLabel(tr("识别方式 :"));
    identify_type_combobox = new QComboBox;
    identify_type_combobox->addItem("虹膜识别");
    identify_type_combobox->addItem("密码识别");
    identify_type_combobox->addItem("指纹识别");

    identify_succeed_btn = new QPushButton(tr("识别成功"));
    identify_waiting_btn = new QPushButton(tr("识别等待"));
    identify_succeed_btn->setEnabled(true);
    identify_waiting_btn->setEnabled(false);

    QHBoxLayout *hlayout = new QHBoxLayout;
    hlayout->addWidget(personal_photo_label);
    hlayout->setMargin(20);

    QGridLayout *gridlayout = new QGridLayout;
    gridlayout->addWidget(id_label,0,0,1,1);
    gridlayout->addWidget(id_lineedit,0,1,1,3);
    gridlayout->addWidget(name_label,1,0,1,1);
    gridlayout->addWidget(name_lineedit,1,1,1,3);
    gridlayout->addWidget(identify_type_label,2,0,1,1);
    gridlayout->addWidget(identify_type_combobox,2,1,1,3);
    gridlayout->addWidget(identify_succeed_btn,3,0,2,2);
    gridlayout->addWidget(identify_waiting_btn,3,2,2,2);
    gridlayout->setSpacing(20);


    QVBoxLayout *vlayout = new QVBoxLayout;
    vlayout->addLayout(hlayout);
    vlayout->addLayout(gridlayout);
    vlayout->setMargin(20);

    frame = new QFrame;
    frame->setObjectName("frame");
    frame->setLayout(vlayout);

    QVBoxLayout *frame_vlayout = new QVBoxLayout;
    frame_vlayout->addWidget(frame);
    frame_vlayout->setMargin(30);

    centralWidget = new QWidget(this);
    centralWidget->setObjectName("centralWidget");
    centralWidget->setLayout(frame_vlayout);

    setCentralWidget(centralWidget);

    connect(identify_succeed_btn, SIGNAL(clicked()), SLOT(on_identify_succeed()));
    connect(identify_waiting_btn, SIGNAL(clicked()), SLOT(on_identify_waiting()));


    QFile file(":/qss/mainwindow.qss");
    if (file.open(QFile::ReadOnly)) {
        QString stylesheet = QLatin1String(file.readAll());
        setStyleSheet(stylesheet);
        file.close();
    }
}
其实代码部分只要关注与qt如何读取qss文件,也就是下面这一部分,在initUI()里:
	QFile file(":/qss/mainwindow.qss");
    if (file.open(QFile::ReadOnly)) {
        QString stylesheet = QLatin1String(file.readAll());
        setStyleSheet(stylesheet);
        file.close();
    }
2.1 qss文件的创建
需要注意的是,程序所用到的图片或qss文件都需要被包括在qt工程里,需要将其加载到.qrc文件里,不然qt程序读取不到。
点击文件->新建文件或项目,选择qt resour file也就是.qrc文件

生成好.qrc文件后,右键resource/qss.qrc,点击添加现有文件(或者也可以add new直接创建一个qss文件),然后选择你已经写好的qss文件。这样程序就能找到这个qss文件了。
2.2 qss代码
QWidget #centralWidget
{
background-color: white;
background-image: url(:/image/blue.jpg);
}

#frame
{
background-image: url(:/image/frame.jpg);
border-radius: 20px;
}

QLabel
{
color: black;
font: normal 400 16px "SimSun";
height: 30px;
}

QLineEdit+
{
color: black;
font: normal 400 16px "SimSun";
height: 30px;
border: 1px solid gray;
border-radius: 10px;
padding-left: 3px;
}

QComboBox
{
color: black;
font: normal 400 16px "SimSun";
height: 30px;
border: 1px solid gray;
border-radius: 10px;
}
QComboBox::drop-down
{
    subcontrol-origin: padding;
    subcontrol-position: top right;
    width: 30px;

    border-left-width: 1px;
    border-left-color: darkgray;
    border-left-style: solid;
    border-top-right-radius: 10px;
    border-bottom-right-radius: 10px;
}
QComboBox::down-arrow
{
    image: url(:/image/arrow_down.svg);
}
QComboBox QAbstractItemView
{
    outline: 0px solid gray;   /* 选定项的虚框 */
    border: 1px solid white;   /* 整个下拉窗体的边框 */
    color: black;
    background: white;
    selection-background-color: rgb(49, 193, 254);   /* 整个下拉窗体被选中项的背景色 */
    selection-color: white;
    height: 30px;
}


#personal_photo_label
{
border: 1px solid gray;
background-color: rgb(240,240,240);
border-radius: 20px;
}

QPushButton
{
color: white;
height: 50px;
background-color: rgb(49, 193, 254);
border-radius: 15px;
font: normal 400 16px "SimSun";
}
QPushButton::hover
{
color: black;
}
QPushButton::pressed
{
color: black;
font: normal 400 18px "SimSun";
}


 被折叠的 条评论
为什么被折叠?
被折叠的 条评论
为什么被折叠?
 到【灌水乐园】发言


