


作者 | 伯恩legacy 编辑 | 计算机视觉工坊
原文链接:https://zhuanlan.zhihu.com/p/88318324
点击下方卡片,关注“自动驾驶之心”公众号
ADAS巨卷干货,即可获取
点击进入→自动驾驶之心【模型部署】技术交流群
后台回复【模型部署工程】获取基于TensorRT的分类、检测任务的部署源码!
一.简介
TensorRT是Nvidia公司出的能加速模型推理的框架,其实就是让你训练的模型在测试阶段的速度加快,比如你的模型测试一张图片的速度是50ms,那么用tensorRT加速的话,可能只需要10ms。当然具体能加速多少也不能保证,反正确实速度能提升不少。但是TensorRT坑爹的地方在于,有些模型操作是不支持的、又或者就算支持但是支持并不完善,对于这些难题,要么自己写插件,要么就只能等待官方的更新了。
现在我们训练深度学习模型主流的框架有tensorflow,pytorch,mxnet,caffe等。这个贴子只涉及pytorch,对于tensorflow的话,可以参考TensorRT部署深度学习模型,https://zhuanlan.zhihu.com/p/84125533,这个帖子是c++如何部署TensorRT。其实原理都是一样的,对于tensorflow模型,需要把pb模型转化为uff模型;对于pytorch模型,需要把pth模型转化为onnx模型;对于caffe模型,则不需要转化,因为tensorRT是可以直接读取caffe模型的。mxnet模型也是需要转化为onnx的。
那么,这篇教学贴主要是从python和c++两种语言环境下,尝试将pytorch模型转化为tensorRT,教刚接触TensorRT的同学们如何快速上手。
二.TensorRT的安装
TensorRT的安装并不难,推荐安装最新版本的。由于我使用的是Centos,因此我一般是按照这个教程来安装TensorRT的。
CentOS安装TensorRT指南
https://tbr8.org/how-to-install-tensorrt-on-centos/
安装完成后,在python环境下import tensorrt看能不能成功,并且编译一下官方的sampleMnist的例子,如果都可以的话,就安装成功了。

python环境下,成功导入tensorrt
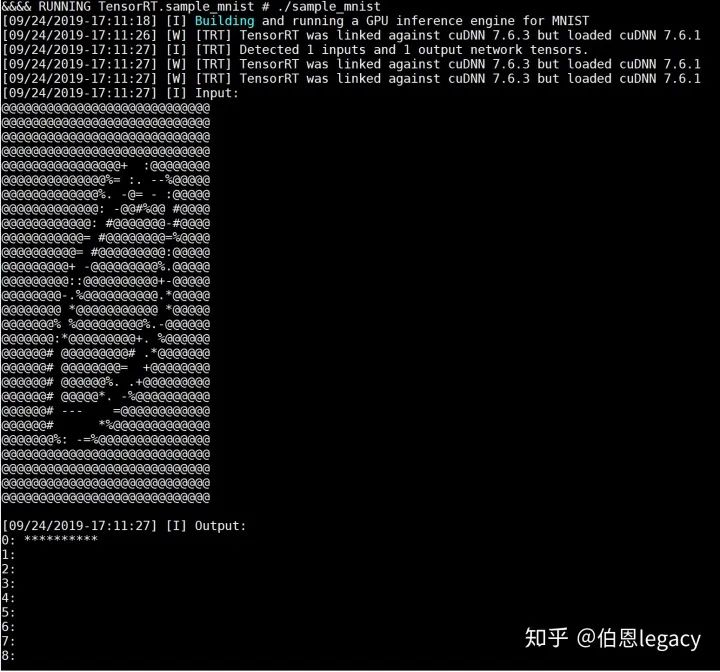
运行官方的mnist例子
三.Python环境下pytorch模型如何转化为TensorRT
python环境下pytorch模型转化为TensorRT有两种路径,一种是先把pytorch的pt模型转化为onnx,然后再转化为TensorRT;另一种是直接把pytorch的pt模型转成TensorRT。
首先,我们先把pt模型转化为onnx模型,需要安装onnx,直接pip install onnx即可。我们以ResNet50为例,代码如下:
import torchvision
import torch
from torch.autograd import Variable
import onnx
print(torch.__version__)


input_name = ['input']
output_name = ['output']
input = Variable(torch.randn(1, 3, 224, 224)).cuda()
model = torchvision.models.resnet50(pretrained=True).cuda()
torch.onnx.export(model, input, 'resnet50.onnx', input_names=input_name, output_names=output_name, verbose=True)
以上代码使用torchvision里面预训练的resnet50模型为基础,将resnet50的pt模型转化成res50.onnx,其中规定onnx的输入名是'input',输出名是'output',输入图像的大小是3通道224x224。其中batch size是1,其实这个batch size你可以取3、4、5等。运行这个代码就可以生成一个名为resnet50.onnx文件。
最好检查一下生成的onnx,代码如下:
test = onnx.load('resnet50.onnx')
onnx.checker.check_model(test)
print("==> Passed")
接下来比较一下pytorch模型和TensorRT的结果吧:
import pycuda.autoinit
import numpy as np
import pycuda.driver as cuda
import tensorrt as trt
import torch
import os
import time
from PIL import Image
import cv2
import torchvision


filename = 'test.jpg'
max_batch_size = 1
onnx_model_path = 'resnet50.onnx'


TRT_LOGGER = trt.Logger()  # This logger is required to build an engine


def get_img_np_nchw(filename):
    image = cv2.imread(filename)
    image_cv = cv2.cvtColor(image, cv2.COLOR_BGR2RGB)
    image_cv = cv2.resize(image_cv, (224, 224))
    miu = np.array([0.485, 0.456, 0.406])
    std = np.array([0.229, 0.224, 0.225])
    img_np = np.array(image_cv, dtype=float) / 255.
    r = (img_np[:, :, 0] - miu[0]) / std[0]
    g = (img_np[:, :, 1] - miu[1]) / std[1]
    b = (img_np[:, :, 2] - miu[2]) / std[2]
    img_np_t = np.array([r, g, b])
    img_np_nchw = np.expand_dims(img_np_t, axis=0)
    return img_np_nchw


class HostDeviceMem(object):
    def __init__(self, host_mem, device_mem):
        """Within this context, host_mom means the cpu memory and device means the GPU memory
        """
        self.host = host_mem
        self.device = device_mem


    def __str__(self):
        return "Host:\n" + str(self.host) + "\nDevice:\n" + str(self.device)


    def __repr__(self):
        return self.__str__()


def allocate_buffers(engine):
    inputs = []
    outputs = []
    bindings = []
    stream = cuda.Stream()
    for binding in engine:
        size = trt.volume(engine.get_binding_shape(binding)) * engine.max_batch_size
        dtype = trt.nptype(engine.get_binding_dtype(binding))
        # Allocate host and device buffers
        host_mem = cuda.pagelocked_empty(size, dtype)
        device_mem = cuda.mem_alloc(host_mem.nbytes)
        # Append the device buffer to device bindings.
        bindings.append(int(device_mem))
        # Append to the appropriate list.
        if engine.binding_is_input(binding):
            inputs.append(HostDeviceMem(host_mem, device_mem))
        else:
            outputs.append(HostDeviceMem(host_mem, device_mem))
    return inputs, outputs, bindings, stream


def get_engine(max_batch_size=1, onnx_file_path="", engine_file_path="", \
               fp16_mode=False, int8_mode=False, save_engine=False,
               ):
    """Attempts to load a serialized engine if available, otherwise builds a new TensorRT engine and saves it."""


    def build_engine(max_batch_size, save_engine):
        """Takes an ONNX file and creates a TensorRT engine to run inference with"""
        with trt.Builder(TRT_LOGGER) as builder, \
                builder.create_network() as network, \
                trt.OnnxParser(network, TRT_LOGGER) as parser:


            builder.max_workspace_size = 1 << 30  # Your workspace size
            builder.max_batch_size = max_batch_size
            # pdb.set_trace()
            builder.fp16_mode = fp16_mode  # Default: False
            builder.int8_mode = int8_mode  # Default: False
            if int8_mode:
                # To be updated
                raise NotImplementedError


            # Parse model file
            if not os.path.exists(onnx_file_path):
                quit('ONNX file {} not found'.format(onnx_file_path))


            print('Loading ONNX file from path {}...'.format(onnx_file_path))
            with open(onnx_file_path, 'rb') as model:
                print('Beginning ONNX file parsing')
                parser.parse(model.read())


            print('Completed parsing of ONNX file')
            print('Building an engine from file {}; this may take a while...'.format(onnx_file_path))


            engine = builder.build_cuda_engine(network)
            print("Completed creating Engine")


            if save_engine:
                with open(engine_file_path, "wb") as f:
                    f.write(engine.serialize())
            return engine


    if os.path.exists(engine_file_path):
        # If a serialized engine exists, load it instead of building a new one.
        print("Reading engine from file {}".format(engine_file_path))
        with open(engine_file_path, "rb") as f, trt.Runtime(TRT_LOGGER) as runtime:
            return runtime.deserialize_cuda_engine(f.read())
    else:
        return build_engine(max_batch_size, save_engine)


def do_inference(context, bindings, inputs, outputs, stream, batch_size=1):
    # Transfer data from CPU to the GPU.
    [cuda.memcpy_htod_async(inp.device, inp.host, stream) for inp in inputs]
    # Run inference.
    context.execute_async(batch_size=batch_size, bindings=bindings, stream_handle=stream.handle)
    # Transfer predictions back from the GPU.
    [cuda.memcpy_dtoh_async(out.host, out.device, stream) for out in outputs]
    # Synchronize the stream
    stream.synchronize()
    # Return only the host outputs.
    return [out.host for out in outputs]


def postprocess_the_outputs(h_outputs, shape_of_output):
    h_outputs = h_outputs.reshape(*shape_of_output)
    return h_outputs


img_np_nchw = get_img_np_nchw(filename)
img_np_nchw = img_np_nchw.astype(dtype=np.float32)


# These two modes are dependent on hardwares
fp16_mode = False
int8_mode = False
trt_engine_path = './model_fp16_{}_int8_{}.trt'.format(fp16_mode, int8_mode)
# Build an engine
engine = get_engine(max_batch_size, onnx_model_path, trt_engine_path, fp16_mode, int8_mode)
# Create the context for this engine
context = engine.create_execution_context()
# Allocate buffers for input and output
inputs, outputs, bindings, stream = allocate_buffers(engine) # input, output: host # bindings


# Do inference
shape_of_output = (max_batch_size, 1000)
# Load data to the buffer
inputs[0].host = img_np_nchw.reshape(-1)


# inputs[1].host = ... for multiple input
t1 = time.time()
trt_outputs = do_inference(context, bindings=bindings, inputs=inputs, outputs=outputs, stream=stream) # numpy data
t2 = time.time()
feat = postprocess_the_outputs(trt_outputs[0], shape_of_output)


print('TensorRT ok')


model = torchvision.models.resnet50(pretrained=True).cuda()
resnet_model = model.eval()


input_for_torch = torch.from_numpy(img_np_nchw).cuda()
t3 = time.time()
feat_2= resnet_model(input_for_torch)
t4 = time.time()
feat_2 = feat_2.cpu().data.numpy()
print('Pytorch ok!')


mse = np.mean((feat - feat_2)**2)
print("Inference time with the TensorRT engine: {}".format(t2-t1))
print("Inference time with the PyTorch model: {}".format(t4-t3))
print('MSE Error = {}'.format(mse))


print('All completed!')
运行结果如下:
TensorRT ok
Pytorch ok!
Inference time with the TensorRT engine: 0.0037250518798828125
Inference time with the PyTorch model: 0.3574800491333008
MSE Error = 3.297184357139993e-12
这个结果Pytorch模型ResNet50竟然需要340ms,感觉有些迷,但是好像没发现有啥问题。可以发现,TensorRT进行inference的结果和pytorch前向的结果差距很小。代码来源于https://github.com/RizhaoCai/PyTorch_ONNX_TensorRT
接下来介绍python环境下,直接把pytorch模型转化为TensorRT,参考的代码来源于NVIDIA-AI-IOT/torch2trt,https://github.com/NVIDIA-AI-IOT/torch2trt这个工程比较简单易懂,质量很高,安装也不难,我自己运行的结果如下:
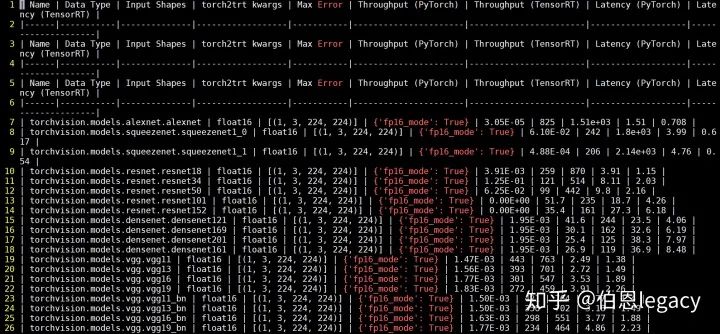
对于你自己的Pytorch模型,只需要把该代码的model进行替换即可。注意在运行过程中经常会出现"output tensor has no attribute _trt",这是因为你模型当中有一些操作还没有实现,需要自己实现。
四.C++环境下Pytorch模型如何转化为TensorRT
c++环境下,以TensorRT5.1.5.0的sampleOnnxMNIST为例子,用opencv读取一张图片,然后让TensorRT进行doInference输出(1,1000)的特征。代码如下所示,把这个代码替换sampleOnnxMNIST替换,然后编译就能运行了。
#include <algorithm>
#include <assert.h>
#include <cmath>
#include <cuda_runtime_api.h>
#include <fstream>
#include <iomanip>
#include <iostream>
#include <sstream>
#include <sys/stat.h>
#include <time.h>
#include <opencv2/opencv.hpp>
#include "NvInfer.h"
#include "NvOnnxParser.h"
#include "argsParser.h"
#include "logger.h"
#include "common.h"
#include "image.hpp"
#define DebugP(x) std::cout << "Line" << __LINE__ << "  " << #x << "=" << x << std::endl


using namespace nvinfer1;


static const int INPUT_H = 224;
static const int INPUT_W = 224;
static const int INPUT_C = 3;
static const int OUTPUT_SIZE = 1000;


const char* INPUT_BLOB_NAME = "input";
const char* OUTPUT_BLOB_NAME = "output";


const std::string gSampleName = "TensorRT.sample_onnx_image";


samplesCommon::Args gArgs;


bool onnxToTRTModel(const std::string& modelFile, // name of the onnx model
                    unsigned int maxBatchSize,    // batch size - NB must be at least as large as the batch we want to run with
                    IHostMemory*& trtModelStream) // output buffer for the TensorRT model
{
    // create the builder
    IBuilder* builder = createInferBuilder(gLogger.getTRTLogger());
    assert(builder != nullptr);
    nvinfer1::INetworkDefinition* network = builder->createNetwork();


    auto parser = nvonnxparser::createParser(*network, gLogger.getTRTLogger());


    //Optional - uncomment below lines to view network layer information
    //config->setPrintLayerInfo(true);
    //parser->reportParsingInfo();


    if ( !parser->parseFromFile( locateFile(modelFile, gArgs.dataDirs).c_str(), static_cast<int>(gLogger.getReportableSeverity()) ) )
    {
        gLogError << "Failure while parsing ONNX file" << std::endl;
        return false;
    }

    // Build the engine
    builder->setMaxBatchSize(maxBatchSize);
    //builder->setMaxWorkspaceSize(1 << 20);
    builder->setMaxWorkspaceSize(10 << 20);
    builder->setFp16Mode(gArgs.runInFp16);
    builder->setInt8Mode(gArgs.runInInt8);


    if (gArgs.runInInt8)
    {
        samplesCommon::setAllTensorScales(network, 127.0f, 127.0f);
    }

    samplesCommon::enableDLA(builder, gArgs.useDLACore);

    ICudaEngine* engine = builder->buildCudaEngine(*network);
    assert(engine);


    // we can destroy the parser
    parser->destroy();


    // serialize the engine, then close everything down
    trtModelStream = engine->serialize();
    engine->destroy();
    network->destroy();
    builder->destroy();


    return true;
}


void doInference(IExecutionContext& context, float* input, float* output, int batchSize)
{
    const ICudaEngine& engine = context.getEngine();
    // input and output buffer pointers that we pass to the engine - the engine requires exactly IEngine::getNbBindings(),
    // of these, but in this case we know that there is exactly one input and one output.
    assert(engine.getNbBindings() == 2);
    void* buffers[2];


    // In order to bind the buffers, we need to know the names of the input and output tensors.
    // note that indices are guaranteed to be less than IEngine::getNbBindings()

    const int inputIndex = engine.getBindingIndex(INPUT_BLOB_NAME);
    const int outputIndex = engine.getBindingIndex(OUTPUT_BLOB_NAME);

    DebugP(inputIndex); DebugP(outputIndex);
    // create GPU buffers and a stream
    CHECK(cudaMalloc(&buffers[inputIndex], batchSize * INPUT_C * INPUT_H * INPUT_W * sizeof(float)));
    CHECK(cudaMalloc(&buffers[outputIndex], batchSize * OUTPUT_SIZE * sizeof(float)));


    cudaStream_t stream;
    CHECK(cudaStreamCreate(&stream));


    // DMA the input to the GPU,  execute the batch asynchronously, and DMA it back:
    CHECK(cudaMemcpyAsync(buffers[inputIndex], input, batchSize * INPUT_C * INPUT_H * INPUT_W * sizeof(float), cudaMemcpyHostToDevice, stream));
    context.enqueue(batchSize, buffers, stream, nullptr);
    CHECK(cudaMemcpyAsync(output, buffers[outputIndex], batchSize * OUTPUT_SIZE * sizeof(float), cudaMemcpyDeviceToHost, stream));
    cudaStreamSynchronize(stream);


    // release the stream and the buffers
    cudaStreamDestroy(stream);
    CHECK(cudaFree(buffers[inputIndex]));
    CHECK(cudaFree(buffers[outputIndex]));
}


//!
//! \brief This function prints the help information for running this sample
//!
void printHelpInfo()
{
    std::cout << "Usage: ./sample_onnx_mnist [-h or --help] [-d or --datadir=<path to data directory>] [--useDLACore=<int>]\n";
    std::cout << "--help          Display help information\n";
    std::cout << "--datadir       Specify path to a data directory, overriding the default. This option can be used multiple times to add multiple directories. If no data directories are given, the default is to use (data/samples/mnist/, data/mnist/)" << std::endl;
    std::cout << "--useDLACore=N  Specify a DLA engine for layers that support DLA. Value can range from 0 to n-1, where n is the number of DLA engines on the platform." << std::endl;
    std::cout << "--int8          Run in Int8 mode.\n";
    std::cout << "--fp16          Run in FP16 mode." << std::endl;
}


int main(int argc, char** argv)
{
    bool argsOK = samplesCommon::parseArgs(gArgs, argc, argv);
    if (gArgs.help)
    {
        printHelpInfo();
        return EXIT_SUCCESS;
    }
    if (!argsOK)
    {
        gLogError << "Invalid arguments" << std::endl;
        printHelpInfo();
        return EXIT_FAILURE;
    }
    if (gArgs.dataDirs.empty())
    {
        gArgs.dataDirs = std::vector<std::string>{"data/samples/mnist/", "data/mnist/"};
    }


    auto sampleTest = gLogger.defineTest(gSampleName, argc, const_cast<const char**>(argv));


    gLogger.reportTestStart(sampleTest);


    // create a TensorRT model from the onnx model and serialize it to a stream
    IHostMemory* trtModelStream{nullptr};


    if (!onnxToTRTModel("resnet50.onnx", 1, trtModelStream))
        gLogger.reportFail(sampleTest);


    assert(trtModelStream != nullptr);
    std::cout << "Successfully parsed ONNX file!!!!" << std::endl;


    std::cout << "Start reading the input image!!!!" << std::endl;

    cv::Mat image = cv::imread(locateFile("test.jpg", gArgs.dataDirs), cv::IMREAD_COLOR);
    if (image.empty()) {
        std::cout << "The input image is empty!!! Please check....."<<std::endl;
    }
    DebugP(image.size());
    cv::cvtColor(image, image, cv::COLOR_BGR2RGB);


    cv::Mat dst = cv::Mat::zeros(INPUT_H, INPUT_W, CV_32FC3);
    cv::resize(image, dst, dst.size());
    DebugP(dst.size());


    float* data = normal(dst);


    // deserialize the engine
    IRuntime* runtime = createInferRuntime(gLogger);
    assert(runtime != nullptr);
    if (gArgs.useDLACore >= 0)
    {
        runtime->setDLACore(gArgs.useDLACore);
    }


    ICudaEngine* engine = runtime->deserializeCudaEngine(trtModelStream->data(), trtModelStream->size(), nullptr);
    assert(engine != nullptr);
    trtModelStream->destroy();
    IExecutionContext* context = engine->createExecutionContext();
    assert(context != nullptr);

    float prob[OUTPUT_SIZE];
    typedef std::chrono::high_resolution_clock Time;
    typedef std::chrono::duration<double, std::ratio<1, 1000>> ms;
    typedef std::chrono::duration<float> fsec;
    double total = 0.0;


    // run inference and cout time
    auto t0 = Time::now();
    doInference(*context, data, prob, 1);
    auto t1 = Time::now();
    fsec fs = t1 - t0;
    ms d = std::chrono::duration_cast<ms>(fs);
    total += d.count();
    // destroy the engine
    context->destroy();
    engine->destroy();
    runtime->destroy();

    std::cout << std::endl << "Running time of one image is:" << total << "ms" << std::endl;

    gLogInfo << "Output:\n";
    for (int i = 0; i < OUTPUT_SIZE; i++)
    {
        gLogInfo << prob[i] << " ";
    }
    gLogInfo << std::endl;


    return gLogger.reportTest(sampleTest, true);
}
其中image.cpp的代码为:
#include <opencv2/opencv.hpp>
#include "image.hpp"


static const float kMean[3] = { 0.485f, 0.456f, 0.406f };
static const float kStdDev[3] = { 0.229f, 0.224f, 0.225f };
static const int map_[7][3] = { {0,0,0} ,
        {128,0,0},
        {0,128,0},
        {0,0,128},
        {128,128,0},
        {128,0,128},
        {0,128,0}};


float* normal(cv::Mat img) {
  //cv::Mat image(img.rows, img.cols, CV_32FC3);
  float * data;
  data = (float*)calloc(img.rows*img.cols * 3, sizeof(float));


  for (int c = 0; c < 3; ++c)
  {

    for (int i = 0; i < img.rows; ++i)
    { //获取第i行首像素指针
      cv::Vec3b *p1 = img.ptr<cv::Vec3b>(i);
      //cv::Vec3b *p2 = image.ptr<cv::Vec3b>(i);
      for (int j = 0; j < img.cols; ++j)
      {
        data[c * img.cols * img.rows + i * img.cols + j] = (p1[j][c] / 255.0f - kMean[c]) / kStdDev[c];

      }
    }

  }
  return data;
}
image.hpp的内容为:
#pragma once
typedef struct {
  int w;
  int h;
  int c;
  float *data;
} image;
float* normal(cv::Mat img);
运行结果为:
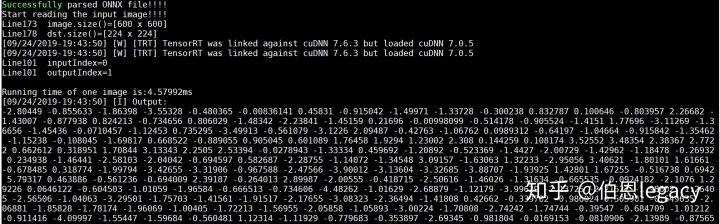
同样的test.jpg在python环境下的运行结果为:

可以发现,c++环境下resnet50输出的(1,1000)的特征与python环境下feat1(TensorRT)和feat2(pytorch)的结果差距很小。
上面的是将pytorch首先转化为onnx,然后让TensorRT解析onnx从而构建TensorRT引擎。那么我们如何让TensorRT直接加载引擎文件呢,也就是说,我们先把onnx转化为TensorRT的trt文件,然后让c++环境下的TensorRT直接加载trt文件,从而构建engine。
在这里我们首先使用onnx-tensorrt这个项目来使resnet50.onnx转化为resnet50.trt。采用的项目是https://github.com/onnx/onnx-tensorrt这个项目的安装也不难。按要求安装好protobuf就可以。安装成功的结果如下:
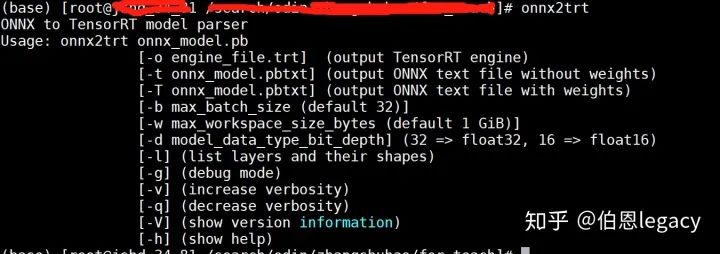
运行如下命令,就可以获得rensnet50.trt这个引擎文件
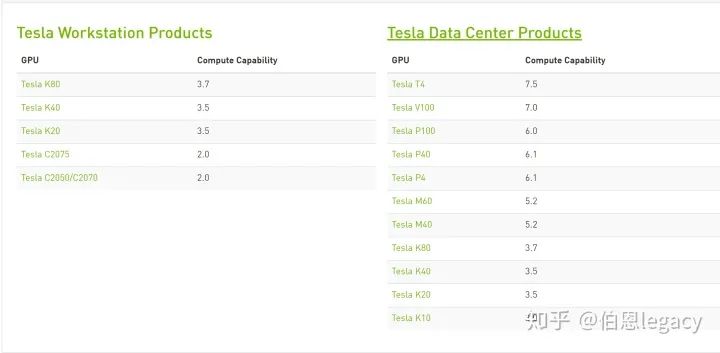
onnx2trt resnet50.onnx -o resnet50.trt需要注意的是,onnx-tensort这个项目在编译的时有一个指定GPU计算能力的选项,如下图所示:
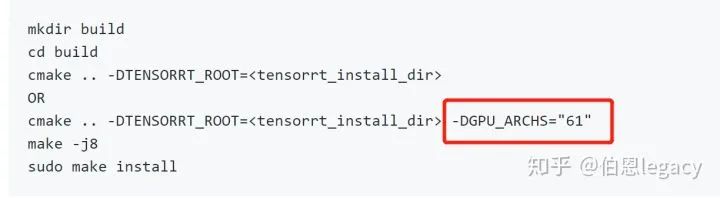
https://developer.nvidia.com/cuda-gpus可以查看不同显卡的计算能力,比如你用7.5计算力生成的trt文件,是不能用6.5的显卡来解析的。
另外在onnx2trt命令有个-b操作,是指定生成的trt文件的batch size的。在实际test过程中,你的batch size是多少,这个就设置成多少。我记得我当时trt文件的batch size是1,但是我实际的batch size是8,运行后,只有一张图片有结果,其他7张图片都是0。
如果能顺利生成trt文件的话,在代码中可以直接添加以下函数,来生成engine, 其他就不需要改变。
bool read_TRT_File(const std::string& engineFile, IHostMemory*& trtModelStream)
{
     std::fstream file;
     std::cout << "loading filename from:" << engineFile << std::endl;
     nvinfer1::IRuntime* trtRuntime;
     //nvonnxparser::IPluginFactory* onnxPlugin = createPluginFactory(gLogger.getTRTLogger());
     file.open(engineFile, std::ios::binary | std::ios::in);
     file.seekg(0, std::ios::end);
     int length = file.tellg();
     std::cout << "length:" << length << std::endl;
     file.seekg(0, std::ios::beg);
     std::unique_ptr<char[]> data(new char[length]);
     file.read(data.get(), length);
     file.close();
     std::cout << "load engine done" << std::endl;
     std::cout << "deserializing" << std::endl;
     trtRuntime = createInferRuntime(gLogger.getTRTLogger());
     //ICudaEngine* engine = trtRuntime->deserializeCudaEngine(data.get(), length, onnxPlugin);
     ICudaEngine* engine = trtRuntime->deserializeCudaEngine(data.get(), length, nullptr);
     std::cout << "deserialize done" << std::endl;
     assert(engine != nullptr);
     std::cout << "The engine in TensorRT.cpp is not nullptr" <<std::endl;
     trtModelStream = engine->serialize();
     return true;
 }
如果想保存引擎文件的话,可以在自己的代码中添加这几句话,就可以生成trt文件,然后下次直接调用trt文件。
nvinfer1::IHostMemory* data = engine->serialize();
  std::ofstream file;
  file.open(filename, std::ios::binary | std::ios::out);
  cout << "writing engine file..." << endl;
  file.write((const char*)data->data(), data->size());
  cout << "save engine file done" << endl;
  file.close();
五.总结
TensorRT的部署并不难,难的是模型转化,在这个过程中有太多的操作是TensorRT不支持的,或者pytorch模型转化成的onnx本身就有问题。经常会出现,expand, Gather, reshape不支持等。感觉TensorRT对pytorch的维度变化特别不友好,我自己在模型转化过程中绝大多数bug都出在维度变化上。如果你有什么问题的话,请在下方留言吧!好吧,暂时就先写这么多,以后再补充吧。
发现了一个tiny-tensorrt,貌似在C++和python环境下部署很easy,先记录一下。感兴趣的同学可以去看看:https://github.com/zerollzeng/tiny-tensorrt
国内首个自动驾驶学习社区
近1000人的交流社区,和20+自动驾驶技术栈学习路线,想要了解更多自动驾驶感知(分类、检测、分割、关键点、车道线、3D目标检测、多传感器融合、目标跟踪、光流估计、轨迹预测)、自动驾驶定位建图(SLAM、高精地图)、自动驾驶规划控制、领域技术方案、AI模型部署落地实战、行业动态、岗位发布,欢迎扫描下方二维码,加入自动驾驶之心知识星球,这是一个真正有干货的地方,与领域大佬交流入门、学习、工作、跳槽上的各类难题,日常分享论文+代码+视频,期待交流!

【自动驾驶之心】全栈技术交流群
自动驾驶之心是首个自动驾驶开发者社区,聚焦目标检测、语义分割、全景分割、实例分割、关键点检测、车道线、目标跟踪、3D目标检测、BEV感知、多传感器融合、SLAM、光流估计、深度估计、轨迹预测、高精地图、NeRF、规划控制、模型部署落地、自动驾驶仿真测试、硬件配置、AI求职交流等方向;

添加汽车人助理微信邀请入群
备注:学校/公司+方向+昵称


 691
691


 被折叠的 条评论
为什么被折叠?
被折叠的 条评论
为什么被折叠?
 到【灌水乐园】发言


