


.ui文件
widget.ui 是窗体界面定义文件,是一个
XML
文件,
定义了窗口上的所有组件的属性设置、布局,及其信号与槽函数的关联等。用UI设计器可视化设计的界面都由 Qt 自动解析,并以 XML 文件的形式保存下来。在设计界面时,只需在 UI 设计器里进行可视化设计即可,而
不用管 widget.ui 文件是怎么生成的。
.qrc文件
Qt中的qrc文件是一个
xml
格式的资源配置文件,与应用程序关联的应用程序由 . qrc 文件来指定,它
用XML记录硬盘上的文件和对应的随意指定的资源名称,应用程序通过资源名称来访问资源。 指
定的路径是 . qrc 文件所在目录的相对路径。
布局管理
-
QVBoxLayout:QVBoxLayout是一个垂直布局管理器,它将窗口部件垂直排列。
-
QHBoxLayout:QHBoxLayout是一个水平布局管理器,它将水平排列。
-
QGridLayout:QGridLayout是一个网格布局管理器,它在一个网格中放置窗口部件。可以通过指定行和列来控制窗口部件在网格中的位置。
import sys
from PySide6.QtWidgets import QApplication, QWidget, QVBoxLayout, QPushButton

app = QApplication(sys.argv)

# 创建一个窗口部件
widget = QWidget()

# 创建一个垂直布局管理器
layout = QVBoxLayout()

# 创建两个按钮
button1 = QPushButton("Button 1")
button2 = QPushButton("Button 2")

# 将按钮添加到布局中
layout.addWidget(button1)
layout.addWidget(button2)

# 将布局设置为窗口部件的布局
widget.setLayout(layout)

# 显示窗口部件
widget.show()

sys.exit(app.exec())
教程学习
0001 第一个QtWidgets应用程序
import sys
from PySide6.QtWidgets import QApplication, QLabel

app = QApplication(sys.argv)
label = QLabel("<font color=red size=40>Hello World!</font>")
label.show()
app.exec()
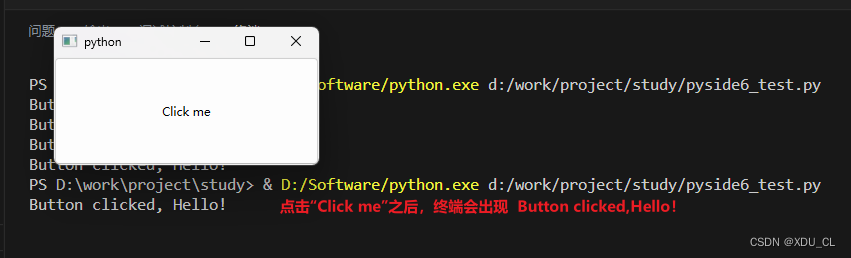
0002 按钮与终端
信号和槽是 Qt 的一项功能,可让您的图形小部件与其他图形小部件
或 Python 代码进行通信。
应用程序APP创建一个按钮Button 来 单击的按钮Button 每次单击它时都会向 python 控制台发送消息
import sys
from PySide6.QtWidgets import QApplication, QPushButton
from PySide6.QtCore import Slot

@Slot()
def say_hello():
 print("Button clicked, Hello!") #输出到终端

# Create the Qt Application
app = QApplication(sys.argv)

# Create a button, connect it and show it  创建、连接 和 展示
button = QPushButton("Click me")
button.clicked.connect(say_hello)
button.show()

# Run the main Qt loop
app.exec()
0003 信号和槽
类比
灯的信号与槽 开关(信号) 槽(结果,亮灭)
当您移动灯开关(信号)时,您会得到一个结果,这可能是您的灯泡被打开/关闭(插槽)
1. 典型
import sys
from PySide6.QtWidgets import QApplication, QPushButton

def function():
    print("The 'function' has been called!")

app = QApplication()

button = QPushButton("Call function")
button.clicked.connect(function) # click 单击 是信号, function 是槽 要执行的操作;
# connect 意为 将信号和槽 连接起来
button.show()

sys.exit(app.exec())
2. 信号类型
signal1 = Signal(int)  # Python types
signal2 = Signal(QUrl)  # Qt Types
signal3 = Signal(int, str, int)  # more than one type
signal4 = Signal((float,), (QDate,))  # optional types
3. 重载不同类型的信号和槽
import sys
from PySide6.QtWidgets import QApplication, QPushButton
from PySide6.QtCore import QObject, Signal, Slot


class Communicate(QObject):
    # create two new signals on the fly: one will handle
    # int type, the other will handle strings
    speak = Signal((int,), (str,))

    def __init__(self, parent=None):
        super().__init__(parent)

        self.speak[int].connect(self.say_something)
        # speak[int] 信号;connect 连接;say_something方法 槽,就是有信号后,要执行的操作
        self.speak[str].connect(self.say_something)

    # define a new slot that receives a C 'int' or a 'str'
    # and has 'say_something' as its name
    @Slot(int)
    @Slot(str)
    def say_something(self, arg):
        if isinstance(arg, int):
            print("This is a number:", arg)
        elif isinstance(arg, str):
            print("This is a string:", arg)

if __name__ == "__main__":
    app = QApplication(sys.argv)
    someone = Communicate()

    # emit 'speak' signal with different arguments.
    # we have to specify the str as int is the default
    someone.speak.emit(10)
    someone.speak[str].emit("Hello everybody!")
0004 创建对话框


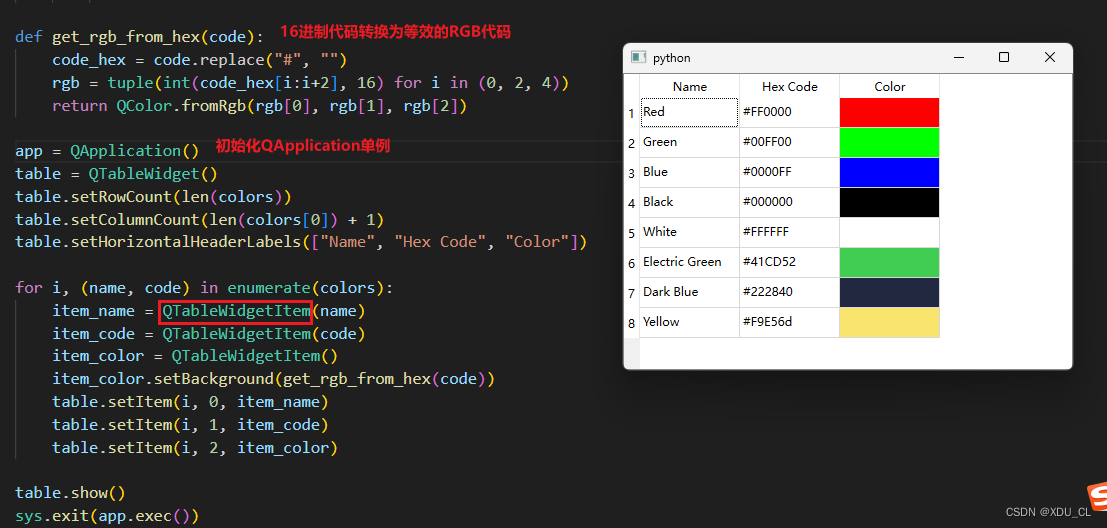
0005 使用表格小部件显示数据


 1万+
1万+

 被折叠的 条评论
为什么被折叠?
被折叠的 条评论
为什么被折叠?
 到【灌水乐园】发言


