


背景知识
- 预处理(进行宏替换)
- 编译(生成汇编)
- 汇编(生成机器可识别代码)
- 连接(生成可执行文件或库文件)
写一个hello world并运行:
[CegghnnoR@VM-4-13-centos 2022_7_25]$ touch test.c	#创建文件
[CegghnnoR@VM-4-13-centos 2022_7_25]$ vim test.c	#vim打开编辑,过程略
[CegghnnoR@VM-4-13-centos 2022_7_25]$ gcc test.c	#gcc编译
[CegghnnoR@VM-4-13-centos 2022_7_25]$ ls
a.out  test.c										#生成a.out文件
[CegghnnoR@VM-4-13-centos 2022_7_25]$ ./a.out		#运行
Hello world
gcc如何完成
预处理
预处理功能主要包括宏定义,文件包含,条件编译,去注释等。
选项
-o指定目标文件名称
写一个包括,宏、注释、条件编译的代码如下:
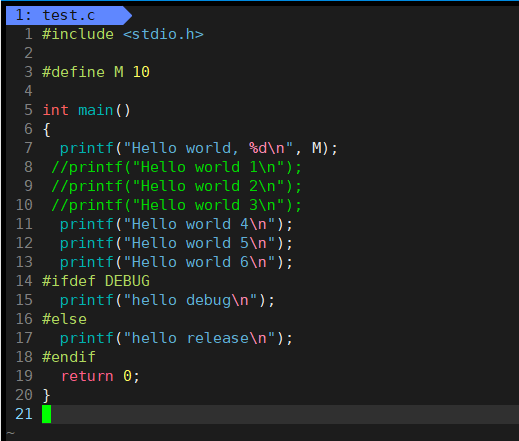
[CegghnnoR@VM-4-13-centos 2022_7_25]$ gcc test.c -o mytest	#生成指定名称为mytest的可执行程序
[CegghnnoR@VM-4-13-centos 2022_7_25]$ ls
mytest  test.c
[CegghnnoR@VM-4-13-centos 2022_7_25]$ ./mytest
Hello world, 10
Hello world 4
Hello world 5
Hello world 6
hello release
对于使用来说,掌握这条指令就够了,要研究编译的过程,就有必要拆分步骤了。
gcc -E test.c -o test.i
-E 开始翻译直到预处理完成就停止;结果写到 test.i 文件中
接下来vim test.c 然后输入:vs test.i,这样就进行了分屏,输入 G 跳转到文本末尾
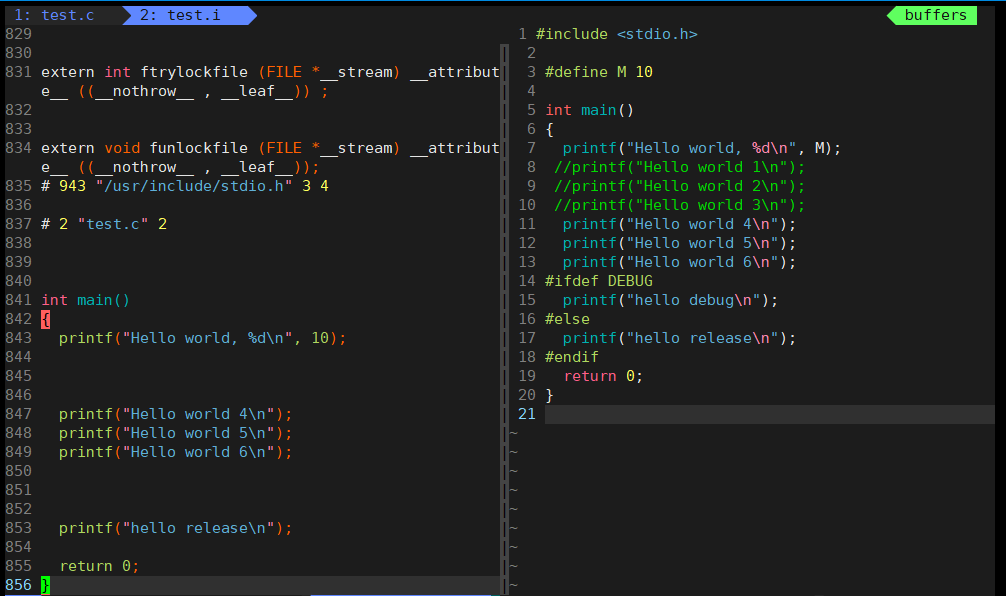
通过对比可以发现:前面八百多行都是头文件展开,宏定义不见了,但在843行成功完成替换,注释被去除,条件编译只保留了一项
另:
- 分屏模式下
Ctrl+ww让光标在两个窗口之间切换。 - 头文件在
/usr/include下
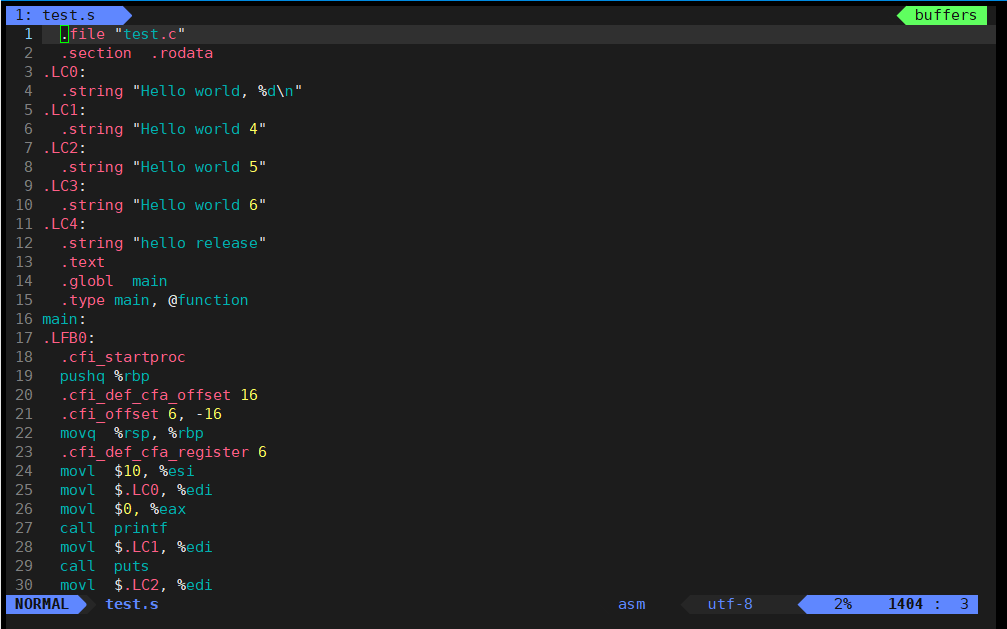
编译
将C语言翻译成汇编语言。
gcc -S test.i -o test.s
-S 开始翻译直到编译完成就停止;结果写到 test.s 文件中
也可以打开看看,不过得会汇编才看得懂:
汇编
将汇编语言翻译为可重定位二进制文件.o/.obj
gcc -c test.s -o test.o
-c 开始翻译直到汇编完成就停止;结果写到 test.o 文件中
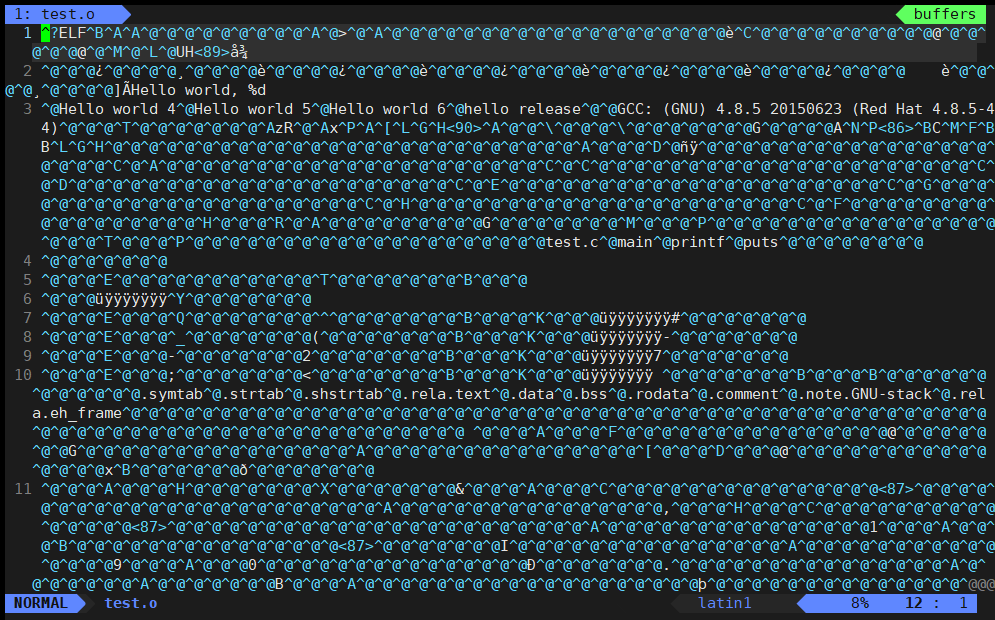
vim 看下来就是乱码,当然你也可以使用二进制查看 od test.o
虽然它是二进制,但还不能运行。
链接
上面所做的一切都只是在翻译自己的代码,而我们并没有定义 printf 的实现,头文件中也只有声明。那么它的实现在哪呢?
答案是它在库中,需要链接来实现关联。在没有特别指定时, gcc 会到系统默认的搜索路径/lib64/libc* 下进行查找。
gcc test.o -o mytest
运行:
[CegghnnoR@VM-4-13-centos 2022_7_25]$ ./mytest
Hello world, 10
Hello world 4
Hello world 5
Hello world 6
使用 ldd 可以查看调用了那些库:
[CegghnnoR@VM-4-13-centos 2022_7_25]$ ldd mytest
	linux-vdso.so.1 =>  (0x00007fff35523000)
	/$LIB/libonion.so => /lib64/libonion.so (0x00007fa750dcd000)
	libc.so.6 => /lib64/libc.so.6 (0x00007fa7508e6000)
	libdl.so.2 => /lib64/libdl.so.2 (0x00007fa7506e2000)
	/lib64/ld-linux-x86-64.so.2 (0x00007fa750cb4000)
静态库、动态库
-
静态库是指编译链接时,把库文件的代码全部加入到可执行文件中,因此生成的文件比较大,但在运行时也就不再需要库文件了。其后缀名一般为“.a”
-
动态库与之相反,在编译链接时并没有把库文件的代码加入到可执行文件中,而是在程序执行时由运行时链接文件加载库,这样可以节省系统的开销。动态库一般后缀名为“.so”,如前面所述的 libc.so.6 就是动态库。gcc 在编译时默认使用动态库。完成了链接之后,gcc 就可以生成可执行文件。
-
gcc 默认生成的二进制程序,是动态链接的,这点可以通过
file命令验证。
如果要使用静态链接,需要事先安装静态库:
C静态库安装:yum install -y glibc-static
C++静态库安装:yum install -y libstdc++-static
加 -static 使用静态链接编译:
[CegghnnoR@VM-4-13-centos 2022_7_25]$ gcc test.c -o mytest2 -static
[CegghnnoR@VM-4-13-centos 2022_7_25]$ ll
total 888
-rwxrwxr-x 1 CegghnnoR CegghnnoR   8408 Jul 25 23:12 mytest
-rwxrwxr-x 1 CegghnnoR CegghnnoR 861384 Jul 26 15:17 mytest2
可以看到,静态链接生成的文件大小比动态链接生成的大了近100倍。
Linux调试器—gdb
- 程序的发布方式有两种,debug模式和release模式
- Linux gcc/g++出来的二进制程序,默认是release模式
- 要使用gdb调试,必须在源代码生成二进制程序的时候, 加上
-g选项
首先写一个求1加到100的代码:
#include <stdio.h>

int AddToTop(int top)
{
    int res = 0;
    for (int i = 1; i <= top; ++i)
    {
        res += i;
    }
    return res;
}

int main()
{
    int result = 0;
    int top = 100;
    result = AddToTop(top);
    printf("result: %d\n", result);
    return 0;
}
gcc hello.c -o hello_g -g 生成可执行程序,然后 gdb hello_g 进入调试。
退出:Ctrl+d 或 quit
[CegghnnoR@VM-4-13-centos gdb]$ ll
total 28
-rwxrwxr-x 1 CegghnnoR CegghnnoR 8392 Jul 26 15:48 hello
-rwxrwxr-x 1 CegghnnoR CegghnnoR 9632 Jul 26 16:01 hello_g
可以看到 debug 版本比 release 版本大一些。
使用 readelf 可以看到它包含了一些调试信息,这在 realease 版本下是没有的:
[CegghnnoR@VM-4-13-centos gdb]$ readelf -S hello_g | grep debug
  [27] .debug_aranges    PROGBITS         0000000000000000  00001061
  [28] .debug_info       PROGBITS         0000000000000000  00001091
  [29] .debug_abbrev     PROGBITS         0000000000000000  00001189
  [30] .debug_line       PROGBITS         0000000000000000  00001214
  [31] .debug_str        PROGBITS         0000000000000000  0000126a
[CegghnnoR@VM-4-13-centos gdb]$ readelf -S hello | grep debug
list/l [行号]显示源代码,行号前后共10行。list/l [函数名]列出某个函数的源代码
例子:
(gdb) l
7	  for (i = 1; i <= top; ++i)
8	  {
9	    res += i;
10	  }
11	  return res;
12	}
13
14	int main()
15	{
16	  int result = 0;
(gdb) l 0
1	#include <stdio.h>
2
3	int AddToTop(int top)
4	{
5	  int res = 0;
6	  int i;
7	  for (i = 1; i <= top; ++i)
8	  {
9	    res += i;
10	  }
(gdb) l main
10	  }
11	  return res;
12	}
13
14	int main()
15	{
16	  int result = 0;
17	  int top = 100;
18	  result = AddToTop(top);
19	  printf("result: %d\n", result);
显示一段代码后直接按回车可以继续往下显示:
(gdb) l 0
1	#include <stdio.h>
2
3	int AddToTop(int top)
4	{
5	  int res = 0;
6	  int i;
7	  for (i = 1; i <= top; ++i)
8	  {
9	    res += i;
10	  }
(gdb)
11	  return res;
12	}
13
14	int main()
15	{
16	  int result = 0;
17	  int top = 100;
18	  result = AddToTop(top);
19	  printf("result: %d\n", result);
20	  return 0;
(gdb)
21	}
(gdb)
Line number 22 out of range; hello.c has 21 lines.
-
break/b [行号]在某一行设置断点 -
break [函数名]在某个函数开头设置断点 -
info/i b查看断点 -
d [断点编号]删除断点 -
r/run运行程序 -
p/print打印表达式的值,通过表达式可以修改变量的值或者调用函数 -
s/step逐语句,相当于vs的F11 -
n/next逐过程,想打于vs的F10 -
bt查看堆栈 -
display [变量名]跟踪查看一个变量,每次停下来都显示它的值 -
undisplay [编号]取消对先前设置的变量的跟踪 -
until [行号]跳至某一行并执行完中间的代码 -
c/continue从一个断点直接运行到另一个断点 -
finish执行完成一个函数就停下来
Linux项目自动化构建工具—make/makefile
- 会不会写 makefile,从一个侧面说明了一个人是否具备完成大型工程的能力
- 一个工程中的源文件不计数,其按类型、功能、模块分别放在若干个目录中,makefile 定义了一系列的规则来指定,哪些文件需要先编译,哪些文件需要后编译,哪些文件需要重新编译,甚至于进行更复杂的功能操作
- makefile 带来的好处就是——“自动化编译”,一旦写好,只需要一个 make 命令,整个工程完全自动编译,极大的提高了软件开发的效率。
- make 是一个命令工具,是一个解释 makefile 中指令的命令工具,一般来说,大多数的 IDE 都有这个命令,比如:Delphi 的make,Visual C++ 的 nmake,Linux 下 GNU 的 make。可见,makefile 都成为了一种在工程方面的编译方法。
- make 是一条命令,makefile 是一个文件,两个搭配使用,完成项目自动化构建
例子:
首先写好一个 mytst.c ,然后创建一个 makefile或Makefile 文件
makefile:
- 依赖关系
- 依赖方法
vim 打开 makefile,写下如下内容:
mytest:mytest.c
    gcc mytest.c -o mytest
这就表示 mytest 依赖 mytest.c ,依赖方法是 gcc mytest.c -o mytest,注意:前面一定要用tab键分隔,不能用空格
接下来要编译 mytest.c 就不用输入 gcc 命令了,而是直接输入 make :
- make 命令默认只会生成第一个目标文件,执行该依赖关系的依赖方法。
[CegghnnoR@VM-4-13-centos mkfile]$ ls
makefile  mytest.c  proc1.c  proc2.c  proc.c
[CegghnnoR@VM-4-13-centos mkfile]$ make
gcc mytest.c -o mytest
[CegghnnoR@VM-4-13-centos mkfile]$ ls
makefile  mytest  mytest.c  proc1.c  proc2.c  proc.c
清理:
先写一行 .PHONY:clean
mytest:mytest.c
    gcc mytest.c -o mytest

.PHONY:clean
clean:
    rm -f mytest
使用 make clean 清理:
[CegghnnoR@VM-4-13-centos mkfile]$ make clean
rm -f mytest
[CegghnnoR@VM-4-13-centos mkfile]$ ls
makefile  mytest.c  proc1.c  proc2.c  proc.c
.PHONY是makefile中的一个关键字,:后面跟的就是伪目标。- clean 被 .PHONY 修饰时,表明:总是被执行的。
没有被 .PHONY 修饰的,多次make不会重复执行:
[CegghnnoR@VM-4-13-centos 2022_8_9]$ make
make: `mytest' is up to date.
makefile 是如何识别 exe/bin 是新的还是旧的?
使用 stat 可以查看文件的 inode 内容,其中包括三个时间:
Access最后访问时间Modify最后修改文件内容时间Change最后改变文件属性时间
修改文件内容也有可能引起 change 时间的变化,比如文件大小的改变。
[CegghnnoR@VM-4-13-centos 2022_8_9]$ stat mytest
  File: ‘mytest’
  Size: 8360      	Blocks: 24         IO Block: 4096   regular file
Device: fd01h/64769d	Inode: 655904      Links: 1
Access: (0775/-rwxrwxr-x)  Uid: ( 1001/CegghnnoR)   Gid: ( 1001/CegghnnoR)
Access: 2022-08-09 20:53:56.557336072 +0800
Modify: 2022-08-09 20:53:55.095342706 +0800
Change: 2022-08-09 20:53:55.095342706 +0800
 Birth: -
系统内部可以根据 mytest.c 和 mytest 的修改时间判断 mytest 是否是最新的:
如果 mytest 修改时间在 mytest.c 之后,那么就是最新的,反之则不是最新的,可以重新编译。
所以 .PHONY 修饰,本质上就是忽略对比最后修改时间,从而可以总是执行
下面是一个多文件的 makefile
hello:main.o test.o
    gcc -o hello main.o test.o
main.o:main.c
    gcc -c main.c
test.o:test.c
    gcc -c test.c -o test.o

.PHONY:clean
clean:
    rm -f *.o hello
Linux 小程序——进度条
- 缓冲区的理解
对于以下程序,hello world!并不会立马显示出来,而是先存在缓冲区中,等 sleep 完成再显示到屏幕上。因为我们的刷新策略是行刷新,只有遇到换行符、程序结束、缓冲区满才把数据显示到屏幕上。
  1 #include <stdio.h>
  2 #include <unistd.h>
  3 int main()
  4 {
  5     printf("hello world!");
  6     sleep(2);
  7     return 0;
  8 }
使用 fflush(stdout); 可以立马将缓冲区中的数据刷新到屏幕上
- 回车与换行的区别
-
回车表示将光标回到当前行的最开始
-
换行表示新起一行,光标垂直位置向下一格,水平位置不变。
我们平时用的 \n 其实就是回车+换行,\r 表示只回车
- 简单倒计时:
倒计时9秒
  1 #include <stdio.h>
  2 #include <unistd.h>
  3 int main()
  4 {
  5     int cnt = 9;
  6     while(cnt)
  7     {
  8         printf("%d\r", cnt--);
  9         fflush(stdout);
 10         sleep(1);
 11     }
 12
 13     return 0;
 14 }

- 进度条
  1 #include <stdio.h>
  2 #include <string.h>
  3 #include <unistd.h>
  4
  5 #define NUM 101
  6 #define STYLE '#'
  7
  8 void process()
  9 {
 10     char bar[NUM];
 11     memset(bar, '\0', sizeof(bar));
 12
 13     const char* lable = "|/-\\";	// 旋转光标
 14
 15     int cnt = 0;
 16     while (cnt <= 100)
 17     {
 18         printf("\033[47;30m%-100s\033[0m [%d%%] %c\r", bar, cnt, lable[cnt % 4]);	// 进度条白色背景黑色字
 19         fflush(stdout);	// 刷新
 20         bar[cnt++] = STYLE;
 21         usleep(100000);	// 睡眠100毫秒
 22     }
 23     printf("\n");
 24 }
 25
 26 int main()
 27 {
 28     process();
 29     return 0;
 30 }


 762
762


 被折叠的 条评论
为什么被折叠?
被折叠的 条评论
为什么被折叠?
 到【灌水乐园】发言


