


RHCE考试
全程需要在控制节点操作其他节点,需要使用指定用户操作,切记不可使用root用户做题,避免考试得零分。
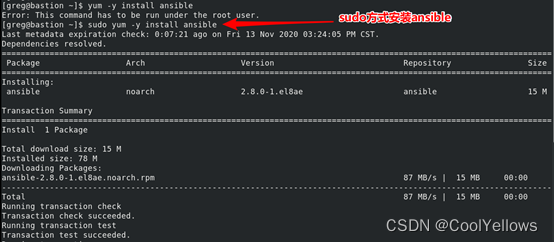
一、安装及配置 ansible

- yum -y install ansible #安装ansible
- ansible --version #查看ansible版本

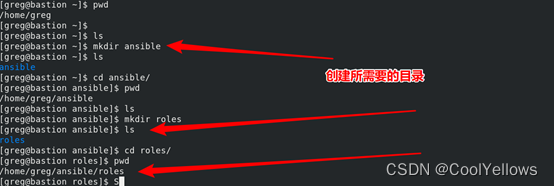
- mkdir /home/greg/ansible #创建ansible目录
- mkdir /home/greg/ansible/roles #创建roles目录
- vim inventory #修改inventory清单文件

- ansible-inventory -i inventory --graph #验证清单文件


- cp /etc/ansible/ansible.cfg /home/greg/ansible/ansible.cfg #创建ansible配置文件
![]()
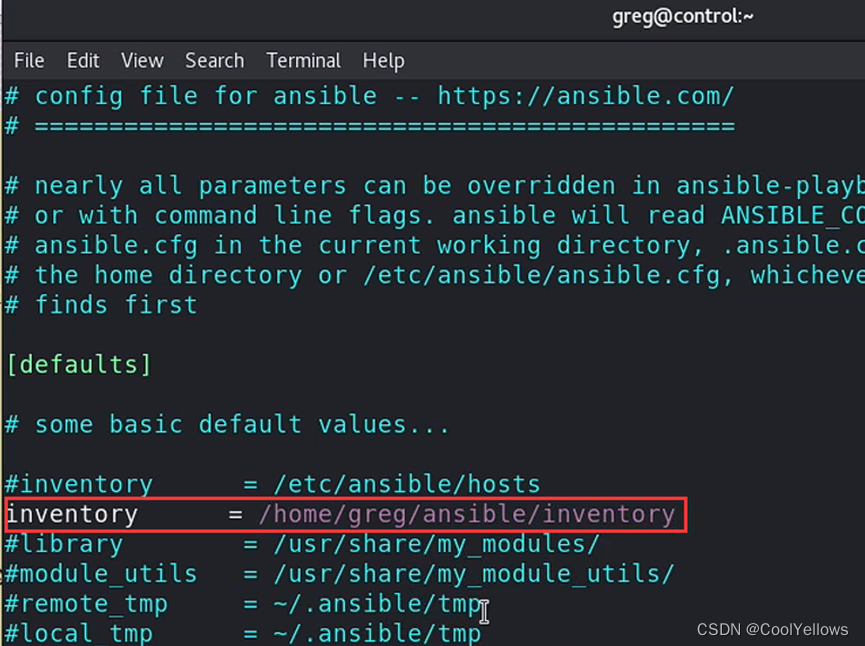
- vi ansible.cfg
[defaults]
inventory = /home/greg/ansible/inventory
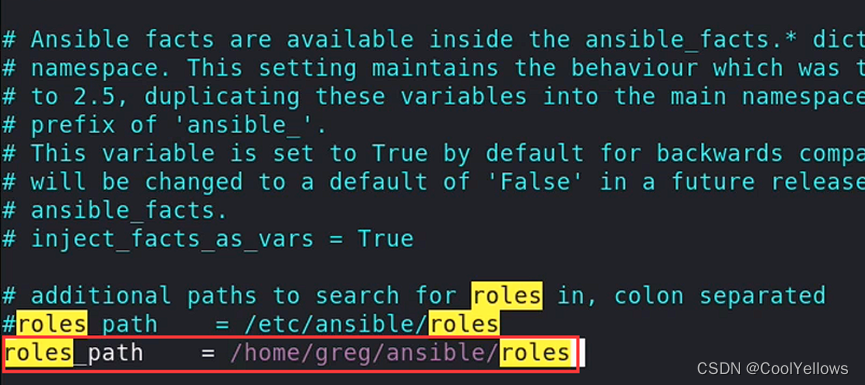
roles_path = /home/greg/ansible/roles
host_key_checking = False
remote_user = greg
[privilege_escalation] #查找privi,然后按n往下翻,将注释打开 become=True become_method=sudo
become_user=root
become_ask_pass=False

二、创建并运行 ansible ad-hoc 命令
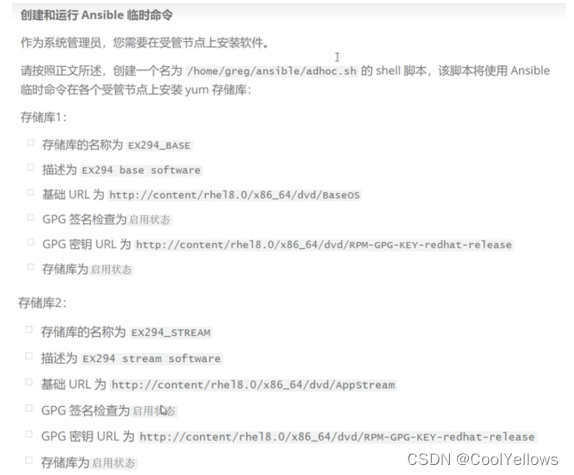
- vi /home/grep/ansible/adhoc.sh #编辑adhoc.sh文件
![]()
- ansible-doc -l |grep yum #查看ansible帮助

- ansible-doc yum_repository #查看具体yun_repository模块帮助

#!/bin/bash
ansible all -m yum_repository -a "file=EX294_BASE name='EX294_BASE' description=‘EX294 base software’ baseurl='http://foundation0.ilt.example.com/dvd/BaseOS' gpgcheck=yes gpgkey='http://foundation0.ilt.example.com/dvd/RPM-GPGKEY-redhat-release' enabled=yes"
ansible all -m yum_repository -a "file=EX294_STREAM name='EX294_STREAM' description=‘EX294 stream software’ baseurl='http://foundation0.ilt.example.com/dvd/AppStream' gpgcheck=yes gpgkey='http://foundation0.ilt.example.com/dvd/RPM-GPGKEY-redhat-release' enabled=yes"

- chmod +x adhoc.sh #添加执行权限


- ansible all -a 'yum repolist' #验证all受控节点yum仓库

- ansible all -a 'yum -y install lftp' #临时命令安装lftp

- ansible all -a 'rpm -q lftp' #查看是否安装成功

三、安装软件包

- vim /home/grep/ansible/packages.yml #编辑剧本文件

- ansible-doc yum #查看帮助


---
- name: install php and mariadb
hosts: dev,test,prod
tasks:
- name: install php and mariadb
yum:
name: php,mariadb
state: present
- name: install groups
hosts: dev
tasks:
- name: install dev tools
yum:
name: '@RPM Development Tools'
state: present
- name: install update all
yum:
name: '*'
state: latest

- ansible-playbook --syntax-check packages.yml #检测剧本是否有错
- ansible-playbook packages.yml #运行剧本


- ansible test -a 'rpm -q php' #验证一下php是否安装

- ansible dev -a ‘yum grouplist’ #验证一下软件包组是否安装

四、使用RHEL系统角色

- yum search roles #搜索roles安装包
- yum install rhel-system-roles.noarch #安装roles

- ansible-galaxy list #检测系统角色
- rpm -ql rhel-system-roles-1.0-5.el8.noarch #寻找系统角色安装的路径和产生的文件

- vi /home/grep/ansible/ansible.cfg
- :/usr/share/ansible/roles


- rpm -ql rhel-system-roles-1.0-5.el8.noarch |grep example #查询系统时间角色案例

- cp /usr/share/doc/rhel-system-roles/timesync/example-timesync-playbook.yml /home/greg/ansible/timesync.yml #复制案例修改名字

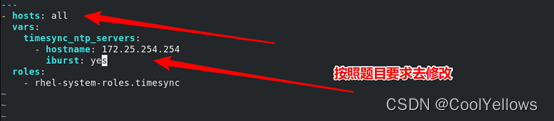
- vi timesync.yml #按题目要求修改
---
- hosts: all
vars:
timesync_ntp_servers:
- hostname: 172.25.254.254
iburst: yes
roles:
- rhel-system-roles.timesync
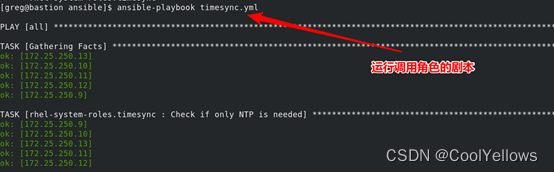
- ansible-playbook timesync.yml #运行调用角色脚本
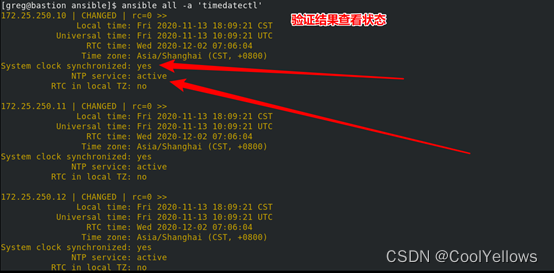
- ansible all -a 'timedatectl' #验证结果
五、使用 Ansible Galaxy 安装角色

- vim /home/greg/ansible/roles/requirements.yml #编辑requirements.yml文件

---
- src: http://materials/haproxy.tar
name: balancer
- src: http://materials/phpinfo.tar
name: phpinfo

- ansible-galaxy install -r /home/greg/ansible/roles/requirements.yml #安装requirements.yml文件

- tree balancer/ #验证结果


六、创建和使用角色

- ansible-galaxy --help #查看帮助信息
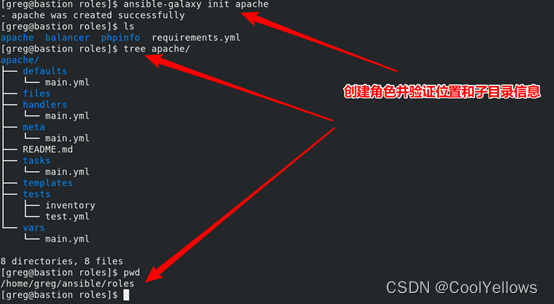
- ansible-galaxy init apache #创建Apache角色
- tree apache #验证位置和子目录信息
- vim apache/tasks/main.yml #编写角色任务
![]()
- ansible-doc yum #查看yum模块帮助
- ansible-doc service #查看service模块帮助
- ansible-doc firewalld #查看firewalld模块帮助
- ansible-doc template #查看template模块帮助
---
# tasks file for apache
- name: install the latest version of Apache
yum:
name: httpd
state: latest
- name: Start service httpd, if not started
service:
name: httpd
state: started
enabled: yes
- name: Start service firewalld
service:
name: firewalld
state: started
enabled: yes
- firewalld:
service: http
permanent: yes
state: enabled
immediate: yes
- name: User firewalld http
firewalld:
service: http
permanent: yes
immediate: yes
state: enabled
- name: Template a file to index.html.j2
template:
src: index.html.j2
dest: /var/www/html/index.html
setype: httpd_sys_content_t

- vim /home/greg/ansible/roles/apache/templates/index.html.j2

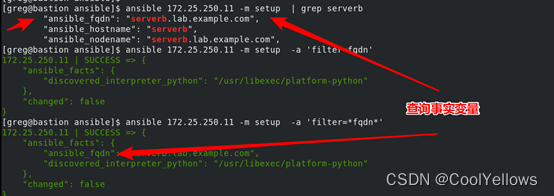
- ansible 172.25.250.11 -m setup |grep serverb #查询主机对应事实变量
- ansible 172.25.250.11 -m setup -a 'filter=*fqdn*' #查询主机对应事实变量
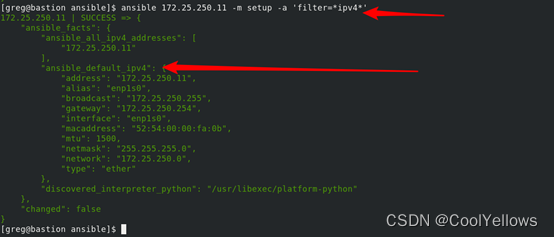
- ansible 172.25.250.11 -m setup -a 'filter=*ipv4*' #查询IP地址对应事实变量
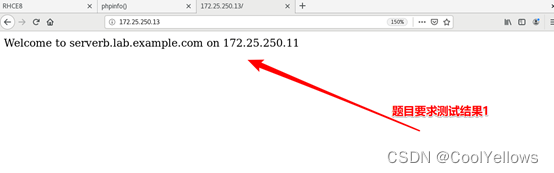
- cat index.html.j2
Welcome to {{ ansible_fqdn}} on {{ansible_default_ipv4.address }} #设置变量,加空格,加空格
![]()
七、从Ansible Galaxy使用角色
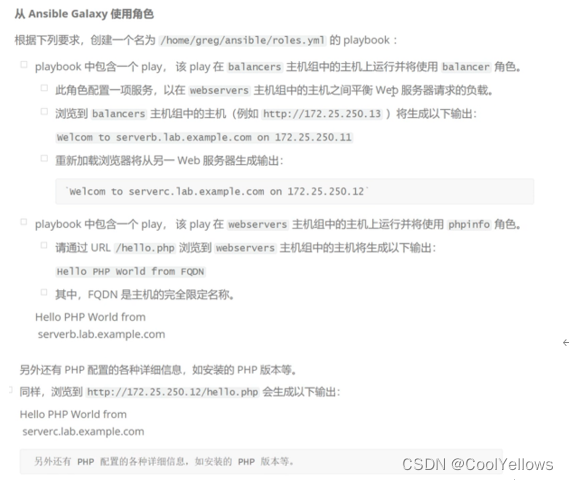
- vi /home/greg/ansible/roles.yml #写roles.yml剧本
![]()
---
- name: use apache
hosts: webservers
roles:
- apache
- name: use role balancers
hosts: balancers
roles:
- balancer
- name: use phpinfo
hosts: webservers
roles:
- phpinfo

- ansible-playbook --syntax-check roles.yml #检测错误
- ansible-playbook roles.yml #运行剧本

- 测试


八、创建和使用逻辑卷
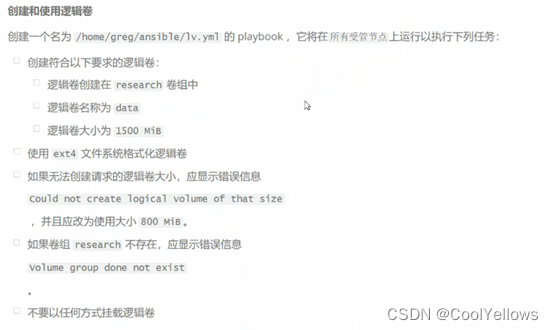
block: 定义要运行的主要任务
rescue: 定义要在block子句中,定义的任务失败时运行的任务
always:定义始终都独立运行的任务,不论block和rescue字句中定义额任务是否成功还是失败
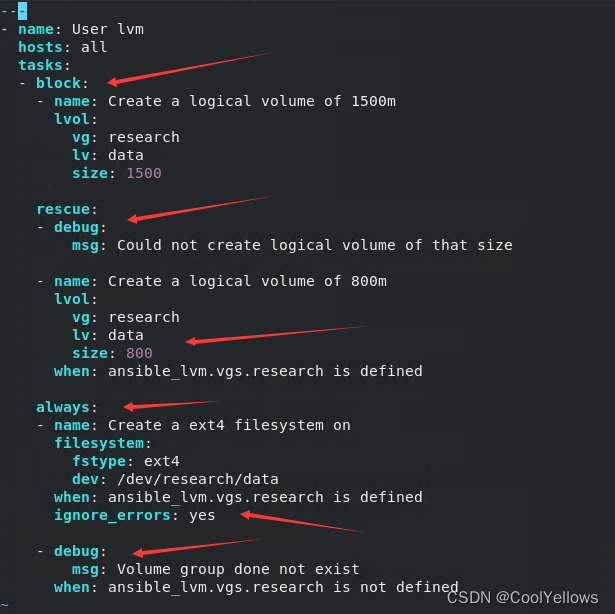
- vim /home/greg/ansible/lv.yml #编辑剧本
![]()
- ansile-doc -lgrep -I lvm #查询lvm模块

- ansile-doc lvol #lvol模块,创建、删除或调整逻辑卷的大小

- ansile-doc filesystem #filesystem模块,格式化文件系统

- ansible-doc mount #mount模块,管理被控端设备挂载
- ansile-doc debug #debug模块,用于在调试中输出信息

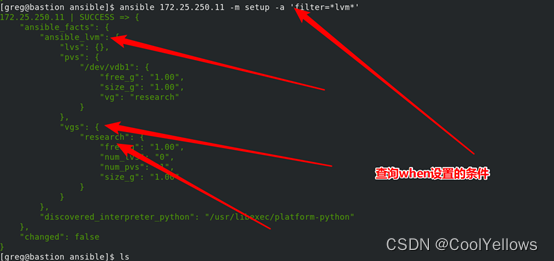
- ansible node3 -m setup -a “filter=*lvm*” #查询lvm对应的变量
- ansible-doc stat #stat模块,检索文件或文件系统状态,查询when设置案例

---
- name: User create lvm
hosts: all
tasks:
- block: #定义要运行的主要任务
- name: Create a logical volume of 1500M
lvol:
vg: research #卷组名
lv: data #逻辑卷名称
size: 1500 #逻辑卷大小
- name: Create a ext4 filesystem
filesystem:
fstype: ext4 #文件格式
dev: /dev/research/data #卷组路径
rescue: #定义要在block子句中定义的任务,失败时运行的任务
- debug:
msg: Could not create logical volume of that size #报错信息
- name: Create a logical volume of 800M
lvol:
vg: research
lv: data
size: 800
when: ansible_lvm.vgs.research is defined #条件表示卷组存在且定义,注意条件格式
ignore_errors: yes
- debug:
msg: Volume group done not exist #报错信息
when: ansible_lvm.vgs.research is not defined #条件表示卷组不存在,注意条件格式


- ansible-playbook --syntax-check /home/ansible/lv.yml #检测语法
- ansible-playbook /home/ansible/lv.yml #运行剧本

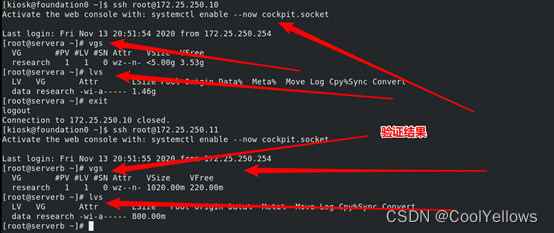
九、生成主机文件
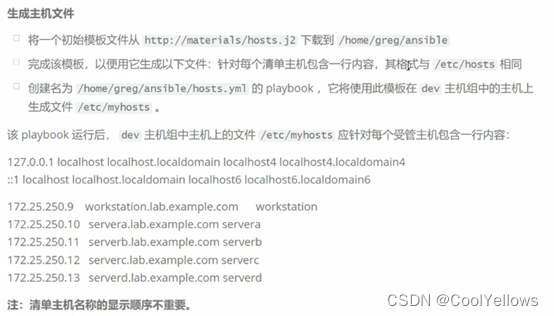
- wget http://http://materials/hosts.j2 -P /home/greg/ansible #下载hosts.j2文件

- vi /home/greg/ansible/hosts.j2 #编辑剧本
![]()
{% for host in groups['all'] %}
{{ hostvars[host]['ansible_facts']['default_ipv4']['address'] }} {{ hostvars[host]['ansible_facts']['fqdn'] }} {{ hostvars[host]['ansible_facts']['hostname'] }}
{% endfor %} #注意空格和分号以及格式

- ansible-doc template #查询template模块
---
- name: get host file
hosts: all
tasks:
- name: Template a file
template:
src: /home/greg/ansible/hosts.j2
dest: /etc/myhosts
when: "'dev' in group_names" #设置条件,只在dev组执行
when: "inventory_hostname in groups.dev" #设置条件,只在dev组执

- ansible-playbook hosts.yml #执行剧本


- cat /etc/myhosts #登录主机172.25.2250.9验证结果
十、修改文件内容

- ansible-inventory --graph #查看对应的主机组

- cat /etc/issue #查看原始文件

- vim /home/greg/ansible/issue.yml #编辑剧本
![]()
- ansible-doc copy #copy模块,查询模块使用模板

---
- name: User issue
hosts: all
tasks:
- name: copy using inline dev
copy:
content: 'Development'
dest: /etc/issue
when: "'dev' in group_names" # 设置条件,只在dev组执行
when: "inventory_hostname in groups.dev" #设置条件,只在dev组执行
- name: copy using inline test
copy:
content: 'Test'
dest: /etc/issue
when: "'test' in group_names" #设置条件,只在test组执行
when: "inventory_hostname in groups.test" #设置条件,只在test组执行
- name: copy using inline prod
copy:
content: 'Production'
dest: /etc/issue
when: "'prod' in group_names" #设置条件,只在prod组执行
when: "inventory_hostname in groups.prod" #设置条件,只在prod组执行

- ansible-play --syntax-check issue.yml #验证剧本
- ansible-play issue.yml #执行剧本

- ansible all -a "cat /etc/issue" #验证结果

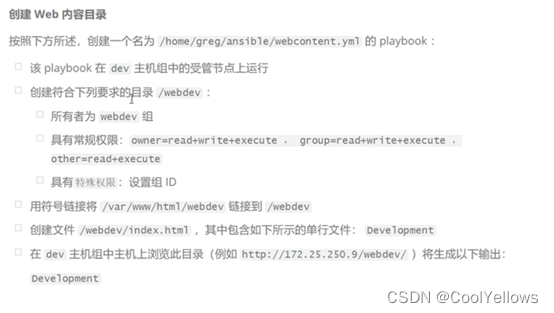
十一、创建Web内容目录
- Ansible -dev -a "rpm -q httpd" #验证dev组中http软件和服务是否安装、开启

- ansible-doc file #file模块,文件操作模块查看帮助

- ansible-doc copy #copy模块,查询帮助和模板

- ll -lZ /var/www/ #查看目录上下级类型,并设置相同的上下级类型httpd_sys_content_t

- vim /home/greg/ansible/webcontent.yml #编辑剧本
![]()
---
- name: User httpd
hosts: dev
roles: #调用roles角色,apache服务
- apache
tasks:
- name: Create a directory
file:
path: /webdev
state: directory
mode: '2775' #设置目录属组、属主、其他权限,注意权限不要写错
group: webdev
- name: Create a symbolic link
file:
src: /webdev
dest: /var/www/html/webdev
state: link
- name: Copy using inline content
copy:
content: 'Development'
dest: /webdev/index.html
setype: httpd_sys_content_t

- ansible-play --syntax-check webcontent.yml #验证剧本
- ansible-play webcontent.yml #执行剧本


十二、生成硬件报告

- ansible-doc get_url #get_url模块,下载文件

- ansible-doc lineinfile #lineinfile模块,增加或修改文件内容

- ansible 172.25.250.9 -m setup -a "filter=*mem*" #查询内存收集事实变量

- ansible 172.25.250.9 -m setup -a "filter=*bios*" #查询bios,事实变量
- ansible 172.25.250.9 -m setup -a "filter=*dev*" #查询硬盘,事实变量

---
- name: User hwreport
hosts: all
tasks:
- name: Download hwreport.txt
get_url:
url: http://materials/hwreport.empty
dest: /root/hwreport.txt
- name: Esure host
lineinfile:
path: /root/hwreport.txt
regexp: '^HOST='
line: HOST={{ inventory_hostname | default('NONE',true) }}
- name: Esure MEMORY
lineinfile:
path: /root/hwreport.txt
regexp: '^MEMORY='
line: MEMORY={{ ansible_memtotal_mb | default('NONE',true) }}
- name: Esure BIOS
lineinfile:
path: /root/hwreport.txt
regexp: '^BIOS='
line: BIOS={{ ansible_bios_version | default('NONE',true) }}
- name: Esure VDA
lineinfile:
path: /root/hwreport.txt
regexp: '^DISK_SIZE_VDA='
line: DISK_SIZE_VDA={{ ansible_devices.vda.size | default('NONE',true) }}
- name: Esure VDB
lineinfile:
path: /root/hwreport.txt
regexp: '^DISK_SIZE_VDB='
line: DISK_SIZE_VDB={{ ansible_devices.vdb.size | default('NONE',true) }}

- ansible-playbook --syntax-check hwreport.yml #验证剧本
- ansible-playbook hwreport.yml #执行剧本

- ansible all -a "cat /root/hwreport.txt" #验证结果

十三、创建密码库

- vim /home/greg/ansible/locker.yml #编辑存储库
![]()
![]()
- pw_developer: Imadev
- pw_manager: Imamgr #注意不要忘记冒号后面空格,

- ansible-vault --help #查看帮助信息

- ansible-vault encrypt locker.yml #加密文件
![]()
![]()

- ansible-vault view locker.yml #验证结果

十四、创建用户账户

- wget http://materials/user_list.yml -P /home/greg/ansible #下载文件
- cat user_list.yml #验证查看内容

- vim ansible.cfg #编辑配置文件
![]()
- vault_password_file = /home/greg/ansible/secret.txt #修改存放密码的文件位置

- ansible-doc user #user模块,查看帮助信息


- ansible-doc group #group模块,查看帮助信息


---
- name: Touch user
hosts: dev,test
vars_files:
- /home/greg/ansible/user_list.yml
- /home/greg/ansible/locker.yml
tasks:
- name: Ensuer group
group:
name: devops
state: present
- name: Add the user
user:
name: "{{ item.name }}" #注意变量格式,双引号、括号、空格不可少
password: "{{ pw_developer | password_hash('sha512') }}" #注意变量格式,双引号、括号、空格不可少
groups: devops
append: yes
loop: "{{ users }}" #注意双引号不可少
when: item.job == 'developer' #注意单引号不可少
- name: Touch user1
hosts: prod
vars_files:
- /home/greg/ansible/user_list.yml
- /home/greg/ansible/locker.yml
tasks:
- name: Ensuer group1
group:
name: opsmgr
state: present
- name: Add the user1
user:
name: "{{ item.name }}"
password: "{{ pw_manager | password_hash('sha512') }}"
groups: opsmgr
append: yes
loop: "{{ users }}"
when: item.job == 'manager'

- ansible-playbook --syntax-check users.yml #验证剧本
- ansible-playbook users.yml #执行剧本


十五、更新Ansible库秘钥

- wget http://materials/salaries.yml -P /home/greg/asnible #下载文件到指定目录

- ansible-vault --help #查看帮助信息

- ansible-vault rekey salaries.yml #更新密码库

- ansible-vault view salaries.yml #验证结果

十六、安装RHEL角色(随机题)
安装RHEL角色,并使用SeLinux角色,要求在所有节点运行,配置该角色,配置被管理节点的selinux为enforcing
- yum search roles #搜索roles安装包
- yum install rhel-system-roles.noarch #安装roles

- ansible-galaxy list #检测系统角色
- rpm -ql rhel-system-roles-1.0-5.el8.noarch #寻找系统角色安装的路径和产生的文件

- vi /home/grep/ansible/ansible.cfg
- :/usr/share/ansible/roles


- rpm -ql rhel-system-roles-1.0-5.el8.noarch |grep selinux #查询selinux角色案例

- cp -a /user/share/ansible/roles/rhel-system-roles.selinux /home/greg/ansible/roles/selinux #复制模板角色到roles目录

- cp /usr/share/doc/rhel-system-roles/selinux/example-selinux-playbook.yml /home/greg/ansible/selinux.yml #复制模板示例文件到ansible目录
- vim /home/greg/ansible/selinux.yml #修改selinux角色剧本

---
- hosts: all
become: true
become_method: sudo
become_user: root
vars:
selinux_policy: targeted
selinux_state: enforcing
# prepare prerequisites which are used in this playbook
tasks:
- name: Creates directory
file:
path: /tmp/test_dir
state: directory
- name: Add a Linux System Roles SELinux User
user:
comment: Linux System Roles SELinux User
name: sar-user
- name: execute the role and catch errors
block:
- include_role:
#name: rhel-system-roles.selinux
name: selinux #修改对应的角色名称
rescue:
# Fail if failed for a different reason than selinux_reboot_required.
- name: handle errors
fail:
msg: "role failed"
when: not selinux_reboot_required
- name: restart managed host
shell: sleep 2 && shutdown -r now "Ansible updates triggered"
async: 1
poll: 0
ignore_errors: true
- name: wait for managed host to come back
wait_for_connection:
delay: 10
timeout: 300
- name: reapply the role
include_role:
#name: rhel-system-roles.selinux
name: selinux #修改对应的角色名称

十七、创建到期用户账户有效期30天(随机题)
创建用户账户,账户jack,新增设置密码有效期为30天。账户jony,新增设置相应的ID1111,用户有效期到2022-01-20
- ansible-doc user #user模块,管理用户操作
![]()
- ansible-doc shell #shell模块,执行对应指令
![]()
- date -d 2022-01-20 +%s #有效期查询
![]()
- vim /home/greg/ansible/create_user.yml #创建剧本
![]()
---
- name: Create users
hosts: all
vars:
- users:
- name: jack
- name: jony #创建需要的用户
tasks:
- name: Add the user
user:
name: "{{ item.name }}" #引用用户名
password: "{{ 'redhat' | password_hash('sha512') }}" #设置密码
loop: "{{ users }}" #循环
- name: Password expired jack
shell: chage -M 30 "{{ item.name }}" #设置密码到期时间,30天
loop: "{{ users }}"
when: item.name == 'jack'
- name: Added a expire jony
user:
name: "{{ item.name }}"
uid: 1111 #设置用户uid
expires: 1692489600 #设置用户到期时间 ,date -d 2023-08-20
loop: "{{ users }}"
when: item.name == 'jony'

十八、使用crontab模块(随机题)
用户jack每三个月的每周日晚上22点39分查看一次自身用户登录情况
- ansible-crond #cron模块,计划任务,相当于crontab命令

- vim /home/greg/ansible/crontab.yml #创建剧本

---
- hosts: all
tasks:
- name: create a cron file under /etc/cron.d
cron:
name: Lgin time
minute: "39" #分
hour: "22" #时
day: "" #日
month: "*/3" #月
weekday: "0" #周 每周日
user: jack #指定用户
job: " last " #执行内容

- ansible dev -a 'crontab -l' #验证剧本是否生效

十九、创建新的磁盘分区(随机题)
在balancers主机上,划分新的partition ,/dev/vdd,编号1,大小1500m,格式化成ext4 ,mount到/newpart1目录,如果空间不够,分800m,如果没有vdd,报错
- ansible-doc file #file模块,文件相关操作

- ansible-doc parted #parted模块,硬盘分区和调整

- ansible-doc filesystem #filesystem模块,格式化文件系统

- ansible-doc mount #mount模块,挂载操作

- ansible-doc debug #debug模块,用于在调试中输出信息

- vim /home/greg/ansible/parted.yml #创建剧本
![]()
---
- name: User parted
hosts: balancers,dev
tasks:
- name: Create a directory if it does not exist
file:
path: /newpart1
state: directory #创建newpart1目录
- block:
- name: Create a new primary partition with a size of 1500MiB
parted:
device: /dev/vdb
number: 1
state: present
part_end: 1500MiB #创建分区
- name: Create a ext4 filesystem
filesystem:
fstype: ext4
dev: /dev/vdb1 #格式化分区
- name: Mount and bind a volume
mount:
path: /newpart
src: /dev/vdb1
state: mounted
fstype: ext4 #挂载分区
rescue:
- debug:
msg: Could not create partation of that size
- name: Create a new primary partition with a size of 800MiB
parted:
device: /dev/vdb
number: 1
state: present
part_end: 800MiB
when: ansible_facts.devices.vdb is defined
- name: Create a ext4 filesystem
filesystem:
fstype: ext4
dev: /dev/vdb1
when: ansible_facts.devices.vdb is defined
- name: Mount and bind a volume
mount:
path: /newpart
src: /dev/vdb1
state: mounted
fstype: ext4
when: ansible_facts.devices.vdb is defined
ignore_errors: yes
- debug:
msg: Disk does not exist
when: ansible_facts.devices.vdb is not defined


 6045
6045


 被折叠的 条评论
为什么被折叠?
被折叠的 条评论
为什么被折叠?
 到【灌水乐园】发言


