


HTML5 实现本地图片裁剪
文章目录
这次小的案例是利用 HTML5 的 canvas 技术,结合 HTML5 的 File API 来实现图片的本地裁剪,从一个大图片中选取裁剪区域,
1.知识点
- canvas
- JavaScript
代码1的目录如下
创建下面的目录结构:
imgcut
  |__index.html
  |__main.js
然后在该目录下下载实验需要用到的图片:
https://labfile.oss.aliyuncs.com/courses/363/aviary_heibai.jpg
可以自行去下载
1.HTML 结构与 CSS 样式
我们在 index.html 中写下下面的代码:
<!DOCTYPE html>
<html>
  <head>
    <title>HTML5 Crop Image</title>
  </head>
  <style type="text/css">
    body {
      text-align: center;
    }
    #label {
      border: 1px solid #ccc;
      background-color: #fff;
      text-align: center;
      height: 300px;
      width: 300px;
      margin: 20px auto;
      position: relative;
    }
    #get_image {
      position: absolute;
    }
    #edit_pic {
      position: absolute;
      display: none;
      background: #000;
    }
    #cover_box {
      position: absolute;
      z-index: 9999;
      display: none;
      top: 0px;
      left: 0px;
    }
    #show_edit {
      margin: 0 auto;
      display: inline-block;
    }
    #show_pic {
      height: 100px;
      width: 100px;
      border: 2px solid #000;
      overflow: hidden;
      margin: 0 auto;
      display: inline-block;
    }
  </style>
  <body>
    <input type="file" name="file" id="post_file" />
    <button id="save_button">SAVE</button>
    <div id="label">
      <canvas id="get_image"></canvas>
      <p>
        <canvas id="cover_box"></canvas>
        <canvas id="edit_pic"></canvas>
      </p>
    </div>
    <p>
      <span id="show_edit"></span>
      <span id="show_pic"><img src="" /></span>
    </p>
    <script type="text/javascript" src="main.js"></script>
  </body>
</html>
以上的三个 <canvas> 标签都是用来处理跟图片相关的内容的,详细的处理会在后续的 js 代码中给出。而 id 为 show_edit 和 id 为 show_pic 这两个是为了图片的预览和查看最后的图片生成结果。做完 html 和 css 的布局之后,我们就可以进入 js 代码,实现本节课的图片裁剪功能。
2.初始化
var postFile = {
  init: function () {
    var t = this;
    t.regional = document.getElementById('label');
    t.getImage = document.getElementById('get_image');
    t.editPic = document.getElementById('edit_pic');
    t.editBox = document.getElementById('cover_box');
    t.px = 0; //background image x
    t.py = 0; //background image y
    t.sx = 15; //crop area x
    t.sy = 15; //crop area y
    t.sHeight = 150; //crop area height
    t.sWidth = 150; //crop area width
    document
      .getElementById('post_file')
      .addEventListener('change', t.handleFiles, false);
  },
};
这样子,我们就实现了初始化
我们所有的函数和变量都是封装在postFile这个对象里面的,上面的 init 函数主要是设置一些初始值。
t.px = 0;
t.py = 0;
t.sx = 15;
t.sy = 15;
t.sHeight = 100;
t.sWidth = 100;
以上的t.px, t.py分别表示在实时预览区域的背景图片的坐标;t.sx,t.sy, t.sHeight, t.sWidth分别表示图片的横纵坐标和宽高。
并且我们通过document.getElementById获取了多个稍后需要操作的元素,注意到:
document
  .getElementById('post_file')
  .addEventListener('change', t.handleFiles, false);
我们通过监听id为post_file的input表单的change事件来处理用户上传的文件,在这我们交给了handleFiles函数来处理,所以下面我们就来实现handleFiles函数。
3 实现 handleFiles,获取文件,读取文件并生成 url
 handleFiles: function() {
        var fileList = this.files[0];
        var oFReader = new FileReader();
        oFReader.readAsDataURL(fileList);
        oFReader.onload = function (oFREvent) {
            postFile.paintImage(oFREvent.target.result);
        };
    },
上面这几行代码就可以基本实现handleFiles的处理功能,我们在这里就使用了 HTML5 的 File API,首先通过new FileReader()来实例化一个 FileReader 对象oFReader,再调用其readAsDataURL()方法将文件的内容读取出来并处理成 base64 编码的格式。
最后,当文件读取完毕并完成加载的时候,我们通过 postFile.paintImage(oFREvent.target.result)处理我们读取到的图片,说白了就是将读取到的图片数据重新绘画到浏览器上。
关于oFREvent究竟是什么东西,你可以通过 console.log(oFREvent)来查看。你还可以查看这里的链接来获取更多的 FileReader 的知识:
https://developer.mozilla.org/zh-CN/docs/Web/API/FileReader
4.实现 paintImage 方法
 paintImage: function(url) {
        var t = this;
        var createCanvas = t.getImage.getContext("2d");
        var img = new Image();
        img.src = url;
        img.onload = function(){

            if ( img.width < t.regional.offsetWidth && img.height < t.regional.offsetHeight) {
                t.imgWidth = img.width;
                t.imgHeight = img.height;

            } else {
                var pWidth = img.width / (img.height / t.regional.offsetHeight);
                var pHeight = img.height / (img.width / t.regional.offsetWidth);
                t.imgWidth = img.width > img.height ? t.regional.offsetWidth : pWidth;
                t.imgHeight = img.height > img.width ? t.regional.offsetHeight : pHeight;
            }
            t.px = (t.regional.offsetWidth - t.imgWidth) / 2 + 'px';
            t.py = (t.regional.offsetHeight - t.imgHeight) / 2 + 'px';

            t.getImage.height = t.imgHeight;
            t.getImage.width = t.imgWidth;
            t.getImage.style.left = t.px;
            t.getImage.style.top = t.py;

            createCanvas.drawImage(img,0,0,t.imgWidth,t.imgHeight);
            t.imgUrl = t.getImage.toDataURL();
            t.cutImage();
            t.drag();
        };
    },
以上最重要的就是根据容器的大小使用 canvas 绘制图片。在上一步使用 File API 的 FileReader 已经得到了需要上传图片的地址了(oFREvent.target.result 这个值),接下来需要使用 canvas 把这个图片绘制出来。我们首先使用到 getImage.getContext 来获取<canvas id="get_image"></canvas>的 2d 内容,简单理解就是图像内容,然后利用 new Image()来得到一个<img>标签,设置 src 属性的值,如果你 console.log(img),得到的大概是这样的结果:
<img src="images/background.png" />
在img.onload函数里,我们的主要目的是为了将图片按照原大小等比例地重画出来,所以才有 if 条件判断,最后我们通过createCanvas.drawImage(img,0,0,t.imgWidth,t.imgHeight);这一行代码来实现真正的绘画图片,效果大概是这样的:
这里为什么不直接插入img而用canvas重新绘制呢,这不是多此一举了吗?其实不然。如果用img直接插入页面,就无法自适应居中了,如果使用canvas绘制图片,不但能使图片自适应居中以及能等比例缩放,并且方便把图片的坐标,尺寸大小传给后来的遮罩层(id为label的 div),这样能根据图片的坐标以及图片的尺寸大小来绘制遮罩层。
如果你对drawImage()有任何疑问,点击下面的链接进行详细的了解:
https://developer.mozilla.org/zh-CN/docs/Web/API/CanvasRenderingContext2D/drawImage
到这里,前期的一小半工作其实已经完成了。我们按照上面的思路,接下来就把cutImage和drag这两个方法实现就可以了。
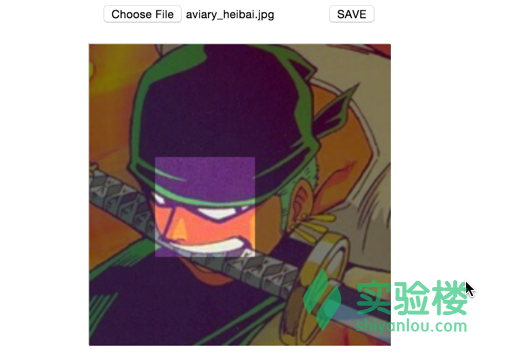
5 实现 cutImage 方法
在上一张图片中,我们其实很清楚地看到了两个明暗不一的层,这是因为我们根据背景图的坐标和尺寸来绘制遮罩层覆盖在背景上面,并且使用 canvas 的clearRect方法清空出一块裁剪区域,使之与不裁剪的地方做明暗对比,这样的目的一个是为了更好地看到对比,一个就是为了用户体验:
cutImage: function() {
    var t = this;

    t.editBox.height = t.imgHeight;
    t.editBox.width = t.imgWidth;
    t.editBox.style.display = 'block';
    t.editBox.style.left = t.px;
    t.editBox.style.top = t.py;

    var cover = t.editBox.getContext("2d");
    cover.fillStyle = "rgba(0, 0, 0, 0.5)";
    cover.fillRect (0,0, t.imgWidth, t.imgHeight);
    cover.clearRect(t.sx, t.sy, t.sHeight, t.sWidth);


    document.getElementById('show_edit').style.background = 'url(' + t.imgUrl + ')' + -t.sx + 'px ' + -t.sy + 'px no-repeat';
    document.getElementById('show_edit').style.height = t.sHeight + 'px';
    document.getElementById('show_edit').style.width = t.sWidth + 'px';
},
以上的cutImage方法主要是负责两个事情,一个是制造遮罩层,一个是利用 css 的background属性将选中的裁剪区域实时预览。
6 编写 drag 方法
在很多 web 应用中,使用截图上传头像功能时我们希望能裁剪到满意的图片,所以裁剪框就需要不停的变动才得以裁剪出完美的图片。前几步已经把裁剪图片的基本功能做出来了,所以现在需要做的就是裁剪框跟进鼠标的移动来实时裁剪图片
 drag: function() {
        var t = this;
        var draging = false;
        var startX = 0;
        var startY = 0;

        document.getElementById('cover_box').onmousemove = function(e) {


            var pageX = e.pageX - ( t.regional.offsetLeft + this.offsetLeft );
            var pageY = e.pageY - ( t.regional.offsetTop + this.offsetTop );

            if ( pageX > t.sx && pageX < t.sx + t.sWidth && pageY > t.sy && pageY < t.sy + t.sHeight ) {
                this.style.cursor = 'move';

                this.onmousedown = function(){
                    draging = true;

                    t.ex = t.sx;
                    t.ey = t.sy;


                    startX = e.pageX - ( t.regional.offsetLeft + this.offsetLeft );
                    startY = e.pageY - ( t.regional.offsetTop + this.offsetTop );

                }
                window.onmouseup = function() {
                    draging = false;
                }

                if (draging) {


                    if ( t.ex + (pageX - startX) < 0 ) {
                        t.sx = 0;
                    } else if ( t.ex + (pageX - startX) + t.sWidth > t.imgWidth) {
                        t.sx = t.imgWidth - t.sWidth;
                    } else {
                        t.sx = t.ex + (pageX - startX);
                    };

                    if (t.ey + (pageY - startY) < 0) {
                        t.sy = 0;
                    } else if ( t.ey + (pageY - startY) + t.sHeight > t.imgHeight ) {
                        t.sy = t.imgHeight - t.sHeight;
                    } else {
                        t.sy = t.ey + (pageY - startY);
                    }

                    t.cutImage();
                }
            } else{
                this.style.cursor = 'auto';
            }
        };
    }
这个方法你要理解以下几个主要的点:
var pageX = e.pageX - (t.regional.offsetLeft + this.offsetLeft);
var pageY = e.pageY - (t.regional.offsetTop + this.offsetTop);
我们通过上面两行代码来获取鼠标距离背景图片的距离,e.pageX 代表鼠标到浏览器左边缘的距离,t.regional.offsetLeft + this.offsetLeft 可以计算出图片到浏览器的左边边缘的距离。上边的距离同理可得。
if ( pageX > t.sx && pageX < t.sx + t.sWidth && pageY > t.sy && pageY < t.sy + t.sHeight )
在理解了鼠标距离背景图片的距离之后,这个应该很容易理解:就是判断鼠标是否在图片的区域内部。
t.ex = t.sx;
t.ey = t.sy;

startX = e.pageX - (t.regional.offsetLeft + this.offsetLeft);
startY = e.pageY - (t.regional.offsetTop + this.offsetTop);
这两段代码也是要拿出来说说的,头两行是为了记录上一次截图时候的坐标(没有上一次就是初始化的时候的坐标);后两行记录鼠标按下时候的坐标。你都可以通过console.log()来分别查看这几个值。
if (draging) {
  if (t.ex + (pageX - startX) < 0) {
    t.sx = 0;
  } else if (t.ex + (pageX - startX) + t.sWidth > t.imgWidth) {
    t.sx = t.imgWidth - t.sWidth;
  } else {
    t.sx = t.ex + (pageX - startX);
  }

  if (t.ey + (pageY - startY) < 0) {
    t.sy = 0;
  } else if (t.ey + (pageY - startY) + t.sHeight > t.imgHeight) {
    t.sy = t.imgHeight - t.sHeight;
  } else {
    t.sy = t.ey + (pageY - startY);
  }

  t.cutImage();
}
上面这一行代码就是说:如果是在拖动的情况下,我们需要根据坐标的变化来实时更新t.sx和t.sy的值,并且实时调用cutImage方法实现预览。
移动时裁剪区域的坐标 = 上次记录的定位 + (当前鼠标的位置 - 按下鼠标的位置)
7 保存截图
从一开始,我们就有一个save按钮在页面上,我们的目的就是在用户点击 save 按钮的时候,将裁剪出来的图片保存到预览右边的方框内,预览框并不是真正的截图,鼠标右键点击是不能保存的,点击 Save 后产生的图片才是可以保存的。于是,我们在 init 方法里面添加下面的代码:
document.getElementById('save_button').onclick = function () {
  t.editPic.height = t.sHeight;
  t.editPic.width = t.sWidth;
  var ctx = t.editPic.getContext('2d');
  var images = new Image();
  images.src = t.imgUrl;

  images.onload = function () {
    ctx.drawImage(
      images,
      t.sx,
      t.sy,
      t.sHeight,
      t.sWidth,
      0,
      0,
      t.sHeight,
      t.sWidth
    );
    document
      .getElementById('show_pic')
      .getElementsByTagName('img')[0].src = t.editPic.toDataURL();
  };
};
跟实现paintImage方法类似,首先监听 save 按钮的点击事件,然后我们将选中区域的图片利用drawImage方法绘制出来,最后利用toDataURL方法转换成 base64 编码格式,并将该值赋予show_pic下img的src属性,这样就完成了图片的裁剪保存。
8 js部分 代码
var postFile = {
  init: function () {
    var t = this;
    t.regional = document.getElementById('label');
    t.getImage = document.getElementById('get_image');
    t.editPic = document.getElementById('edit_pic');
    t.editBox = document.getElementById('cover_box');
    t.px = 0; //background image x
    t.py = 0; //background image y
    t.sx = 15; //crop area x
    t.sy = 15; //crop area y
    t.sHeight = 100; //crop area height
    t.sWidth = 100; //crop area width
    document
      .getElementById('post_file')
      .addEventListener('change', t.handleFiles, false);

    document.getElementById('save_button').onclick = function () {
      t.editPic.height = t.sHeight;
      t.editPic.width = t.sWidth;
      var ctx = t.editPic.getContext('2d');
      var images = new Image();
      images.src = t.imgUrl;

      images.onload = function () {
        ctx.drawImage(
          images,
          t.sx,
          t.sy,
          t.sHeight,
          t.sWidth,
          0,
          0,
          t.sHeight,
          t.sWidth
        );
        document
          .getElementById('show_pic')
          .getElementsByTagName('img')[0].src = t.editPic.toDataURL();
      };
    };
  },

  handleFiles: function () {
    var fileList = this.files[0];
    var oFReader = new FileReader();
    oFReader.readAsDataURL(fileList);
    oFReader.onload = function (oFREvent) {
      postFile.paintImage(oFREvent.target.result);
    };
  },

  paintImage: function (url) {
    var t = this;
    var createCanvas = t.getImage.getContext('2d');
    var img = new Image();
    img.src = url;
    img.onload = function () {
      if (
        img.width < t.regional.offsetWidth &&
        img.height < t.regional.offsetHeight
      ) {
        t.imgWidth = img.width;
        t.imgHeight = img.height;
      } else {
        var pWidth = img.width / (img.height / t.regional.offsetHeight);
        var pHeight = img.height / (img.width / t.regional.offsetWidth);
        t.imgWidth = img.width > img.height ? t.regional.offsetWidth : pWidth;
        t.imgHeight =
          img.height > img.width ? t.regional.offsetHeight : pHeight;
      }
      t.px = (t.regional.offsetWidth - t.imgWidth) / 2 + 'px';
      t.py = (t.regional.offsetHeight - t.imgHeight) / 2 + 'px';

      t.getImage.height = t.imgHeight;
      t.getImage.width = t.imgWidth;
      t.getImage.style.left = t.px;
      t.getImage.style.top = t.py;

      createCanvas.drawImage(img, 0, 0, t.imgWidth, t.imgHeight);
      t.imgUrl = t.getImage.toDataURL();
      t.cutImage();
      t.drag();
    };
  },


postFile.init();
源码:https://download.csdn.net/download/Deng872347348/85301441


 544
544


 被折叠的 条评论
为什么被折叠?
被折叠的 条评论
为什么被折叠?
 到【灌水乐园】发言


