


1 大模型部署面临的挑战
1.1 计算量巨大
大模型参数量巨大,前向推理时需要进行大量计算。20B模型每生成1个token,就要进行约406亿次浮点运算;照此计算,若生成128个token,就要进行5.2万亿次运算。20B算是大模型里的“小”模型了,若模型参数规模达到175B (GPT-3),Batch-Size (BS)再大一点,每次推理计算量将达到干万亿量级。以NVIDIA A100为例,单张理论FP16运算性能为每秒77.97 TFLOPS (77万亿),性能不足。
大模型前向推理所需计算量计算公式
C
f
o
r
w
a
r
d
=
2
N
+
2
n
l
a
y
e
r
n
c
t
x
d
a
t
t
n
C_{forward}=2N+2n_{layer}n_{ctx}d_{attn}
Cforward=2N+2nlayernctxdattn
其中
N
N
N为模型参数量,
n
l
a
y
e
r
n_{layer}
nlayer为模型层数,
n
c
t
x
n_{ctx}
nctx为上下文长度(默认1024),
d
a
t
t
n
d_{attn}
dattn为注意力输出维度(embedding向量维度),单位FLOPs per Token。

1.2 内存开销巨大
以FP16为例,20B模型仅加载参数就需40G+显存,175B模型 (如GPT-3) 更是需要350G+显存。大模型在推理过程中,为避免重复计算,会将计算注意力 (Attention) 得到的KV进行缓存。根据InternLM2技术报告提供的模型参数数据,以及KV Cache空间估算方法,以FP16为例,在batch-size为16、输入512 tokens、输出32 tokens的情境下,仅20B模型就会产生10.3GB的缓存。目前,以NVIDIA RTX 4060消费级显卡为例 (参考零售价¥2399),单卡显存仅有8GB;NVIDIA A100单卡显存仅有80GB。
KV Cache显存占用估算公式
M
k
v
c
a
c
h
e
=
4
b
n
l
a
y
e
r
d
a
t
t
n
(
s
+
n
)
M_{kvcache}=4bn_{layer}d_{attn}(s+n)
Mkvcache=4bnlayerdattn(s+n)
其中,
b
b
b为batch-size,
n
l
a
y
e
r
n_{layer}
nlayer为模型层数,
d
a
t
t
n
d_{attn}
dattn为注意力输出维度,
s
s
s为输入序列长度,
n
n
n为输出序列长度。单位:字节 (B)

1.3 访存瓶颈
大模型推理是“访存密集”型任务。目前硬件计算速度“远快于”显存带宽,存在严重的访存性能瓶颈。以RTX 4090推理175B大模型为例,BS为1时计算量为6.83 TFLOPS,远低于82.58 TFLOPS的FP16计算能力;但访存量为32.62 TB,是显存带宽每秒处理能力的30倍。
动态请求:请求量不确定、请求时间不确定;Token逐个生成,生成数量不确定(生成语句长度不确定,短的需要等待长的,导致GPU利用率不足)。

2 大模型部署方法
2.1 模型剪枝(Pruning)
剪枝指移除模型中不必要或多余的组件,比如参数,以使模型更加高效。通过对模型中贡献有限的冗余参数进行剪枝,在保证性能最低下降的同时,可以减小存储需求、提高计算效率。
非结构化剪枝:SparseGPT,LoRAPrune,Wanda
指移除个别参数,而不考虑整体网络结构。这种方法通过将低于阈值的参数置零的方式对个别权重或神经元进行处理。
结构化剪枝:LLM-Pruner
根据预定义规则移除连接或分层结构,同时保持整体网络结构。这种方法一次性地针对整组权重,优势在于降低模型复杂性和内存使用,同时保持整体的LLM结构完整。
2.2 知识蒸馏(Knowledge Distillation)
知识蒸馏是一种经典的模型压缩方法,核心思想是通过引导轻量化的学生模型“模仿”性能更好、结构更复杂的教师模型,在不改变学生模型结构的情况下提高其性能。
- 上下文学习 (ICL):ICL distillation
- 思维链 (CoT):MT-COT,Fine-tune-CoT等
- 指令跟随 (IF):LaMini-LM
2.3 量化(Quantization)
量化技术将传统的表示方法中的浮点数转换为整数或其他离散形式,以减轻深度学习模型的存储和计算负担。通过量化可以降低访存瓶颈,从而克服计算过程中定点数转化为浮点数的性能损失。
- 量化感知训练 (QAT):LLM-QAT:量化目标无缝地集成到模型的训练过程中。这种方法使LLM在训练过程中适应低精度表示。
- 量化感知微调 (QAF):PEQA,QLoRA:QAF涉及在微调过程中对LLM进行量化。主要目标是确保经过微调的LLM在量化为较低位宽后仍保持性能。
- 训练后量化 (PTQ):LLM.int8,AWQ:在LLM的训练阶段完成后对其参数进行量化。PTQ的主要目标是减少LLM的存储和计算复杂性,而无需对LLM架构进行修改或进行重新训练。

3 实战
3.1 环境部署
打开命令行终端,创建一个名为lmdeploy的环境,激活刚刚创建的虚拟环境,并安装0.3.0版本的lmdeploy。
studio-conda -t lmdeploy -o pytorch-2.1.2
conda activate lmdeploy
pip install lmdeploy[all]==0.3.0
3.2 LMDeploy模型对话(chat)
3.2.1 Huggingface与TurboMind
HuggingFace
HuggingFace是一个高速发展的社区,包括Meta、Google、Microsoft、Amazon在内的超过5000家组织机构在为HuggingFace开源社区贡献代码、数据集和模型。可以认为是一个针对深度学习模型和数据集的在线托管社区,如果有数据集或者模型想对外分享,网盘又不太方便,就不妨托管在HuggingFace。
托管在HuggingFace社区的模型通常采用HuggingFace格式存储,简写为HF格式。
但是HuggingFace社区的服务器在国外,国内访问不太方便。国内可以使用阿里巴巴的MindScope社区,或者上海AI Lab搭建的OpenXLab社区,上面托管的模型也通常采用HF格式。
TurboMind
TurboMind是LMDeploy团队开发的一款关于LLM推理的高效推理引擎,它的主要功能包括:LLaMa 结构模型的支持,continuous batch 推理模式和可扩展的 KV 缓存管理器。
TurboMind推理引擎仅支持推理TurboMind格式的模型。因此,TurboMind在推理HF格式的模型时,会首先自动将HF格式模型转换为TurboMind格式的模型。该过程在新版本的LMDeploy中是自动进行的,无需用户操作。
几个容易迷惑的点:
- TurboMind与LMDeploy的关系:LMDeploy是涵盖了LLM 任务全套轻量化、部署和服务解决方案的集成功能包,TurboMind是LMDeploy的一个推理引擎,是一个子模块。LMDeploy也可以使用PyTorch作为推理引擎。
- TurboMind与TurboMind模型的关系:TurboMind是推理引擎的名字,TurboMind模型是一种模型存储格式,TurboMind引擎只能推理TurboMind格式的模型。
3.2.2 下载模型
ls /root/share/new_models/Shanghai_AI_Laboratory/

以InternLM2-Chat-1.8B模型为例,从官方仓库下载模型。执行如下指令由开发机的共享目录软链接或拷贝模型:
cd ~
ln -s /root/share/new_models/Shanghai_AI_Laboratory/internlm2-chat-1_8b /root/
# cp -r /root/share/new_models/Shanghai_AI_Laboratory/internlm2-chat-1_8b /root/
执行完如上指令后,可以运行“ls”命令。可以看到,当前目录下已经多了一个internlm2-chat-1_8b文件夹,即下载好的预训练模型。

3.2.3 使用Transformer库运行模型
Transformer库是Huggingface社区推出的用于运行HF模型的官方库。在3.2.2中已经下载好了InternLM2-Chat-1.8B的HF模型。下面先用Transformer来直接运行InternLM2-Chat-1.8B模型,后面对比一下LMDeploy的使用感受。首先打开VSCode,在左边栏空白区域单击鼠标右键,点击Open in Intergrated Terminal。在终端中输入如下指令,新建pipeline_transformer.py,将以下内容复制粘贴进入pipeline_transformer.py。
touch /root/pipeline_transformer.py
import torch
from transformers import AutoTokenizer, AutoModelForCausalLM

tokenizer = AutoTokenizer.from_pretrained("/root/internlm2-chat-1_8b", trust_remote_code=True)

# Set `torch_dtype=torch.float16` to load model in float16, otherwise it will be loaded as float32 and cause OOM Error.
model = AutoModelForCausalLM.from_pretrained("/root/internlm2-chat-1_8b", torch_dtype=torch.float16, trust_remote_code=True).cuda()
model = model.eval()

inp = "hello"
print("[INPUT]", inp)
response, history = model.chat(tokenizer, inp, history=[])
print("[OUTPUT]", response)

inp = "please provide three suggestions about time management"
print("[INPUT]", inp)
response, history = model.chat(tokenizer, inp, history=history)
print("[OUTPUT]", response)
回到终端,激活conda环境,运行Python代码,得到输出:

3.2.4 使用LMDeploy与模型对话
执行如下命令运行下载的1.8B模型:
# lmdeploy chat [HF格式模型路径/TurboMind格式模型路径]
lmdeploy chat /root/internlm2-chat-1_8b
下面就可以与InternLM2-Chat-1.8B大模型对话了。比如输入“请给我讲一个小故事吧”,然后按两下回车键。

有关LMDeploy的chat功能的更多参数可通过-h命令查看。
lmdeploy chat -h
usage: lmdeploy chat [-h] [--backend {pytorch,turbomind}] [--trust-remote-code] [--meta-instruction META_INSTRUCTION]
                     [--cap {completion,infilling,chat,python}] [--adapters [ADAPTERS ...]] [--tp TP] [--model-name MODEL_NAME]
                     [--session-len SESSION_LEN] [--max-batch-size MAX_BATCH_SIZE] [--cache-max-entry-count CACHE_MAX_ENTRY_COUNT]
                     [--model-format {hf,llama,awq}] [--quant-policy QUANT_POLICY] [--rope-scaling-factor ROPE_SCALING_FACTOR]
                     model_path

Chat with pytorch or turbomind engine.

positional arguments:
  model_path            The path of a model. it could be one of the following options: - i) a local directory path of a turbomind model which is
                        converted by `lmdeploy convert` command or download from ii) and iii). - ii) the model_id of a lmdeploy-quantized model
                        hosted inside a model repo on huggingface.co, such as "internlm/internlm-chat-20b-4bit",
                        "lmdeploy/llama2-chat-70b-4bit", etc. - iii) the model_id of a model hosted inside a model repo on huggingface.co, such
                        as "internlm/internlm-chat-7b", "qwen/qwen-7b-chat ", "baichuan-inc/baichuan2-7b-chat" and so on. Type: str

options:
  -h, --help            show this help message and exit
  --backend {pytorch,turbomind}
                        Set the inference backend. Default: turbomind. Type: str
  --trust-remote-code   Trust remote code for loading hf models. Default: True
  --meta-instruction META_INSTRUCTION
                        System prompt for ChatTemplateConfig. Deprecated. Please use --chat-template instead. Default: None. Type: str
  --cap {completion,infilling,chat,python}
                        The capability of a model. Deprecated. Please use --chat-template instead. Default: chat. Type: str

PyTorch engine arguments:
  --adapters [ADAPTERS ...]
                        Used to set path(s) of lora adapter(s). One can input key-value pairs in xxx=yyy format for multiple lora adapters. If
                        only have one adapter, one can only input the path of the adapter.. Default: None. Type: str
  --tp TP               GPU number used in tensor parallelism. Should be 2^n. Default: 1. Type: int
  --model-name MODEL_NAME
                        The name of the to-be-deployed model, such as llama-7b, llama-13b, vicuna-7b and etc. You can run `lmdeploy list` to get
                        the supported model names. Default: None. Type: str
  --session-len SESSION_LEN
                        The max session length of a sequence. Default: None. Type: int
  --max-batch-size MAX_BATCH_SIZE
                        Maximum batch size. Default: 128. Type: int
  --cache-max-entry-count CACHE_MAX_ENTRY_COUNT
                        The percentage of gpu memory occupied by the k/v cache. Default: 0.8. Type: float

TurboMind engine arguments:
  --tp TP               GPU number used in tensor parallelism. Should be 2^n. Default: 1. Type: int
  --model-name MODEL_NAME
                        The name of the to-be-deployed model, such as llama-7b, llama-13b, vicuna-7b and etc. You can run `lmdeploy list` to get
                        the supported model names. Default: None. Type: str
  --session-len SESSION_LEN
                        The max session length of a sequence. Default: None. Type: int
  --max-batch-size MAX_BATCH_SIZE
                        Maximum batch size. Default: 128. Type: int
  --cache-max-entry-count CACHE_MAX_ENTRY_COUNT
                        The percentage of gpu memory occupied by the k/v cache. Default: 0.8. Type: float
  --model-format {hf,llama,awq}
                        The format of input model. `hf` meaning `hf_llama`, `llama` meaning `meta_llama`, `awq` meaning the quantized model by
                        awq. Default: None. Type: str
  --quant-policy QUANT_POLICY
                        Whether to use kv int8. Default: 0. Type: int
  --rope-scaling-factor ROPE_SCALING_FACTOR
                        Rope scaling factor. Default: 0.0. Type: float
3.3 LMDeploy模型量化(lite)
本部分内容主要介绍如何对模型进行量化。主要包括 KV8量化和W4A16量化。总的来说,量化是一种以参数或计算中间结果精度下降换空间节省(以及同时带来的性能提升)的策略。
正式介绍 LMDeploy 量化方案前,需要先介绍两个概念:
- 计算密集(compute-bound): 指推理过程中,绝大部分时间消耗在数值计算上;针对计算密集型场景,可以通过使用更快的硬件计算单元来提升计算速度。
- 访存密集(memory-bound): 指推理过程中,绝大部分时间消耗在数据读取上;针对访存密集型场景,一般通过减少访存次数、提高计算访存比或降低访存量来优化。
常见的 LLM 模型由于 Decoder Only 架构的特性,实际推理时大多数的时间都消耗在了逐 Token 生成阶段(Decoding 阶段),是典型的访存密集型场景。
那么,如何优化 LLM 模型推理中的访存密集问题呢? 我们可以使用KV8量化和W4A16量化。KV8量化是指将逐 Token(Decoding)生成过程中的上下文 K 和 V 中间结果进行 INT8 量化(计算时再反量化),以降低生成过程中的显存占用。W4A16 量化,将 FP16 的模型权重量化为 INT4,Kernel 计算时,访存量直接降为 FP16 模型的 1/4,大幅降低了访存成本。Weight Only 是指仅量化权重,数值计算依然采用 FP16(需要将 INT4 权重反量化)。
3.3.1 设置最大KV Cache缓存大小
KV Cache是一种缓存技术,通过存储键值对的形式来复用计算结果,以达到提高性能和降低内存消耗的目的。在大规模训练和推理中,KV Cache可以显著减少重复计算量,从而提升模型的推理速度。理想情况下,KV Cache全部存储于显存,以加快访存速度。当显存空间不足时,也可以将KV Cache放在内存,通过缓存管理器控制将当前需要使用的数据放入显存。
模型在运行时,占用的显存可大致分为三部分:模型参数本身占用的显存、KV Cache占用的显存,以及中间运算结果占用的显存。LMDeploy的KV Cache管理器可以通过设置--cache-max-entry-count参数,控制KV缓存占用剩余显存的最大比例。默认的比例为0.8。
下面通过几个例子,来看一下调整--cache-max-entry-count参数的效果。首先保持不加该参数(默认0.8),运行1.8B模型。与模型对话,查看右上角资源监视器中的显存占用情况,为7816 / 8182MiB (95.53%)。
lmdeploy chat /root/internlm2-chat-1_8b
下面,改变--cache-max-entry-count参数,设为0.5。与模型对话,再次查看右上角资源监视器中的显存占用情况。看到显存占用明显降低,变为6600M。
lmdeploy chat /root/internlm2-chat-1_8b --cache-max-entry-count 0.5
接下来,把--cache-max-entry-count参数设置为0.01,约等于禁止KV Cache占用显存。然后与模型对话,可以看到,此时显存占用仅为4552MB,代价是会降低模型推理速度。
lmdeploy chat /root/internlm2-chat-1_8b --cache-max-entry-count 0.01
3.3.2 使用W4A16量化
LMDeploy使用AWQ算法,实现模型4bit权重量化。推理引擎TurboMind提供了非常高效的4bit推理cuda kernel,性能是FP16的2.4倍以上。它支持以下NVIDIA显卡:
- 图灵架构(sm75):20系列、T4
- 安培架构(sm80,sm86):30系列、A10、A16、A30、A100
- Ada Lovelace架构(sm90):40 系列
运行前,首先安装一个依赖库并进行模型量化。
pip install einops==0.7.0
lmdeploy lite auto_awq \
   /root/internlm2-chat-1_8b \
  --calib-dataset 'ptb' \
  --calib-samples 128 \
  --calib-seqlen 1024 \
  --w-bits 4 \
  --w-group-size 128 \
  --work-dir /root/internlm2-chat-1_8b-4bit
量化工作结束后,新的HF模型被保存到internlm2-chat-1_8b-4bit目录。下面使用Chat功能运行W4A16量化后的模型。为了更加明显体会到W4A16的作用,将KV Cache比例再次调为0.01,查看显存占用情况。显存从7396MB降为2436MB,明显降低。有关LMDeploy的lite功能的更多参数可通过-h命令查看。
lmdeploy chat /root/internlm2-chat-1_8b-4bit --model-format awq --cache-max-entry-count 0.01
lmdeploy lite -h
usage: lmdeploy lite [-h] {auto_awq,calibrate,kv_qparams,smooth_quant} ...

Compressing and accelerating LLMs with lmdeploy.lite module

options:
  -h, --help            show this help message and exit

Commands:
  This group has the following commands:

  {auto_awq,calibrate,kv_qparams,smooth_quant}
    auto_awq            Perform weight quantization using AWQ algorithm.
    calibrate           Perform calibration on a given dataset.
    kv_qparams          Export key and value stats.
    smooth_quant        Perform w8a8 quantization using SmoothQuant.
3.4 LMDeploy服务(serve)
在前面的应用中,我们都是在本地直接推理大模型,这种方式成为本地部署。在生产环境下,我们有时会将大模型封装为API接口服务,供客户端访问。我们来看下面一张架构图:
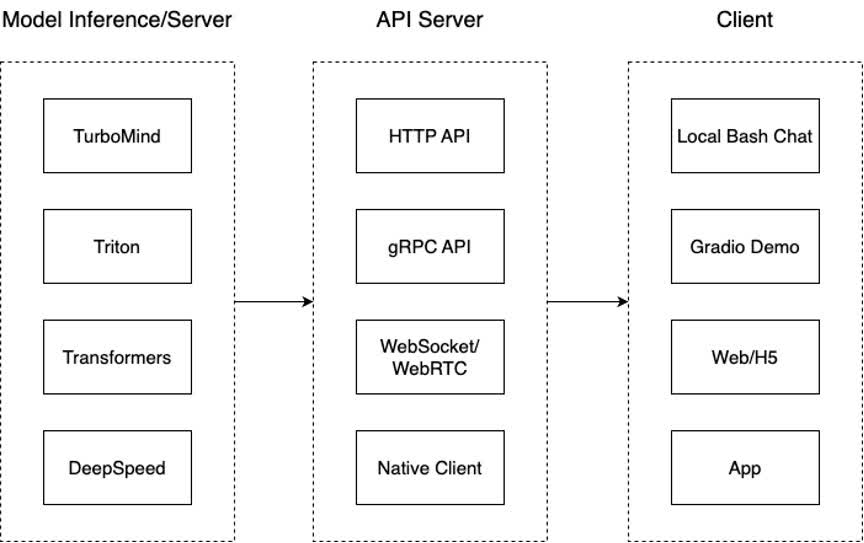
从架构上把整个服务流程分成下面几个模块。
- 模型推理/服务。主要提供模型本身的推理,一般来说可以和具体业务解耦,专注模型推理本身性能的优化。可以以模块、API等多种方式提供。
- API Server。中间协议层,把后端推理/服务通过HTTP,gRPC或其他形式的接口,供前端调用。
- Client。可以理解为前端,与用户交互的地方。通过通过网页端/命令行去调用API接口,获取模型推理/服务。
值得说明的是,以上的划分是一个相对完整的模型,但在实际中这并不是绝对的。比如可以把“模型推理”和“API Server”合并,有的甚至是三个流程打包在一起提供服务。
3.4.1 启动API服务器
通过以下命令启动API服务器,推理internlm2-chat-1_8b模型:
lmdeploy serve api_server \
    /root/internlm2-chat-1_8b \
    --model-format hf \
    --quant-policy 0 \
    --server-name 0.0.0.0 \
    --server-port 23333 \
    --tp 1
其中,model-format、quant-policy这些参数是与上一节中量化推理模型一致的;server-name和server-port表示API服务器的服务IP与服务端口;tp参数表示并行数量(GPU数量)。
通过运行以上指令,我们成功启动了API服务器,请勿关闭该窗口,后面我们要新建客户端连接该服务。可以通过运行一下指令,查看更多参数及使用方法。注意,这一步由于Server在远程服务器上,所以本地需要做一下ssh转发才能直接访问。在cmd窗口输入命令,然后打开浏览器,访问http://127.0.0.1:23333。
lmdeploy serve api_server -h
ssh -CNg -L 23333:127.0.0.1:23333 root@ssh.intern-ai.org.cn -p 你的ssh端口号

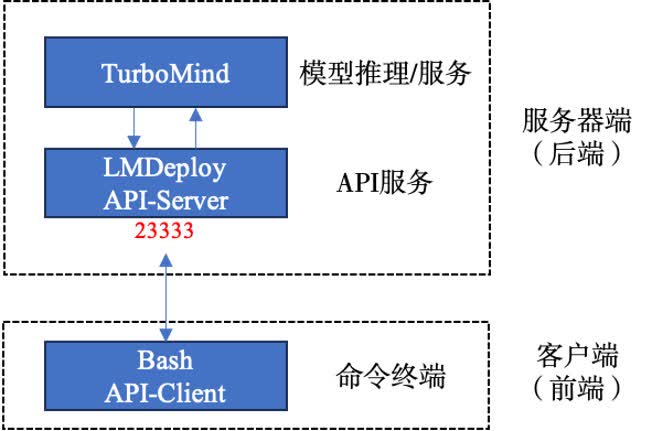
3.4.2 命令行客户端连接API服务器
本节中,我们要新建一个命令行客户端去连接API服务器。首先通过VS Code新建一个终端,激活Conda环境,运行命令行客户端:
lmdeploy serve api_client http://localhost:23333
运行后,可以通过命令行窗口直接与模型对话。

现在使用的架构是这样的:
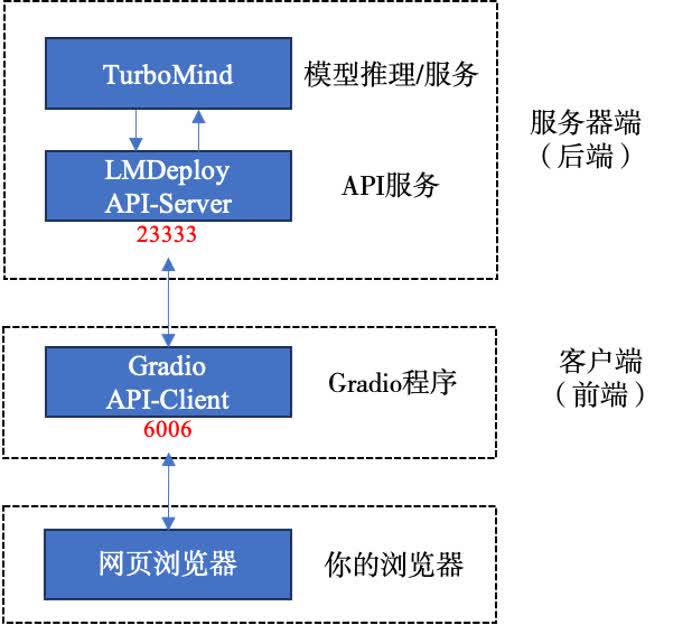
3.4.3 网页客户端连接API服务器
关闭刚刚的VSCode终端,但服务器端的终端不要关闭。新建一个VSCode终端,激活conda环境。使用Gradio作为前端,启动网页客户端。
lmdeploy serve gradio http://localhost:23333 \
    --server-name 0.0.0.0 \
    --server-port 6006
运行命令后,网页客户端启动。在电脑本地新建一个cmd终端,新开一个转发端口:
ssh -CNg -L 6006:127.0.0.1:6006 root@ssh.intern-ai.org.cn -p <你的ssh端口号>
打开浏览器,访问地址http://127.0.0.1:6006,然后就可以与模型进行对话了。

现在使用的架构是这样的:
3.5 Python代码集成
在开发项目时,有时我们需要将大模型推理集成到Python代码里面。
3.5.1 Python代码集成运行1.8B模型
首先激活conda环境,新建Python源代码文件pipeline.py,打开pipeline.py,填入以下内容。
touch /root/pipeline.py
from lmdeploy import pipeline

pipe = pipeline('/root/internlm2-chat-1_8b')
response = pipe(['Hi, pls intro yourself', '上海是'])
print(response)
代码解读:
- 第1行,引入lmdeploy的pipeline模块
- 第3行,从目录“./internlm2-chat-1_8b”加载HF模型
- 第4行,运行pipeline,这里采用了批处理的方式,用一个列表包含两个输入,lmdeploy同时推理两个输入,产生两个输出结果,结果返回给response
- 第5行,输出response
保存后运行代码文件。
python /root/pipeline.py
[WARNING] gemm_config.in is not found; using default GEMM algo
[Response(text='你好,我是书生·浦语,是上海人工智能实验室开发的人工智能助手。我致力于通过语言模型来帮助用户解答问题、提供信息和娱乐。如果你有任何问题,都可以随时向我提问。', generate_token_len=43, input_token_len=108, session_id=0, finish_reason='stop'), Response(text='你好,我可以帮你。请问你需要什么帮助?', generate_token_len=11, input_token_len=104, session_id=1, finish_reason='stop')]
3.5.2 向TurboMind后端传递参数
在3.3节,我们通过向lmdeploy传递附加参数,实现模型的量化推理,及设置KV Cache最大占用比例。在Python代码中,可以通过创建TurbomindEngineConfig,向lmdeploy传递参数。以设置KV Cache占用比例为例,新建python文件pipeline_kv.py,打开pipeline_kv.py,填入如下内容。
touch /root/pipeline_kv.py
from lmdeploy import pipeline, TurbomindEngineConfig

# 调低 k/v cache内存占比调整为总显存的 20%
backend_config = TurbomindEngineConfig(cache_max_entry_count=0.2)

pipe = pipeline('/root/internlm2-chat-1_8b',
                backend_config=backend_config)
response = pipe(['Hi, pls intro yourself', '上海是'])
print(response)
保存后运行Python代码。
python /root/pipeline_kv.py
[WARNING] gemm_config.in is not found; using default GEMM algo
[Response(text='Hello! I am InternLM, a conversational language model developed by Shanghai AI Laboratory. I am here to help and assist you in any way I can. Please feel free to ask me any questions you have, and I will do my best to provide you with accurate and helpful information.', generate_token_len=59, input_token_len=108, session_id=0, finish_reason='stop'), Response(text='上海是中国最大的城市之一,位于长江三角洲,是中国的经济、金融、贸易、教育、科技、文化中心,也是中国的国际大都市之一。', generate_token_len=33, input_token_len=104, session_id=1, finish_reason='stop')]
4 拓展部分
4.1 使用LMDeploy运行视觉多模态大模型llava
最新版本的LMDeploy支持了llava多模态模型,下面演示使用pipeline推理llava-v1.6-7b。首先激活conda环境,安装llava依赖库。
pip install git+https://github.com/haotian-liu/LLaVA.git@4e2277a060da264c4f21b364c867cc622c945874
新建python文件pipeline_llava.py,填入内容如下:
touch /root/pipeline_llava.py
代码解读:
- 第1行引入用于载入图片的load_image函数,第2行引入了lmdeploy的pipeline模块;
- 第5行创建了pipeline实例;
- 第7行从github下载了一张关于老虎的图片;
- 第8行运行pipeline,输入提示词“describe this image”,和图片,结果返回至response;
- 第9行输出response。
保存后运行pipeline。
python /root/pipeline_llava.py
得到输出结果:
Response(text="1. A single tiger is the main subject of the image.\n2. The tiger is lying down on a grassy area, possibly a field or a lawn.\n3. The tiger's fur is predominantly orange with black stripes.\n4. The tiger is facing the camera, giving a direct look at its face.\n5. The tiger's eyes are open and alert, and it appears to be in a relaxed posture.\n6. The background is a soft blur of green, suggesting a natural, outdoor setting.\n7. The lighting in the image suggests it could be daytime.\n8. The overall impression is that of a calm, natural scene with a large, majestic tiger as the focal point.", generate_token_len=166, input_token_len=1023, session_id=0, finish_reason='stop')
也可以通过Gradio来运行llava模型。新建python文件gradio_llava.py,填入以下内容并运行,通过ssh转发一下7860端口,通过浏览器访问http://127.0.0.1:7860。
touch /root/gradio_llava.py
import gradio as gr
from lmdeploy import pipeline, TurbomindEngineConfig


backend_config = TurbomindEngineConfig(session_len=8192) # 图片分辨率较高时请调高session_len
# pipe = pipeline('liuhaotian/llava-v1.6-vicuna-7b', backend_config=backend_config) 非开发机运行此命令
pipe = pipeline('/share/new_models/liuhaotian/llava-v1.6-vicuna-7b', backend_config=backend_config)

def model(image, text):
    if image is None:
        return [(text, "请上传一张图片。")]
    else:
        response = pipe((text, image)).text
        return [(text, response)]

demo = gr.Interface(fn=model, inputs=[gr.Image(type="pil"), gr.Textbox()], outputs=gr.Chatbot())
demo.launch()
python /root/gradio_llava.py

4.2 使用LMDeploy运行第三方大模型
LMDeploy不仅支持运行InternLM系列大模型,还支持其他第三方大模型。支持的模型列表如下:
| Model | Size |
|---|---|
| Llama | 7B - 65B |
| Llama2 | 7B - 70B |
| InternLM | 7B - 20B |
| InternLM2 | 7B - 20B |
| InternLM-XComposer | 7B |
| QWen | 7B - 72B |
| QWen-VL | 7B |
| QWen1.5 | 0.5B - 72B |
| QWen1.5-MoE | A2.7B |
| Baichuan | 7B - 13B |
| Baichuan2 | 7B - 13B |
| Code Llama | 7B - 34B |
| ChatGLM2 | 6B |
| Falcon | 7B - 180B |
| YI | 6B - 34B |
| Mistral | 7B |
| DeepSeek-MoE | 16B |
| DeepSeek-VL | 7B |
| Mixtral | 8x7B |
| Gemma | 2B-7B |
| Dbrx | 132B |
可以从Modelscope,OpenXLab下载相应的HF模型,下载好HF模型,下面的步骤和使用LMDeploy运行InternLM2一样。
4.3 定量比较LMDeploy与Transformer库的推理速度差异
为了直观感受LMDeploy与Transformer库推理速度的差异,来编写一个速度测试脚本。先来测试Transformer库推理Internlm2-chat-1.8b的速度,新建python文件,命名为benchmark_transformer.py,填入以下内容:
import torch
import datetime
from transformers import AutoTokenizer, AutoModelForCausalLM

tokenizer = AutoTokenizer.from_pretrained("/root/internlm2-chat-1_8b", trust_remote_code=True)

# Set `torch_dtype=torch.float16` to load model in float16, otherwise it will be loaded as float32 and cause OOM Error.
model = AutoModelForCausalLM.from_pretrained("/root/internlm2-chat-1_8b", torch_dtype=torch.float16, trust_remote_code=True).cuda()
model = model.eval()

# warmup
inp = "hello"
for i in range(5):
    print("Warm up...[{}/5]".format(i+1))
    response, history = model.chat(tokenizer, inp, history=[])

# test speed
inp = "请介绍一下你自己。"
times = 10
total_words = 0
start_time = datetime.datetime.now()
for i in range(times):
    response, history = model.chat(tokenizer, inp, history=history)
    total_words += len(response)
end_time = datetime.datetime.now()

delta_time = end_time - start_time
delta_time = delta_time.seconds + delta_time.microseconds / 1000000.0
speed = total_words / delta_time
print("Speed: {:.3f} words/s".format(speed))
运行Python脚本:
python benchmark_transformer.py
Loading checkpoint shards: 100%|████████████████████████████████████████████████████████████████████████████████████| 2/2 [00:27<00:00, 13.60s/it]
Warm up...[1/5]
Warm up...[2/5]
Warm up...[3/5]
Warm up...[4/5]
Warm up...[5/5]
Speed: 54.415 words/s
可以看到,Transformer库的推理速度约为54.415 words/s,注意单位是words/s,不是token/s,word和token在数量上可以近似认为成线性关系。
下面来测试一下LMDeploy的推理速度,新建python文件benchmark_lmdeploy.py,填入以下内容并运行脚本。
import datetime
from lmdeploy import pipeline

pipe = pipeline('/root/internlm2-chat-1_8b')

# warmup
inp = "hello"
for i in range(5):
    print("Warm up...[{}/5]".format(i+1))
    response = pipe([inp])

# test speed
inp = "请介绍一下你自己。"
times = 10
total_words = 0
start_time = datetime.datetime.now()
for i in range(times):
    response = pipe([inp])
    total_words += len(response[0].text)
end_time = datetime.datetime.now()

delta_time = end_time - start_time
delta_time = delta_time.seconds + delta_time.microseconds / 1000000.0
speed = total_words / delta_time
print("Speed: {:.3f} words/s".format(speed))
python benchmark_lmdeploy.py
[WARNING] gemm_config.in is not found; using default GEMM algo
Warm up...[1/5]
Warm up...[2/5]
Warm up...[3/5]
Warm up...[4/5]
Warm up...[5/5]
Speed: 471.927 words/s
可以看到,LMDeploy的推理速度约为471.927 words/s,是Transformer库的8.67倍。
5 进阶作业
5.1 设置KV Cache最大占用比例为0.4,开启W4A16量化,以命令行方式与模型对话
lmdeploy chat /root/internlm2-chat-1_8b-4bit --model-format awq --cache-max-entry-count 0.4

可以看到显存占用为4932MB,当KV Cache最大占用比例为0.01时为2436MB,详见3.3.2节。
5.2 以API Server方式启动 lmdeploy,开启 W4A16量化,调整KV Cache的占用比例为0.4,分别使用命令行客户端与Gradio网页客户端与模型对话
lmdeploy serve api_server \
    /root/internlm2-chat-1_8b \
    --model-format hf \
    --quant-policy 0 \
    --server-name 0.0.0.0 \
    --server-port 23333 \
    --tp 1 \
    --cache-max-entry-count 0.4


5.3 使用W4A16量化,调整KV Cache的占用比例为0.4,使用Python代码集成的方式运行internlm2-chat-1.8b模型
from lmdeploy import pipeline, TurbomindEngineConfig

# 调低 k/v cache内存占比调整为总显存的 40%
backend_config = TurbomindEngineConfig(cache_max_entry_count=0.4)

pipe = pipeline('/root/internlm2-chat-1_8b',
                backend_config=backend_config)
response = pipe(['Hi, pls intro yourself', '上海是'])
print(response)
[WARNING] gemm_config.in is not found; using default GEMM algo
[Response(text='你好,我是书生·浦语,由上海人工智能实验室开发。我致力于通过语言模型提供帮助和支持,致力于成为一个有用、诚实且无害的AI助手。我能够理解并回答您的问题,并使用中文进行交流。', generate_token_len=51, input_token_len=108, session_id=0, finish_reason='stop'), Response(text='你好,请问有什么我可以帮助你的吗?', generate_token_len=10, input_token_len=104, session_id=1, finish_reason='stop')]


 799
799


 被折叠的 条评论
为什么被折叠?
被折叠的 条评论
为什么被折叠?
 到【灌水乐园】发言


