


项目1.鸢尾花识别
1.完整代码
import matplotlib.pyplot as plt
from sklearn import datasets
from pandas import DataFrame
import pandas as pd
import numpy as np
import tensorflow as tf

# 数据处理
#1.读取iris数据(sklearn已有)
#2.随机打乱(特征标签仍配对)
#3.选取部分数据为train,test(不重叠)
#4.from_tensor_slices将特征与标签一一对应
#将x特征进行类型转换,防止数据类型不一致,后续矩阵相乘报错
x_data = datasets.load_iris().data
y_data = datasets.load_iris().target

np.random.seed(116)
np.random.shuffle(x_data)
np.random.seed(116)
np.random.shuffle(y_data)
tf.random.set_seed(116)

x_train = x_data[:-30]
y_train = y_data[:-30]
x_test = x_data[-30:]
y_test = y_data[-30:]

x_train = tf.cast(x_train, tf.float32)
x_test = tf.cast(x_test, tf.float32)

train_db = tf.data.Dataset.from_tensor_slices((x_train, y_train)).batch(32)
test_db = tf.data.Dataset.from_tensor_slices((x_test, y_test)).batch(32)

# 搭建网络
w1 = tf.Variable(tf.random.truncated_normal([4, 3], stddev=0.1, seed=1))
b1 = tf.Variable(tf.random.truncated_normal([3], stddev=0.1, seed=1))

#设置超参数
epoch = 500
lr = 0.1
train_loss_result = []
test_acc = []
loss_all = 0

#训练网络,每个epoch都会测试准确率
for epoch in range(epoch):
    for step, (x_train, y_train) in enumerate(train_db):
        with tf.GradientTape() as tape:
            y = tf.matmul(x_train, w1) + b1
            y = tf.nn.softmax(y)
            y_ = tf.one_hot(y_train, depth=3)
            loss = tf.reduce_mean(tf.square(y_ - y))
            loss_all += loss.numpy()
        grads = tape.gradient(loss, [w1, b1])
        w1.assign_sub(lr * grads[0])
        b1.assign_sub(lr * grads[1])
    print("Epoch{},loss:{}".format(epoch, loss_all / 4))
    train_loss_result.append(loss_all / 4)
    loss_all = 0

    total_correct, total_number = 0, 0
    for x_test, y_test in test_db:
        y = tf.matmul(x_test, w1) + b1
        y = tf.nn.softmax(y)
        pred = tf.argmax(y, axis=1)
        pred = tf.cast(pred, dtype=y_test.dtype)
        correct = tf.cast(tf.equal(pred, y_test), dtype=tf.int32)
        correct = tf.reduce_sum(correct)
        total_correct += int(correct)
        total_number += x_test.shape[0]
    acc=total_correct/total_number
    test_acc.append(acc)
    print("Test_acc:",acc)
    print("----------------------------------")

#可视化
plt.title('Loss Function Curve')
plt.xlabel('Epoch')
plt.ylabel('Loss')
plt.plot(train_loss_result,label="$Loss$")
plt.legend()
plt.show()

plt.title('Acc Curve')
plt.xlabel('Epoch')
plt.ylabel('Acc')
plt.plot(test_acc,label="$Accuracy$")
plt.legend()
plt.show()
2.整体流程和学习笔记
2.1数据的读取与处理
# 数据处理
#1.读取iris数据(sklearn已有)
#2.随机打乱(特征标签仍配对)
#3.选取部分数据为train,test(不重叠)
#4.from_tensor_slices将特征与标签一一对应
#将x特征进行类型转换,防止数据类型不一致,后续矩阵相乘报错
x_data = datasets.load_iris().data
y_data = datasets.load_iris().target

np.random.seed(116)
np.random.shuffle(x_data)
np.random.seed(116)
np.random.shuffle(y_data)
tf.random.set_seed(116)

x_train = x_data[:-30]
y_train = y_data[:-30]
x_test = x_data[-30:]
y_test = y_data[-30:]

x_train = tf.cast(x_train, tf.float32)
x_test = tf.cast(x_test, tf.float32)

train_db = tf.data.Dataset.from_tensor_slices((x_train, y_train)).batch(32)
test_db = tf.data.Dataset.from_tensor_slices((x_test, y_test)).batch(32)
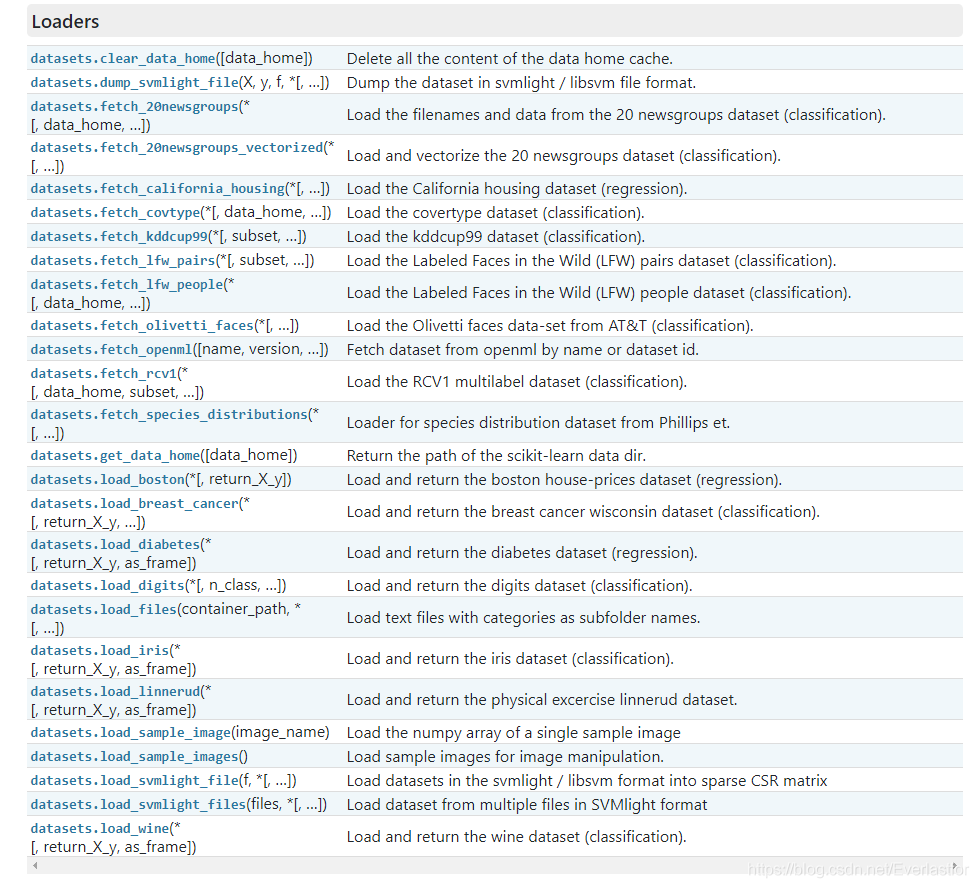
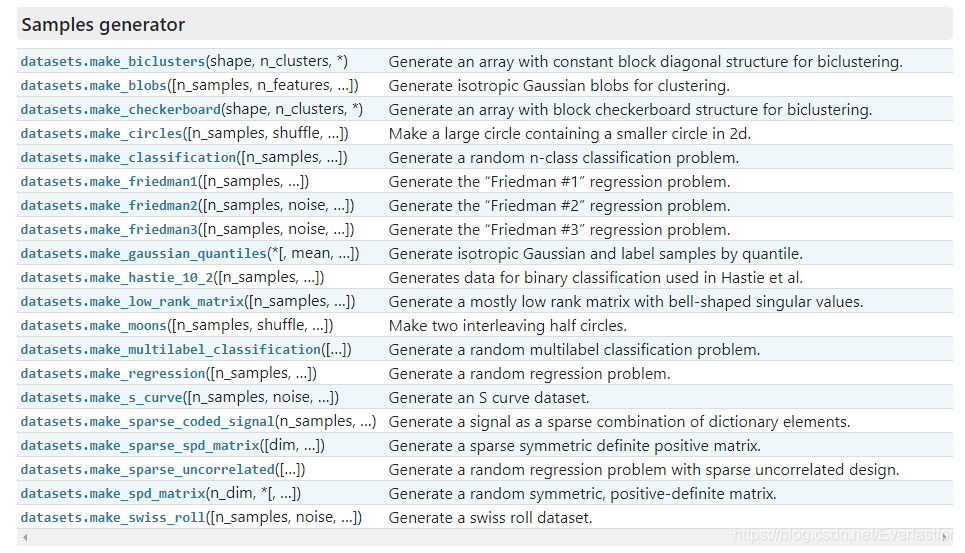
2.1.1 关于datasets
详细见sklearn官方手册–datasets
①数据的种类
主要有两种:
- 封装好的经典数据。 例如boston 房价, 糖尿病, 数字, Iris 花。在代码中以“load”开头。
- 自己设计参数,然后生成的数据。 例如用来训练线性回归模型的数据(强大)。在代码中以“make”开头。
②datasets的用法
2.2.2 随机数random的用法
数据集随机化的作用:shuffle 就是为了避免数据投入的顺序对网络训练造成影响。
增加随机性,提高网络的泛化性能,避免因为有规律的数据出现,导致权重更新时的梯度过于极端,避免最终模型过拟合或欠拟合。
random更多可参考Python3.7的random模块详解
random.seed(a=None, version=2)
传入的数值用于指定随机数生成时所用算法开始时所选定的整数值。
random()是伪随机,实际上由确定公式根据初始值seed计算得出。当seed固定时,对特定数据的处理会产生相同的结果。 如果使用相同的seed()值,则每次生成的随机数都相同;如果不设置这个值,则系统会根据时间来自己选择这个值,此时每次生成的随机数会因时间的差异而有所不同。
对于seed()的理解,简单的说就是“seed()的输入值决定了这个随机序列,输入值确定随机序列也就确定了,不同输入值的随机序列不同”
random.shuffle(x[, random])
用于打乱序列。该函数没有返回值。
当random.seed()设定一个初始值时,random.shuffle()打乱的顺序保持不变。因此可以保证,打乱后特征与标签仍然一一对应。原理在于种子
>>> deck = 'ace two three four'.split()
>>> shuffle(deck)
>>> deck
['four', 'two', 'ace', 'three']
另外,还有特征与标签随机打乱后,不改变配对关系的方法:使用zip将a,b打包。
b = [1, 2,3, 4, 5,6 , 7,8 ,9]
a  = ['a', 'b', 'c', 'd', 'e', 'f', 'g', 'h','i']
c = list(zip(a, b))
print(c)
random.Random(100).shuffle(c)
print(c)
a, b = zip(*c)
print(a)
print(b)

输出结果:
[('a', 1), ('b', 2), ('c', 3), ('d', 4), ('e', 5), ('f', 6), ('g', 7), ('h', 8), ('i', 9)]
[('a', 1), ('g', 7), ('c', 3), ('i', 9), ('h', 8), ('e', 5), ('f', 6), ('d', 4), ('b', 2)]
('a', 'g', 'c', 'i', 'h', 'e', 'f', 'd', 'b')
(1, 7, 3, 9, 8, 5, 6, 4, 2)
关于在x,y的训练数据打乱后,又添上一段
tf.random.seed()的作用是:
Operations that rely on a random seed actually derive it from two seeds: the global and operation-level seeds. This sets the global seed.Its interactions with operation-level seeds is as follows:
——If neither the global seed nor the operation seed is set: A randomly picked seed is used for this op.
——If the global seed is set, but the operation seed is not: The system deterministically picks an operation seed in conjunction with the global seed so that it gets a unique random sequence. Within the same version of tensorflow and user code, this sequence is deterministic. However across different versions, this sequence might change. If the code depends on particular seeds to work, specify both global and operation-level seeds explicitly.
——If the operation seed is set, but the global seed is not set: A default global seed and the specified operation seed are used to determine the random sequence.
——If both the global and the operation seed are set: Both seeds are used in conjunction to determine the random sequence. To illustrate the user-visible effects, consider these examples:。
2.2.3
—————————————————————————————————————————————
2021.08.24
to be continued


 2612
2612


 被折叠的 条评论
为什么被折叠?
被折叠的 条评论
为什么被折叠?
 到【灌水乐园】发言


