


简介:
Bazel 是 google 研发的一款开源构建和测试工具,也是一种简单、易读的构建工具。
Bazel 支持多种编程语言的项目,并针对多个平台构建输出。
高级构建语言:Bazel 使用一种抽象的、人类可读的语言在高语义级别上描述项目的构建属性。与其他工具不同,Bazel 在库、二进制文件、脚本和数据集的概念上运行,免于编写对编译器和链接器等工具的单独调用的复杂性。
Bazel 既快速又可靠:Bazel 会缓存之前完成的所有工作,并跟踪对文件内容和构建命令所做的更改。这样,Bazel就能知道何时需要重新构建某些内容,并且仅重新构建。如需进一步加快构建速度,可以将项目设置为以高度并行且增量的方式进行构建。
Bazel 是多平台应用:Bazel可在 Linux、macOS 和 Windows 上运行。Bazel 可以在同一个项目中为多个平台(包括桌面设备、服务器和移动设备)构建二进制文件和可部署软件包。
Bazel 可以扩缩。在处理具有 10 万多个源文件的 build 时,Bazel 能够保持敏捷性。它可与数以万计的代码库和用户群进行协作。
Bazel 是可扩展的。支持许多语言,您、可以扩展 Bazel 以支持任何其他语言或框架。
Bazel 基本使用流程
在 Aoollo 的 docker 容器中已经安装了 Bazel,所以直接使用即可,Bazel的使用比较简单,大致流程下:
1.新建project目录,project 目录下新建文件 WORKSPACE;
2.新建包,在包下新建 BUILD 文件;
3.包中编写源文件;
4.编辑BUILD文件;
5.编译;
6.执行。
准备工作:在 /apollo/cyber 目录下新建 demo_base_bazel 目录,后续关于 bazel 实现都存储在该目录中。
C++实现
1.新建project目录
在demo_base_bazel 目录下新建目录 pro1_helloworld,再在 pro1_helloworld 目录下新建 WORKSPACE 文件。
2.新建包目录
在 pro1_helloworld 目录下新建 demo_pkg 目录,该目录下新建 BUILD 文件。
3.新建源文件
在 demo_pkg 目录下新建 C++ 源文件 hello_world.cc,编写内容如下:
/*
    输出 hello bazel
*/
# include<iostream>

using namespace  std;

int main(int argc, char const *argv[])
{
    /* code */
    cout<<"hello bazel"<<endl;
    return 0;
}
在 demo_pkg 目录下新建文件 BUILD,编写内容如下:
cc_binary(
    name="hello",
    srcs=["hello_world.cc"],
)
name:可执行文件;
srcs:源文件
4.保存后,到达 pro01_helloworld 目录下,执行:
bazel build demo_pkg/...
如果在 pro01_helloworld 下有多个文件,可以使用下面的指令指定编译文件:
bazel build demo_pkg:指定文件名(为BUILD文件中的name)
5.在 pro01_helloworld 目录下的 bazel-bin/demo_pkg 下找到 hello 文件,执行:
./bazel-bin/demo_pkg/hello
也可以使用:
bazel run demo_pkg:hello
这条指令同时进行编译和执行,可以不先编译直接进行使用。


python 实现与C++步骤相同,唯一不同就是这里是 py_binary,且name与src一致:
// BUILD
py_binary(
    name="hello_world_py",
    srcs=["hello_world_py.py"],
)
#hello_world_py.py
#!usr/bin/env python3
if __name__ == "__main__":
    print("hello bazel(python)")

Bazel 使用的库依赖
编写被依赖库实现
首先需要实现被依赖的库的相关文件。
1.新建project目录
在demo_base_bazel目录下新建目录pro2_lib,再在pro2_lib目录下新建WORKSPACE文件。
⒉新建包目录
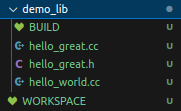
在pro2_lib目录下新建demo_lib目录,该目录下新建BUILD文件。
3.新建头文件与源文件
在demo_lib目录下新建c++头文件 hello_great.h,编写内容如下:
#ifndef LIB_HELLO_GREAT_H
#define LIB_HELLO_FREAT_H
#include <string>
std :: string get_great(const std :: string& name);
#endif
在 demo_lib 目录下新建C++ 头文件hello_great.cc,编写内容如下:
#include "hello_great.h"

std :: string get_great( const std :: string&  name){
    return "hello " + name;
}
4.编辑BUILD文件
内容如下:
cc_library(
    name="hello_great_lib",
    srcs=["hello_great.cc"],
    hdrs=["hello_great.h"],
)
name 库文件
srcs 源文件
hdrs 头文件
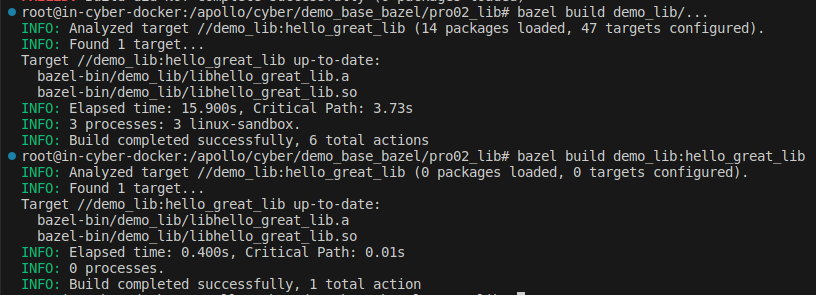
5.进行编译
bazel build demo_lib/...
//或
bazel build demo_lib:hello_world_great
同包下的库依赖
1.编写C++源文件
承上,在 demo_lib 目录中新建 hello_world.cc,需要包含 hello_great.h 并调用头文件中的 get_great 函数,内容如下:
#include <iostream>
#include "hello_great.h"
using namespace std;
int main(int argc,char const *argv[]){
	cout<<get_great("bazel lib")<<endl;
	return 0;
}
2.编辑BUILD文件
cc_binary(
	name="hello_world",
	srcs=["hello_world.cc"],
	deps=[":hello_great_lib"]
)
deps:依赖项
3.编译

4.执行

跨包库依赖
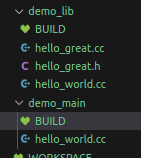
1.新建包
基于上面的,在pro2_lib下新建包: demo_main,包下新建BUILD文件。
⒉.新建C++源文件
在包 demo_main 中新建hello_world.cc 文件,需要包含 hello_great.h 并调用头文件中的 get_great 函数,内容如下:
#include <iostream>
#include "demo_lib/hello_great.h"
using namespace std;
int main(int argc,char const *argv[])
	cout << get_great( "bazel lib") << endl;
	return 0;
}
3.编辑BUILD文件
BUILD文件内容如下:
cc_binary(
	name = "hello_world",
	srcs = ["hello_world.cc"],
	deps = ["//demo_lib:hello_great_lib"],
另外,还需要为 demo_lib 包添加可访问权限,否则会导致编译失败,修改 demo_lib/BUILD 文件。
方式1:在demo_lib/BUILD文件中添加函数:
package(default_visibility = [" //visibility : public"])
方式2:修改cc_library函数内容如下:
cc_library(
	name = "hello_great_lib",
	srcs = ["hello_great.cc"],
	hdrs = [ "hello_great.h"],
	visibility = ["//demo_main:__pkg__"]
)
visibility 设置可见度(权限)
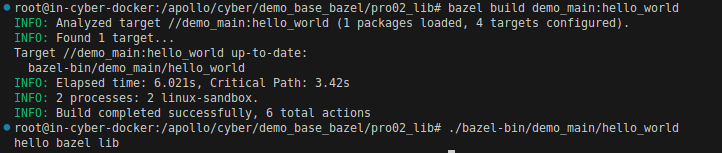
4.编译和运行
…


 9671
9671


 被折叠的 条评论
为什么被折叠?
被折叠的 条评论
为什么被折叠?
 到【灌水乐园】发言


