


车牌识别
介绍
数字图像处理大作业车牌识别
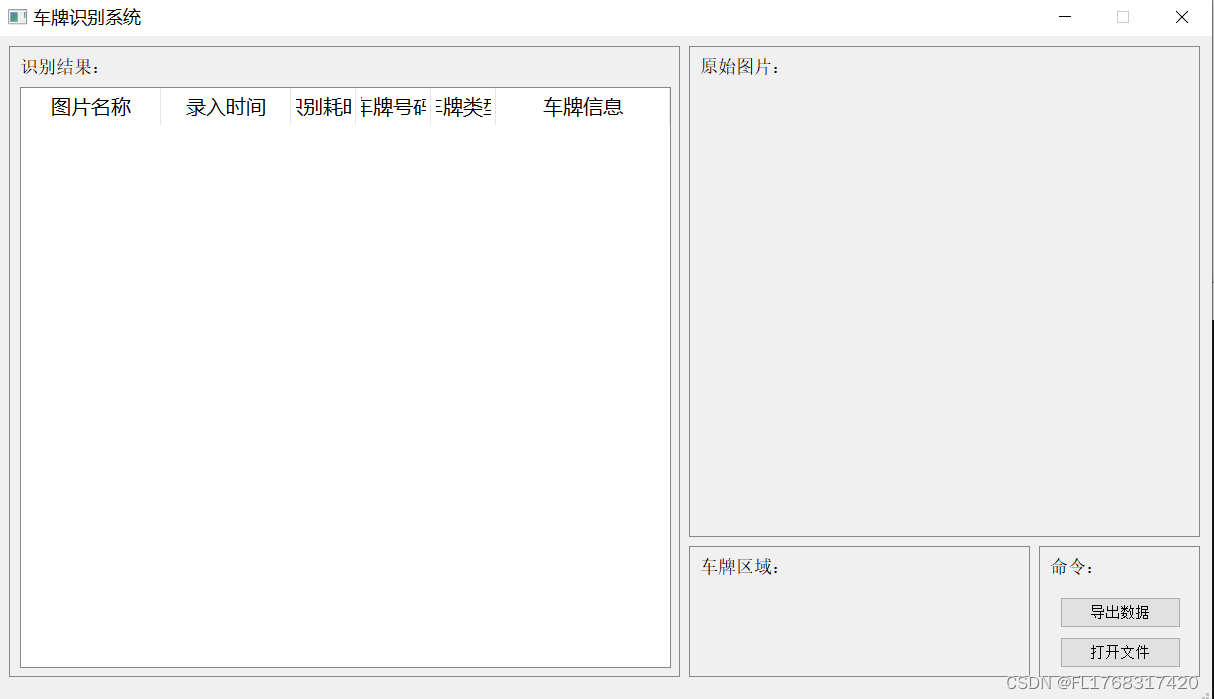
主界面:
主界面代码:
import sys

import cv2
import numpy as np
import xlwt
from PyQt5 import QtCore, QtGui, QtWidgets
from PyQt5.QtCore import Qt
from PyQt5.QtGui import *
from PyQt5.QtWidgets import *

import os
from Recognition import PlateRecognition


class Ui_MainWindow(object):

    def __init__(self):
        self.RowLength = 0
        self.Data = [['文件名称', '录入时间', '车牌号码', '车牌类型', '识别耗时', '车牌信息']]

    def setupUi(self, MainWindow):
        MainWindow.setObjectName("MainWindow")
        MainWindow.resize(1213, 670)
        MainWindow.setFixedSize(1213, 670)  # 设置窗体固定大小
        MainWindow.setToolButtonStyle(QtCore.Qt.ToolButtonIconOnly)
        self.centralwidget = QtWidgets.QWidget(MainWindow)
        self.centralwidget.setObjectName("centralwidget")
        self.scrollArea = QtWidgets.QScrollArea(self.centralwidget)
        self.scrollArea.setGeometry(QtCore.QRect(690, 10, 511, 491))
        self.scrollArea.setWidgetResizable(True)
        self.scrollArea.setObjectName("scrollArea")
        self.scrollAreaWidgetContents = QtWidgets.QWidget()
        self.scrollAreaWidgetContents.setGeometry(QtCore.QRect(0, 0, 509, 489))
        self.scrollAreaWidgetContents.setObjectName("scrollAreaWidgetContents")
        self.label_0 = QtWidgets.QLabel(self.scrollAreaWidgetContents)
        self.label_0.setGeometry(QtCore.QRect(10, 10, 111, 20))
        font = QtGui.QFont()
        font.setPointSize(11)
        self.label_0.setFont(font)
        self.label_0.setObjectName("label_0")
        self.label = QtWidgets.QLabel(self.scrollAreaWidgetContents)
        self.label.setGeometry(QtCore.QRect(10, 40, 481, 441))
        self.label.setObjectName("label")
        self.label.setAlignment(Qt.AlignCenter)
        self.scrollArea.setWidget(self.scrollAreaWidgetContents)
        self.scrollArea_2 = QtWidgets.QScrollArea(self.centralwidget)
        self.scrollArea_2.setGeometry(QtCore.QRect(10, 10, 671, 631))
        self.scrollArea_2.setWidgetResizable(True)
        self.scrollArea_2.setObjectName("scrollArea_2")
        self.scrollAreaWidgetContents_1 = QtWidgets.QWidget()
        self.scrollAreaWidgetContents_1.setGeometry(QtCore.QRect(0, 0, 669, 629))
        self.scrollAreaWidgetContents_1.setObjectName("scrollAreaWidgetContents_1")
        self.label_1 = QtWidgets.QLabel(self.scrollAreaWidgetContents_1)
        self.label_1.setGeometry(QtCore.QRect(10, 10, 111, 20))
        font = QtGui.QFont()
        font.setPointSize(11)
        self.label_1.setFont(font)
        self.label_1.setObjectName("label_1")
        self.tableWidget = QtWidgets.QTableWidget(self.scrollAreaWidgetContents_1)
        self.tableWidget.setGeometry(QtCore.QRect(10, 40, 651, 581))  # 581))
        self.tableWidget.setObjectName("tableWidget")
        self.tableWidget.setColumnCount(6)
        self.tableWidget.setColumnWidth(0, 140)  # 设置1列的宽度
        self.tableWidget.setColumnWidth(1, 130)  # 设置2列的宽度
        self.tableWidget.setColumnWidth(2, 65)  # 设置3列的宽度
        self.tableWidget.setColumnWidth(3, 75)  # 设置4列的宽度
        self.tableWidget.setColumnWidth(4, 65)  # 设置5列的宽度
        self.tableWidget.setColumnWidth(5, 174)  # 设置6列的宽度

        self.tableWidget.setHorizontalHeaderLabels(["图片名称", "录入时间", "识别耗时", "车牌号码", "车牌类型", "车牌信息"])
        self.tableWidget.setRowCount(self.RowLength)
        self.tableWidget.verticalHeader().setVisible(False)  # 隐藏垂直表头)
        # self.tableWidget.setStyleSheet("selection-background-color:blue")
        # self.tableWidget.setAlternatingRowColors(True)
        self.tableWidget.setEditTriggers(QAbstractItemView.NoEditTriggers)
        self.tableWidget.raise_()
        self.scrollArea_2.setWidget(self.scrollAreaWidgetContents_1)
        self.scrollArea_3 = QtWidgets.QScrollArea(self.centralwidget)
        self.scrollArea_3.setGeometry(QtCore.QRect(690, 510, 341, 131))
        self.scrollArea_3.setWidgetResizable(True)
        self.scrollArea_3.setObjectName("scrollArea_3")
        self.scrollAreaWidgetContents_3 = QtWidgets.QWidget()
        self.scrollAreaWidgetContents_3.setGeometry(QtCore.QRect(0, 0, 339, 129))
        self.scrollAreaWidgetContents_3.setObjectName("scrollAreaWidgetContents_3")
        self.label_2 = QtWidgets.QLabel(self.scrollAreaWidgetContents_3)
        self.label_2.setGeometry(QtCore.QRect(10, 10, 111, 20))
        font = QtGui.QFont()
        font.setPointSize(11)
        self.label_2.setFont(font)
        self.label_2.setObjectName("label_2")
        self.label_3 = QtWidgets.QLabel(self.scrollAreaWidgetContents_3)
        self.label_3.setGeometry(QtCore.QRect(10, 40, 321, 81))
        self.label_3.setObjectName("label_3")
        self.scrollArea_3.setWidget(self.scrollAreaWidgetContents_3)
        self.scrollArea_4 = QtWidgets.QScrollArea(self.centralwidget)
        self.scrollArea_4.setGeometry(QtCore.QRect(1040, 510, 161, 131))
        self.scrollArea_4.setWidgetResizable(True)
        self.scrollArea_4.setObjectName("scrollArea_4")
        self.scrollAreaWidgetContents_4 = QtWidgets.QWidget()
        self.scrollAreaWidgetContents_4.setGeometry(QtCore.QRect(0, 0, 159, 129))
        self.scrollAreaWidgetContents_4.setObjectName("scrollAreaWidgetContents_4")
        self.pushButton_2 = QtWidgets.QPushButton(self.scrollAreaWidgetContents_4)
        self.pushButton_2.setGeometry(QtCore.QRect(20, 50, 121, 31))
        self.pushButton_2.setObjectName("pushButton_2")
        self.pushButton = QtWidgets.QPushButton(self.scrollAreaWidgetContents_4)
        self.pushButton.setGeometry(QtCore.QRect(20, 90, 121, 31))
        self.pushButton.setObjectName("pushButton")
        self.label_4 = QtWidgets.QLabel(self.scrollAreaWidgetContents_4)
        self.label_4.setGeometry(QtCore.QRect(10, 10, 111, 20))
        font = QtGui.QFont()
        font.setPointSize(11)
        self.label_4.setFont(font)
        self.label_4.setObjectName("label_4")
        self.scrollArea_4.setWidget(self.scrollAreaWidgetContents_4)
        MainWindow.setCentralWidget(self.centralwidget)
        self.statusbar = QtWidgets.QStatusBar(MainWindow)
        self.statusbar.setObjectName("statusbar")
        MainWindow.setStatusBar(self.statusbar)

        self.retranslateUi(MainWindow)
        QtCore.QMetaObject.connectSlotsByName(MainWindow)

        self.retranslateUi(MainWindow)
        QtCore.QMetaObject.connectSlotsByName(MainWindow)
        self.pushButton.clicked.connect(self.__openimage)  # 设置点击事件
        self.pushButton_2.clicked.connect(self.__writeFiles)  # 设置点击事件
        self.retranslateUi(MainWindow)
        QtCore.QMetaObject.connectSlotsByName(MainWindow)
        self.ProjectPath = os.getcwd()  # 获取当前工程文件位置

    def retranslateUi(self, MainWindow):
        _translate = QtCore.QCoreApplication.translate
        MainWindow.setWindowTitle(_translate("MainWindow", "车牌识别系统"))
        self.label_0.setText(_translate("MainWindow", "原始图片:"))
        self.label.setText(_translate("MainWindow", ""))
        self.label_1.setText(_translate("MainWindow", "识别结果:"))
        self.label_2.setText(_translate("MainWindow", "车牌区域:"))
        self.label_3.setText(_translate("MainWindow", ""))
        self.pushButton.setText(_translate("MainWindow", "打开文件"))
        self.pushButton_2.setText(_translate("MainWindow", "导出数据"))
        self.label_4.setText(_translate("MainWindow", "命令:"))
        self.scrollAreaWidgetContents_1.show()

    # 识别
    def __vlpr(self, path):
        PR = PlateRecognition()
        result = PR.VLPR(path)
        return result

    def __show(self, result, FileName):
        # 显示表格
        self.RowLength = self.RowLength + 1
        if self.RowLength > 18:
            self.tableWidget.setColumnWidth(5, 157)
        self.tableWidget.setRowCount(self.RowLength)
        self.tableWidget.setItem(self.RowLength - 1, 0, QTableWidgetItem(FileName))
        self.tableWidget.setItem(self.RowLength - 1, 1, QTableWidgetItem(result['InputTime']))
        self.tableWidget.setItem(self.RowLength - 1, 2, QTableWidgetItem(str(result['UseTime']) + '秒'))
        self.tableWidget.setItem(self.RowLength - 1, 3, QTableWidgetItem(result['Number']))
        self.tableWidget.setItem(self.RowLength - 1, 4, QTableWidgetItem(result['Type']))
        if result['Type'] == '蓝色牌照':
            self.tableWidget.item(self.RowLength - 1, 4).setBackground(QBrush(QColor(3, 128, 255)))
        elif result['Type'] == '绿色牌照':
            self.tableWidget.item(self.RowLength - 1, 4).setBackground(QBrush(QColor(98, 198, 148)))
        elif result['Type'] == '黄色牌照':
            self.tableWidget.item(self.RowLength - 1, 4).setBackground(QBrush(QColor(242, 202, 9)))
        self.tableWidget.setItem(self.RowLength - 1, 5, QTableWidgetItem(result['From']))

        # 显示识别到的车牌位置
        size = (int(self.label_3.width()), int(self.label_3.height()))
        shrink = cv2.resize(result['Picture'], size, interpolation=cv2.INTER_AREA)
        shrink = cv2.cvtColor(shrink, cv2.COLOR_BGR2RGB)
        self.QtImg = QtGui.QImage(shrink[:], shrink.shape[1], shrink.shape[0], shrink.shape[1] * 3,
                                  QtGui.QImage.Format_RGB888)
        self.label_3.setPixmap(QtGui.QPixmap.fromImage(self.QtImg))

    def __writexls(self, DATA, path):
        wb = xlwt.Workbook();
        ws = wb.add_sheet('Data');
        # DATA.insert(0, ['文件名称','录入时间', '车牌号码', '车牌类型', '识别耗时', '车牌信息'])
        for i, Data in enumerate(DATA):
            for j, data in enumerate(Data):
                ws.write(i, j, data)
        wb.save(path)
        QMessageBox.information(None, "成功", "数据已保存!", QMessageBox.Yes)

    def __writecsv(self, DATA, path):
        f = open(path, 'w')
        # DATA.insert(0, ['文件名称','录入时间', '车牌号码', '车牌类型', '识别耗时', '车牌信息'])
        for data in DATA:
            f.write((',').join(data) + '\n')
        f.close()
        QMessageBox.information(None, "成功", "数据已保存!", QMessageBox.Yes)

    def __writeFiles(self):
        path, filetype = QFileDialog.getSaveFileName(None, "另存为", self.ProjectPath,
                                                     "Excel 工作簿(*.xls);;CSV (逗号分隔)(*.csv)")
        if path == "":  # 未选择
            return
        if filetype == 'Excel 工作簿(*.xls)':
            self.__writexls(self.Data, path)
        elif filetype == 'CSV (逗号分隔)(*.csv)':
            self.__writecsv(self.Data, path)

    def __openimage(self):
        path, filetype = QFileDialog.getOpenFileName(None, "选择文件", self.ProjectPath,
                                                     "JPEG Image (*.jpg);;PNG Image (*.png);;JFIF Image (*.jfif)")  # ;;All Files (*)
        if path == "":  # 未选择文件
            return
        filename = path.split('/')[-1]

        # 尺寸适配
        size = cv2.imdecode(np.fromfile(path, dtype=np.uint8), cv2.IMREAD_COLOR).shape
        if size[0] / size[1] > 1.0907:
            w = size[1] * self.label.height() / size[0]
            h = self.label.height()
            jpg = QtGui.QPixmap(path).scaled(w, h)
        elif size[0] / size[1] < 1.0907:
            w = self.label.width()
            h = size[0] * self.label.width() / size[1]
            jpg = QtGui.QPixmap(path).scaled(w, h)
        else:
            jpg = QtGui.QPixmap(path).scaled(self.label.width(), self.label.height())

        self.label.setPixmap(jpg)
        result = self.__vlpr(path)
        if result is not None:
            self.Data.append(
                [filename, result['InputTime'], result['Number'], result['Type'], str(result['UseTime']) + '秒',
                 result['From']])
            self.__show(result, filename)
        else:
            QMessageBox.warning(None, "Error", "无法识别此图像!", QMessageBox.Yes)


# 重写MainWindow类
class MainWindow(QtWidgets.QMainWindow):

    def closeEvent(self, event):
        reply = QtWidgets.QMessageBox.question(self, '提示',
                                               "是否要退出程序?\n提示:退出后将丢失所有识别数据",
                                               QtWidgets.QMessageBox.Yes | QtWidgets.QMessageBox.No,
                                               QtWidgets.QMessageBox.No)
        if reply == QtWidgets.QMessageBox.Yes:
            event.accept()
        else:
            event.ignore()


if __name__ == "__main__":
    app = QtWidgets.QApplication(sys.argv)
    MainWindow = MainWindow()
    ui = Ui_MainWindow()
    ui.setupUi(MainWindow)
    MainWindow.show()
    sys.exit(app.exec_())
车牌训练源码:
# 模型文本训练

import cv2
import numpy as np
from numpy.linalg import norm

import os
from args import args


class StatModel(object):
    def load(self, fn):
        self.model = self.model.load(fn)

    def save(self, fn):
        self.model.save(fn)


class SVM(StatModel):
    def __init__(self, C=1, gamma=0.5):
        self.model = cv2.ml.SVM_create()
        self.model.setGamma(gamma)
        self.model.setC(C)
        self.model.setKernel(cv2.ml.SVM_RBF)
        self.model.setType(cv2.ml.SVM_C_SVC)
        # 不能保证包括所有省份

    # 训练svm
    def train(self, samples, responses):
        self.model.train(samples, cv2.ml.ROW_SAMPLE, responses)

    # 字符识别
    def predict(self, samples):
        r = self.model.predict(samples)
        return r[1].ravel()


# 定义参数
SZ = args.Size  # 训练图片长宽
MAX_WIDTH = args.MAX_WIDTH  # 原始图片最大宽度
Min_Area = args.Min_Area  # 车牌区域允许最大面积
PROVINCE_START = args.PROVINCE_START
provinces = args.provinces


# 来自opencv的sample,用于svm训练
def deskew(img):
    m = cv2.moments(img)
    if abs(m['mu02']) < 1e-2:
        return img.copy()
    skew = m['mu11'] / m['mu02']
    M = np.float32([[1, skew, -0.5 * SZ * skew], [0, 1, 0]])
    img = cv2.warpAffine(img, M, (SZ, SZ), flags=cv2.WARP_INVERSE_MAP | cv2.INTER_LINEAR)
    return img


# 来自opencv的sample,用于svm训练
def preprocess_hog(digits):
    samples = []
    for img in digits:
        gx = cv2.Sobel(img, cv2.CV_32F, 1, 0)
        gy = cv2.Sobel(img, cv2.CV_32F, 0, 1)
        mag, ang = cv2.cartToPolar(gx, gy)
        bin_n = 16
        bin = np.int32(bin_n * ang / (2 * np.pi))
        bin_cells = bin[:10, :10], bin[10:, :10], bin[:10, 10:], bin[10:, 10:]
        mag_cells = mag[:10, :10], mag[10:, :10], mag[:10, 10:], mag[10:, 10:]
        hists = [np.bincount(b.ravel(), m.ravel(), bin_n) for b, m in zip(bin_cells, mag_cells)]
        hist = np.hstack(hists)

        # transform to Hellinger kernel
        eps = 1e-7
        hist /= hist.sum() + eps
        hist = np.sqrt(hist)
        hist /= norm(hist) + eps

        samples.append(hist)
    return np.float32(samples)


def train_svm(path):
    # 识别英文字母和数字
    Model = SVM(C=1, gamma=0.5)
    # 识别中文
    Modelchinese = SVM(C=1, gamma=0.5)
    # 英文字母和数字部分训练
    chars_train = []
    chars_label = []

    for root, dirs, files in os.walk(os.path.join(path, 'chars')):
        if len(os.path.basename(root)) > 1:
            continue
        root_int = ord(os.path.basename(root))
        for filename in files:
            print('input:{}'.format(filename))
            filepath = os.path.join(root, filename)
            digit_img = cv2.imread(filepath)
            digit_img = cv2.cvtColor(digit_img, cv2.COLOR_BGR2GRAY)
            chars_train.append(digit_img)
            chars_label.append(root_int)

    chars_train = list(map(deskew, chars_train))
    chars_train = preprocess_hog(chars_train)
    chars_label = np.array(chars_label)
    Model.train(chars_train, chars_label)

    if not os.path.exists("svm.dat"):
        # 保存模型
        Model.save("svm.dat")
    else:
        # 更新模型
        os.remove("svm.dat")
        Model.save("svm.dat")

    # 中文部分训练
    chars_train = []
    chars_label = []

    for root, dirs, files in os.walk(os.path.join(path, 'charsChinese')):
        if not os.path.basename(root).startswith("zh_"):
            continue
        pinyin = os.path.basename(root)
        index = provinces.index(pinyin) + PROVINCE_START + 1  # 1是拼音对应的汉字
        for filename in files:
            print('input:{}'.format(filename))
            filepath = os.path.join(root, filename)
            digit_img = cv2.imread(filepath)
            digit_img = cv2.cvtColor(digit_img, cv2.COLOR_BGR2GRAY)
            chars_train.append(digit_img)
            chars_label.append(index)
    chars_train = list(map(deskew, chars_train))
    chars_train = preprocess_hog(chars_train)
    chars_label = np.array(chars_label)
    Modelchinese.train(chars_train, chars_label)

    if not os.path.exists("svmchinese.dat"):
        # 保存模型
        Modelchinese.save("svmchinese.dat")
    else:
        # 更新模型
        os.remove("svmchinese.dat")
        Modelchinese.save("svmchinese.dat")


if __name__ == '__main__':
    path = 'train'
    train_svm(path)
    print('完成')
svm识别算法代码:
# 识别
import time
import cv2
import numpy as np
import SVM_Train
import os
from SVM_Train import SVM
from args import args
class PlateRecognition():
def __init__(self):
self.SZ = args.Size # 训练图片长宽
self.MAX_WIDTH = args.MAX_WIDTH # 原始图片最大宽度
self.Min_Area = args.Min_Area # 车牌区域允许最大面积
self.PROVINCE_START = args.PROVINCE_START
self.provinces = args.provinces
self.cardtype = args.cardtype
self.Prefecture = args.Prefecture
self.cfg = args.Pic_size
# 读取图片文件
def __imreadex(self, filename):
return cv2.imdecode(np.fromfile(filename, dtype=np.uint8), cv2.IMREAD_COLOR)
def __point_limit(self, point):
if point[0] < 0:
point[0] = 0
if point[1] < 0:
point[1] = 0
# 利用投影法,根据设定的阈值和图片直方图,找出波峰,用于分隔字符
def __find_waves(self, threshold, histogram):
up_point = -1 # 上升点
is_peak = False
if histogram[0] > threshold:
up_point = 0
is_peak = True
wave_peaks = []
for i, x in enumerate(histogram):
if is_peak and x < threshold:
if i - up_point > 2:
is_peak = False
wave_peaks.append((up_point, i))
elif not is_peak and x >= threshold:
is_peak = True
up_point = i
if is_peak and up_point != -1 and i - up_point > 4:
wave_peaks.append((up_point, i))
return wave_peaks
# 根据找出的波峰,分隔图片,从而得到逐个字符图片
def __seperate_card(self, img, waves):
part_cards = []
for wave in waves:
part_cards.append(img[:, wave[0]:wave[1]])
return part_cards
# 缩小车牌边界
def __accurate_place(self, card_img_hsv, limit1, limit2, color):
row_num, col_num = card_img_hsv.shape[:2]
xl = col_num
xr = 0
yh = 0
yl = row_num
# col_num_limit = self.cfg["col_num_limit"]
row_num_limit = self.cfg["row_num_limit"]
col_num_limit = col_num * 0.8 if color != "green" else col_num * 0.5 # 绿色有渐变
for i in range(row_num):
count = 0
for j in range(col_num):
H = card_img_hsv.item(i, j, 0)
S = card_img_hsv.item(i, j, 1)
V = card_img_hsv.item(i, j, 2)
if limit1 < H <= limit2 and 34 < S and 46 < V:
count += 1
if count > col_num_limit:
if yl > i:
yl = i
if yh < i:
yh = i
for j in range(col_num):
count = 0
for i in range(row_num):
H = card_img_hsv.item(i, j, 0)
S = card_img_hsv.item(i, j, 1)
V = card_img_hsv.item(i, j, 2)
if limit1 < H <= limit2 and 34 < S and 46 < V:
count += 1
if count > row_num - row_num_limit:
if xl > j:
xl = j
if xr < j:
xr = j
return xl, xr, yh, yl
# 预处理
def __preTreatment(self, car_pic):
if type(car_pic) == type(""):
img = self.__imreadex(car_pic)
else:
img = car_pic
pic_hight, pic_width = img.shape[:2]
if pic_width > self.MAX_WIDTH:
resize_rate = self.MAX_WIDTH / pic_width
img = cv2.resize(img, (self.MAX_WIDTH, int(pic_hight * resize_rate)),
interpolation=cv2.INTER_AREA) # 图片分辨率调整
# cv2.imshow('Image', img)
'''
# 代码后期添加
# 用于处理不同亮度时色调整
gray = cv2.cvtColor(img, cv2.COLOR_BGR2GRAY)
dark_point = (gray<40)
target_array = gray[dark_point]
datk_size = int(target_array.size / gray.size * 100)
# datk_size为暗色占比
# img = cv2.addWeighted(img, 1, img, 2, 40) # 调整亮度
# img = cv2.addWeighted(img, 1.5, img, 0.5, 1) # 调整对比度
'''
kernel = np.array([[0, -1, 0], [-1, 5, -1], [0, -1, 0]], np.float32) # 定义一个核
img = cv2.filter2D(img, -1, kernel=kernel) # 锐化
blur = self.cfg["blur"]
# 高斯去噪
if blur > 0:
img = cv2.GaussianBlur(img, (blur, blur), 0)
oldimg = img
img = cv2.cvtColor(img, cv2.COLOR_BGR2GRAY)
# cv2.imshow('GaussianBlur', img)
kernel = np.ones((20, 20), np.uint8)
img_opening = cv2.morphologyEx(img, cv2.MORPH_OPEN, kernel) # 开运算
img_opening = cv2.addWeighted(img, 1, img_opening, -1, 0); # 与上一次开运算结果融合
# cv2.imshow('img_opening', img_opening)
# 找到图像边缘
ret, img_thresh = cv2.threshold(img_opening, 0, 255, cv2.THRESH_BINARY + cv2.THRESH_OTSU) # 二值化
img_edge = cv2.Canny(img_thresh, 100, 200)
# cv2.imshow('img_edge', img_edge)
# 使用开运算和闭运算让图像边缘成为一个整体
kernel = np.ones((self.cfg["morphologyr"], self.cfg["morphologyc"]), np.uint8)
img_edge1 = cv2.morphologyEx(img_edge, cv2.MORPH_CLOSE, kernel) # 闭运算
img_edge2 = cv2.morphologyEx(img_edge1, cv2.MORPH_OPEN, kernel) # 开运算
# cv2.imshow('img_edge2', img_edge2)
# 查找图像边缘整体形成的矩形区域,可能有很多,车牌就在其中一个矩形区域中
try:
image, contours, hierarchy = cv2.findContours(img_edge2, cv2.RETR_TREE, cv2.CHAIN_APPROX_SIMPLE)
except ValueError:
# ValueError: not enough values to unpack (expected 3, got 2)
# cv2.findContours方法在高版本OpenCV中只返回两个参数
contours, hierarchy = cv2.findContours(img_edge2, cv2.RETR_TREE, cv2.CHAIN_APPROX_SIMPLE)
contours = [cnt for cnt in contours if cv2.contourArea(cnt) > self.Min_Area]
# 逐个排除不是车牌的矩形区域
car_contours = []
for cnt in contours:
# 框选 生成最小外接矩形 返回值(中心(x,y), (宽,高), 旋转角度)
rect = cv2.minAreaRect(cnt)
# print('宽高:',rect[1])
area_width, area_height = rect[1]
# 选择宽大于高的区域
if area_width < area_height:
area_width, area_height = area_height, area_width
wh_ratio = area_width / area_height
# print('宽高比:',wh_ratio)
# 要求矩形区域长宽比在2到5.5之间,2到5.5是车牌的长宽比,其余的矩形排除
if wh_ratio > 2 and wh_ratio < 5.5:
car_contours.append(rect)
# box = cv2.boxPoints(rect)
# box = np.int0(box)
# 框出所有可能的矩形
# oldimg = cv2.drawContours(img, [box], 0, (0, 0, 255), 2)
# cv2.imshow("Test",oldimg )
# 矩形区域可能是倾斜的矩形,需要矫正,以便使用颜色定位
card_imgs = []
for rect in car_contours:
if rect[2] > -1 and rect[2] < 1: # 创造角度,使得左、高、右、低拿到正确的值
angle = 1
else:
angle = rect[2]
rect = (rect[0], (rect[1][0] + 5, rect[1][1] + 5), angle) # 扩大范围,避免车牌边缘被排除
box = cv2.boxPoints(rect)
heigth_point = right_point = [0, 0]
left_point = low_point = [pic_width, pic_hight]
for point in box:
if left_point[0] > point[0]:
left_point = point
if low_point[1] > point[1]:
low_point = point
if heigth_point[1] < point[1]:
heigth_point = point
if right_point[0] < point[0]:
right_point = point
if left_point[1] <= right_point[1]: # 正角度
new_right_point = [right_point[0], heigth_point[1]]
pts2 = np.float32([left_point, heigth_point, new_right_point]) # 字符只是高度需要改变
pts1 = np.float32([left_point, heigth_point, right_point])
M = cv2.getAffineTransform(pts1, pts2)
dst = cv2.warpAffine(oldimg, M, (pic_width, pic_hight))
self.__point_limit(new_right_point)
self.__point_limit(heigth_point)
self.__point_limit(left_point)
card_img = dst[int(left_point[1]):int(heigth_point[1]), int(left_point[0]):int(new_right_point[0])]
card_imgs.append(card_img)
elif left_point[1] > right_point[1]: # 负角度
new_left_point = [left_point[0], heigth_point[1]]
pts2 = np.float32([new_left_point, heigth_point, right_point]) # 字符只是高度需要改变
pts1 = np.float32([left_point, heigth_point, right_point])
M = cv2.getAffineTransform(pts1, pts2)
dst = cv2.warpAffine(oldimg, M, (pic_width, pic_hight))
self.__point_limit(right_point)
self.__point_limit(heigth_point)
self.__point_limit(new_left_point)
card_img = dst[int(right_point[1]):int(heigth_point[1]), int(new_left_point[0]):int(right_point[0])]
card_imgs.append(card_img)
# cv2.imshow("card", card_imgs[0])
# #____开始使用颜色定位,排除不是车牌的矩形,目前只识别蓝、绿、黄车牌
colors = []
for card_index, card_img in enumerate(card_imgs):
green = yellow = blue = black = white = 0
try:
# 有转换失败的可能,原因来自于上面矫正矩形出错
card_img_hsv = cv2.cvtColor(card_img, cv2.COLOR_BGR2HSV)
except:
card_img_hsv = None
if card_img_hsv is None:
continue
row_num, col_num = card_img_hsv.shape[:2]
card_img_count = row_num * col_num
# 确定车牌颜色
for i in range(row_num):
for j in range(col_num):
H = card_img_hsv.item(i, j, 0)
S = card_img_hsv.item(i, j, 1)
V = card_img_hsv.item(i, j, 2)
if 11 < H <= 34 and S > 34: # 图片分辨率调整
yellow += 1
elif 35 < H <= 99 and S > 34: # 图片分辨率调整
green += 1
elif 99 < H <= 124 and S > 34: # 图片分辨率调整
blue += 1
if 0 < H < 180 and 0 < S < 255 and 0 < V < 46:
black += 1
elif 0 < H < 180 and 0 < S < 43 and 221 < V < 225:
white += 1
color = "no"
# print('黄:{:<6}绿:{:<6}蓝:{:<6}'.format(yellow,green,blue))
limit1 = limit2 = 0
if yellow * 2 >= card_img_count:
color = "yellow"
limit1 = 11
limit2 = 34 # 有的图片有色偏偏绿
elif green * 2 >= card_img_count:
color = "green"
limit1 = 35
limit2 = 99
elif blue * 2 >= card_img_count:
color = "blue"
limit1 = 100
limit2 = 124 # 有的图片有色偏偏紫
elif black + white >= card_img_count * 0.7:
color = "bw"
# print(color)
colors.append(color)
# print(blue, green, yellow, black, white, card_img_count)
if limit1 == 0:
continue
# 根据车牌颜色再定位,缩小边缘非车牌边界
xl, xr, yh, yl = self.__accurate_place(card_img_hsv, limit1, limit2, color)
if yl == yh and xl == xr:
continue
need_accurate = False
if yl >= yh:
yl = 0
yh = row_num
need_accurate = True
if xl >= xr:
xl = 0
xr = col_num
need_accurate = True
card_imgs[card_index] = card_img[yl:yh, xl:xr] \
if color != "green" or yl < (yh - yl) // 4 else card_img[yl - (yh - yl) // 4:yh, xl:xr]
if need_accurate: # 可能x或y方向未缩小,需要再试一次
card_img = card_imgs[card_index]
card_img_hsv = cv2.cvtColor(card_img, cv2.COLOR_BGR2HSV)
xl, xr, yh, yl = self.__accurate_place(card_img_hsv, limit1, limit2, color)
if yl == yh and xl == xr:
continue
if yl >= yh:
yl = 0
yh = row_num
if xl >= xr:
xl = 0
xr = col_num
card_imgs[card_index] = card_img[yl:yh, xl:xr] \
if color != "green" or yl < (yh - yl) // 4 else card_img[yl - (yh - yl) // 4:yh, xl:xr]
# cv2.imshow("result", card_imgs[0])
# cv2.imwrite('1.jpg', card_imgs[0])
# print('颜色识别结果:' + colors[0])
return card_imgs, colors
# 分割字符并识别车牌文字
def __identification(self, card_imgs, colors, model, modelchinese):
# 识别车牌中的字符
result = {}
predict_result = []
roi = None
card_color = None
for i, color in enumerate(colors):
if color in ("blue", "yellow", "green"):
card_img = card_imgs[i]
# old_img = card_img
# 做一次锐化处理
kernel = np.array([[0, -1, 0], [-1, 5, -1], [0, -1, 0]], np.float32) # 锐化
card_img = cv2.filter2D(card_img, -1, kernel=kernel)
# cv2.imshow("custom_blur", card_img)
# RGB转GARY
gray_img = cv2.cvtColor(card_img, cv2.COLOR_BGR2GRAY)
# cv2.imshow('gray_img', gray_img)
# 黄、绿车牌字符比背景暗、与蓝车牌刚好相反,所以黄、绿车牌需要反向
if color == "green" or color == "yellow":
gray_img = cv2.bitwise_not(gray_img)
# 二值化
ret, gray_img = cv2.threshold(gray_img, 0, 255, cv2.THRESH_BINARY + cv2.THRESH_OTSU)
# cv2.imshow('gray_img', gray_img)
# 查找水平直方图波峰
x_histogram = np.sum(gray_img, axis=1)
# 最小值
x_min = np.min(x_histogram)
# 均值
x_average = np.sum(x_histogram) / x_histogram.shape[0]
x_threshold = (x_min + x_average) / 2
wave_peaks = self.__find_waves(x_threshold, x_histogram)
if len(wave_peaks) == 0:
continue
# 认为水平方向,最大的波峰为车牌区域
wave = max(wave_peaks, key=lambda x: x[1] - x[0])
gray_img = gray_img[wave[0]:wave[1]]
# cv2.imshow('gray_img', gray_img)
# 查找垂直直方图波峰
row_num, col_num = gray_img.shape[:2]
# 去掉车牌上下边缘1个像素,避免白边影响阈值判断
gray_img = gray_img[1:row_num - 1]
# cv2.imshow('gray_img', gray_img)
y_histogram = np.sum(gray_img, axis=0)
y_min = np.min(y_histogram)
y_average = np.sum(y_histogram) / y_histogram.shape[0]
y_threshold = (y_min + y_average) / 5 # U和0要求阈值偏小,否则U和0会被分成两半
wave_peaks = self.__find_waves(y_threshold, y_histogram)
# print(wave_peaks)
# for wave in wave_peaks:
# cv2.line(card_img, pt1=(wave[0], 5), pt2=(wave[1], 5), color=(0, 0, 255), thickness=2)
# 车牌字符数应大于6
if len(wave_peaks) <= 6:
# print(wave_peaks)
continue
wave = max(wave_peaks, key=lambda x: x[1] - x[0])
max_wave_dis = wave[1] - wave[0]
# 判断是否是左侧车牌边缘
if wave_peaks[0][1] - wave_peaks[0][0] < max_wave_dis / 3 and wave_peaks[0][0] == 0:
wave_peaks.pop(0)
# 组合分离汉字
cur_dis = 0
for i, wave in enumerate(wave_peaks):
if wave[1] - wave[0] + cur_dis > max_wave_dis * 0.6:
break
else:
cur_dis += wave[1] - wave[0]
if i > 0:
wave = (wave_peaks[0][0], wave_peaks[i][1])
wave_peaks = wave_peaks[i + 1:]
wave_peaks.insert(0, wave)
# 去除车牌上的分隔点
point = wave_peaks[2]
if point[1] - point[0] < max_wave_dis / 3:
point_img = gray_img[:, point[0]:point[1]]
if np.mean(point_img) < 255 / 5:
wave_peaks.pop(2)
if len(wave_peaks) <= 6:
# print("peak less 2:", wave_peaks)
continue
# print(wave_peaks)
# 分割牌照字符
part_cards = self.__seperate_card(gray_img, wave_peaks)
# 分割输出
# for i, part_card in enumerate(part_cards):
# cv2.imshow(str(i), part_card)
# 识别
for i, part_card in enumerate(part_cards):
# 可能是固定车牌的铆钉
if np.mean(part_card) < 255 / 5:
continue
part_card_old = part_card
w = abs(part_card.shape[1] - self.SZ) // 2
# 边缘填充
part_card = cv2.copyMakeBorder(part_card, 0, 0, w, w, cv2.BORDER_CONSTANT, value=[0, 0, 0])
# cv2.imshow('part_card', part_card)
# 图片缩放(缩小)
part_card = cv2.resize(part_card, (self.SZ, self.SZ), interpolation=cv2.INTER_AREA)
# cv2.imshow('part_card', part_card)
part_card = SVM_Train.preprocess_hog([part_card])
if i == 0: # 识别汉字
resp = self.modelchinese.predict(part_card) # 匹配样本
charactor = self.provinces[int(resp[0]) - self.PROVINCE_START]
# print(charactor)
else: # 识别字母
resp = self.model.predict(part_card) # 匹配样本
charactor = chr(resp[0])
# print(charactor)
# 判断最后一个数是否是车牌边缘,假设车牌边缘被认为是1
if charactor == "1" and i == len(part_cards) - 1:
if color == 'blue' and len(part_cards) > 7:
if part_card_old.shape[0] / part_card_old.shape[1] >= 7: # 1太细,认为是边缘
continue
elif color == 'blue' and len(part_cards) > 7:
if part_card_old.shape[0] / part_card_old.shape[1] >= 7: # 1太细,认为是边缘
continue
elif color == 'green' and len(part_cards) > 8:
if part_card_old.shape[0] / part_card_old.shape[1] >= 7: # 1太细,认为是边缘
continue
predict_result.append(charactor)
roi = card_img # old_img
card_color = color
break
return predict_result, roi, card_color # 识别到的字符、定位的车牌图像、车牌颜色
def VLPR(self, car_pic):
result = {}
start = time.time()
# 初始化模型
self.model = SVM(C=1, gamma=0.5)
if os.path.exists("svm.dat"):
self.model.load("svm.dat")
else:
raise FileNotFoundError('svm.dat')
self.modelchinese = SVM(C=1, gamma=0.5)
if os.path.exists("svmchinese.dat"):
self.modelchinese.load("svmchinese.dat")
else:
raise FileNotFoundError('svmchinese.dat')
card_imgs, colors = self.__preTreatment(car_pic)
if card_imgs is []:
return
else:
predict_result, roi, card_color = self.__identification(card_imgs, colors, self.model, self.modelchinese)
if predict_result != []:
result['UseTime'] = round((time.time() - start), 2)
result['InputTime'] = time.strftime("%Y-%m-%d %H:%M:%S")
result['Type'] = self.cardtype[card_color]
result['List'] = predict_result
result['Number'] = ''.join(predict_result[:2]) + '·' + ''.join(predict_result[2:])
result['Picture'] = roi
try:
result['From'] = ''.join(self.Prefecture[result['List'][0]][result['List'][1]])
except:
result['From'] = '未知'
return result
else:
return None
# 测试
if __name__ == '__main__':
c = PlateRecognition()
result = c.VLPR('./Test/京AD77972.jpg')
print(result)
完整源码下载地址:https://download.csdn.net/download/FL1768317420/89325273


 476
476

 被折叠的 条评论
为什么被折叠?
被折叠的 条评论
为什么被折叠?
 到【灌水乐园】发言


