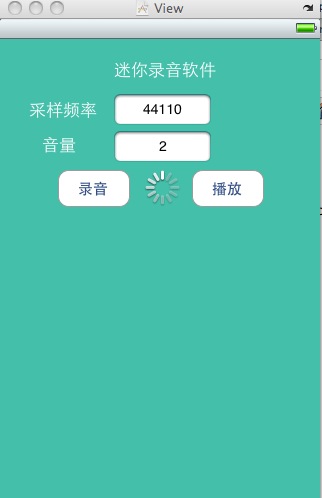
IPhone之AVAudioRecorder 录音

#import   需要引入


//获取document目录的路径
- (NSString*) documentsPath {
 if (! _documentsPath) {
  NSArray *searchPaths =
   NSSearchPathForDirectoriesInDomains
   (NSDocumentDirectory, NSUserDomainMask, YES);
  _documentsPath = [searchPaths objectAtIndex: 0];
  [_documentsPath retain];
 }
 return _documentsPath;
}


//(document目录的路径)
 NSString *destinationString = [[self documentsPath]
   stringByAppendingPathComponent:filenameField.text];
 NSURL *destinationURL = [NSURL fileURLWithPath: destinationString];

//初始化AVAudioRecorder
 NSError *recorderSetupError = nil;
 AVAudioRecorder audioRecorder = [[AVAudioRecorder alloc] initWithURL:destinationURL
   settings:recordSettings error:&recorderSetupError]; 
 [recordSettings release];

第二个参数  settings是一个容纳键值对的NSDictionary有四种一般的键
1:一般的音频设置
2:线性PCM设置
3:编码器设置
4:采样率转换设置


NSMutableDictionary  需要加入五个设置值(线性PCM)

NSMutableDictionary *recordSettings =
  [[NSMutableDictionary alloc] initWithCapacity:10];

  //1 ID号
  [recordSettings setObject:
   [NSNumber numberWithInt: kAudioFormatLinearPCM] forKey: AVFormatIDKey];
  float sampleRate =
   [pcmSettingsViewController.sampleRateField.text floatValue];
  //2 采样率
  [recordSettings setObject:
   [NSNumber numberWithFloat:sampleRate] forKey: AVSampleRateKey];
  
  //3 通道的数目
  [recordSettings setObject:
   [NSNumber numberWithInt:
    (pcmSettingsViewController.stereoSwitch.on ? 2 : 1)]
   forKey:AVNumberOfChannelsKey];
  int bitDepth =
   [pcmSettingsViewController.sampleDepthField.text intValue];
  
  //4 采样位数  默认 16
  [recordSettings setObject:
   [NSNumber numberWithInt:bitDepth] forKey:AVLinearPCMBitDepthKey];
  
  //5
  [recordSettings setObject:
   [NSNumber numberWithBool:
     pcmSettingsViewController.bigEndianSwitch.on]
    forKey:AVLinearPCMIsBigEndianKey];


  //6 采样信号是整数还是浮点数
  [recordSettings setObject:
   [NSNumber numberWithBool:
     pcmSettingsViewController.floatingSamplesSwitch.on]
    forKey:AVLinearPCMIsFloatKey];


AVAudioRecorder成功创建后,使用他非常直接.它的三个基本方法如下

-(void) startRecording {
 [audioRecorder record];
}

-(void) pauseRecording {
 [audioRecorder pause];
 recordPauseButton.selected = NO;
}

-(void) stopRecording {
 [audioRecorder stop];
}


分类: 【开发技术】IOS 2012-03-22 11:18  5875人阅读  评论(2)  收藏  举报

这两天也调了一下ios的录音,原文链接:http://www.iphoneam.com/blog/index.php?title=using-the-iphone-to-record-audio-a-guide&more=1&c=1&tb=1&pb=1

这里ios的录音功能主要依靠AVFoundation.framework与CoreAudio.framework来实现
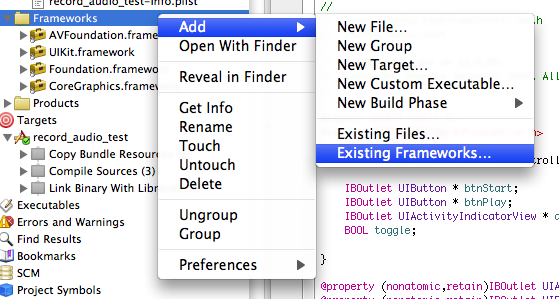

在工程内添加这两个framework

我这里给工程命名audio_text

在生成的audio_textViewController.h里的代码如下


[cpp]  view plain copy
  1. #import   
  2. #import   
  3. #import   
  4.   
  5. @interface audio_textViewController UIViewController  
  6.   
  7.     IBOutlet UIButton *bthStart;  
  8.     IBOutlet UIButton *bthPlay;  
  9.     IBOutlet UITextField *freq;  
  10.     IBOutlet UITextField *value;  
  11.     IBOutlet UIActivityIndicatorView *actSpinner;  
  12.     BOOL toggle;  
  13.       
  14.     //Variable setup for access in the class  
  15.     NSURL *recordedTmpFile;  
  16.     AVAudioRecorder *recorder;  
  17.     NSError *error;  
  18.  
  19.   
  20. @property (nonatomic,retain)IBOutlet UIActivityIndicatorView *actSpinner;  
  21. @property (nonatomic,retain)IBOutlet UIButton *bthStart;  
  22. @property (nonatomic,retain)IBOutlet UIButton *bthPlay;  
  23.   
  24. -(IBAction)start_button_pressed;  
  25. -(IBAction)play_button_pressed;  
  26. @end  
audio_textViewController.m


[cpp]  view plain copy
  1. #import "audio_textViewController.h"  
  2.   
  3. @implementation audio_textViewController  
  4.   
  5.   
  6. (void)viewDidLoad  
  7.     [super viewDidLoad];  
  8.       
  9.     //Start the toggle in true mode.  
  10.     toggle YES;  
  11.     bthPlay.hidden YES;  
  12.       
  13.     //Instanciate an instance of the AVAudioSession object.  
  14.     AVAudioSession audioSession [AVAudioSession sharedInstance];  
  15.     //Setup the audioSession for playback and record.   
  16.     //We could just use record and then switch it to playback leter, but  
  17.     //since we are going to do both lets set it up once.  
  18.     [audioSession setCategory:AVAudioSessionCategoryPlayAndRecord error: &error];  
  19.     //Activate the session  
  20.     [audioSession setActive:YES error: &error];  
  21.       
  22.  
  23.   
  24.   
  25.   
  26.   
  27.   
  28.   
  29.   
  30.   
  31.   
  32.   
  33. (IBAction)  start_button_pressed{  
  34.       
  35.     if(toggle)  
  36.      
  37.         toggle NO;  
  38.         [actSpinner startAnimating];  
  39.         [bthStart setTitle:@"停" forState: UIControlStateNormal ];     
  40.         bthPlay.enabled toggle;  
  41.         bthPlay.hidden !toggle;  
  42.           
  43.         //Begin the recording session.  
  44.         //Error handling removed.  Please add to your own code.  
  45.           
  46.         //Setup the dictionary object with all the recording settings that this   
  47.         //Recording sessoin will use  
  48.         //Its not clear to me which of these are required and which are the bare minimum.  
  49.         //This is good resource: http://www.totodotnet.net/tag/avaudiorecorder/  
  50.         NSMutableDictionary* recordSetting [[NSMutableDictionary alloc] init];  
  51.           
  52.         [recordSetting setValue :[NSNumber numberWithInt:kAudioFormatAppleIMA4] forKey:AVFormatIDKey];  
  53.           
  54.         [recordSetting setValue:[NSNumber numberWithFloat:[freq.text floatValue]] forKey:AVSampleRateKey];   
  55.         [recordSetting setValue:[NSNumber numberWithInt: [value.text intValue]] forKey:AVNumberOfChannelsKey];  
  56.           
  57.         //Now that we have our settings we are going to instanciate an instance of our recorder instance.  
  58.         //Generate temp file for use by the recording.  
  59.         //This sample was one found online and seems to be good choice for making tmp file that  
  60.         //will not overwrite an existing one.  
  61.         //I know this is mess of collapsed things into call.  can break it out if need be.  
  62.         recordedTmpFile [NSURL fileURLWithPath:[NSTemporaryDirectory() stringByAppendingPathComponent: [NSString stringWithFormat: @"%.0f.%@"[NSDate timeIntervalSinceReferenceDate] 1000.0, @"caf"]]];  
  63.         NSLog(@"Using File called: %@",recordedTmpFile);  
  64.         //Setup the recorder to use this file and record to it.  
  65.         recorder [[ AVAudioRecorder alloc] initWithURL:recordedTmpFile settings:recordSetting error:&error];  
  66.         //Use the recorder to start the recording.  
  67.         //Im not sure why we set the delegate to self yet.    
  68.         //Found this in antother example, but Im fuzzy on this still.  
  69.         [recorder setDelegate:self];  
  70.         //We call this to start the recording process and initialize   
  71.         //the subsstems so that when we actually say "record" it starts right away.  
  72.         [recorder prepareToRecord];  
  73.         //Start the actual Recording  
  74.         [recorder record];  
  75.         //There is an optional method for doing the recording for limited time see   
  76.         //[recorder recordForDuration:(NSTimeInterval) 10]  
  77.           
  78.      
  79.     else  
  80.      
  81.         toggle YES;  
  82.         [actSpinner stopAnimating];  
  83.         [bthStart setTitle:@"开始录音" forState:UIControlStateNormal ];  
  84.         bthPlay.enabled toggle;  
  85.         bthPlay.hidden !toggle;  
  86.           
  87.         NSLog(@"Using File called: %@",recordedTmpFile);  
  88.         //Stop the recorder.  
  89.         [recorder stop];  
  90.      
  91.  
  92.   
  93. (void)didReceiveMemoryWarning  
  94.     // Releases the view if it doesn't have superview.  
  95.     [super didReceiveMemoryWarning];  
  96.       
  97.     // Release any cached data, images, etc that aren't in use.  
  98.  
  99.   
  100. -(IBAction) play_button_pressed{  
  101.       
  102.     //The play button was pressed...   
  103.     //Setup the AVAudioPlayer to play the file that we just recorded.  
  104.     AVAudioPlayer avPlayer [[AVAudioPlayer alloc] initWithContentsOfURL:recordedTmpFile error:&error];  
  105.     [avPlayer prepareToPlay];  
  106.     [avPlayer play];  
  107.       
  108.  
  109.   
  110. (void)viewDidUnload  
  111.     // Release any retained subviews of the main view.  
  112.     // e.g. self.myOutlet nil;  
  113.     //Clean up the temp file.  
  114.     NSFileManager fm [NSFileManager defaultManager];  
  115.     [fm removeItemAtPath:[recordedTmpFile path] error:&error];  
  116.     //Call the dealloc on the remaining objects.  
  117.     [recorder dealloc];  
  118.     recorder nil;  
  119.     recordedTmpFile nil;  
  120.  
  121.   
  122.   
  123. (void)dealloc  
  124.     [super dealloc];  
  125.  
  126.   
  127. @end  
最后在interface builder里面绘制好界面,如


设置下按键的属性


基本就ok了,可以开始录音了。


BUG解决
但是大家要注意一个貌似是ios5.0之后引入的bug,就是当你录制音频的时候启动时间往往会比较慢,大概需要3--5秒的时间吧,这种现象尤其在播放的时候立刻切换到录制的时候非常明显。

具体的原因我也不是很清楚,感觉应该是更底层的一些bug。目前我的解决方案是这样的。
1.在音频队列的初始化方法中加入代码

OSStatus error = AudioSessionInitialize(NULL, NULL, NULL, NULL);

        UInt32 category = kAudioSessionCategory_PlayAndRecord;

error = AudioSessionSetProperty(kAudioSessionProperty_AudioCategory, sizeof(category), &category);


AudioSessionAddPropertyListener(kAudioSessionProperty_AudioRouteChange, NULL, self);


UInt32 inputAvailable 0;

UInt32 size = sizeof(inputAvailable);


AudioSessionGetProperty(kAudioSessionProperty_AudioInputAvailable, &size, &inputAvailable);


AudioSessionAddPropertyListener(kAudioSessionProperty_AudioInputAvailable, NULL, self);


        AudioSessionSetActive(true); 

2.在录制声音开始的时候先把播放声音stop,加入


    UInt32 category = kAudioSessionCategory_PlayAndRecord;

    AudioSessionSetProperty(kAudioSessionProperty_AudioCategory, sizeof(category), &category);


这样做应该会让你的录制启动速度显著加快的。
基于SSM框架的智能家政保洁预约系统,是一个旨在提高家政保洁服务预约效率和管理水平的平台。该系统通过集成现代信息技术,为家政公司、家政服务人员和消费者提供了一个便捷的在线预约和管理系统。 系统的主要功能包括: 1. **用户管理**:允许消费者注册、登录,并管理他们的个人资料和预约历史。 2. **家政人员管理**:家政服务人员可以注册并更新自己的个人信息、服务类别和服务时间。 3. **服务预约**:消费者可以浏览不同的家政服务选项,选择合适的服务人员,并在线预约服务。 4. **订单管理**:系统支持订单的创建、跟踪和管理,包括订单的确认、完成和评价。 5. **评价系统**:消费者可以在家政服务完成后对服务进行评价,帮助提高服务质量和透明度。 6. **后台管理**:管理员可以管理用户、家政人员信息、服务类别、预约订单以及处理用户反馈。 系统采用Java语言开发,使用MySQL数据库进行数据存储,通过B/S架构实现用户与服务的在线交互。系统设计考虑了不同用户角色的需求,包括管理员、家政服务人员和普通用户,每个角色都有相应的权限和功能。此外,系统还采用了软件组件化、精化体系结构、分离逻辑和数据等方法,以便于未来的系统升级和维护。 智能家政保洁预约系统通过提供一个集中的平台,不仅方便了消费者的预约和管理,也为家政服务人员提供了一个展示和推广自己服务的机会。同时,系统的后台管理功能为家政公司提供了强大的数据支持和决策辅助,有助于提高服务质量和管理效率。该系统的设计与实现,标志着家政保洁服务向现代化和网络化的转型,为管理决策和控制提供保障,是行业发展中的重要里程碑。
评论
添加红包

请填写红包祝福语或标题

红包个数最小为10个

红包金额最低5元

当前余额3.43前往充值 >
需支付:10.00
成就一亿技术人!
领取后你会自动成为博主和红包主的粉丝 规则
hope_wisdom
发出的红包
实付
使用余额支付
点击重新获取
扫码支付
钱包余额 0

抵扣说明:

1.余额是钱包充值的虚拟货币,按照1:1的比例进行支付金额的抵扣。
2.余额无法直接购买下载,可以购买VIP、付费专栏及课程。

余额充值