


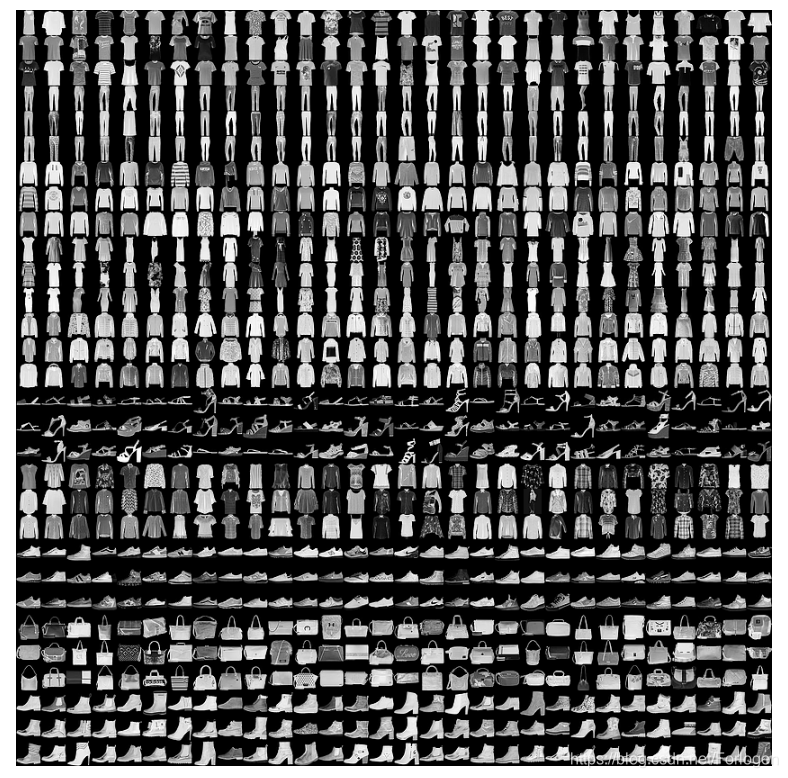
Fashion Mnist数据集是和前面的MNIST数据集一样一个入门的数据集 ,它包含70000张图像,有10个类别。具体可见:https://github.com/zalandoresearch/fashion-mnist
数据集分为4个部分
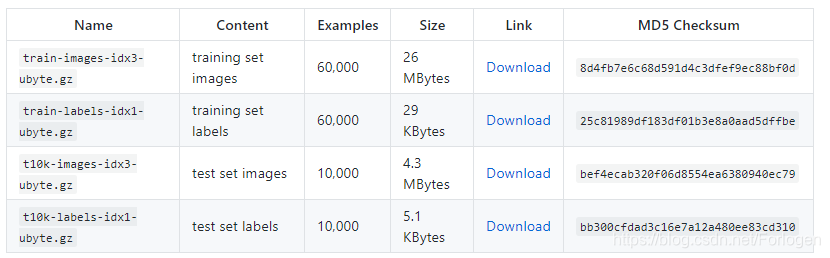
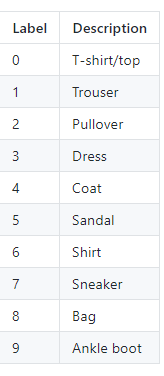
相应的类别用0-9的整数进行表示
我们在Fashion Mnist数据集上构建一个简单的神经网络模型,进行入门的学习
# -*- coding: utf-8 -*-
"""
Created on Sun Nov 18 19:52:22 2018
@author: dyliang
完成一个对于服饰图像进行分类的神经网络模型
"""
import tensorflow as tf
from tensorflow import keras
import numpy as np
import matplotlib.pyplot as plt
print (tf.__version__)
#导入数据集,包含70000张灰度图像,10个类别
fashion_mnist = keras.datasets.fashion_mnist
#60000张用于训练,10000张用于测试
(train_images,train_labels),(test_images,test_labels) = fashion_mnist.load_data()
#类别标签
class_names = ['T-shirt/top','Trouser','Pullover','Dress','Coat','Sandal','Shirt','Sneaker','Bag','Ankle boot']
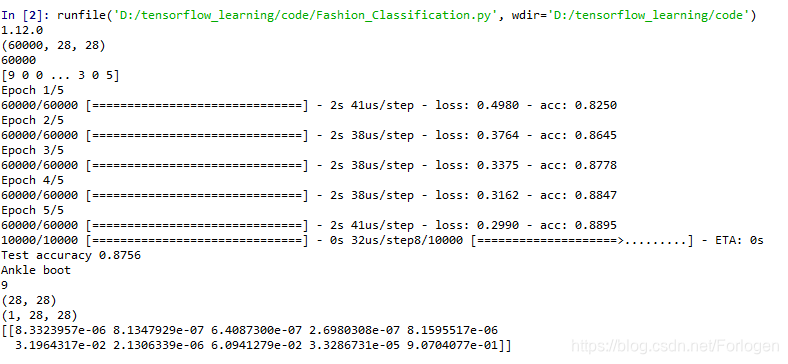
print (train_images.shape)
print (len(train_labels))
print (train_labels)
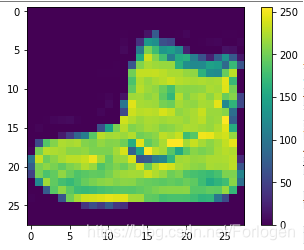
#显示图像数据
plt.figure()
plt.imshow(train_images[0])
plt.colorbar()
plt.grid(False)
output:
#将图像的数据类型转换成浮点型,再将像素值缩小到0-1,完成数据的预处理
train_images = train_images / 255.0
test_images = test_images / 255.0
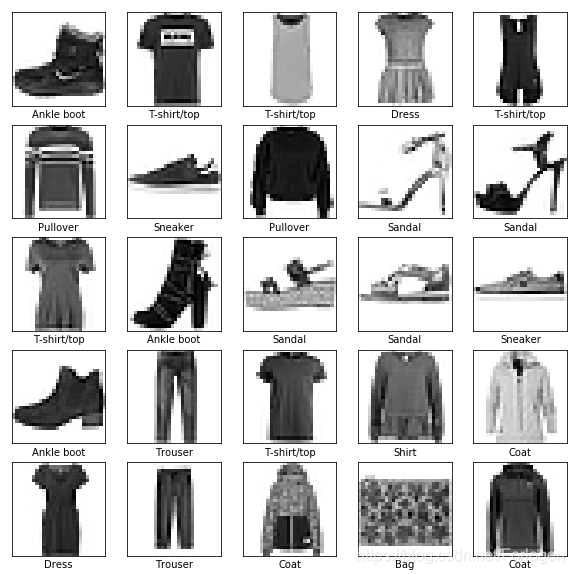
#显示前25张图像,并在图像下显示类别名称
plt.figure(figsize=(10,10))
for i in range(25):
plt.subplot(5,5,i+1)
plt.xticks([])
plt.yticks([])
plt.grid(False)
plt.imshow(train_images[i],cmap=plt.cm.binary)
plt.xlabel(class_names[train_labels[i]])
output:
	#构建模型
	#设置层
	model = keras.Sequential([
	    #将二维数组转换成一维数组
	    keras.layers.Flatten(input_shape = (28,28)),
	    #密集连接层
	    keras.layers.Dense(128,activation = tf.nn.relu),
	    #返回10个概率得分的数组,表示当前图像属于10个类别中某一个的概率
	    keras.layers.Dense(10,activation = tf.nn.softmax)
	])

	#编译模型
	model.compile(optimizer=tf.train.AdamOptimizer(),
	              loss = 'sparse_categorical_crossentropy',
	              metrics = ['accuracy'])

	#拟合数据
	model.fit(train_images,train_labels,epochs=5)

	#测试
	test_loss,test_acc = model.evaluate(test_images,test_labels)
	print ('Test accuracy',test_acc)

	#做预测
	predictions = model.predict(test_images)
	print (class_names[np.argmax(predictions[0])])
	print (test_labels[0])
output:
	#将预测绘制成图,查看全部10个通道
	def plot_image(i, predictions_array, true_label, img):
	  predictions_array, true_label, img = predictions_array[i], true_label[i], img[i]
	  plt.grid(False)
	  plt.xticks([])
	  plt.yticks([])

	  plt.imshow(img, cmap=plt.cm.binary)

	  predicted_label = np.argmax(predictions_array)
	  if predicted_label == true_label:
	    color = 'blue'
	  else:
	    color = 'red'

	  plt.xlabel("{} {:2.0f}% ({})".format(class_names[predicted_label],
	                                100*np.max(predictions_array),
	                                class_names[true_label]),
	                                color=color)


	def plot_value_array(i, predictions_array, true_label):
	  predictions_array, true_label = predictions_array[i], true_label[i]
	  plt.grid(False)
	  plt.xticks([])
	  plt.yticks([])
	  thisplot = plt.bar(range(10), predictions_array, color="#777777")
	  plt.ylim([0, 1])
	  predicted_label = np.argmax(predictions_array)

	  thisplot[predicted_label].set_color('red')
	  thisplot[true_label].set_color('blue')

	#查看第0张图像、预测和预测数组
	i = 0
	plt.figure(figsize=(6,3))
	plt.subplot(1,2,1)
	plot_image(i, predictions, test_labels, test_images)
	plt.subplot(1,2,2)
	plot_value_array(i, predictions,  test_labels)

	i = 12
	plt.figure(figsize=(6,3))
	plt.subplot(1,2,1)
	plot_image(i, predictions, test_labels, test_images)
	plt.subplot(1,2,2)
	plot_value_array(i, predictions,  test_labels)
output:
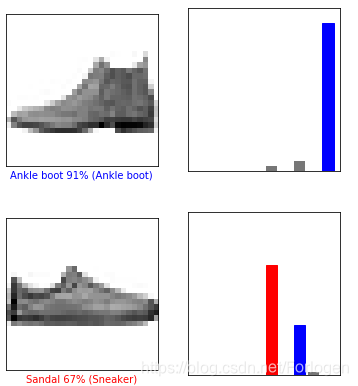
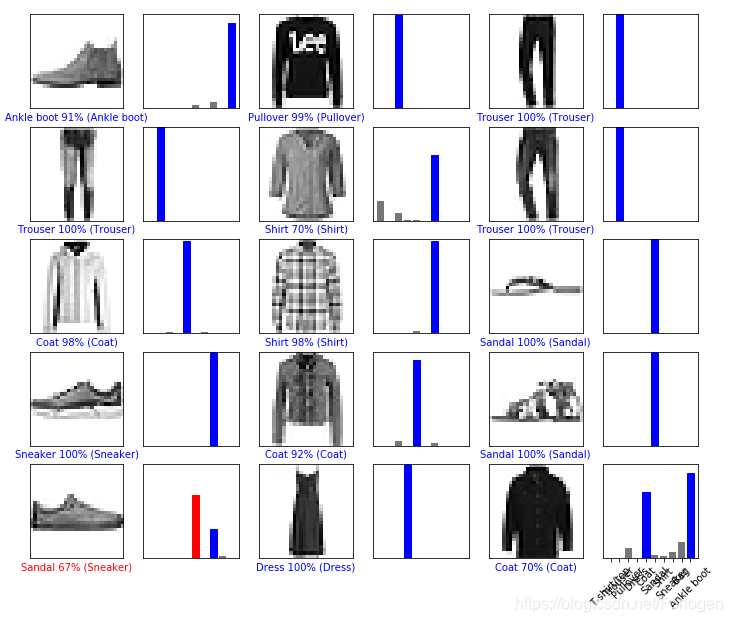
	# 将预测绘制成图像,正确的预测标签为蓝色,错误的预测标签为红色,数字表示预测标签的百分比
	num_rows = 5
	num_cols = 3
	num_images = num_rows*num_cols
	plt.figure(figsize=(2*2*num_cols, 2*num_rows))
	for i in range(num_images):
	  plt.subplot(num_rows, 2*num_cols, 2*i+1)
	  plot_image(i, predictions, test_labels, test_images)
	  plt.subplot(num_rows, 2*num_cols, 2*i+2)
	  plot_value_array(i, predictions, test_labels)

	# 用模型预测单个图像
	img = test_images[0]

	print(img.shape)

	img = (np.expand_dims(img,0))
	print (img.shape)

	#预测图像
	predictions_single = model.predict(img)

	print(predictions_single)

	plot_value_array(0, predictions_single, test_labels)
	_ = plt.xticks(range(10), class_names, rotation=45)

	np.argmax(predictions_single[0])
output:
使用模型子类化创建模型:
# -*- coding: utf-8 -*-
"""
Created on Thu Aug 29 17:26:34 2019

@author: dyliang
"""

from __future__ import absolute_import,print_function,division,unicode_literals
import tensorflow as tf
import numpy as np
from tensorflow import  keras
from tensorflow.keras.layers import Conv2D,Flatten,Dense
from tensorflow.keras import optimizers,metrics
from tensorflow.keras import Model

class_names = ['T-shirt/top','Trouser','Pillover','Dress','Coat','Sandal','Shirt','Sneaker','Bag','Ankle boot']

def load_fashion_mnist_data():
    fashion_mnist = keras.datasets.fashion_mnist
    (train_images,train_labels),(test_iamges,test_labels) = fashion_mnist.load_data()
    train_images,test_images = train_images / 255.0, test_iamges / 255.0
    train_labels,test_labels = train_labels.astype(np.int64),test_labels.astype(np.int64)

    return train_images,train_labels,test_images,test_labels

train_dataset,train_labels,test_datasets,text_labels = load_fashion_mnist_data()

print (train_dataset.shape)
print (train_labels)

class MyModel(Model):
    def __init__(self):
        super(MyModel,self).__init__(name = 'MyModel')

        self.flatten = Flatten(input_shape = (28,28))
        self.d1 = Dense(128,activation = 'relu')
        self.d2 = Dense(10,activation = 'softmax')

    def call(self,x,training = True):
        x = self.flatten(x)
        x = self.d1(x)
        return self.d2(x)

model = MyModel()
model.compile(optimizer = 'adam',
              loss = 'sparse_categorical_crossentropy',
              metrics = ['accuracy'])

model.fit(train_dataset,train_labels,epochs=5)

model.summary()


 2495
2495

 被折叠的 条评论
为什么被折叠?
被折叠的 条评论
为什么被折叠?
 到【灌水乐园】发言


