


初识ES6
let和const是什么?
// 1.let 和 const 是什么
// 声明变量或声明常量
// var 声明变量
// let 代替 var,声明变量
// const 声明常量 constant

// 2.let 和 const 的用法
// var 一样
var username = 'Alex';
let age = 18;
const sex = 'male';
console.log(username, age, sex);

// 3.什么是变量,什么是常量
username = 'ZS';
age = 28;
console.log(username, age);

// 报错
sex = 'female';

// var、let声明的就是变量,变量一旦初始化之后,还可以重新赋值
// const 声明的就是常量,常量一旦初始化,就不能重新赋值了,否则就会报错
const概述
// 1.为什么需要 const
// let
let sex = 'male';
// // ...
sex = 'female';
console.log(sex);

// const
const sex = 'male';
// // ...
sex = 'female'; //报错
console.log(sex);

// const 就是为了那些一旦初始化就不希望重新赋值的情况设计的

// 2.const 的注意事项
// 2.1.使用 const 声明常量,一旦声明,就必须立即初始化,不能留到以后赋值
const sex;  //Uncaught SyntaxError: Missing initializer in const declaration
sex='male'	//Uncaught SyntaxError: Missing initializer in const declaration

const sex = 'male';

// 2.2.const 声明的常量,允许在不重新赋值的情况下修改它的值
// 基本数据类型
const sex = 'male';
sex = 'female';  //报错

// 引用数据类型
const person = { username: 'Alex' };
person = {}; //报错
person.username = 'ZhangSan';
console.log(person); //{username: 'ZhangSan'}

// 3.什么时候用 const,什么时候用 let
// 如果没有特殊的要求一般使用const,只有明确知道这个变量后期需要修改的时候才使用let
for (let i = 0; i < 3; i++) {}
const username = 'Alex';
username = 'ZhangSan'; //报错
let、const、var的区别
// 1.重复声明
// 已经存在的变量或常量,又声明了一遍
// var 允许重复声明,let、const 不允许
let a = 1;
// // ...
let a = 2; //报错
console.log(a);
function func(a) {
let a = 1; //报错 Identifier 'a' has already been declared
}
func();
// 2.变量提升
// var 会提升变量的声明到当前作用域的顶部
console.log(a); //undefined
var a = 1;
// 相当于
var a;
console.log(a); //undefined
a = 1;
// let、const 不存在变量提升
console.log(a); //报错
let a = 1;
// 养成良好的编程习惯,对于所有的变量或常量,做到先声明,后使用
// 3.暂时性死区
// 只要作用域内存在 let、const,它们所声明的变量或常量就自动“绑定”这个区域,不再受到外部作用域的影响
// let、const 存在暂时性死区
let a = 2;
let b = 1;
function func1() {
console.log(b);
}
func1();
let a = 2;
let b = 1;
function func2() {
console.log(a); //Uncaught ReferenceError: Cannot access 'a' before initialization
let a = 1;
}
func2();
{let ac = 3;}
console.log(ac) //Uncaught ReferenceError: ac is not defined
// 养成良好的编程习惯,对于所有的变量或常量,做到先声明,后使用
// 4.window 对象的属性和方法
// 全局作用域中,var 声明的变量,通过 function 声明的函数,会自动变成 window 对象的属性或方法
// let、const 不会
// var/function
var age = 18;
function add() {}
console.log(window.age);
console.log(window.add === add);
// let/const
let age = 18;
const add = function () {};
console.log(window.age); //undefined
console.log(window.add === add); //
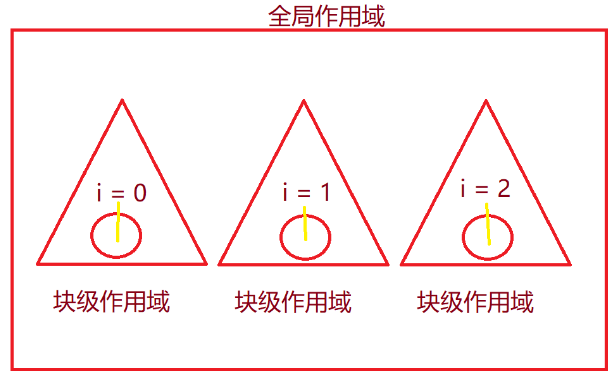
// 5.块级作用域
// 1.什么是块级作用域
// var 没有块级作用域
for (var i = 0; i < 3; i++) {
console.log(i);
}
console.log(i); //3
//上面的for循环等价于
var i;
for(i=0;i<3;i++){}
//let/const 有块级作用域
for (let i = 0; i < 3; i++) {
i = i+1
console.log(i);
}
console.log(i);
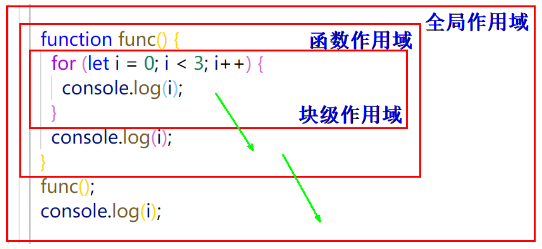
// 2.作用域链
function func() {
for (let i = 0; i < 3; i++) {
console.log(i);
}
}
func(); //0 1 2
console.log(i); //ReferenceError
// 作用域链:内层作用域->外层作用域->...->全局作用域
// 3.有哪些块级作用域
{}
{
let age = 18;
// console.log(age);
}
console.log(age);
{}
for(){}
while(){}
do{}while()
if(){}
switch(){}
function(){}
const person = {
getAge: function () {}
};
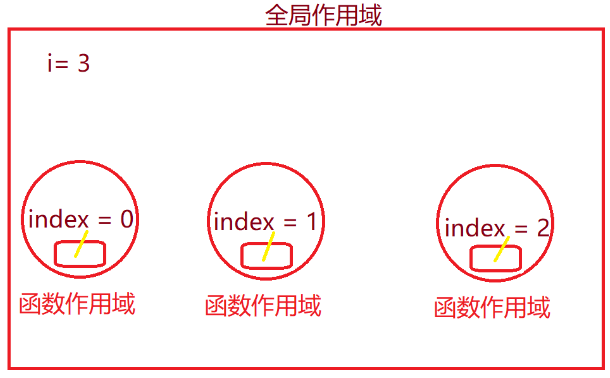
let和const的应用
<!DOCTYPE html>
<html lang="en">
  <head>
    <meta charset="UTF-8" />
    <meta name="viewport" content="width=device-width, initial-scale=1.0" />
    <meta http-equiv="X-UA-Compatible" content="ie=edge" />
    <title>let 和 const 的应用</title>
    <style>
      body {
        padding: 50px 0 0 150px;
      }

      .btn {
        width: 100px;
        height: 100px;
        margin-right: 20px;
        font-size: 80px;
        cursor: pointer;
      }
    </style>
  </head>
  <body>
    <button class="btn">0</button>
    <button class="btn">1</button>
    <button class="btn">2</button>

    <script>
      // 1.var
      // var btns = document.querySelectorAll('.btn');

      // for (var i = 0; i < btns.length; i++) {
      //   btns[i].addEventListener(
      //     'click',
      //     function () {
      //       console.log(i);
      //     },
      //     false
      //   );
      // }

      // 2.闭包
      // var btns = document.querySelectorAll('.btn');

      // for (var i = 0; i < btns.length; i++) {
      //   (function (index) {
      //     btns[index].addEventListener(
      //       'click',
      //       function () {
      //         console.log(index);
      //       },
      //       false
      //     );
      //   })(i);
      // }

      // 3.let/const
      let btns = document.querySelectorAll('.btn');

      for (let i = 0; i < btns.length; i++) {
        btns[i].addEventListener(
          'click',
          function () {
            console.log(i);
          },
          false
        );
      }
    </script>
  </body>
</html>
模板字符串
初识模板字符串
// 1.认识模板字符串
const username1 = 'alex';
// "alex"

const username2 = `alex`;
console.log(username1, username2, username1 === username2);

// 2.模板字符串与一般字符串的区别
const person = {
    username: 'Alex',
    age: 18,
    sex: 'male'
};

const info =
      '我的名字是:' +
      person.username +
      ', 性别:' +
      person.sex +
      ', 今年' +
      person.age +
      '岁了';
console.log(info);

const info = `我的名字是:${person.username}, 性别:${person.sex}, 今年${person.age}岁了`;
console.log(info);

// 模板字符串还可以嵌套另一个模板字符串
const str = `这件衬衫的价格是${`大概有$${3}`}`; //这件衬衫的价格是大概有$3
console.log(str);

// 和其他东西一起使用的时候,使用模板字符串,方便注入
// 其他情况下使用模板字符串或一般字符串都行
模板字符串注意事项
// 1.输出多行字符串
// 一般字符串
const info = '第1行\n第2行';
console.log(info);

// 模板字符串
const info = `第1行\n第2行`;
const info = `第1行
第2行`;
console.log(info);
//第1行
//第2行

// 模板字符串中,所有的空格、换行或缩进都会被保留在输出之中

// 2.输出 ` 和 \ 等特殊字符
const info = `'\`\\`;  // '`\
console.log(info);

// 3.模板字符串的注入
// ${}
const username = 'alex';
const person = { age: 18, sex: 'male' };
const getSex = function (sex) {
    return sex === 'male' ? '男' : '女';
};

const info = `${username}, ${person.age + 2}, ${getSex(person.sex)}`;
console.log(info);

// 只要最终可以得出一个值的就可以通过 ${} 注入到模板字符串中
模板字符串的应用
<!DOCTYPE html>
<html lang="en">
  <head>
    <meta charset="UTF-8" />
    <title>模板字符串的应用</title>
    <style>
      body {
        padding: 50px 0 0 300px;
        font-size: 22px;
      }

      ul {
        padding: 0;
      }

      p {
        margin-bottom: 10px;
      }
    </style>
  </head>
  <body>
    <p>学生信息表</p>
    <ul id="list">
      <li style="list-style: none;">信息加载中……</li>
    </ul>

    <script>
      // 数据
      const students = [
        {
          username: 'Alex',
          age: 18,
          sex: 'male'
        },
        {
          username: 'ZhangSan',
          age: 28,
          sex: 'male'
        },
        {
          username: 'LiSi',
          age: 20,
          sex: 'female'
        }
      ];

      const list = document.getElementById('list');

      let html = '';

      for (let i = 0; i < students.length; i++) {
        html += `<li>我的名字是:${students[i].username},${students[i].sex},${students[i].age}</li>`;
      }

      // console.log(html);
      list.innerHTML = html;
    </script>
  </body>
</html>
箭头函数
箭头函数是什么
// 1.认识箭头函数
const add = (x, y) => {
    return x + y;
};
console.log(add(1, 1));

// 2.箭头函数的结构
// const/let 函数名 = 参数 => 函数体

// 3.如何将一般函数改写成箭头函数
// 声明形式
function add() {}

// 声明形式->函数表达式形式
const add = function () {};

// 函数表达式形式->箭头函数
const add = () => {};
箭头函数注意事项
 // 1.单个参数
// 单个参数可以省略圆括号
const add = x => {
    return x + 1;
};
console.log(add(1));

// 无参数或多个参数不能省略圆括号
const add = () => {
    return 1 + 1;
};
const add = (x, y) => {
    return x + y;
};
console.log(add(1, 1));

// 2.单行函数体
// 单行函数体可以同时省略 {} 和 return
const add = (x, y) => {
    return x + y;
};
//等价于
const add = (x, y) => x + y;
console.log(add(1, 1));

// 多行函数体不能再化简了
const add = (x, y) => {
    const sum = x + y;
    return sum;
};

// 3.单行对象
// 如果箭头函数返回单行对象,可以在 {} 外面加上 (),让浏览器不再认为那是函数体的花括号
const add = (x, y) => {
    return {
        value: x + y
    };
};
const add = (x, y) => ({
    value: x + y
});


const add = (x, y) => [x, y];
console.log(add(1, 2));  //[1,2]
非箭头函数 的this指向
-
只有在函数调用的时候 this 指向才确定,不调用的时候,不知道指向谁
-
this 指向和函数在哪儿调用没关系,只和谁在调用有关
-
没有具体调用对象的话,this 指向 undefined,在非严格模式下,转向 window
// 1.全局作用域中的 this 指向
console.log(this); // window

// 2.一般函数(非箭头函数)中的 this 指向
// 严格模式就指向 undefined
function add() {
    'use strict';
    console.log(this);
}

add(); // undefined->window(非严格模式下)

window.add();

const calc = {
    add: add
};
calc.add(); // calc
const adder = calc.add;
adder(); // undefined->window(非严格模式下)

document.onclick = function () {
    console.log(this);
};
document.onclick(); //#document

function Person(username) {
    this.username = username;
    console.log(this);
}

const p = new Person('Alex'); //Person {username: 'Alex'}
箭头函数的this指向
// 1.箭头函数中的 this 指向
// 箭头函数没有自己的 this
const calc = {
    add: () => {
        console.log(this);
    }
};
// 由于add是一个箭头函数没有自己的this,故此时在外层作用域中寻找最外层的Windows
calc.add(); // window

// 2.练习
// 'use strict';
const calc = {
    add: function () {
        // this
        const adder = () => {
            console.log(this);
        };
        adder();
    }
};
//由adder执行函数,adder是一个箭头函数没有自己的this找到外层作用域中的add是一个function函数,
//此时则遵从非箭头函数中谁调用this指向谁的原则指向了add的调用者calc对象
calc.add(); // calc对象,谁调用指向谁

const addFn = calc.add;
addFn(); // undefined->window
不适用箭头函数的场景
// 1.作为构造函数
// 箭头函数没有 this
const Person = () => {};
new Person();

// 2.需要 this 指向调用对象的时候
document.onclick = function () {
    console.log(this);
};
document.addEventListener(
    'click',
    () => {
        console.log(this); //window
    },
    false
);

// 3.需要使用 arguments 的时候
// 箭头函数中没有 arguments
function add() {
    console.log(arguments);
}
add(1, 2,3,4,5);

const add = () => console.log(arguments);
add();
箭头函数的应用
<!DOCTYPE html>
<html lang="en">
  <head>
    <meta charset="UTF-8" />
    <title>箭头函数的应用</title>
    <style>
      body {
        padding: 50px 0 0 250px;
        font-size: 30px;
      }

      #btn {
        width: 100px;
        height: 100px;
        margin-right: 20px;
        font-size: 30px;
        cursor: pointer;
      }
    </style>
  </head>
  <body>
    <button id="btn">开始</button>
    <span id="result">0</span>

    <script>
      const btn = document.getElementById('btn');
      const result = document.getElementById('result');

      const timer = {
        time: 0,
        start: function () {
          // this
          var that = this;  //要用that保存此作用域的this即timer对象
          // var self = this;
          btn.addEventListener(
            'click',
            function () {
              setInterval(function () { //定时器的this指向的是window
                console.log(this);
                //this.time++;
                //result.innerHTML = this.time;
                that.time++;
                result.innerHTML = that.time;
              }, 1000);
            },
            false
          );
        }
      };

      const timer = {
        time: 0,
        start: function () {
          // this
          btn.addEventListener(
            'click',
            () => {
              // this
              setInterval(() => {
                console.log(this);
                this.time++;
                result.innerHTML = this.time;
              }, 1000);
            },
            false
          );
        }
      };

      timer.start();
    </script>
  </body>
</html>
解构赋值
数组的解构赋值
什么是解构赋值
- 解析某一数据的结构,将我们想要的东西提取出来,赋值给变量或常量
// 1.认识解构赋值
const arr = [1, 2, 3];
const a = arr[0];
const b = arr[1];
const c = arr[2];
console.log(a, b, c);

const [a, b, c] = [1, 2, 3];
console.log(a, b, c); //1 2 3
数组解构赋值的原理
// 1.模式(结构)匹配
[] = [1, 2, 3];

// 2.索引值相同的完成赋值
const [a, b, c] = [1, 2, 3];
console.log(a, b, c);

// 不取的,可以直接用逗号跳过
const [a, [, , b], c] = [1, [2, 4, 5], 3];
console.log(a, b, c);
数组解构赋值的默认值
// 1.默认值的基本用法
const [a, b] = [];
const [a, b] = [undefined, undefined];

const [a = 1, b = 2] = [];
console.log(a, b);

// 2.默认值的生效条件
// 只有当一个数组成员严格等于(===)undefined 时,对应的默认值才会生效
const [a = 1, b = 2] = [3, 0];    //a=3,b=0
const [a = 1, b = 2] = [3, null]; //a=3,b=null
const [a = 1, b = 2] = [3];       //a=3,b=2

// 3.默认值表达式
// 如果默认值是表达式,默认值表达式是惰性求值的
const func = () => {
    console.log('我被执行了');
    return 2;
};
const [x = func()] = [1]; //这里不会执行func()函数,因为不需要使用func函数
const [x = func()] = []; //这里会执行func()函数,只有当需要x使用默认值时才会执行func()函数

console.log(x);
数组解构赋值的应用
<body>
    <p>123</p>
    <p>321</p>
    <p>34567</p>
    <script>
      // 1.常见的类数组的解构赋值
      // arguments
      function func() {
        // console.log(arguments);
        // console.log(arguments.push);
        const [a, b] = arguments;
        console.log(a, b);
      }
      // func();
      func(1, 2);

      // NodeList
      console.log(document.querySelectorAll('p'));
      const [p1, p2, p3] = document.querySelectorAll('p');
      console.log(p1, p2, p3);

      // 2.函数参数的解构赋值
      const array = [1, 1];
      // const add = arr => arr[0] + arr[1];
      const add = ([x = 0, y = 0]) => x + y;
      console.log(add(array));
      console.log(add([]));

      // [x,y]=[1,1]

      // 3.交换变量的值
      let x = 1;
      let y = 2;

      // let tmp = x;
      // x = y;
      // y = tmp;
      // console.log(x, y);

      [x, y] = [y, x];
      //相当于[x, y] = [2, 1];
      console.log(x, y);
    </script>
  </body>
对象的解构赋值
对象的解构赋值原理
 // 1.模式(结构)匹配
// {}={}

// 2.属性名相同的完成赋值
const { age, username } = { username: 'Alex', age: 18 };
const { age: age, username: username } = { username: 'Alex', age: 18 };
console.log(age, username);

// 取别名
const { age: age, username: uname } = { username: 'Alex', age: 18 };
console.log(age, uname);
对象解构赋值的注意事项
// 1.默认值的生效条件
// 对象的属性值严格等于 undefined 时,对应的默认值才会生效
const { username = 'ZhangSan', age = 0 } = { username: 'alex' };
console.log(username, age);
// 2.默认值表达式
// 如果默认值是表达式,默认值表达式是惰性求值的
// 3.将一个已经声明的变量用于解构赋值
let { x } = { x: 1 };
console.log(x);
// 如果将一个已经声明的变量用于对象的解构赋值,整个赋值需在圆括号中进行
let x = 2;
({ x } = { x: 1 }); //这里必须加()否则浏览器将会把对象的{}当作为代码块的{},但如果这个变量没有提前神明则不需要
//数组的解构赋值不需要另外加()
[x] = [1];
console.log(x);
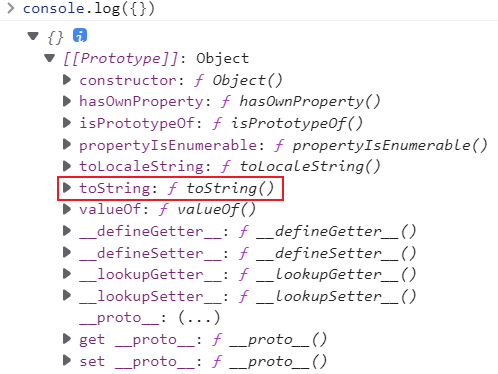
// 4.可以取到继承的属性
const {a = 1} = {}; //此时的a会采用默认值1
const { toString } = {}; //这里的toString会被赋值为{}这个空对象继承自Object的toString方法
console.log(toString);
console.log(Object.prototype);
console.log({});
console.log(toString===Object.prototype.toString) //true
对象解构赋值的应用
// 1.函数参数的解构赋值
const logPersonInfo = user => console.log(user.username, user.age);
const logPersonInfo = ({ age = 0, username = 'ZhangSan' }) => console.log(username, age); //这里就可以省略之前的user.了
logPersonInfo({ username: 'alex', age: 18 });
//相当于执行了以下代码
//({ age:age, username:username }={ username: 'alex', age: 18 })
logPersonInfo({});  //{ age = 0, username = 'ZhangSan' }

// 2.复杂的嵌套
const obj = {
    x: 1,
    y: [2, 3, 4],
    z: {
        a: 5,
        b: 6
    }
};
// const { x, y, z } = obj;
// console.log(x, y, z);
const {
    y,
    y: [, yy],
    z,
    z: { b }
} = obj;
console.log(yy, y, z, b); //3 [2, 3, 4] {a: 5, b: 6} 6
其他数据类型的解构赋值
// 1.字符串的解构赋值
// ''='hello' //这样的形式是不对的
// 数组形式的解构赋值
const [a, b, , , c] = 'hello';
console.log(a, b, c); //h e o

// 对象形式的解构赋值
const { 0: a, 4: b, length } = 'hello';
console.log(a, b, length);  //h o 5
console.log('hello'.length);

// 字符串既可以按数组形式来解构赋值,也可以按对象形式来解构赋值

// 2.数值和布尔值的解构赋值
// 先将等号右边的值转为对象

const { a = 1, toString } = 123;  //这里会先将123转化为它的包装对象即 new Number(123),然后在这个对象中寻找相应的属性,由于没有a这个属性会取默认值
console.log(a, toString);

const { b = 2, toString } = true;
console.log(b, toString); //2 ƒ toString()

// 3.undefined 和 null 的解构赋值
// 由于 undefined 和 null 无法转为对象,所以对它们进行解构赋值,都会报错
const { toString } = undefined; //报错
const { toString } = null;   //报错
对象字面量的增强
属性和方法的简洁表示
// 1.对象字面量是什么
// 实例化构造函数生成对象
const person = new Object();
person.age = 18;
person.speak = function () {};

// 对象字面量
const person = {
    age: 18,
    speak: function () {}
};

// 2.属性的简洁表示法
// 键名和变量或常量名一样的时候,可以只写一个
const age = 18;
const person = {
    // age: age
    age
};
console.log(person);

// 3.方法的简洁表示法
// 方法可以省略冒号和 function 关键字
const person = {
    // speak: function () {}
    //speak: ()=>{}
    speak() {}
};
console.log(person);
方括号语法
// 1.方括号语法的用法
const prop = 'age';
const person = {};

// person.prop = 18;
person[prop] = 18;

// 方括号语法可以写在对象字面量中
const person = {
    [prop]: 18
};

console.log(person);

// 2.方括号中可以放什么
// ${}
// [值或通过计算可以得到值的(表达式)]
const prop = 'age';
const func = () => 'age2';
const person = {
    [prop]: 18,
    [func()]: 18,
    ['sex']: 'male',
    ['s' + 'ex']: 'male',
};
console.log(person);

// 3.方括号语法和点语法的区别
// 点语法是方括号语法的特殊形式
const person = {};
// person.age 等价于 person['age']

// 属性名由数字、字母、下划线以及 $ 构成,并且数字还不能打头的时候可以使用点语法
// age18_$ √
// 18age ×
// 合法标识符可以用来作为变量或常量名

// 当你的属性或方法名是合法标识符时,可以使用点语法,其他情况下请使用方括号语法
person.1a; //不合法
person["1a"]; //合法
函数参数的默认值
函数参数的默认值是什么
// 1.认识函数参数的默认值
// 调用函数的时候传参了,就用传递的参数;如果没传参,就用默认值

// 2.函数参数默认值的基本用法
const multiply = (x, y) => {
    if (typeof y === 'undefined') {
        y = 1;
    }

    return x * y;
};

multiply(2, 1); //2
multiply(2);    //2

const multiply = (x, y = 1) => x * y;
console.log(multiply(2)); //2
函数参数默认值的注意事项
// 1.默认值的生效条件
// 不传参数,或者明确的传递 undefined 作为参数,只有这两种情况下,默认值才会生效
const multiply = (x, y = 1) => x * y;
console.log(multiply(2, 0)); //0
console.log(multiply(2, null)); //0,注意这里的null转为为数字后为0 [Number(null)=0]
console.log(multiply(2, undefined)); //2
console.log(multiply(2)); //2

// 2.默认值表达式
// 如果默认值是表达式,默认值表达式是惰性求值的

// 3.设置默认值的小技巧
// 函数参数的默认值,最好从参数列表的右边开始设置
const multiply = (x = 1, y) => x * y;
console.log(multiply(undefined, 2)); //2
console.log(multiply(2)); //NaN,因为此时的y是undefined

const multiply = (x, y = 1) => x * y;
console.log(multiply(2));
函数参数默认值的应用
// 1.接收很多参数的时候
const logUser = (username = 'ZhangSan', age = 0, sex = 'male') =>console.log(username, age, sex);
logUser('Alex', 18, 'male');
logUser();
// 2.接收一个对象作为参数
const logUser = options => console.log(options.username, options.age, options.sex);
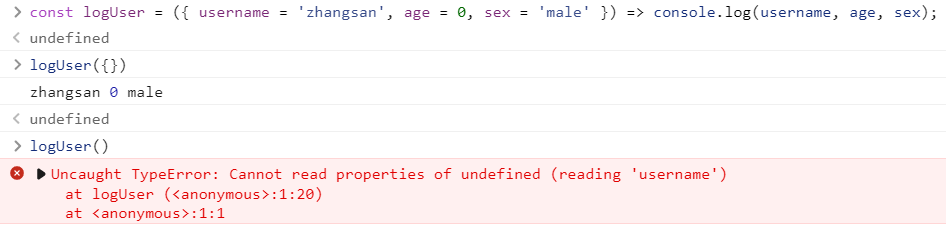
const logUser = ({ username = 'zhangsan', age = 0, sex = 'male' } = {}) => console.log(username, age, sex); //注意这里的{...}={}也应用到了默认值,前面的{...}使用的是解构赋值的默认值,后面的={}使用的是函数参数的默认值
logUser({
username: 'alex',
age: 18,
sex: 'male'
});
logUser({ username: 'alex' });
//上面这行就相当于下面这行
//{ username = 'zhangsan', age = 0, sex = 'male' } = { username: 'alex' }
logUser({}); //zhangsan 0 male
// { username = 'zhangsan', age = 0, sex = 'male' } = {}
logUser(); //zhangsan 0 male 这里会使用函数参数的默认值{},直接使用下面这句话会报错的,所以这里其实是使用了函数参数的空对象默认值
{ username = 'zhangsan', age = 0, sex = 'male' } = undefined

- 这里的logUser就没有使用{}作为函数参数的默认值,所以直接调用logUser()会报错!


 113
113


 被折叠的 条评论
为什么被折叠?
被折叠的 条评论
为什么被折叠?
 到【灌水乐园】发言


