


前言
- 由于本人水平有限,难免出现错漏,敬请批评改正。
- 更多精彩内容,可点击进入Python日常小操作专栏、OpenCV-Python小应用专栏、YOLO系列专栏、自然语言处理专栏或我的个人主页查看
- YOLOv8 Ultralytics:使用Ultralytics框架训练RT-DETR实时目标检测模型
- 基于DETR的人脸伪装检测
- YOLOv7训练自己的数据集(口罩检测)
- YOLOv8训练自己的数据集(足球检测)
- YOLOv5:TensorRT加速YOLOv5模型推理
- YOLOv5:IoU、GIoU、DIoU、CIoU、EIoU
- 玩转Jetson Nano(五):TensorRT加速YOLOv5目标检测
- YOLOv5:添加SE、CBAM、CoordAtt、ECA注意力机制
- YOLOv5:yolov5s.yaml配置文件解读、增加小目标检测层
- Python将COCO格式实例分割数据集转换为YOLO格式实例分割数据集
- YOLOv5:使用7.0版本训练自己的实例分割模型(车辆、行人、路标、车道线等实例分割)
- 使用Kaggle GPU资源免费体验Stable Diffusion开源项目
前提条件
- 熟悉Python
相关介绍
- Python是一种跨平台的计算机程序设计语言。是一个高层次的结合了解释性、编译性、互动性和面向对象的脚本语言。最初被设计用于编写自动化脚本(shell),随着版本的不断更新和语言新功能的添加,越多被用于独立的、大型项目的开发。
- PyTorch 是一个深度学习框架,封装好了很多网络和深度学习相关的工具方便我们调用,而不用我们一个个去单独写了。它分为 CPU 和 GPU 版本,其他框架还有 TensorFlow、Caffe 等。PyTorch 是由 Facebook 人工智能研究院(FAIR)基于 Torch 推出的,它是一个基于 Python 的可续计算包,提供两个高级功能:1、具有强大的 GPU 加速的张量计算(如 NumPy);2、构建深度神经网络时的自动微分机制。
- YOLOv5是一种单阶段目标检测算法,该算法在YOLOv4的基础上添加了一些新的改进思路,使其速度与精度都得到了极大的性能提升。它是一个在COCO数据集上预训练的物体检测架构和模型系列,代表了Ultralytics对未来视觉AI方法的开源研究,其中包含了经过数千小时的研究和开发而形成的经验教训和最佳实践。
- Labelme是一款图像标注工具,由麻省理工(MIT)的计算机科学和人工智能实验室(CSAIL)研发。它是用Python和PyQT编写的,开源且免费。Labelme支持Windows、Linux和Mac等操作系统。
- 这款工具提供了直观的图形界面,允许用户在图像上标注多种类型的目标,例如矩形框、多边形、线条等,甚至包括更复杂的形状。标注结果以JSON格式保存,便于后续处理和分析。这些标注信息可以用于目标检测、图像分割、图像分类等任务。
- 总的来说,Labelme是一款强大且易用的图像标注工具,可以满足不同的图像处理需求。
- Labelme标注json文件是一种用于存储标注信息的文件格式,它包含了以下几个主要的字段:
version: Labelme的版本号,例如"4.5.6"。flags: 一些全局的标志,例如是否是分割任务,是否有多边形,等等。shapes: 一个列表,每个元素是一个字典,表示一个标注对象。每个字典包含了以下几个字段:
label: 标注对象的类别名称,例如"dog"。points: 一个列表,每个元素是一个坐标对,表示标注对象的边界点,例如[[10, 20], [30, 40]]。group_id: 标注对象的分组编号,用于表示属于同一组的对象,例如1。shape_type: 标注对象的形状类型,例如"polygon",“rectangle”,“circle”,等等。flags: 一些针对该标注对象的标志,例如是否是难例,是否被遮挡,等等。lineColor: 标注对象的边界线颜色,例如[0, 255, 0, 128]。fillColor: 标注对象的填充颜色,例如[255, 0, 0, 128]。imagePath: 图像文件的相对路径,例如"img_001.jpg"。imageData: 图像文件的二进制数据,经过base64编码后的字符串,例如"iVBORw0KGgoAAAANSUhEUgAA…"。imageHeight: 图像的高度,例如600。imageWidth: 图像的宽度,例如800。
以下是一个Labelme标注json文件的示例:
{
  "version": "4.5.6",
  "flags": {},
  "shapes": [
    {
      "label": "dog",
      "points": [
        [
          121.0,
          233.0
        ],
        [
          223.0,
          232.0
        ],
        [
          246.0,
          334.0
        ],
        [
          121.0,
          337.0
        ]
      ],
      "group_id": null,
      "shape_type": "polygon",
      "flags": {}
    }
  ],
  "lineColor": [
    0,
    255,
    0,
    128
  ],
  "fillColor": [
    255,
    0,
    0,
    128
  ],
  "imagePath": "img_001.jpg",
  "imageData": "iVBORw0KGgoAAAANSUhEUgAA...",
  "imageHeight": 600,
  "imageWidth": 800
}
实验环境
- Python 3.x (面向对象的高级语言)
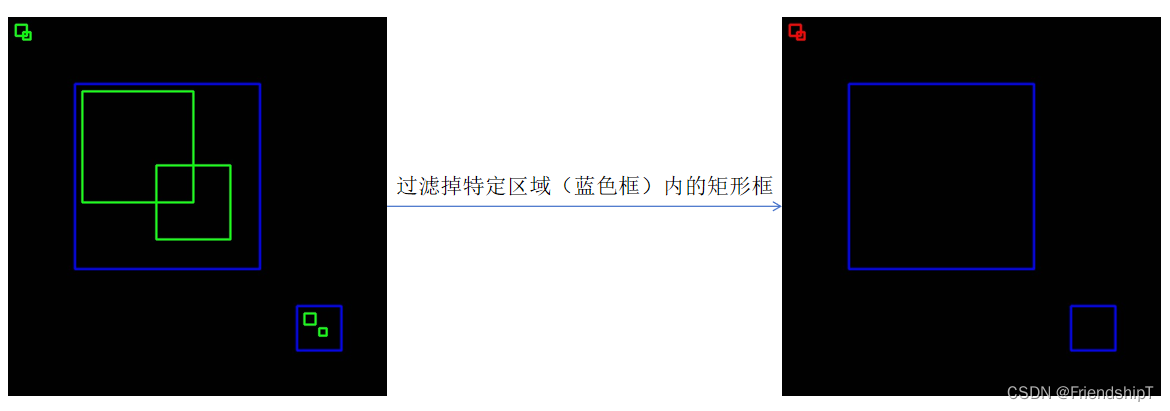
过滤掉特定区域内的矩形框
- 背景:将预测出来的矩形框,过滤掉特定区域内(某些不需要的)的矩形框
方法一:直接法(for循环遍历)
代码实现
import cv2
import copy
import numpy as np

def is_rect_inside(rect, filtered_rects):
    for filtered_rect in filtered_rects:
        if (rect[1] >= filtered_rect[1] and rect[1] + rect[3] <= filtered_rect[1] + filtered_rect[3] and
            rect[2] >= filtered_rect[2] and rect[2] + rect[4] <= filtered_rect[2] + filtered_rect[4]):
            return True
    return False


def filter_rect(rects_list,labels_list,scores_list,filtered_rects,pad_x=50,pad_y=50):
    '''
    合并重叠框

    输入参数:
        rects_list :[[占位符,x,y,w,h,占位符],[占位符,x,y,w,h,占位符],...]
        labels_list :[0,1,...]
        scores_list :[0.8,0.15,...]
        filtered_rects: [[占位符,x,y,w,h,占位符],[占位符,x,y,w,h,占位符],...]

    返回:
        过滤后的rects_list : [[占位符,x,y,w,h,占位符],[占位符,x,y,w,h,占位符],...]
        过滤后的labels_list : [0,1,...]
        过滤后的scores_list : [0.8,0.15,...]
    '''
    new_rects_list = []
    new_labels_list = []
    new_scores_list = []

    for index,rect in enumerate(rects_list):
        if not is_rect_inside(rect, filtered_rects):
            new_rects_list.append(rect)
            new_labels_list.append(labels_list[index])
            new_scores_list.append(scores_list[index])


    return new_rects_list,new_labels_list,new_scores_list


if __name__=="__main__":
    # 特定区域(蓝色区域)
    filtered_rects = [[2.0,390,390,60,60,0.0],[2.0,90,90,250,250,0.0]]
    # 原始矩形框
    rects_list = [[2.0,10,10,15,15,0.0],[2.0,20,20,10,10,0.0],[2.0,100,100,150,150,0.0],
                [2.0,200,200,100,100,0.0],[2.0,400,400,15,15,0.0],[2.0,420,420,10,10,0.0]] # [占位符,x,y,w,h,占位符]
    # print("原始的矩形框:",rects_list)
    labels_list = [0,1,2,3,2,1]
    scores_list = [0.8,0.9,0.5,0.6,0.7,0.3]

    img = np.ones([512, 512, 3], np.uint8)
    for _,x,y,w,h,_ in rects_list:
        img = cv2.rectangle(img, (x,y), (x+w,y+h), (0, 255, 0), 2)
    for _,x,y,w,h,_ in filtered_rects:
        img = cv2.rectangle(img, (x,y), (x+w,y+h), (255, 0, 0), 2)
    cv2.imshow('origin', img)
    # cv2.imwrite('origin.jpg', img)


    new_rects_list,new_labels_list,new_scores_list = filter_rect(rects_list,labels_list,scores_list,filtered_rects,pad_x=50,pad_y=50)
    # print("过滤后的矩形框,类别,置信度:",new_rects_list,new_labels_list,new_scores_list)

    img = np.ones([512, 512, 3], np.uint8)
    for _,x,y,w,h,_ in new_rects_list:
        img = cv2.rectangle(img, (x,y), (x+w,y+h), (0, 0, 255), 2)
    for _,x,y,w,h,_ in filtered_rects:
        img = cv2.rectangle(img, (x,y), (x+w,y+h), (255, 0, 0), 2)
    cv2.imshow('filtered', img)
    # cv2.imwrite('filtered.jpg', img)
    cv2.waitKey(0)
    cv2.destroyAllWindows()
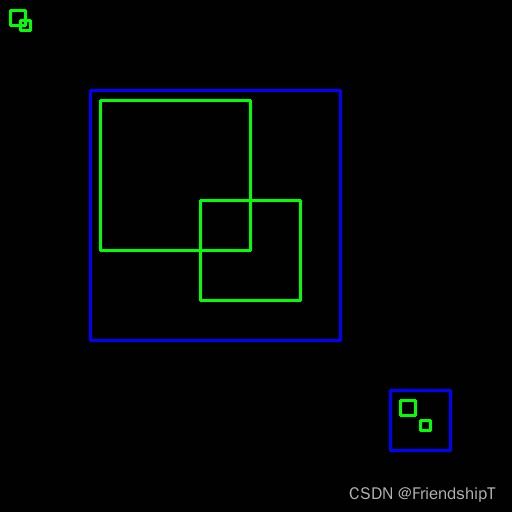
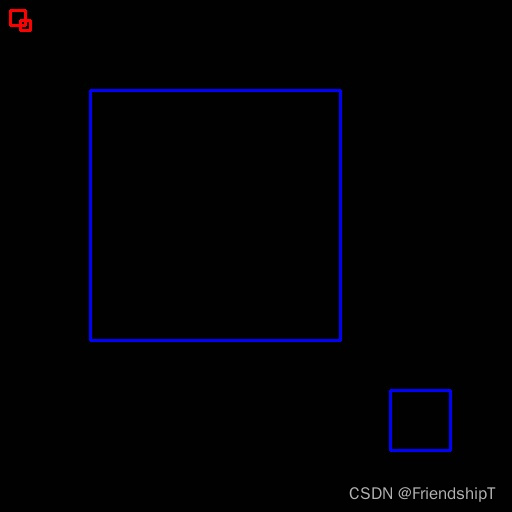
输出结果
方法二:列表推导式
代码实现
import cv2
import copy
import numpy as np

def is_rect_inside(rect, filtered_rects):
    for filtered_rect in filtered_rects:
        if (rect[1] >= filtered_rect[1] and rect[1] + rect[3] <= filtered_rect[1] + filtered_rect[3] and
            rect[2] >= filtered_rect[2] and rect[2] + rect[4] <= filtered_rect[2] + filtered_rect[4]):
            return True
    return False


if __name__=="__main__":
    # 特定区域(蓝色区域)
    filtered_rects = [[2.0,390,390,60,60,0.0],[2.0,90,90,250,250,0.0]]
    # 原始矩形框
    rects_list = [[2.0,10,10,15,15,0.0],[2.0,20,20,10,10,0.0],[2.0,100,100,150,150,0.0],
                [2.0,200,200,100,100,0.0],[2.0,400,400,15,15,0.0],[2.0,420,420,10,10,0.0]] # [占位符,x,y,w,h,占位符]
    # print("原始的矩形框:",rects_list)
    labels_list = [0,1,2,3,2,1]
    scores_list = [0.8,0.9,0.5,0.6,0.7,0.3]

    img = np.ones([512, 512, 3], np.uint8)
    for _,x,y,w,h,_ in rects_list:
        img = cv2.rectangle(img, (x,y), (x+w,y+h), (0, 255, 0), 2)
    for _,x,y,w,h,_ in filtered_rects:
        img = cv2.rectangle(img, (x,y), (x+w,y+h), (255, 0, 0), 2)
    cv2.imshow('origin', img)
    # cv2.imwrite('origin.jpg', img)

    print("原始的矩形框:", rects_list)

    filtered_rects_list = [rect for rect in rects_list if not is_rect_inside(rect, filtered_rects)]
    filtered_labels_list = [labels_list[index] for index,rect in enumerate(rects_list) if not is_rect_inside(rect, filtered_rects)]
    filtered_scores_list = [scores_list[index] for index,rect in enumerate(rects_list) if not is_rect_inside(rect, filtered_rects)]

    print("过滤后的矩形框,类别,置信度:", filtered_rects_list,filtered_labels_list,filtered_scores_list)

    img = np.ones([512, 512, 3], np.uint8)
    for _,x,y,w,h,_ in filtered_rects_list:
        img = cv2.rectangle(img, (x,y), (x+w,y+h), (0, 0, 255), 2)
    for _,x,y,w,h,_ in filtered_rects:
        img = cv2.rectangle(img, (x,y), (x+w,y+h), (255, 0, 0), 2)
    cv2.imshow('filtered', img)
    # cv2.imwrite('filtered.jpg', img)

    cv2.waitKey(0)
    cv2.destroyAllWindows()
输出结果

- 由于本人水平有限,难免出现错漏,敬请批评改正。
- 更多精彩内容,可点击进入Python日常小操作专栏、OpenCV-Python小应用专栏、YOLO系列专栏、自然语言处理专栏或我的个人主页查看
- YOLOv8 Ultralytics:使用Ultralytics框架训练RT-DETR实时目标检测模型
- 基于DETR的人脸伪装检测
- YOLOv7训练自己的数据集(口罩检测)
- YOLOv8训练自己的数据集(足球检测)
- YOLOv5:TensorRT加速YOLOv5模型推理
- YOLOv5:IoU、GIoU、DIoU、CIoU、EIoU
- 玩转Jetson Nano(五):TensorRT加速YOLOv5目标检测
- YOLOv5:添加SE、CBAM、CoordAtt、ECA注意力机制
- YOLOv5:yolov5s.yaml配置文件解读、增加小目标检测层
- Python将COCO格式实例分割数据集转换为YOLO格式实例分割数据集
- YOLOv5:使用7.0版本训练自己的实例分割模型(车辆、行人、路标、车道线等实例分割)
- 使用Kaggle GPU资源免费体验Stable Diffusion开源项目


 被折叠的 条评论
为什么被折叠?
被折叠的 条评论
为什么被折叠?
 到【灌水乐园】发言


