


caffemodel转om在Atlas服务器上面推理
本文是接上一篇文章写的《YOLOv4 darknet模型转换成caffemodel》把caffemodel转成om模型,然后在Atlas的服务器上面使用acl进行推理.
如果还没有阅读我的第一篇文章,请看,上一篇文章的传送门:
YOLOv4 darknet模型转换成caffemodel
整理不易,如果大家觉得有用,关注点赞加收藏也是一种美德哦.
1. 修改转换好的YOLOv4 caffemodel的prototxt文件
由于caffe并不支持YOLOv4的一些层,并且转换时候自动忽略,这里需要手动添加回caffe忽略的层,我们打开xxxxx.prototxt文件,并进行以下的修改:
删掉第2行至第6行的input相关描述
input: "data"
input_dim: 1
input_dim: 3
input_dim: 608
input_dim: 608
改成,下面需要注意的是 inputshape要和目标模型保持一致,YOLOv4默认的入网尺寸是608*608,如果原模型修改了入网尺寸如800*800,这里要跟着变成800*800
input: "data"
input_shape {
  dim: 1
  dim: 3
  dim: 608
  dim: 608
}
input: "img_info"
input_shape {
  dim: 1
  dim: 4
}
第3304行,
layer {
    bottom: "layer118-conv"
    top: "layer119-upsample"
    name: "layer119-upsample"
    type: "Upsample"
    upsample_param {
        scale: 2
    }
}
scale改成1, 需要加上stride为2
layer {
    bottom: "layer118-conv"
    top: "layer119-upsample"
    name: "layer119-upsample"
    type: "Upsample"
    upsample_param {
        scale: 1
        stride: 2
    }
}
第3606行
layer {
    bottom: "layer128-conv"
    top: "layer129-upsample"
    name: "layer129-upsample"
    type: "Upsample"
    upsample_param {
        scale: 2
    }
}
scale改成1, 需要加上stride为2
layer {
    bottom: "layer128-conv"
    top: "layer129-upsample"
    name: "layer129-upsample"
    type: "Upsample"
    upsample_param {
        scale: 1
        stride: 2
    }
}
文件最后加上3个YOLO层
需要注意的是,下面有classes的地方,都要换成实际的classes的数量,原本coco数据集默认的classes是80,并且boxes的数目要等于yolov4.cfg,里面的mask(mask = 0,1,2)的数目,YOLOv4默认是3,如果原模型已经修改,这里所有boxes需要修改,否则会导致编译错误
layer {
	bottom: "layer139-conv"
	top: "yolo1_coords"
	top: "yolo1_obj"
	top: "yolo1_classes"
	name: "yolo1"
	type: "Yolo"
	yolo_param {
		boxes: 3
		coords: 4
		classes: 80
		yolo_version: "V3"
		softmax: true
		background: false
    }
}

layer {
	bottom: "layer150-conv"
	top: "yolo2_coords"
	top: "yolo2_obj"
	top: "yolo2_classes"
	name: "yolo2"
	type: "Yolo"
	yolo_param {
		boxes: 3
		coords: 4
		classes: 80
		yolo_version: "V3"
		softmax: true
		background: false
	}
}

layer {
	bottom: "layer161-conv"
	top: "yolo3_coords"
	top: "yolo3_obj"
	top: "yolo3_classes"
	name: "yolo3"
	type: "Yolo"
	yolo_param {
		boxes: 3
		coords: 4
		classes: 80
		yolo_version: "V3"
		softmax: true
		background: false
	}
}
文件最后加上YoloV3DetectionOutput层
默认的YoloV3DetectionOutput层如下所示,这里需要对阈值参数以及anchor做些许修改
layer {
       name: "detection_out3"
       type: "YoloV3DetectionOutput"
       bottom: "yolo1_coords"
       bottom: "yolo2_coords"
       bottom: "yolo3_coords"
       bottom: "yolo1_obj"
       bottom: "yolo2_obj"
       bottom: "yolo3_obj"
       bottom: "yolo1_classes"
       bottom: "yolo2_classes"
       bottom: "yolo3_classes"
       bottom: "img_info"
       top: "box_out"
       top: "box_out_num"
       yolov3_detection_output_param {
                           boxes: 3
                           classes: 80
                           relative: true
                           obj_threshold: 0.5
                           score_threshold: 0.5
                           iou_threshold: 0.45
                           pre_nms_topn: 512
                           post_nms_topn: 1024
                           biases_high: 142
                           biases_high: 110
                           biases_high: 192
                           biases_high: 243
                           biases_high: 459
                           biases_high: 401
                           biases_mid: 36
                           biases_mid: 75
                           biases_mid: 76
                           biases_mid: 55
                           biases_mid: 72
                           biases_mid: 146
                           biases_low: 12
                           biases_low: 16
                           biases_low: 19
                           biases_low: 36
                           biases_low: 40
                           biases_low: 28
       }
}
修改anchor
注意如果原来模型的anchor已经被修改了,这里的anchor就需要跟着改变,上面的数值是YOLOv4模型在coco数据集下面聚类而成的anchor,这里给出yolov4.cfg关于anchor的代码,这里和上面的biases数值是相对应的.
[yolo]
mask = 0,1,2
anchors = 12, 16, 19, 36, 40, 28, 36, 75, 76, 55, 72, 146, 142, 110, 192, 243, 459, 401
classes=80
num=9
jitter=.3
ignore_thresh = .7
truth_thresh = 1
scale_x_y = 1.2
iou_thresh=0.213
cls_normalizer=1.0
iou_normalizer=0.07
iou_loss=ciou
nms_kind=greedynms
beta_nms=0.6
max_delta=5
而我们这个实例里面的anchor值如下所示
[yolo]
mask = 0,1,2
anchors = 21, 22,  58, 37,  37, 82, 110, 74,  75,170, 195,137, 147,308, 308,254, 430,440
classes=11
num=9
jitter=.3
ignore_thresh = .7
truth_thresh = 1
scale_x_y = 1.2
iou_thresh=0.213
cls_normalizer=1.0
iou_normalizer=0.07
iou_loss=ciou
nms_kind=greedynms
beta_nms=0.6
max_delta=5
模仿上面的YoloV3DetectionOutput层去写即可,
                           biases_high: 147
                           biases_high: 308
                           biases_high: 308
                           biases_high: 254
                           biases_high: 430
                           biases_high: 440
                           biases_mid: 110
                           biases_mid: 74
                           biases_mid: 75
                           biases_mid: 170
                           biases_mid: 195
                           biases_mid: 137
                           biases_low: 21
                           biases_low: 22
                           biases_low: 58
                           biases_low: 37
                           biases_low: 37
                           biases_low: 82
Anchor填写的注意事项:
如上上面的mask数量不为3,比如为4,即每一个scale(YOLOv4一共有3个不同维度的featuremap输出)有4个anchor,必须我遇到的另一个例子如下:
[yolo]
mask = 8,9,10,11
anchors = 12,  9,  26, 14,  25, 30,  47, 24,  52, 49,  80, 36,  93, 66, 168, 69, 125,114, 207,144, 270,225, 431,357
classes=6
num=12
jitter=.3
ignore_thresh = .7
truth_thresh = 1
random=1
scale_x_y = 1.05
iou_thresh=0.213
cls_normalizer=1.0
iou_normalizer=0.07
iou_loss=ciou
nms_kind=greedynms
beta_nms=0.6
max_delta=5
分析:
这里的mask=4,但是有4组anchor(一共12对),那么在修改anchor时候,多出的3对应该填在biases_high项目当中,正确的填法如下所示:
layer {
       name: "detection_out3"
       type: "YoloV3DetectionOutput"
       bottom: "yolo1_coords"
       bottom: "yolo2_coords"
       bottom: "yolo3_coords"
       bottom: "yolo1_obj"
       bottom: "yolo2_obj"
       bottom: "yolo3_obj"
       bottom: "yolo1_classes"
       bottom: "yolo2_classes"
       bottom: "yolo3_classes"
       bottom: "img_info"
       top: "box_out"
       top: "box_out_num"
       yolov3_detection_output_param {
                           boxes: 4
                           classes: 6
                           relative: true
                           obj_threshold: 0.5
                           score_threshold: 0.5
                           iou_threshold: 0.213
                           pre_nms_topn: 512
                           post_nms_topn: 1024
                           biases_high: 93
                           biases_high: 66
                           biases_high: 168
                           biases_high: 69
                           biases_high: 125
                           biases_high: 114
                           biases_high: 207
                           biases_high: 144
                           biases_high: 270
                           biases_high: 225
                           biases_high: 431
                           biases_high: 357
                           biases_mid: 47
                           biases_mid: 24
                           biases_mid: 52
                           biases_mid: 49
                           biases_mid: 80
                           biases_mid: 36
                           biases_low: 12
                           biases_low: 9
                           biases_low: 26
                           biases_low: 14
                           biases_low: 25
                           biases_low: 30
       }
}
IoU和置信度的thresh
IoU的thresh在上面的YOLO层有描述,这里是0.213
目标置信度原来的代码中传的是0.3
进行以下的修改
obj_threshold: 0.3
score_threshold: 0.3
iou_threshold: 0.213
完成修改后的YoloV3DetectionOutput如下所示
layer {
       name: "detection_out3"
       type: "YoloV3DetectionOutput"
       bottom: "yolo1_coords"
       bottom: "yolo2_coords"
       bottom: "yolo3_coords"
       bottom: "yolo1_obj"
       bottom: "yolo2_obj"
       bottom: "yolo3_obj"
       bottom: "yolo1_classes"
       bottom: "yolo2_classes"
       bottom: "yolo3_classes"
       bottom: "img_info"
       top: "box_out"
       top: "box_out_num"
       yolov3_detection_output_param {
                           boxes: 3
                           classes: 11
                           relative: true
                           obj_threshold: 0.3
                           score_threshold: 0.3
                           iou_threshold: 0.213
                           pre_nms_topn: 512
                           post_nms_topn: 1024
                           biases_high: 147
                           biases_high: 308
                           biases_high: 308
                           biases_high: 254
                           biases_high: 430
                           biases_high: 440
                           biases_mid: 110
                           biases_mid: 74
                           biases_mid: 75
                           biases_mid: 170
                           biases_mid: 195
                           biases_mid: 137
                           biases_low: 21
                           biases_low: 22
                           biases_low: 58
                           biases_low: 37
                           biases_low: 37
                           biases_low: 82
       }
}
2. 克隆华为Ascend ACL的YOLO算法推理样例
git clone https://gitee.com/liangjiaxi2019/acl_yolov3.git
在项目目录下面创建,model文件夹,准备好caffemodel和修改完的prototxt文件

复制 {项目目录}/data/model/aipp_yolov3.cfg文件到model文件下面并改名为aipp_yolov4.cfg
修改aipp_yolov4.cfg里面内容,把src_image_size_w, src_image_size_h改成608,即YOLOv4的输入,如果原模型不是YOLOv4默认入网尺寸,如800*800,这里就要修改成800*800:
aipp_op {
aipp_mode : static
related_input_rank : 0
input_format : RGB888_U8
csc_switch : false
rbuv_swap_switch : true
src_image_size_w : 608
src_image_size_h : 608
crop : false
var_reci_chn_0 : 0.0039216
var_reci_chn_1 : 0.0039216
var_reci_chn_2 : 0.0039216
}
3. 利用华为的ATC工具去把模型转成om格式
以3.2.0版本为例,首先要配置ATC工具的环境变量
atc工具环境变量配置
export PATH=/usr/local/Ascend/ascend-toolkit/latest/atc/ccec_compiler/bin:/usr/local/Ascend/ascend-toolkit/latest/atc/bin:$PATH
export ASCEND_OPP_PATH=/usr/local/Ascend/ascend-toolkit/latest/arm64-linux/opp
export ASCEND_AICPU_PATH=/usr/local/Ascend/ascend-toolkit/latest/
配置Pyacl的环境变量,用于推理,模型转成并没有用到
export PYTHONPATH=/usr/local/Ascend/ascend-toolkit/latest/arm64-linux/pyACL/python/site-packages/acl:$PYTHONPATH
export LD_LIBRARY_PATH=/usr/local/Ascend/ascend-toolkit/latest/arm64-linux/acllib/lib64:$LD_LIBRARY_PATH
准备好caffemodel,执行下面命令进行转换
atc --model=./junyahuanqx.prototxt \
    --weight=./junyahuanqx.caffemodel \
    --framework=0 \
    --output=./yolov4_aipp \
    --output_type=FP32 \
    --soc_version=Ascend910 \
    --insert_op_conf=./aipp_yolov4.cfg
转换完成后ouput目录下面就会输出yolov4_aipp .om模型
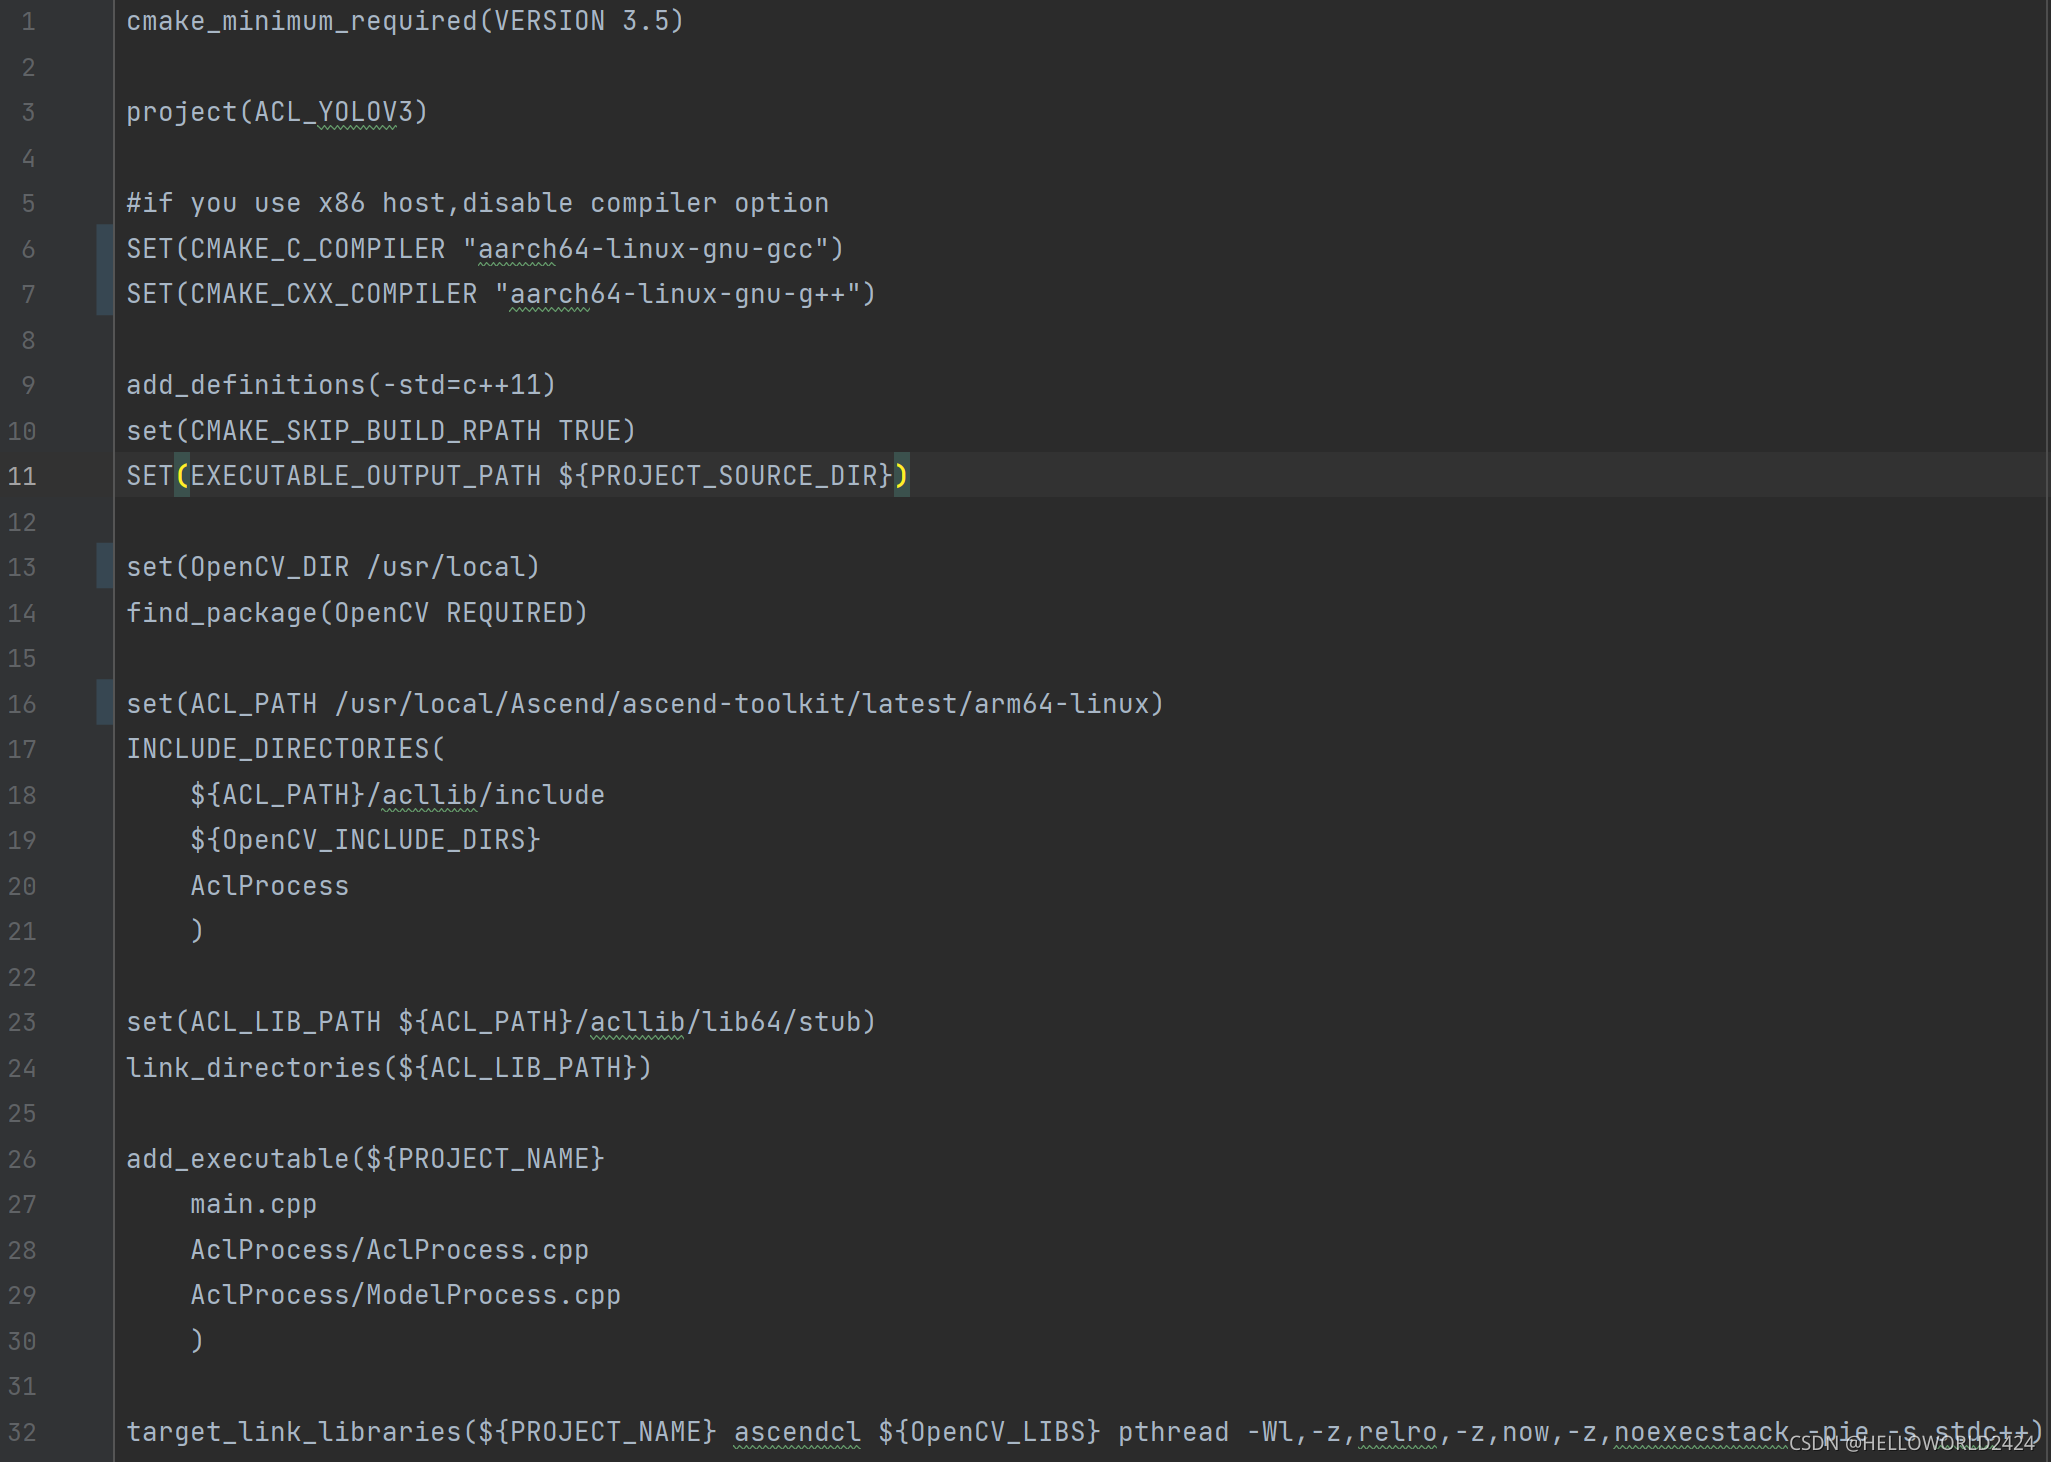
4. 编译acl项目
修改CMakeLists.txt
蓝色部分为需要改成实际目录的内容,分别为编译器,opencv目录,已经ascend-toolkit的位置
执行下面的命令先创建acl.json,然后进行编译
cd data
echo {} > acl.json
cd ..
mkdir build
cd build
cmake ..
make
预测
./ACL_YOLOV3 ./model/yolov4_aipp.om testimage.jpg
执行成功后返回
root@346873305bef:/home/jxl/guochan/guochan_src_code/dxaijunyahuan_cpp# ./ACL_YOLOV3 ./model/yolov4_aipp.om testimage.jpg
acl init successfully
Create context successfully
set context successfully
Create stream successfully
ModelProcess:Begin to init instance.
finish init AclProcess
ModelProcess:Begin to inference.
begin postprocess
The number of output buffers of yolov3 model is 2
Object detected number is 4
#Obj0, box(2762, 1960, 2970, 2754)   confidence: 0.998047 lable: 1
#Obj1, box(2690, 2118, 3042, 2606)   confidence: 0.994141 lable: 1
#Obj2, box(3104, 2384, 3892, 2870)   confidence: 0.991211 lable: 2
#Obj3, box(3268, 2236, 3724, 3032)   confidence: 0.989258 lable: 2
model run success!
cost time : 20.799ms
ModelProcess:Begin to deinit instance.
ModelProcess:Finished deinit instance.
all tasks in stream done
Destroy Stream successfully
Destroy Context successfully
acl deinit successfully
5. 问题
1. 如果运行时候,opencv的的库提示找不到,需要安装编译opencv,我这里的opencv编译命令如下所示,
cd /root
unzip opencv-3.4.5_contirbute_cache.zip
cd opencv-3.4.5_contirbute_cache
mkdir build
cd build
cmake -D CMAKE_BUILD_TYPE=Release \
-D BUILD_SHARED_LIBS=ON \
-D CMAKE_CXX_FLAGS=-fPIC \
-D CMAKE_C_FLAGS=-fPIC \
-D CMAKE_EXE_LINKER_FLAGS=-lpthread -lrt -ldl \
-D CMAKE_INSTALL_PREFIX=/usr/local \
-D OPENCV_EXTRA_MODULES_PATH=../opencv_contrib-3.4.5/modules \
-D OPENCV_ENABLE_NONFREE=True \
-D PYTHON3_EXECUTABLE=/usr/bin/python3.7 \
-D PYTHON3_INCLUDE_DIR=/usr/include/python3.7 \
-D PYTHON3_LIBRARY=/usr/lib/python3.7/config-3.7m-aarch64-linux-gnu/libpython3.7.so \
-D PYTHON3_NUMPY_INCLUDE_DIRS=/usr/local/lib/python3.7/dist-packages/numpy/core/include \
-D PYTHON2_EXECUTABLE=/usr/bin/python2.7 \
-D PYTHON2_INCLUDE_DIR=/usr/include/python2.7 \
-D PYTHON2_LIBRARY=/usr/lib/python2.7/config-aarch64-linux-gnu/libpython2.7.so \
-D PYTHON2_NUMPY_INCLUDE_DIRS=/usr/local/lib/python2.7/dist-packages/numpy/core/include \
-D BUILD_TESTS=OFF \
-D BUILD_PERF_TESTS=OFF \
-D BUILD_opencv_python3=ON \
..
make -j128
make install
其中CMAKE_INSTALL_PREFIX是opencv的安装路径,我这里是
/usr/local
需要加入到系统的搜索路径当中去
echo /usr/local/lib > /etc/ld.so.conf.d/opencv.conf
ldconfig
ACL初始化错误
如果出现以下提示:
Failed to init acl, ret = 100003
AclProcess Init faild.
some tasks in stream not done, ret = 107002
all tasks in stream done
Destroy Stream faild, ret = 107002
Destroy Stream successfully
Destroy Context faild, ret = 107002
Destroy Context successfully
acl deinit successfully
因为在4中编译时候没有在data目录下面加入空白的json文件,执行:
cd data
echo {} > acl.json
cd ..
然后重新编译即可
PS 注意事项
经过测试后,我们发现,转换以后的模型在输出类别时候是从0开始算的,而我们原来的模型是从1开始计算类别的,所以我们转换完成以后需要把输出的类别shift一下(即输出+1)从而得到真实的类别.
6. Pyacl版本
Python通过接口亦可访问ACL,这里通过对上面C++版本代码的迁移,给出YOLOv4,Python版本的前向运算样例, 其中这里需要用到atlas_utils模块,可以通过下面地址下载
https://gitee.com/ascend/samples/tree/master/python/common
import acl
import numpy as np
from atlas_utils.acl_model import Model
from atlas_utils.acl_resource import AclResource
import cv2


MODEL_PATH = "model/junyahuanqx.om"
MODEL_WIDTH = 608
MODEL_HEIGHT = 608


def main():
    """
    Program execution with picture directory parameters
    """

    acl_resource = AclResource()
    acl_resource.init()
    model = Model(MODEL_PATH)

    img = cv2.imread("./testimage.jpg")
    img = cv2.cvtColor(img, cv2.COLOR_BGR2RGB)
    # Input
    origin_height, origin_width, _ = img.shape
    dims, ret = acl.mdl.get_input_dims(model._model_desc, 0)
    batch, height, width, channels = tuple(dims["dims"])

    r = origin_height * 1.0 / origin_width
    if r > 1:
        offset = (width - origin_width * (height * 1.0 / origin_height)) / 2.0
        M = cv2.getAffineTransform(np.array([[0, 0], [0, origin_height], [origin_width, 0]], dtype=np.float32),
                                   np.array([[offset, 0], [offset, height], [(width - offset), 0]], dtype=np.float32))
    else:
        offset = (height - origin_height * (width * 1.0 / origin_width)) / 2.0
        M = cv2.getAffineTransform(np.array([[0, 0], [origin_width, 0], [0, origin_height]], dtype=np.float32),
                                   np.array([[0, offset], [width, offset], [0, (height-offset)]], dtype=np.float32))
    imgResize = cv2.warpAffine(img,  M, (height, width), cv2.INTER_NEAREST)
    imgInfo = np.array([height, width, origin_height, origin_width], dtype=np.float32)

    result = model.execute([imgResize, imgInfo])
    box_out, box_out_num = tuple(result)

    box_out = box_out[0]
    objNum = int(box_out_num[0][0])

    objInfo = []
    for k in range(objNum):
        pos = 0
        leftTopX = box_out[objNum*pos + k]
        pos += 1
        leftTopY = box_out[objNum*pos + k]
        pos += 1
        rightBotX = box_out[objNum*pos + k]
        pos += 1
        rightBotY = box_out[objNum*pos + k]
        pos += 1
        confidence = box_out[objNum*pos + k]
        pos += 1
        class_Id = box_out[objNum*pos + k]
        objInfo.append([leftTopX, leftTopY, rightBotX, rightBotY, confidence, class_Id])
    print(objInfo)
    for box in objInfo:
        cv2.rectangle(img, (int(box[0]), int(box[1])), (int(box[2]), int(box[3])), (0, 0, 255), 3)
    cv2.imwrite("result_python.jpg", img)


if __name__ == '__main__':
    main()


 871
871


 被折叠的 条评论
为什么被折叠?
被折叠的 条评论
为什么被折叠?
 到【灌水乐园】发言


