


1. BCE公式部分
可以简单浏览下这篇博客的文章:
https://blog.csdn.net/qq_14845119/article/details/114121003
这是多分类 经典
B
C
E
L
o
s
s
BCELoss
BCELoss 公式
L
=
−
y
L
+
−
(
1
−
y
)
L
−
L = -y L_{+} - (1-y) L_{-}
L=−yL+−(1−y)L−
其中, L + / − L_{+/-} L+/− 是正负例预测概率的log值,即:
L + = l o g ( y ^ ) L − = l o g ( 1 − y ^ ) y ^ = s i g m o i d ( l o g i t ) \begin{aligned} L_{+} &= log( \hat{y} )\\ L_{-} &= log( 1- \hat{y} )\\ \hat{y} &= sigmoid( logit ) \end{aligned} L+L−y^=log(y^)=log(1−y^)=sigmoid(logit)
实际上由于 l a b e l label label 标签 y y y 值,是一个 0 / 1 0/1 0/1 矩阵,实际上充当了一个掩码 m a s k mask mask 的作用,挑选出 L + L_{+} L+ 中正例部分 和 L − L_{-} L− 中负例部分
假设:
y = [ 0 0 1 0 ] y = \begin{bmatrix} 0 & 0 \\ 1 & 0 \end{bmatrix} y=[0100]
y ^ = [ 0.5 0.1 0.3 0.2 ] L + = [ − 0.6931 − 2.3026 − 1.2040 − 1.6094 ] L − = [ − 0.6931 − 0.1054 − 0.3567 − 0.2231 ] \hat{y} = \begin{bmatrix} 0.5 & 0.1 \\ 0.3 & 0.2 \end{bmatrix} \ L_{+} = \begin{bmatrix} -0.6931 & -2.3026 \\ -1.2040 & -1.6094 \end{bmatrix} \ L_{-} = \begin{bmatrix} -0.6931 & -0.1054 \\ -0.3567 & -0.2231 \end{bmatrix} y^=[0.50.30.10.2] L+=[−0.6931−1.2040−2.3026−1.6094] L−=[−0.6931−0.3567−0.1054−0.2231]
所以, L L L 左下角为 L + L_{+} L+对应的值的相反数,左上角和右上角和右下角为 L − L_{-} L−对应的值的相反数
L = [ 0.6931 0.1054 1.2040 0.2231 ] L = \begin{bmatrix} 0.6931 & 0.1054 \\ 1.2040 & 0.2231 \end{bmatrix} L=[0.69311.20400.10540.2231]
代码验证:
x = torch.tensor([0.5, 0.1, 0.3, 0.2]).reshape(2, 2).float()
y = torch.tensor([0, 0, 1, 0]).reshape(2, 2).float()
torch.nn.functional.binary_cross_entropy(x, y, reduction='none')
tensor([[0.6931, 0.1054],
        [1.2040, 0.2231]])
(不要小看这个 mask 代码的操作,一会儿写 asl 代码会用的上)
2. focal loss 公式部分
基本公式依旧是这个:
L
=
−
y
L
+
−
(
1
−
y
)
L
−
L = -y L_{+} - (1-y) L_{-}
L=−yL+−(1−y)L−
L
+
L_{+}
L+ 和
L
−
L_{-}
L− 如下:
L
+
=
(
1
−
p
)
γ
∗
l
o
g
(
p
)
L
−
=
p
γ
∗
l
o
g
(
1
−
p
)
p
=
s
i
g
m
o
i
d
(
l
o
g
i
t
)
\begin{aligned} L_{+} &= (1-p)^{\gamma} * log(p) \\ L_{-} &= p^{\gamma} * log(1-p) \\ p &= sigmoid(logit) \end{aligned}
L+L−p=(1−p)γ∗log(p)=pγ∗log(1−p)=sigmoid(logit)
3. asl 公式部分
asl loss 是 focal loss的改进版
L + = ( 1 − p ) γ + ∗ l o g ( p ) L − = p m γ − ∗ l o g ( 1 − p m ) p = s i g m o i d ( l o g i t ) p m = m a x ( p − m , 0 ) \begin{aligned} L_{+} &= (1-p)^{\gamma_{+}} &*& log(p) \\ L_{-} &= p_m^{\gamma_{-}} &*& log(1-p_m) \\ p &= sigmoid(logit) \\ p_m &= max(p-m, 0) \end{aligned} L+L−ppm=(1−p)γ+=pmγ−=sigmoid(logit)=max(p−m,0)∗∗log(p)log(1−pm)
由于 p m p_m pm 仅在 L − L_{-} L− 中存在,而 p p p一般出现在 L + L_{+} L+中, ( 1 − p ) (1-p) (1−p)一般出现在 L − L_{-} L−中,所以将 p m p_m pm 做一些反向操作
先引入一个引理,显然成立,x和y都是函数(或者变量),二者中大的加上负号,就是二者相反数中小的
− m a x ( x , y ) = = m i n ( − x , − y ) -max(x, y) == min(-x, -y) −max(x,y)==min(−x,−y)
所以:
p
m
=
m
a
x
(
p
−
m
,
0
)
=
−
m
i
n
(
m
−
p
,
0
)
−
p
m
=
m
i
n
(
m
−
p
,
0
)
1
−
p
m
=
m
i
n
(
m
−
p
,
0
)
+
1
1
−
p
m
=
m
i
n
(
m
−
p
+
1
,
1
)
1
−
p
m
=
m
i
n
(
m
+
1
−
p
,
1
)
1
−
p
m
=
n
p
.
c
l
i
p
(
m
+
1
−
p
,
m
a
x
=
1
)
\begin{aligned} p_m &= max(p-m, 0) \\ &= -min(m-p, 0) \\ -p_m &= min(m-p, 0) \\ 1-p_m &= min(m-p, 0) + 1 \\ 1-p_m &= min(m-p+ 1, 1) \\ 1-p_m &= min(m+ 1-p, 1) \\ 1-p_m &= np.clip(m+ 1-p, max=1) \\ \end{aligned}
pm−pm1−pm1−pm1−pm1−pm=max(p−m,0)=−min(m−p,0)=min(m−p,0)=min(m−p,0)+1=min(m−p+1,1)=min(m+1−p,1)=np.clip(m+1−p,max=1)
这一行咱等会要用到
4. asl 代码
看看 asl loss 的代码,torch代码来自:
https://github.com/Alibaba-MIIL/ASL/blob/main/src/loss_functions/losses.py
self.gamma_neg是 γ − \gamma_{-} γ−self.gamma_pos是 γ + \gamma_{+} γ+self.eps是用作 log 函数内部,防止溢出
class AsymmetricLossOptimized(nn.Module):
    ''' Notice - optimized version, minimizes memory allocation and gpu uploading,
    favors inplace operations'''

    def __init__(self, gamma_neg=4, gamma_pos=1, clip=0.05, eps=1e-8, disable_torch_grad_focal_loss=False):
        super(AsymmetricLossOptimized, self).__init__()

        self.gamma_neg = gamma_neg
        self.gamma_pos = gamma_pos
        self.clip = clip
        self.disable_torch_grad_focal_loss = disable_torch_grad_focal_loss
        self.eps = eps

        # prevent memory allocation and gpu uploading every iteration, and encourages inplace operations
        self.targets = self.anti_targets = self.xs_pos = self.xs_neg = self.asymmetric_w = self.loss = None

    def forward(self, x, y):
        """"
        Parameters
        ----------
        x: input logits
        y: targets (multi-label binarized vector)
        """

        self.targets = y
        self.anti_targets = 1 - y

        # 分别计算正负例的概率
        self.xs_pos = torch.sigmoid(x)
        self.xs_neg = 1.0 - self.xs_pos

        # 非对称裁剪
        if self.clip is not None and self.clip > 0:
            self.xs_neg.add_(self.clip).clamp_(max=1)  # 给 self.xs_neg 加上 clip 值

        # 先进行基本交叉熵计算
        self.loss = self.targets * torch.log(self.xs_pos.clamp(min=self.eps))
        self.loss.add_(self.anti_targets * torch.log(self.xs_neg.clamp(min=self.eps)))

        # Asymmetric Focusing
        if self.gamma_neg > 0 or self.gamma_pos > 0:
            if self.disable_torch_grad_focal_loss:
                torch.set_grad_enabled(False)

            # 以下 4 行相当于做了个并行操作
            self.xs_pos = self.xs_pos * self.targets
            self.xs_neg = self.xs_neg * self.anti_targets
            self.asymmetric_w = torch.pow(1 - self.xs_pos - self.xs_neg,
                                          self.gamma_pos * self.targets + self.gamma_neg * self.anti_targets)

            if self.disable_torch_grad_focal_loss:
                torch.set_grad_enabled(True)
            self.loss *= self.asymmetric_w

        return -self.loss.sum()
来咱单独看一下代码:
# 非对称裁剪
if self.clip is not None and self.clip > 0:
	self.xs_neg.add_(self.clip).clamp_(max=1)  # 给 self.xs_neg 加上 clip 值
这两行用于计算:
1
−
p
m
=
n
p
.
c
l
i
p
(
m
+
1
−
p
,
m
a
x
=
1
)
\begin{aligned} 1-p_m &= np.clip(m+ 1-p, max=1) \end{aligned}
1−pm=np.clip(m+1−p,max=1)
# 先进行基本交叉熵计算
self.loss = self.targets * torch.log(self.xs_pos.clamp(min=self.eps))
self.loss.add_(self.anti_targets * torch.log(self.xs_neg.clamp(min=self.eps)))
这两行用于计算红框部分:
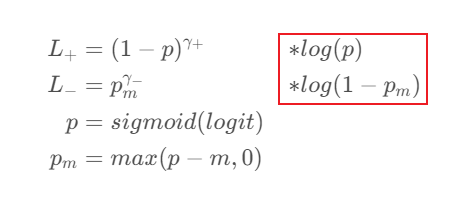
注意 self.targets 和 self.anti_targets 都相当于掩码 mask 的作用,此处的 self.loss 矩阵的shape是和 self.targets 一样的 shape,不理解可以回忆一下 BCE公式部分 的计算
而前面的 幂 相当于权重,就是代码中的 self.asymmetric_w,也就是此处的:
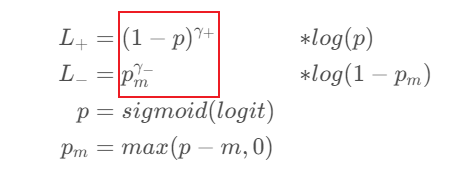
self.asymmetric_w 是这样计算的,这部分很妙!
self.xs_pos = self.xs_pos * self.targets
self.xs_neg = self.xs_neg * self.anti_targets
self.asymmetric_w = torch.pow(1 - self.xs_pos - self.xs_neg,
                              self.gamma_pos * self.targets + self.gamma_neg * self.anti_targets)
插一句 torch.pow 该函数会将两个shape相同的张量的对应位置做幂运算,看这个例子
>>> x = torch.tensor([1, 2, 3, 4])
>>> y = torch.tensor([2, 2, 3, 1])
>>> torch.pow(x, y)
tensor([ 1,  4, 27,  4])
计算 self.asymmetric_w 时,只需将pow的
x
x
x 参数对应位置写成
(
1
−
p
)
(1-p)
(1−p) 或者
p
m
p_m
pm,将pow的
y
y
y 参数对应位置写成
γ
−
\gamma_{-}
γ− 或者
γ
+
\gamma_{+}
γ+ 即可,先看简单的,
y
y
y 参数这里计算:
self.gamma_pos * self.targets + self.gamma_neg * self.anti_targets
也是通过 self.targets 的 mask 操作来进行的,而 x x x 参数这样计算:
1 - self.xs_pos - self.xs_neg
当计算
L
+
L_{+}
L+ 时,self.xs_neg==0,
x
x
x 参数对应位置就是 1 - self.xs_pos 即 (1-p)
当计算
L
−
L_{-}
L− 时,self.xs_pos==0,
x
x
x 参数对应位置就是 1 - self.xs_neg 即
(
1
−
(
1
−
p
m
)
)
=
p
m
(1-(1-p_m))=p_m
(1−(1−pm))=pm
通过一个 torch.pow 巧妙的计算了 self.asymmetric_w NICE!
之后二者对应位置相乘即可
self.loss *= self.asymmetric_w
5. asl 代码 Paddle 实现
class AsymmetricLossOptimizedWithLogit(nn.Layer):
    ''' Notice - optimized version, minimizes memory allocation and gpu uploading,
    favors inplace operations'''

    def __init__(self, gamma_neg=4, gamma_pos=1, clip=0.05, eps=1e-5, disable_paddle_grad_focal_loss=False):
        super(AsymmetricLossOptimizedWithLogit, self).__init__()

        self.gamma_neg = gamma_neg
        self.gamma_pos = gamma_pos
        self.clip = clip
        self.disable_paddle_grad_focal_loss = disable_paddle_grad_focal_loss
        self.eps = eps

        self.targets = self.anti_targets = self.xs_pos = self.xs_neg = self.asymmetric_w = self.loss = None

    def forward(self, x, y, weights=None):
        """"
        Parameters
        ----------
        x: input logits
        y: targets (multi-label binarized vector)
        """

        self.targets = y
        self.anti_targets = 1 - y

        # Calculating Probabilities
        self.xs_pos = F.sigmoid(x)
        self.xs_neg = 1.0 - self.xs_pos

        # Asymmetric Clipping
        if self.clip is not None and self.clip > 0:
            # self.xs_neg.add_(self.clip).clip_(max=1)
            self.xs_neg = (self.xs_neg + self.clip).clip_(max=1)

        # Basic CE calculation
        self.loss = self.targets * paddle.log(self.xs_pos.clip(min=self.eps))
        self.loss.add_(self.anti_targets * paddle.log(self.xs_neg.clip(min=self.eps)))

        # Asymmetric Focusing
        if self.gamma_neg > 0 or self.gamma_pos > 0:
            if self.disable_paddle_grad_focal_loss:
                paddle.set_grad_enabled(False)
            self.xs_pos = self.xs_pos * self.targets
            self.xs_neg = self.xs_neg * self.anti_targets
            self.asymmetric_w = paddle.pow(1 - self.xs_pos - self.xs_neg,
                                            (self.gamma_pos * self.targets + \
                                            self.gamma_neg * self.anti_targets).astype("float32"))
            if self.disable_paddle_grad_focal_loss:
                paddle.set_grad_enabled(True)
            self.loss *= self.asymmetric_w

        if weights is not None:
            self.loss *= weights

        _loss = -self.loss.sum()

        return _loss


if __name__ == "__main__":

    np.random.seed(11070109)
    x = np.random.randn(3, 3)
    x = paddle.to_tensor(x).cast("float32")
    y = (x > 0.5).cast("float32")

    loss = AsymmetricLossOptimizedWithLogit()
    out = loss(x, y)


 1万+
1万+


 被折叠的 条评论
为什么被折叠?
被折叠的 条评论
为什么被折叠?
 到【灌水乐园】发言


