


项目目录
组合式 API
组合式 API 是 Vue 3 中引入的一种更灵活的 API 设计

setup
setup 函数在 Vue 3 中可以看作是替代 Vue 2 中的 data 选项和其他一些选项(如 computed、methods 等)的方式
- 执行时机:
beforeCreate生命周期钩子之前 setup函数中,获取不到this- 可以使用
<script setup>语法糖简化代码
示例代码如下:
<!--<script>
选项式写法需要 return
export default {
  setup() {
    // 属性
    const message = '程序员校花'
    // 函数
    const logMessage = () => {
      console.log(message)
    }

    return {
      message,
      logMessage
    }
  },
  beforeCreate() {
    console.log('beforeCreate函数')
  }
}
</script>-->

<script setup>
const message = 'this is a message'
const logMessage = () => {
  console.log(message)
}
</script>

<template>
  <div>{{ message }}</div>
  <button @click="logMessage">按钮</button>
</template>
reactive & ref
-
不使用
reactive或ref数据就不是响应式的 -
reactive:接收对象类型的数据传入并返回一个响应式的对象 -
ref:接收简单类型或者对象类型的数据传入并返回一个响应式的对象:- 在传入数据的时候包装了一层对象
- 内部实现依赖于
reactive - js 中访问需要通过
.value,template 中则不需要
示例代码如下:
<script setup>
import {reactive, ref} from "vue";
const state = reactive({
  count: 100
})

const state2 = ref(3)
console.log(state2.value) // 3
</script>

<template>
  <div>{{state.count}}</div>
  <button @click="state.count++">+1</button>

  <div>{{state2}}</div>
  <button @click="state2++">+1</button>
</template>
computed
- 计算属性基本思想和 Vue2 的一致,组合式 API 下的计算属性只是写法不同
- 计算属性应该是只读的,特殊情况可以配置 get、set
示例代码如下:
<script setup>
import {computed, ref} from "vue";

// 声明数据
const list = ref([1, 2, 3, 4])

// 基于 list 过滤大于 2 的数组
const computedList = computed(() => {
  return list.value.filter( i => i > 2)
})
console.log(computedList.value) // [3, 4]
</script>

<template>
  <div>原始数据:{{list}}</div>
  <div>计算后的数据:{{computedList}}</div>
</template>
watch
执行 watch 函数传入要侦听的响应式数据( ref 对象)和回调函数,示例代码如下:
<script setup>
import {watch, ref} from "vue";

const count = ref(100)
const nickName = ref('校花')

const changeCount = () => {
  count.value++
}
const chengNickname = () => {
  nickName.value = '程序员校花'
}

// 监视单个数据的变化
watch(count, (newValue, oldValue) => {
  console.log(newValue, oldValue)
}, {
  immediate: true // 一进页面立即执行
})
// 监视多个数据的变化
watch([count, nickName], (newArr, oldArr) => {
  console.log(newArr, oldArr)
})

// 监视对象
const userInfo = ref({
  name: 'zs',
  age: 18
})
const setUserInfo = () => {
  userInfo.value.age++
}
watch(userInfo, (newValue) => {
  console.log(newValue)
}, {
  deep: true // 深度监视
})

// 精确侦听对象的某个属性,不使用 deep
watch(() => userInfo.value.age, (newValue, oldValue) => {
  console.log(newValue, oldValue)
})
</script>

<template>
  <div>{{ count }}</div>
  <button @click="changeCount">改数字</button>
  <div>{{ nickName }}</div>
  <button @click="chengNickname">改昵称</button>
  <div>{{ userInfo }}</div>
  <button @click="setUserInfo">修改 userInfo</button>
</template>
生命周期
Vue 3 的生命周期 API(选项式 VS 组合式)
| 选项式 | 组合式 |
|---|---|
| setup | |
| beforeCreate | onBeforeMount |
| created | onMounted |
| beforeMount | onBeforeUpdate |
| mounted | onUpdated |
| beforeUpdate | onBeforeUnmount |
| updated | onUnmounted |
| beforeUnmount | |
| unmounted |
组合式 API 的生命周期函数可以声明多次,按照顺序依次执行
父子通信
父传子
父组件代码如下:
<script setup>
import Son from "@/components/Son.vue";
import {ref} from "vue";

const money = ref(100)
</script>

<template>
  <div>
    <h3>父组件 - {{money}}</h3>
    <Son car="玛莎拉蒂" :money="money"></Son>
  </div>
</template>
子组件代码如下:
<script setup>
const props = defineProps({
  car: String,
  money: Number
})
console.log(props.car) // 玛莎拉蒂
console.log(props.money) // 100
</script>

<template>
  <!-- 对于 props 传递过来的数据,模板中可以直接使用-->
  <div class="son">子组件 -  {{car}} - {{money}}</div>
</template>
子传父
父组件代码如下:
<script setup>
import Son from "@/components/Son.vue";
import {ref} from "vue";

const money = ref(100)

const changeFn = (newMoney) => {
  money.value = newMoney
}
</script>

<template>
  <div>
    <h3>父组件 - {{ money }}</h3>
    <Son
        @changeMoney="changeFn"
        :money="money"
    ></Son>
  </div>
</template>
子组件代码如下:
<script setup>
const props = defineProps({
  money: Number
})

// 1.先定义事件
const emit = defineEmits(['changeMoney'])

const buy = () => {
  // 2.再触发
  emit('changeMoney', 5)
}

</script>

<template>
  <div class="son">
    子组件 - {{ money }}
    <button @click="buy">花钱</button>
  </div>
</template>
模板引用
- 模板引用:用来获取 dom 或者组件实例对象
- 默认
<script setup>中组件内部的属性和方法是不开放给父组件访问的,可以通过defineExpose编译宏指定哪些属性和方法允许被访问
父组件代码如下:
<script setup>
import Test from "@/components/Test.vue";
import {onMounted, ref} from "vue";

// 模板引用(获取 dom 或者 组件)
const inp = ref(null)

onMounted(() => {
  // 渲染完 dom
  console.log(inp.value) // 输入框 dom
  inp.value.focus()
})

// 点击获取焦点
const clickFn = () => {
  inp.value.focus()
}

// -------------------------------------

// 获取组件
const test = ref(null)

const getCom = () => {
  console.log(test.value.count) // 666
}
</script>

<template>
  <div>
    <input ref="inp" type="text">
    <button @click="clickFn">点击让输入框聚焦</button>
  </div>
  <Test ref="test"></Test>
  <button @click="getCom">获取组件</button>
</template>
测试(子)组件代码如下:
<script setup>
const count = 666
const sayHi = () => {
  console.log('打招呼')
}

defineExpose({
  count,
  sayHi
})
</script>

<template>
  <div>
    我是用于测试的组件 - {{ count }}
  </div>
</template>
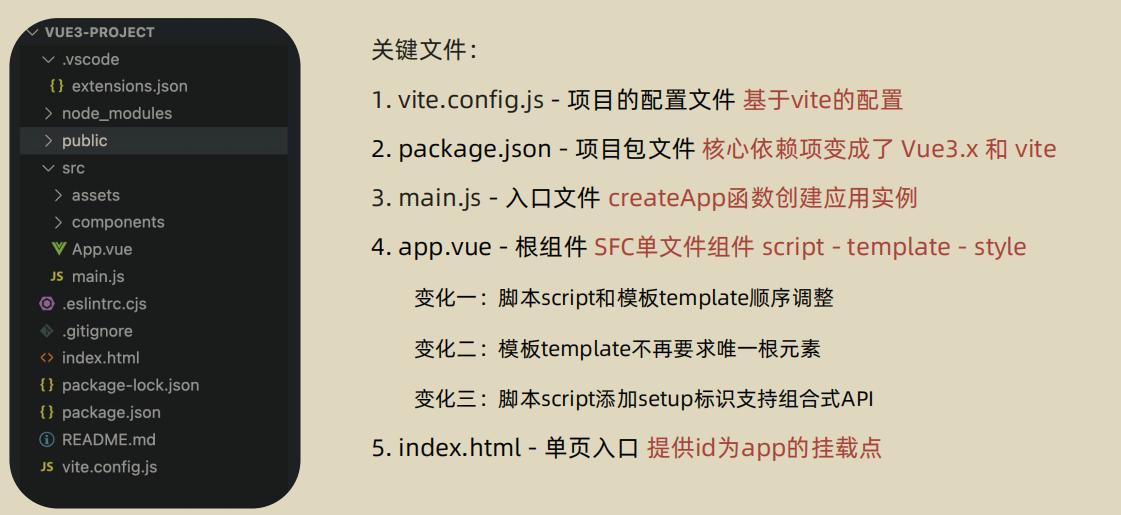
provide & inject
作用:顶层组件向任意的底层组件传递数据和方法,实现跨层组件通信
跨层传递普通数据

跨层传递响应式数据
在调用 provide 函数时,第二个参数设置为 ref 对象
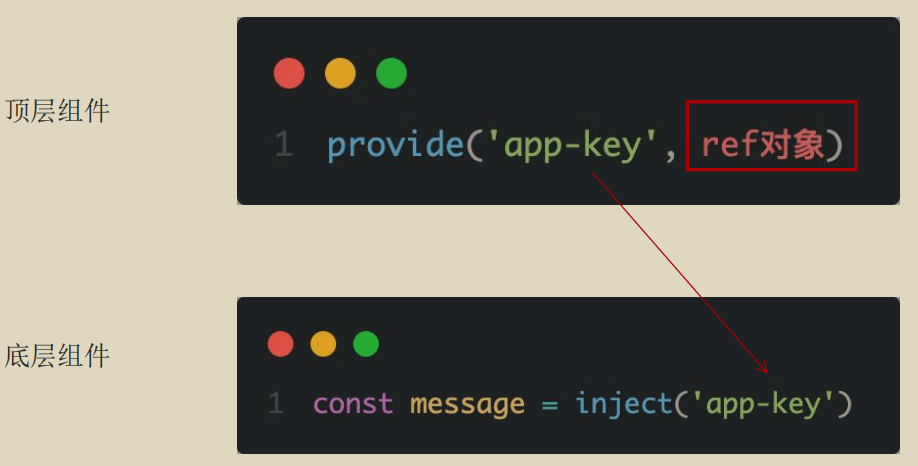
跨层传递方法
顶层组件可以向底层组件传递方法,底层组件调用方法修改顶层组件中的数据
新特性
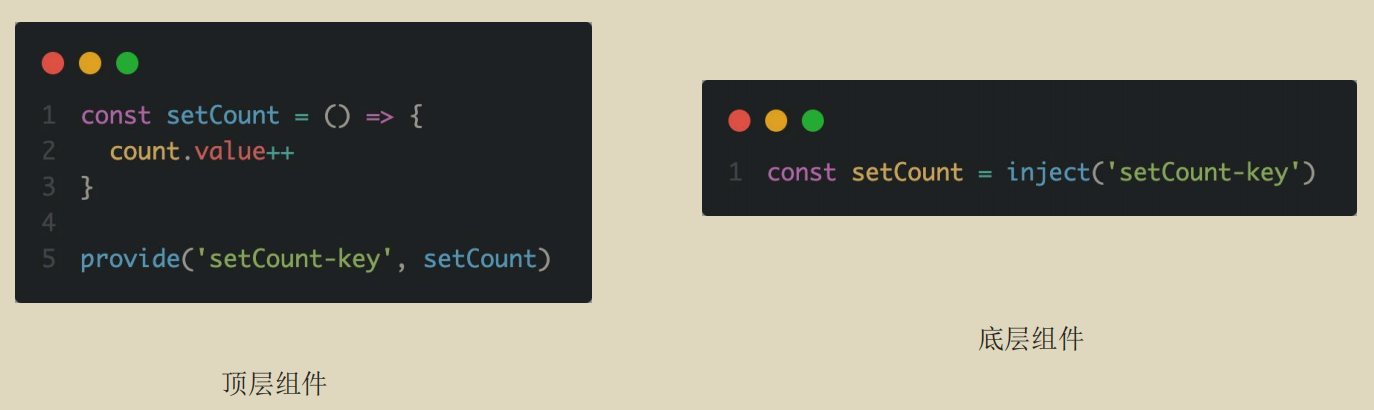
defineOptions
在 Vue 3.3 中新引入了 defineOptions 宏函数,顾名思义,主要是用来定义 Options API 的选项,可以用 defineOptions 定义任意的选项,props、emits、expose、slots 除外(因为这些可以使用 defineXXX 来做到)
Pinia
Pinia 是 Vue 的最新状态管理工具 ,是 Vuex 的替代品:
- 提供更加简单的 API (去掉了 mutation )
- 提供符合组合式风格的 API(和 Vue 3 新语法统一)
- 去掉了 modules 的概念,每一个 store 都是一个独立的模块
- 配合 TypeScript 更加友好,提供可靠的类型推断
基本语法
定义 store(使用组合式 API),示例代码如下:
import {defineStore} from "pinia";
import {computed, ref} from "vue";

// 定义 store
// defineStore(仓库的唯一标识, () => {...})
export const useCounterStore = defineStore('counter', () => {
    // 声明数据 state - count
    const count = ref(0)

    // 声明操作数据的方法 function
    const addCount = () => count.value++
    const subCount = () => count.value--

    // 声明基基于数据的计算属性 getters(computed)
    const double = computed(() => count.value * 2)

    // 声明数据 state - meg
    const meg = ref('hello pinia')

    return {
        count,
        meg,
        addCount,
        subCount,
        double
    }
})
组件使用 store,示例代码如下:
<script setup>
import {useCounterStore} from "@/store/counter";

const counterStore = useCounterStore()
console.log(counterStore.meg) // hello pinia
</script>

<template>
  <div>
    Son1 - {{ counterStore.count }} - {{ counterStore.double}}
    <button @click='counterStore.addCount'>+</button>
  </div>
</template>
storeToRefs
- 方法可以直接解构
- 属性需要
storeToRefs再解构

持久化
使用 pinia-plugin-persistedstate 插件实现快速持久化,官方文档


 6万+
6万+


 被折叠的 条评论
为什么被折叠?
被折叠的 条评论
为什么被折叠?
 到【灌水乐园】发言


