


欢迎收看,这篇文章是关于我如何使用 ResNet50作为特征提取器来构建掩码检测,然后使用支持向量机(SVM) + 决策树和叠加集成方法作为分类器的一个快速解释。
为了向研究人员致敬,这个应用程序是基于研究论文,题目是“在2019冠状病毒疾病大流行时代用于面具检测的机器学习方法的混合深度转移学习模型”,作者是 Mohamed Loey,et al。
数据集检索
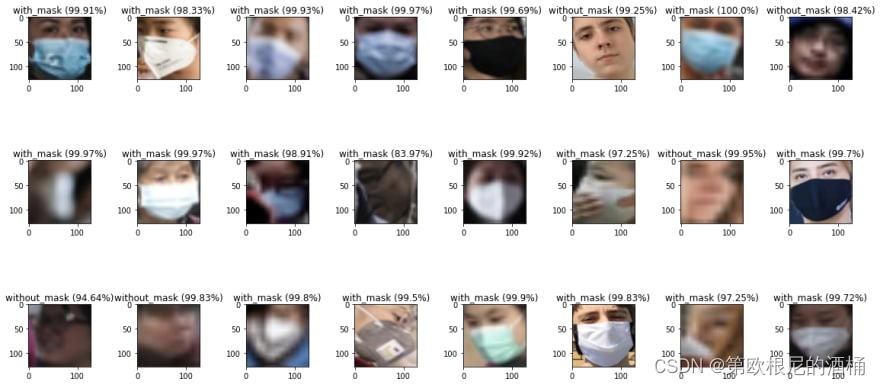
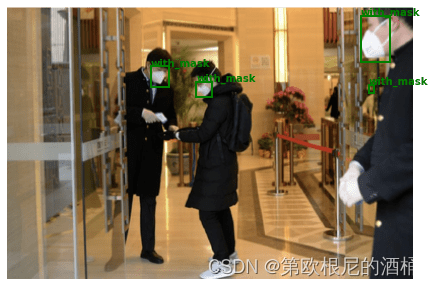
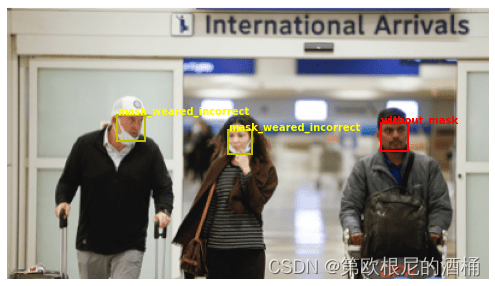
此应用程序使用来自 Kaggle 的数据集。该数据集包含属于3个类的853个图像,以及它们的 PASCAL VOC 格式的边界框。这些类是带面具的,没有面具的,戴面具的不正确。由于某些原因,我只使用了 with _ cover 和 without _ cover 标签。看看下面的图片样本。
您可以通过下面的网址访问此数据集。
点击前往
预处理
首先,我们需要从数据集文件夹中读取所有的 XML 文件和图像文件。然后,根据边界框信息对人脸区域进行裁剪,以完成预处理。
import os

img_names = []
xml_names = []
for dirname, _, filenames in os.walk('./face-mask-detection'):
  for filename in filenames:
    if os.path.join(dirname, filename)[-3:] != "xml":
      img_names.append(filename)
    else:
      xml_names.append(filename)

print(len(img_names), "images")
然后,根据每个图像的边界框裁剪所有图像,并读取标签信息。
import xmltodict
from matplotlib import pyplot as plt
from skimage.io import imread

path_annotations = "face-mask-detection/annotations/"
path_images = "face-mask-detection/images/"

class_names = ['with_mask', 'without_mask']
images = []
target = []

def crop_bounding_box(img, bnd):
  x1, y1, x2, y2 = list(map(int, bnd.values()))
  _img = img.copy()
  _img = _img[y1:y2, x1:x2]
  _img = _img[:,:,:3]
  return _img

for img_name in img_names[:]:
  with open(path_annotations+img_name[:-4]+".xml") as fd:
    doc = xmltodict.parse(fd.read())

  img = imread(path_images+img_name)
  temp = doc["annotation"]["object"]
  if type(temp) == list:
    for i in range(len(temp)):
      if temp[i]["name"] not in class_names:
        continue
      images.append(crop_bounding_box(img, temp[i]["bndbox"]))
      target.append(temp[i]["name"])
  else:
    if temp["name"] not in class_names:
        continue
    images.append(crop_bounding_box(img, temp["bndbox"]))
    target.append(temp["name"])
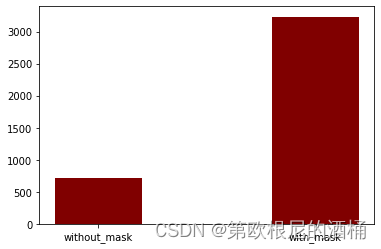
根据标签,该数据集包含了 3232 张佩戴口罩的人脸图像和 717 张未佩戴口罩的人脸图像。
这个预处理还包括了对图像进行 ImageNet 的调整和归一化的步骤。
import torch

from torchvision import transforms

# Define preprocessing
preprocess = transforms.Compose([
  transforms.ToPILImage(),
  transforms.Resize((128, 128)),
  transforms.ToTensor(),
  transforms.Normalize((0.485, 0.456, 0.406), (0.229, 0.224, 0.225)),
])

# Apply preprocess
image_tensor = torch.stack([preprocess(image) for image in images])
image_tensor.shape
特征提取
需要进行特征提取以利用空间操作从图像中提取代表标签的信息。在这个应用中,我使用 ResNet50 作为特征提取器。ResNet 的最后一层是一个具有 1,000 个神经元的全连接层,需要被删除。
from torchvision import models

# Download model
resnet = models.resnet50(pretrained=True)
resnet = torch.nn.Sequential(*(list(resnet.children())[:-1]))
为了冻结并保持 ResNet50的卷积部分不变,我需要将 demand _ grad 设置为 False。
for param in resnet.parameters():
    param.requires_grad = False
我还需要调用 eval ()来将 ResNet50的批量标准化设置为禁用。这将干扰模型的准确性,并确保 ResNet50只作为一个特征提取器。
resnet.eval()
最后一步应用 ResNet50提取特征,然后 ResNet 将返回一个每幅图像有2048个特征的向量。
import numpy as np

result = np.empty((len(image_tensor), 2048))
for i, data in enumerate(image_tensor):
  output = resnet(data.unsqueeze(0))
  output = torch.flatten(output, 1)
  result[i] = output[0].numpy()
分割数据集
为了防止模型过拟合,我需要将数据分成 70% 的训练数据和 30% 的测试数据。训练数据将用于训练模型,而测试数据将用于测试或验证模型。
from sklearn.model_selection import train_test_split

X, y = result, np.array(target)
X_train, X_test, y_train, y_test = train_test_split(X, y, test_size=0.3, random_state=42)

print("Training data\n", np.asarray(np.unique(y_train, return_counts=True)).T)
print("Test data\n", np.asarray(np.unique(y_test, return_counts=True)).T)
定义模型分类器
正如我之前提到的,所提出的模型是一个堆叠分类器(集成方法),将使用支持向量机(SVM)和决策树作为弱学习器。逻辑回归将作为最终的估算器。简而言之,集成方法是一种创建多个模型然后将它们组合以产生改进结果的技术。集成方法通常比单个模型产生更准确的解决方案。
from sklearn.svm import SVC
from sklearn.tree import DecisionTreeClassifier
from sklearn.ensemble import StackingClassifier
from sklearn.linear_model import LogisticRegression

clf = StackingClassifier(
    estimators=[('svm', SVC(random_state=42)),
                ('tree', DecisionTreeClassifier(random_state=42))],
    final_estimator=LogisticRegression(random_state=42),
    n_jobs=-1)
调校模型
调整是在不过拟合或产生过高方差的情况下最大化模型性能的过程。在机器学习中,这是通过选择适当的“超参数”来实现的。您可以定义自己的调整方法,无论您想要什么。但是这是我的调整方法。
from sklearn.model_selection import GridSearchCV

param_grid = {
    'svm__C': [1.6, 1.7, 1.8],
    'svm__kernel': ['rbf'],
    'tree__criterion': ['entropy'],
    'tree__max_depth': [9, 10, 11],
    'final_estimator__C': [1.3, 1.4, 1.5]
}

grid = GridSearchCV(
    estimator=clf,
    param_grid=param_grid,
    scoring='accuracy',
    n_jobs=-1)

grid.fit(X_train, y_train)

print('Best parameters: %s' % grid.best_params_)
print('Accuracy: %.2f' % grid.best_score_)
根据调整过程,最佳的超参数是:
Best parameters: {'final_estimator__C': 1.3, 'svm__C': 1.6, 'svm__kernel': 'rbf', 'tree__criterion': 'entropy', 'tree__max_depth': 11}
Accuracy: 0.98
创建最终模型
最后,我可以用最好的超参数创建一个最终的模型。并且还要防止过拟合。
from sklearn.metrics import accuracy_score, precision_score, recall_score, f1_score

final_clf = StackingClassifier(
    estimators=[('svm', SVC(C=1.6, kernel='rbf', random_state=42)),
                ('tree', DecisionTreeClassifier(criterion='entropy', max_depth=11, random_state=42))],
    final_estimator=LogisticRegression(C=1.3, random_state=42),
    n_jobs=-1)

final_clf.fit(X_train, y_train)
y_pred = final_clf.predict(X_test)

print('Accuracy score : ', accuracy_score(y_test, y_pred))
print('Precision score : ', precision_score(y_test, y_pred, average='weighted'))
print('Recall score : ', recall_score(y_test, y_pred, average='weighted'))
print('F1 score : ', f1_score(y_test, y_pred, average='weighted'))
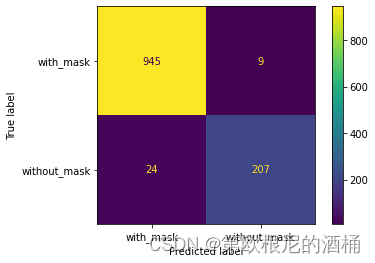
然后根据准确度、精确度、召回度和 f1得分对模型进行测试,结果如下:
Accuracy score :  0.9721518987341772
Precision score :  0.9719379890530496
Recall score :  0.9721518987341772
F1 score :  0.9717932606523529
结果还是很不错的!
部署真正的应用程序
此步骤不是必需的。但是如果您感兴趣,则必须首先导出模型。只有堆叠分类器模型,这是以前的训练。因此,您可以在另一个程序中再次加载。
import pickle

pkl_filename = 'face_mask_detection.pkl'
with open(pkl_filename, 'wb') as file:
  pickle.dump(final_clf, file)
需要记住的重要一点是,您需要实现自己的人脸检测模型并对其进行裁剪。程序示例请查看https://github.com/myxzlpltk/face-mask-detection


 2292
2292


 被折叠的 条评论
为什么被折叠?
被折叠的 条评论
为什么被折叠?
 到【灌水乐园】发言


