


第一节 SSM整合
<properties>
<project.build.sourceEncoding>UTF-8</project.build.sourceEncoding>
<maven.compiler.source>1.8</maven.compiler.source>
<maven.compiler.target>1.8</maven.compiler.target>
<spring.version>5.3.10</spring.version>
</properties>
<dependencies>
<!--spring core -->
<dependency>
<groupId>org.springframework</groupId>
<artifactId>spring-context-support</artifactId>
<version>${spring.version}</version>
</dependency>
<!-- spring mvc-->
<dependency>
<groupId>org.springframework</groupId>
<artifactId>spring-webmvc</artifactId>
<version>${spring.version}</version>
</dependency>
<dependency>
<groupId>org.mybatis</groupId>
<artifactId>mybatis</artifactId>
<version>3.5.7</version>
</dependency>
<!--mybatis提供的对spring支持的jar包,与spring整合使用-->
<dependency>
<groupId>org.mybatis</groupId>
<artifactId>mybatis-spring</artifactId>
<version>1.3.1</version>
</dependency>
<dependency>
<groupId>mysql</groupId>
<artifactId>mysql-connector-java</artifactId>
<version>8.0.17</version>
</dependency>
<dependency>
<groupId>com.alibaba</groupId>
<artifactId>druid</artifactId>
<version>1.2.8</version>
</dependency>
<!--JSR-303 hibernate-validator实现-->
<dependency>
<groupId>org.hibernate</groupId>
<artifactId>hibernate-validator</artifactId>
<version>6.0.1.Final</version>
</dependency>
<!--阿里用来处理JSON格式的数据的包,因为处理速度很快,所以叫fast json-->
<dependency>
<groupId>com.alibaba</groupId>
<artifactId>fastjson</artifactId>
<version>1.2.78</version>
</dependency>
<dependency>
<groupId>javax.servlet</groupId>
<artifactId>javax.servlet-api</artifactId>
<version>4.0.1</version>
<scope>provided</scope>
</dependency>
<dependency>
<groupId>junit</groupId>
<artifactId>junit</artifactId>
<version>4.11</version>
<scope>test</scope>
</dependency>
</dependencies>
1. 整合思路
jsp 中 Listener 与 Servlet 初始化过程演示
利用 Jsp工作原理进行整合,在 Jsp 中,ServletContextListener 能够监听上下文参数配置,并对该配置做出相应的处理。这个监听器可以用来配置 Mybatis 的相关信息,完成 Mybatis 的整合。 Servlet 的运作需要在 web.xml 中进行配置,在配置 Servlet 时,可以配置该 Servlet 的初始化参数。因此可以用来完成 Spring MVC 的整合。所以,SSM 框架整合的场所就是在web.xml 中。
<?xml version="1.0" encoding="UTF-8"?> <web-app xmlns="http://xmlns.jcp.org/xml/ns/javaee" xmlns:xsi="http://www.w3.org/2001/XMLSchema-instance" xsi:schemaLocation="http://xmlns.jcp.org/xml/ns/javaee http://xmlns.jcp.org/xml/ns/javaee/web-app_4_0.xsd" version="4.0"> <display-name>SSM</display-name> <context-param> <!--上下文配置路径--> <param-name>contextConfigLocation</param-name> <param-value>classpath:spring-mybatis.xml</param-value> </context-param> <listener> <!--上下文加载监听器,主要用于监听上下文参数配置,这里主要用来监听mybatis的配置文件--> <listener-class>org.springframework.web.context.ContextLoaderListener</listener-class> </listener> <servlet> <servlet-name>dispatcherServlet</servlet-name> <servlet-class>org.springframework.web.servlet.DispatcherServlet</servlet-class> <init-param> <!--上下文配置路径--> <param-name>contextConfigLocation</param-name> <param-value>classpath:spring-mvc.xml</param-value> </init-param> <load-on-startup>1</load-on-startup> </servlet> <servlet-mapping> <servlet-name>dispatcherServlet</servlet-name> <url-pattern>*.do</url-pattern> </servlet-mapping> <filter> <filter-name>encodingFilter</filter-name> <!--字符编码过滤器--> <filter-class>org.springframework.web.filter.CharacterEncodingFilter</filter-class> <init-param> <!--编码格式--> <param-name>encoding</param-name> <param-value>UTF-8</param-value> </init-param> <init-param> <!--强制编码--> <param-name>forceEncoding</param-name> <param-value>true</param-value> </init-param> </filter> <filter-mapping> <filter-name>encodingFilter</filter-name> <url-pattern>/*</url-pattern> </filter-mapping> </web-app>
2. 整合 Mybatis
<!-- spring-mybatis.xml -->
<?xml version="1.0" encoding="UTF-8"?>
<beans xmlns="http://www.springframework.org/schema/beans"
       xmlns:xsi="http://www.w3.org/2001/XMLSchema-instance" xmlns:tx="http://www.springframework.org/schema/tx"
       xmlns:aop="http://www.springframework.org/schema/aop"
       xmlns:context="http://www.springframework.org/schema/context"
       xsi:schemaLocation="http://www.springframework.org/schema/beans http://www.springframework.org/schema/beans/spring-beans.xsd http://www.springframework.org/schema/tx http://www.springframework.org/schema/tx/spring-tx.xsd http://www.springframework.org/schema/aop https://www.springframework.org/schema/aop/spring-aop.xsd http://www.springframework.org/schema/context https://www.springframework.org/schema/context/spring-context.xsd">
    <!--数据源-->
    <bean id="dataSource" class="com.alibaba.druid.pool.DruidDataSource">
        <property name="driverClassName" value="com.mysql.cj.jdbc.Driver" />
        <property name="url" value="jdbc:mysql://localhost:3306/property?serverTimezone=Asia/Shanghai" />
        <property name="username" value="root" />
        <property name="password" value="root" />
    </bean>
    <!-- SqlSessionFactory 工厂-->
    <bean id="sessionFactory" class="org.mybatis.spring.SqlSessionFactoryBean">
        <!--工厂生产SqlSession需要数据源-->
        <property name="dataSource" ref="dataSource" />
        <!--Mapper接口映射文件存放位置-->
        <property name="mapperLocations" value="classpath:mapper/*Mapper.xml" />
    </bean>
    <!--Mapper接口扫描器配置-->
    <bean class="org.mybatis.spring.mapper.MapperScannerConfigurer">
        <!--sqlSessionFactoryBeanName 这个属性要写SqlSessionFactoryBean的id值-->
        <property name="sqlSessionFactoryBeanName" value="sessionFactory" />
        <!--Mapper接口包,扫描后才能生成Mapper接口代理对象-->
        <property name="basePackage" value="com.qf.ssm.mapper" />
    </bean>
    <!--数据源事物管理-->
    <bean id="tm" class="org.springframework.jdbc.datasource.DataSourceTransactionManager">
        <property name="dataSource" ref="dataSource" />
    </bean>
    <!--声名式事物配置-->
    <tx:advice id="advice" transaction-manager="tm">
        <tx:attributes>
            <tx:method name="get*" propagation="REQUIRED" isolation="READ_COMMITTED" />
            <tx:method name="insert*" propagation="REQUIRED" isolation="SERIALIZABLE" />
            <tx:method name="update*" propagation="REQUIRED" isolation="SERIALIZABLE" />
        </tx:attributes>
    </tx:advice>
    <!--AOP配置-->
    <aop:config>
        <!--定义切点-->
        <aop:pointcut id="pc" expression="execution(* com.qf.ssm.service..*(..))"/>
        <!--安装事物通知-->
        <aop:advisor advice-ref="advice" pointcut-ref="pc" />
    </aop:config>
    <!--开启注解事物-->
    <!--<tx:annotation-driven />
    <context:component-scan base-package="com.qf.ssm.service" />-->
</beans>
3. 整合 Spring MVC
<?xml version="1.0" encoding="UTF-8"?>
<beans xmlns="http://www.springframework.org/schema/beans"
       xmlns:xsi="http://www.w3.org/2001/XMLSchema-instance"
       xmlns:context="http://www.springframework.org/schema/context"
       xmlns:mvc="http://www.springframework.org/schema/mvc"
       xsi:schemaLocation="http://www.springframework.org/schema/beans http://www.springframework.org/schema/beans/spring-beans.xsd http://www.springframework.org/schema/context http://www.springframework.org/schema/context/spring-context.xsd http://www.springframework.org/schema/mvc http://www.springframework.org/schema/mvc/spring-mvc.xsd">
    <bean class="org.springframework.web.servlet.view.InternalResourceViewResolver">
        <property name="prefix" value="/" />
        <property name="suffix" value=".jsp" />
    </bean>
    <bean id="stringHttpMessageConverter" class="org.springframework.http.converter.StringHttpMessageConverter" />
    <bean id="jsonHttpMessageConverter" class="com.alibaba.fastjson.support.spring.FastJsonHttpMessageConverter">
        <property name="supportedMediaTypes">
            <list>
                <value>text/html;charset=UTF-8</value>
                <value>application/json;charset=UTF-8</value>
            </list>
        </property>
    </bean>
    <mvc:annotation-driven>
        <mvc:message-converters>
            <ref bean="stringHttpMessageConverter" />
            <ref bean="jsonHttpMessageConverter" />
        </mvc:message-converters>
    </mvc:annotation-driven>
    <context:component-scan base-package="com.qf.ssm.controller" />
</beans>
第二节 拦截器
1. HandlerInterceptor接口
//前置拦截,在控制器执行之前做事
default boolean preHandle(HttpServletRequest request, HttpServletResponse response, Object handler) throws Exception {
return true;
}
//后置拦截,在控制器执行后做事
default void postHandle(HttpServletRequest request, HttpServletResponse response, Object handler,@Nullable ModelAndView modelAndView) throws Exception {
}
//在视图被渲染后做事
default void afterCompletion(HttpServletRequest request, HttpServletResponse response, Object handler,@Nullable Exception ex) throws Exception {
}
2. 拦截器应用
2.1 登录超时
public class TimeoutInterceptor implements HandlerInterceptor {
@Override
public boolean preHandle(HttpServletRequest request, HttpServletResponse response, Object handler) throws Exception {
HttpSession session = request.getSession();
String username = (String) session.getAttribute("username");
if(username == null){
response.setStatus(HttpServletResponse.SC_UNAUTHORIZED); //未授权
PrintWriter pw = response.getWriter();
pw.print("登录超时");
pw.flush();
pw.close();
return false;
}
return true;
}
}
2.2 权限检测
public class PermissionInterceptor implements HandlerInterceptor {
@Override
public boolean preHandle(HttpServletRequest request, HttpServletResponse response, Object handler) throws Exception {
System.out.println("权限校验超时拦截器执行");
HttpSession session = request.getSession();
String username = (String) session.getAttribute("username");
String uri = request.getRequestURI();
String contextPath = request.getContextPath();
String validUri = uri.replace(contextPath,"");
List<String> userUrls = Arrays.asList("/user/**","/community/**"); //这里需要从数据库中查询出用户能够访问的url
boolean match = userUrls.stream().anyMatch(userUrl -> validUri.startsWith(userUrl.replace("**","")));
if(!match){
response.setStatus(HttpServletResponse.SC_UNAUTHORIZED); //未授权
PrintWriter pw = response.getWriter();
pw.print("登录超时");
pw.flush();
pw.close();
}
return match;
}
}
3. 拦截器配置
<mvc:interceptors>
    <!--配置顺序决定执行的先后顺序-->
    <mvc:interceptor>
        <!--拦截的请求匹配-->
        <mvc:mapping path="/**"/>
        <!--不拦截的请求匹配, 必须写在拦截的请求匹配下面-->
        <mvc:exclude-mapping path="/" />
        <mvc:exclude-mapping path="/user/login" />
        <mvc:exclude-mapping path="/user/init" />
        <bean class="com.qf.ssm.interceptor.TimeoutInterceptor" />
    </mvc:interceptor>
    <mvc:interceptor>
        <mvc:mapping path="/**"/>
        <mvc:exclude-mapping path="/" />
        <mvc:exclude-mapping path="/user/login" />
        <mvc:exclude-mapping path="/user/init" />
        <bean class="com.qf.ssm.interceptor.PermissionInterceptor" />
    </mvc:interceptor>
</mvc:interceptors>
4. 拦截器执行流 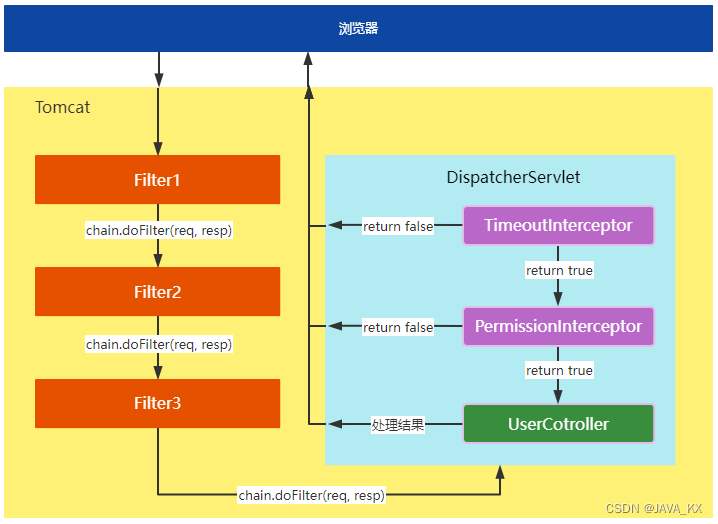
第三节 文件上传和下载
1. 文件上传
文件上传需要使用到 commons-fileupload 和 commons-io 两个 jar 包。
<dependency>
    <groupId>commons-fileupload</groupId>
    <artifactId>commons-fileupload</artifactId>
    <version>1.4</version>
</dependency>
# config.properties
#  配置文件
file.save.dir=D:\\upload
<!-- spring-mvc.xml --> <!--加载properties文件--> <context:property-placeholder location="classpath:config.properties" /> <!--需要注意:这里的id值只能为multipartResolver,修改就要报错,因为spring内部只会去调用这个id--> <bean id="multipartResolver" class="org.springframework.web.multipart.commons.CommonsMultipartResolver"> <property name="defaultEncoding" value="UTF-8" /> <!--内存中可用大小:3 * 1024 * 1024 = 3145728 = 3M--> <property name="maxInMemorySize" value="3145728" /> <!--设置临时存储目录,当上传文件大小超过内存中可使用大小时将产生临时文件--> <property name="uploadTempDir" value="/upload"/> <!--50 * 1024 * 1024 = 52428800 = 50M --> <!--最大上传大小--> <property name="maxUploadSize" value="52428800" /> <!--单个文件大小--> <property name="maxUploadSizePerFile" value="5242880" /> </bean>
@RestController
public class FileController {
@Value("${file.save.dir}")
private String saveDir; //读取配置文件中的信息
//Spring 上传方式
@PostMapping("/upload")
//如果表单上传除了文件外还携带有其他数据,需要使用实体类对象来取值,不能使用Map来取值
public String upload(User user, @RequestPart(name = "file") MultipartFile file) throws IOException {
System.out.println(user);
File dir = new File(saveDir);
if(!dir.exists()) dir.mkdirs(); //确保父级文件夹存在
file.transferTo(new File(dir, file.getOriginalFilename()));
return "success";
}
}
2. 文件下载
//spring 下载方式
@GetMapping("/{fileName:.+}") //路径中的变量匹配文件后缀名
public ResponseEntity<byte[]> download(@PathVariable("fileName") String fileName) throws IOException {
HttpHeaders headers = new HttpHeaders();//创建HTTP响应头对象
//添加Content-Type
headers.add("Content-Type", MediaType.APPLICATION_OCTET_STREAM_VALUE);
File file = new File(saveDir, fileName);//定位下载文件
//由于浏览器默认编码格式是ISO-8859-1,因此中文传输文件过去需要先将字符串转换成该编码格式下的字符串才能正常显示
fileName = new String(fileName.getBytes(StandardCharsets.UTF_8), StandardCharsets.ISO_8859_1);
//添加Content-Disposition 用户可以自己选择保存位置
headers.add("Content-Disposition", "attachment; filename=" + fileName);
//HttpStatus.OK 响应状态 表示200
return new ResponseEntity<>(FileUtils.readFileToByteArray(file), headers, HttpStatus.OK);
}
//Servlet 下载方式
@GetMapping("/{fileName:.+}") //路径中的变量匹配文件后缀名
public void download(@PathVariable("fileName") String fileName, HttpServletResponse response) throws IOException {
File file = new File(saveDir, fileName);//定位下载文件
response.addHeader("Content-Type", MediaType.APPLICATION_OCTET_STREAM_VALUE);
fileName = new String(fileName.getBytes(StandardCharsets.UTF_8), StandardCharsets.ISO_8859_1);
response.addHeader("Content-Disposition", "attachment; filename=" + fileName);
OutputStream os = response.getOutputStream();
InputStream is = new FileInputStream(file);
BufferedInputStream bis = new BufferedInputStream(is);
byte[] buffer = new byte[8192];
int len;
while ((len = bis.read(buffer)) != -1){
os.write(buffer, 0, len);
}
os.flush();
os.close();
}
第四节 Excel处理
<dependency>
    <groupId>org.apache.poi</groupId>
    <artifactId>poi</artifactId>
    <version>5.0.0</version>
</dependency>
<dependency>
    <groupId>org.apache.poi</groupId>
    <artifactId>poi-ooxml</artifactId>
    <version>5.0.0</version>
</dependency>
1. 生成Excel
public static void exportExcel(String fileName) throws IOException {
    Workbook workbook;
    if(fileName.endsWith(".xlsx")){
        workbook = new XSSFWorkbook();
    } else {
        workbook = new HSSFWorkbook();
    }
    Sheet sheet = workbook.createSheet();
    Row titleRow = sheet.createRow(0);
    titleRow.createCell(0).setCellValue("姓名");
    titleRow.createCell(1).setCellValue("性别");
    titleRow.createCell(2).setCellValue("年龄");
    for(int i=0; i<10; i++){
        Row dataRow = sheet.createRow(i+1);
        dataRow.createCell(0, CellType.STRING).setCellValue("张三" + i);
        dataRow.createCell(1, CellType.STRING).setCellValue("男");
        dataRow.createCell(2, CellType.NUMERIC).setCellValue(i*10);
    }
    workbook.write(new FileOutputStream(fileName));
    workbook.close();
}
2. 解析Excel
public static void parseExcel(String fileName) throws IOException {
    File file = new File(fileName);
    Workbook workbook = WorkbookFactory.create(file);
    int numberOfSheets = workbook.getNumberOfSheets();
    for(int i=0; i<numberOfSheets; i++){
        Sheet sheet = workbook.getSheetAt(i);
        int row = sheet.getPhysicalNumberOfRows();
        if(row <= 1) continue; //只有一行 直接跳过
        Row titleRow = sheet.getRow(0);
        int numberOfCells = titleRow.getPhysicalNumberOfCells();
        for(int j=0; j<numberOfCells; j++){
            System.out.print(titleRow.getCell(j).getStringCellValue() + "\t");
        }
        System.out.println();
        for(int m=1; m<row; m++){
            Row dataRow = sheet.getRow(m);
            for(int n=0; n<numberOfCells; n++){
                System.out.print(dataRow.getCell(n).getStringCellValue() + "\t");
            }
        }
    }
    workbook.close();
}
3. Excel 导入导出
第五节 定时任务
@Component
public class ClearTask {
/**
* cron 表达式必须按照 秒 分 时 日 月 周 年 排列
* * 表示所有值. 例如:在分的字段上设置 "*",表示每一分钟都会触发。
* ? 表示不指定值。使用的场景为不需要关心当前设置这个字段的值。
* - 表示区间。例如 在小时上设置 "10-12",表示 10,11,12点都会触发。
* , 表示指定多个值,例如在周字段上设置 "MON,WED,FRI" 表示周一,周三和周五触发
* / 用于递增触发。如在秒上面设置"5/15" 表示从5秒开始,每增15秒触发(5,20,35,50)
*/
@Scheduled(cron = "0/5 * * * * ?")
public void clear(){
System.out.println("开始执行清理任务...");
}
}
<!--开启定时任务注解驱动--> <task:annotation-driven /> <context:component-scan base-package="com.qf.ssm.controller, com.qf.ssm.task" />
定时任务可能存在的问题:
Spring 默认配置下,将会使用具有单线程的 ScheduledExecutorService,单线程执行定时任务,如果某一个定时任务执行时间较长,将会影响其他定时任务执行。如果存在多个定时任务,为了保证定时任务执行时间的准确性,可以修改默认配置,使其使用多线程执行定时任务。
@Bean
public ScheduledExecutorService scheduledExecutorService(){
    return new ScheduledThreadPoolExecutor(10);
}
第六节 Spring事务传播行为
事务传播:是指两个或者两个以上的事务之间存在调用关系,此时,事务的提交和回滚将会出现问题,为了解决这个问题,Spring提供了事务传播行为来进行解决。
public enum Propagation {
REQUIRED(TransactionDefinition.PROPAGATION_REQUIRED),
SUPPORTS(TransactionDefinition.PROPAGATION_SUPPORTS),
MANDATORY(TransactionDefinition.PROPAGATION_MANDATORY),
REQUIRES_NEW(TransactionDefinition.PROPAGATION_REQUIRES_NEW),
NOT_SUPPORTED(TransactionDefinition.PROPAGATION_NOT_SUPPORTED),
NEVER(TransactionDefinition.PROPAGATION_NEVER),
NESTED(TransactionDefinition.PROPAGATION_NESTED);
private final int value;
Propagation(int value) {
this.value = value;
}
public int value() {
return this.value;
}
}
public interface TransactionDefinition {
/**
* Support a current transaction; create a new one if none exists.
* 支持在当前事务中执行,如果当前不存在事务,则创建一个新的事务来执行
*/
int PROPAGATION_REQUIRED = 0;
/**
* Support a current transaction; execute non-transactionally if none exists.
* 支持当前事务,如果当前不存在事务,则以非事务的方式执行
*/
int PROPAGATION_SUPPORTS = 1;
/**
* Support a current transaction; throw an exception if no current transaction
* exists.
* 支持在当前事务执行,如果当前不存在事务,则抛出异常
*/
int PROPAGATION_MANDATORY = 2;
/**
* Create a new transaction, suspending the current transaction if one exists.
* 创建一个新的事务来执行,如果当前存在事务,则将当前事务挂起
*/
int PROPAGATION_REQUIRES_NEW = 3;
/**
* Do not support a current transaction; rather always execute non-transactionally.
* 不支持当前事务,以非事务的方式执行,如果当前存在事务,则将当前事务挂起,执行完毕后,当前事务才恢复
*/
int PROPAGATION_NOT_SUPPORTED = 4;
/**
*Do not support a current transaction; throw an exception if a current transaction
*exists.
* 不支持当前事务,如果当前存在事务,则抛出异常
*/
int PROPAGATION_NEVER = 5;
/**
* Execute within a nested transaction if a current transaction exists,
* behave like {@link #PROPAGATION_REQUIRED} otherwise.
* 如果当前存在事务,则嵌套在当前事务中执行;如果不存在,则创建一个新的事务来执行
*/
int PROPAGATION_NESTED = 6;
}


 1万+
1万+


 被折叠的 条评论
为什么被折叠?
被折叠的 条评论
为什么被折叠?
 到【灌水乐园】发言


