


引言
在 GCaMP 实验中,使用 ImageJ 批量处理视频文件是一项重要任务,尤其是当文件数量较多时,操作流程稍有疏漏就可能导致错误。本教程将介绍如何在 ImageJ 中自动化处理一些 GCaMP 视频数据,包括以下内容:
- 视频 ROI 的选择: 在 GCaMP 实验中,准确选择信号和背景区域非常重要。
- 批量使用 Time Series Analyzer V3 处理: 自动化处理视频并导出 Time Series 数据。
- 生成可用于后续作图的 CSV 文件。
该项目最后附有合并的 Python 脚本文件,直接拖入 ImageJ 中即可运行。
文件准备
在开始操作前,需要整理好实验数据文件,并确保其目录结构规范。以下是项目文件夹的示例:
    ├─Final_Check
    │      2024-12-23 205725.mov
    │      2024-12-23 203914.mov
    │      2024-12-23 194717.mov
    │      2024-12-23 200121.mov
文件说明:
- 原始文件:
.mov格式的视频文件,保存实验的原始数据。
环境准备
软件准备
- 下载并安装 ImageJ。
- 安装 Time Series Analyzer V3 插件:可以在 ImageJ 的插件库中找到并安装。
Python 环境准备
确保实验所需的 Python 脚本可以在 ImageJ 中运行。以下是一个简单测试代码:
- 打开 ImageJ 的 REPL(运行环境)。
- 在命令行中输入以下代码,检查是否能成功加载插件:
from ij import IJ
IJ.run("Time Series Analyzer V3", "");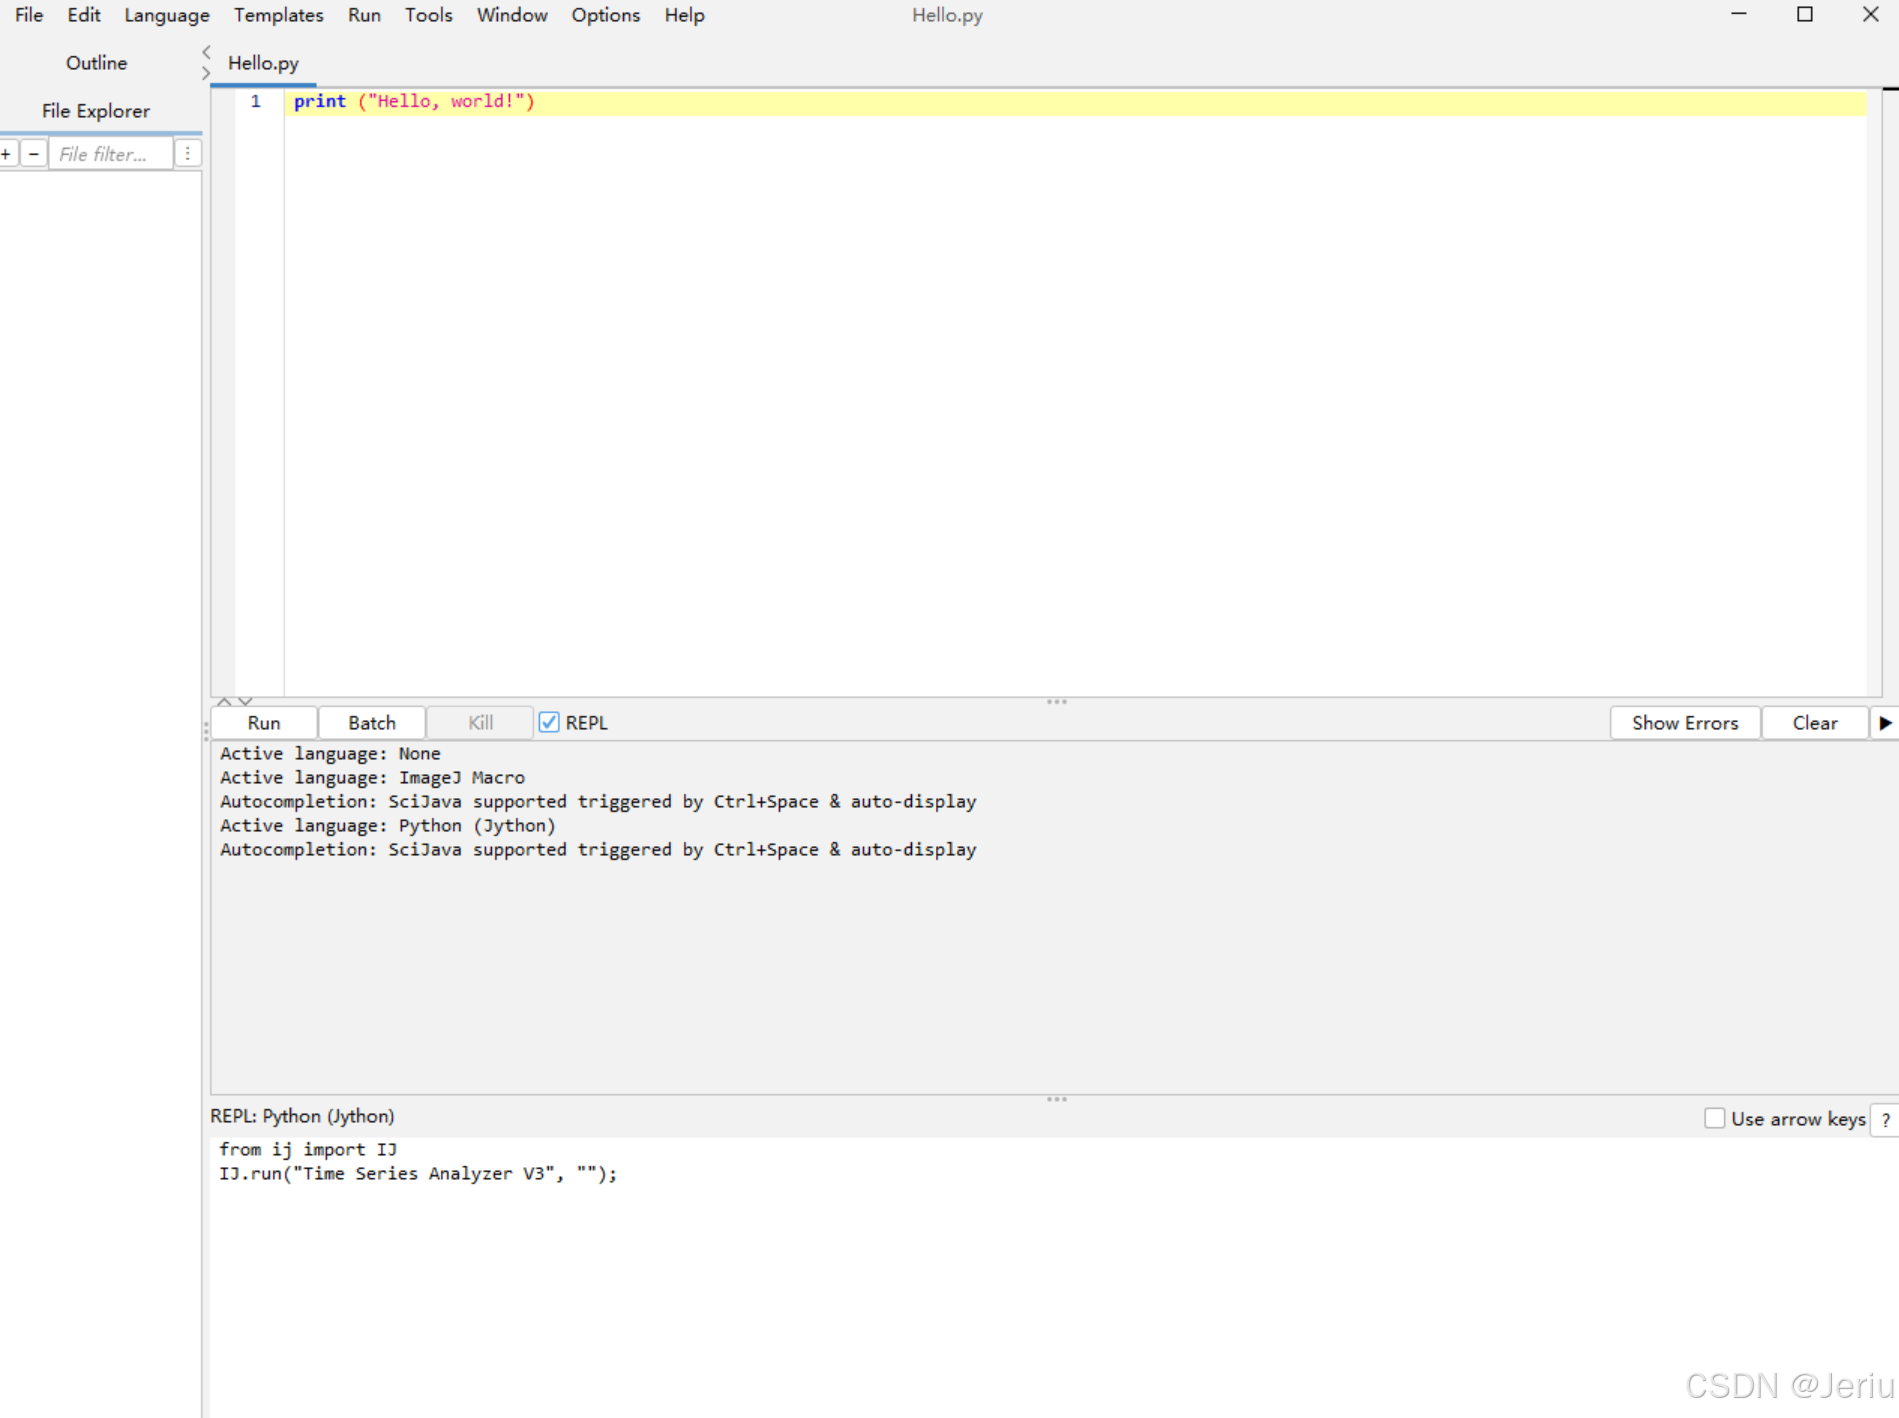
如果插件可以正常运行,说明环境准备就绪。
拆解步骤
导入需要的包
import os
import shutil
from ij import IJ, WindowManager
from ij.plugin.frame import RoiManager
from ij.plugin import ZProjector
import os
import Time_Series_Analyzer_V3
import time
import subprocess
import sys
from java.lang import Runtime  # 用于在 Jython 中执行系统命令
from javax.swing import JOptionPane
import csv
import re
一、创建文件结构
代码部分
函数:创建文件结构并分类整理
setup_project_structure(folder_path2):在该目录下创建一个格式化的文件夹结构,并将视频移动到里面去。
def setup_project_structure(folder_path2):
    """
    Create the directory structure for Project_Folder and organize necessary files into corresponding folders.
    """
    # Define required file types for each category
    required_files = {
        "raw_data": [".mov", ".mp4"],  # At least one .mov or .mp4 file is required
        "converted_data": [".avi"]
    }

    # Define the root project folder
    project_folder = os.path.join(folder_path2, "Project_Folder")

    # Define the directory structure
    folders = {
        "raw_data": os.path.join(project_folder, "raw_data"),                   # Original video files
        "converted_data": os.path.join(project_folder, "converted_data"),       # Converted AVI files
        "results": os.path.join(project_folder, "results"),                     # Output analysis results
        "results_roi": os.path.join(project_folder, "results", "roi"),          # ROI-related files
        "results_gcamp": os.path.join(project_folder, "results", "gcamp_analysis"),  # GCaMP analysis results
        "results_figures": os.path.join(project_folder, "results", "figures")  # Figures generated from data analysis
    }

    # Create the directory structure
    for folder_name, folder_path in folders.items():
        if not os.path.exists(folder_path):  # Check if folder exists
            os.makedirs(folder_path)        # Create folder if it doesn't exist
        print("Folder has been created or confirmed to exist: %s -> %s" % (folder_name, folder_path))

    # Function to check if required video files exist (including in subfolders)
    def has_required_files(folder_path, required_files):
        """
        Check if the folder or its subfolders contain the necessary video files.
        """
        for root, _, files in os.walk(folder_path):  # Traverse the folder and subfolders
            for file in files:
                if file.endswith(tuple(required_files["raw_data"])):  # Check for .mov or .mp4
                    return True
        return False

    # Check if required video files exist
    if not has_required_files(folder_path2, required_files):
        print("No valid .mov or .mp4 files found in the folder or its subfolders. The program has terminated.")
        exit()

    # Move files into corresponding folders
    def move_files_to_folders(folder_path, folders, current_script="workflow.py"):
        for filename in os.listdir(folder_path):
            file_path = os.path.join(folder_path, filename)
            # Skip directories
            if os.path.isdir(file_path):
                continue

            # Skip the current script file
            if filename == current_script:
                continue

            # Categorize files based on extensions
            file_ext = os.path.splitext(filename)[-1].lower()  # Get file extension
            moved = False
            for folder, extensions_or_files in required_files.items():
                # Match file extension
                if folder in ["raw_data", "converted_data"] and file_ext in extensions_or_files:
                    dest_folder = folders[folder]
                    shutil.move(file_path, os.path.join(dest_folder, filename))
                    print("Moved file: %s -> %s" % (filename, dest_folder))
                    moved = True
                    break

            # Unclassified file warning
            if not moved:
                print("Unclassified file: %s, please handle manually." % filename)

    # Start moving files
    move_files_to_folders(folder_path2, folders)

    print("\nThe directory structure has been created and the file classification is complete.")
主程序执行
folder_path2:刚储存视频文件的文件夹
# Main workflow
if __name__ == "__main__":
    # ======= 1. Select Input Folder =======
    folder_path2 = IJ.getDirectory("Choose an input folder.")
    folder_path_project = os.path.join(folder_path2, "Project_Folder\\")

    print("=== Setting up project structure ===\n")
    setup_project_structure(folder_path2)  # Create directories and organize files
    print("\n=== Project structure setup complete ===\n")
执行效果
运行后将在 folder_path2 目录下创建如下文件夹结构,并分类整理文件。
- converted_data: 储存处理过的avi视频
- raw_data: 储存原始mov文件
- results: 储存结果
- figures: 用于画图的文件
- gcamp_analysis: 储存中间产生的csv文件
- roi: 储存选择的ROI Region of Interest 区域
这样设计便于文件的规范化管理,提高后续批量处理的效率。
D:.
└─Project_Folder
    ├─converted_data
    ├─raw_data
    └─results
        ├─figures
        ├─gcamp_analysis
        └─roi
二、选择ROI
代码部分
函数:创建ImageJ宏文件(.ijm),用于选择ROI区域
在这一部分,我们将编写一个ImageJ宏文件(.ijm),该文件用于打开AVI视频文件并选择感兴趣区域(ROI)。通过这种方式,我们能够在ImageJ中自动化ROI的选择,并将其保存以供后续分析使用。
ijm_script = """
// 1.0 Get input folders .
indir = getArgument();("Choose an input folder.");
avidir = indir + "converted_data\\\\"
roidir = indir + "results\\\\roi\\\\"
list = getFileList(avidir);
listroi = getFileList(roidir);
// 2.0 Get filelist of input folder
list = getFileList(avidir);
listroi = getFileList(roidir);
for (i = 0; i < list.length; i++) {
    if (endsWith(list[i], ".avi")) {
        // Check whether run before
        norun = true;
        if (endsWith(list[i], ".avi")) {
            // Initialize control variables
            for (j = 0; j < listroi.length; j++) {
                roiVideoName = listroi[j].substring(0, listroi[j].lastIndexOf(".avi") + 4);
                if (list[i]==roiVideoName) {
                    norun = false;
                    break;
                }
            }
        }
        if (norun) {
            open(avidir + list[i]);
            setTool("rectangle"); // Select Rectangle
            roiManager("reset"); // clear ROI Manager

            keepRunning = true;
            roiIndex = 0; // Number initialized as 0

            while (keepRunning) {
                // Prompt the user to select the signal area
                waitForUser("Draw the **Signal Area** ROI first, then click **OK**.\\n \\nDraw the **Background Area** ROI next, then click **OK**.\\n   - Please draw them in pairs: Signal first, then Background.\\n \\n**The first ROI must be drawn during the activation frame** before clicking **OK**.\\n \\nTo stop:\\n   - Draw a rectangle with width or height **less than 10 pixels** starting from the top-left corner (less than (100, 100)) and click **OK**.");

                // Obtain the rectangular coordinates of the signal area
                getSelectionBounds(x, y, width, height);

                // Check if the user has drawn a too small rectangle
                if ((width < 10 || height < 10) && x <= 100 && y <= 100) {
                    print("The SIGNAL rectangle is too small. Stopping...");
                    keepRunning = false;
                    break; // Exit the while loop
                }

                // If the user clicks Cancel, the entire loop will be stopped
                if (width == 0 && height == 0) {
                    print("User canceled the process. Stopping...");
                    keepRunning = false;
                    break; // Exit the while loop
                }

                // Save the rectangular information of the signal area to the variable
                signalX = x;
                signalY = y;
                signalWidth = width;
                signalHeight = height;

                // Add signal area to ROI Manager
                roiManager("Add");

                currentIndex = roiManager("count") - 1; // Get the ROI index just added
                if (currentIndex < 0) {
                    print("Error: Failed to add SIGNAL ROI.");
                    keepRunning = false;
                    break;
                }
                roiManager("select", currentIndex);
                if (currentIndex == 0) {
                    stimuliName = Roi.getName;
                    stimuliFrame = substring(stimuliName, 0, 4);
                    stimuliFrame = parseInt(stimuliFrame);
                }
                roiManager("rename", "Signal_" + roiIndex); // Manually control the numbering, named Signal-X

                // **Lock the ROI of the signal area to prevent it from being dragged**
                makeRectangle(signalX, signalY, signalWidth, signalHeight); // Restore signal area
                run("Add Selection..."); // Save signal area as static selection
                run("Duplicate...", "title=Fixed_Signal_ROI"); // Create a fixed copy

                // Prompt the user to select the background area
                waitForUser("Drag the rectangle to the BASE (background) area, and confirm.");
                getSelectionBounds(baseX, baseY, baseWidth, baseHeight);

                // Check if the user has drawn a background rectangle that is too small
                if ((baseWidth < 10 || baseHeight < 10) && baseX <= 100 && baseY <= 100) {
                    print("The BASE rectangle is too small. Stopping...");
                    keepRunning = false;
                    break;
                }

                // If the user does not select the background area (clicks Cancel), stop the entire loop
                if (baseWidth == 0 && baseHeight == 0) {
                    print("User canceled the process. Stopping...");
                    keepRunning = false;
                    break;
                }

                // Add background area to ROI Manager and mark it
                roiManager("Add");
                currentIndex = roiManager("count") - 1; // Retrieve the index of the background area
                if (currentIndex < 0) {
                    print("Error: Failed to add BASE ROI.");
                    keepRunning = false;
                    break;
                }
                roiManager("select", currentIndex);
                roiManager("rename", "Base_" + roiIndex); // Manually control the numbering, named Base_X

                roiManager("save", roidir + list[i] + "_SF-" + stimuliFrame + ".all_ROIs.zip");
                print("Signal and Base ROIs saved successfully.");

                // Number increment to ensure signal and background correspondence
                roiIndex++;
            }
            selectImage(list[i]); // Select current image
            run("Close All"); //Close all images
        }
    }
}
"""

def create_ijm_file(output_dir):
    # 自动生成 .ijm 文件
    ijm_path = os.path.join(output_dir, "temp_script.ijm")
    with open(ijm_path, "w") as f:
        f.write(ijm_script)
    return ijm_path
主程序执行
# Main workflow
if __name__ == "__main__":
    folder_path2 = IJ.getDirectory("Choose an input folder.")
    folder_path_project = os.path.join(folder_path2, "Project_Folder\\")

    # ======= 2. ROI Selection Step =======
    print("=== Selecting ROI ===\n")
    output_dir = ".\\temp"  # Temporary directory
    if not os.path.exists(output_dir):
        os.makedirs(output_dir)  # Create the directory if it doesn't exist
    ijm_file = create_ijm_file(output_dir)  # Generate the IJM file
    IJ.runMacroFile(ijm_file, folder_path_project)  # Run the IJM script
    print("\n=== ROI Selection Complete ===\n")
运行ijm后的操作步骤
1. 绘制信号区域 ROI → 点击确定
2. 绘制背景区域 ROI → 点击确定
3. 重复第 1 和第 2 步,成对绘制 ROI
4. 停止:绘制一个小矩形(宽/高 < 10)→ 点击确定-
绘制信号区域 ROI
- 首先,绘制一个矩形框,标记 信号区域。
- (第一个信号区域的 ROI 必须让视频停留在激活帧(Stimuli Frame)再单击 确定。因为GCaMP需要记录什么时候被激活,所有的数据都应当据此对齐)
- 绘制完成后,单击 确定(OK)。
- 首先,绘制一个矩形框,标记 信号区域。
-
制背景区域
- 接下来,拖动矩形框,标记 背景区域&#
 最低0.47元/天 解锁文章


 902
902

 被折叠的 条评论
为什么被折叠?
被折叠的 条评论
为什么被折叠?
 到【灌水乐园】发言


