


Activity中UI框架基本概念:Activity 是应用程序的基本组成部分。
一 、Activity相关概念
Activity:基本的页面单元,提供了可视的界面,与用户进行交互;Activity包含一个Window,window上可以绘制各种view。
View:最基本的UI组件,表示屏幕上的一个矩形区域。
Window:表示顶层窗口,管理界面的显示和事件的响应;每个Activity 均会创建一个。
PhoneWindow:Activity和整个View系统交互的接口,该类继承于Window类,同时,PhoneWindow类内部包含了一个DecorView对象。简而言之,PhoneWindow是把一个FrameLayout进行了一定的包装,并提供了一组通用的窗口操作接口,在Activity的attach方法中通过调用PolicyManager.makeNewWindo创建;
WindowManager:一个interface,继承自ViewManager。所在应用进程的窗口管理器;有一个implementation WindowManagerImpl;主要用来管理窗口的一些状态、属性、view增加、删除、更新、窗口顺序、消息收集和处理等。
DecorView:是Window中View的RootView,设置窗口属性;该类是一个FrameLayout的子类,并且是PhoneWindow中的一个内部类。Decor的英文是Decoration,即“修饰”的意思,DecorView就是对普通的FrameLayout进行了一定的修饰,比如添加一个通用的Titlebar,并响应特定的按键消息等。
ViewRoot:它并不是一个View类型,而是一个Handler。通过IWindowSession接口与全局窗口管理器进行交互,进行界面控制和消息响应:A. 向DecorView分发收到的用户发起的event事件,如按键,触屏,轨迹球等事件;B. 与WindowManagerService交互,完成整个Activity的GUI的绘制。
ActivityThread:应用程序的主线程,其中会创建关联当前Activity与Window;创建WIndowManager实现类实例,把当前DecoView加入到WindowManager;

二 、实现流程框架图
Activity与Window创建关联

相关类结构:

层级关系:

此内容j借鉴于:http://www.cnblogs.com/bastard/archive/2012/04/10/2440577.html
三、补充说明:ViewGroup与View
1. ViewGroup: 一个特殊的View类,它继承于android.view.View。它的功能就是装载和管理下一层的View对象和ViewGroup对象。ViewGroup是布局管理器(layout)及view容器的基类。ViewGroup中,还定义了一个嵌套类ViewGroup.LayoutParams。这个类定义了一个显示对象的位置、大小等属性,view通过LayoutParams中的这些属性值来告诉父级,它们将如何放置。
2. View是所有view类的基类,一个view通常占用屏幕上的一个矩形区域,并负责绘图及事件处理。View是所有窗体部件的基类,是为窗体部件服务的,这里的窗体部件即UI控件,如一个按钮或文本框。Android已经为我们提供了一系列的标准UI控件供我们直接使用,同时,我们也可以通过继承于 View类或View的子类,来实现我们自定义的UI控件。以下表格列出View提供出来的,供重载的方法,这些方法不必都要重载,但至少要实现onDraw(android.graphics.Canvas)方法。

四 、View 绘制流程
DecorView 实际派生自FrameLayout的类,也是一个ViewGroup实例,其内部的ContentViews也是一个ViewGroup实例,依次嵌套View 或ViewGroup,形成了如下的View树。

整个View树的绘图流程是在ViewRoot.java类的performTraversals()函数展开的,该函数做的执行过程可简单概况为,判断是否需要重新计算视图大小(measure)、是否重新需要安置视图的位置(layout)、以及是否需要重绘 (draw),其框架过程如下:
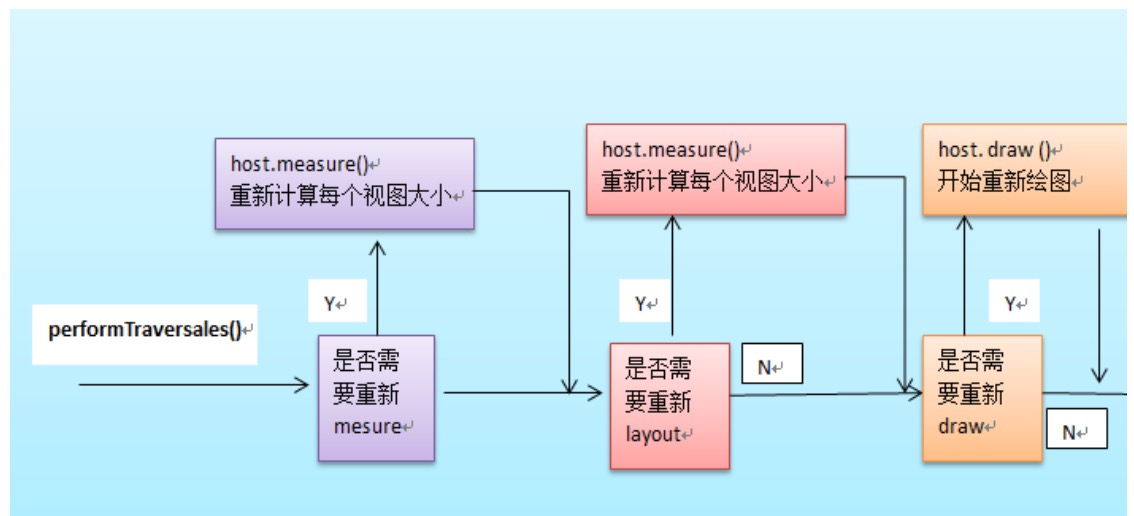
第一步:
mesarue():为整个View树计算实际的大小,即设置实际的高(对应属性:mMeasuredHeight)和宽(对应属性: mMeasureWidth),每个View的控件的实际宽高都是由父视图和本身视图决定的。
在View类中measure过程主要涉及三个函数,函数原型分别为
public final void measure(int widthMeasureSpec, int heightMeasureSpec)
protected final void setMeasuredDimension(int measuredWidth, int measuredHeight)
protected void onMeasure(int widthMeasureSpec, int heightMeasureSpec)
前面两个函数都是final类型的,不能重载,为此在ViewGroup派生的非抽象类中我们必须重载onMeasure函数,实现measure的原理是:假如View还有子View,则measure子View,直到所有的子View完成measure操作之后,再measure自己。ViewGroup中提供的measureChild或measureChildWithMargins就是实现这个功能的。
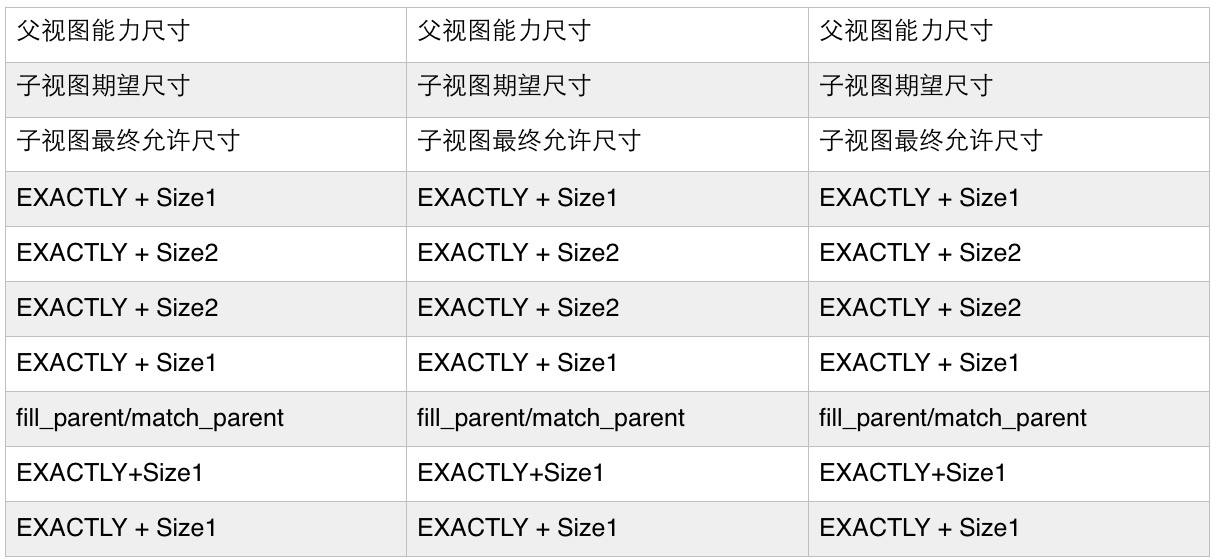
在具体介绍测量原理之前还是先了解些基础知识,即measure函数的参数由类measureSpec的makeMeasureSpec函数方法生成的一个32位整数,该整数的高两位表示模式(Mode),低30位则是具体的尺寸大小(specSize)。
MeasureSpec有三种模式,各表示的意义如下
1、MeasureSpec.UNSPECIFIED(int值为0),父视图不对子视图施加任何限制,子视图可以得到任意想要的大小;
2、MeasureSpec.EXACTLY,父视图希望子视图的大小是specSize中指定的大小;
3、MeasureSpec.AT_MOST,子视图的大小最多是specSize中的大小。
那么对于一个View的上述Mode和specSize值默认是怎么获取的呢,他们是根据View的LayoutParams参数来获取的:
参数为fill_parent/match_parent时,Mode为EXACTLY,specSize为剩余的所有空间;
参数为具体的数值,比如像素值(px或dp),Mode为EXACTLY,specSize为传入的值;
参数为wrap_content,Mode为AT_MOST,specSize运行时决定。
具体测量原理
View 测量顺序调动方法:

相关源码
1.   protected void onMeasure(int widthMeasureSpec, int heightMeasureSpec) {
        setMeasuredDimension(getDefaultSize(getSuggestedMinimumWidth(), widthMeasureSpec),
                getDefaultSize(getSuggestedMinimumHeight(), heightMeasureSpec));
    }


2. public static int getDefaultSize(int size, int measureSpec) {
        int result = size;
        int specMode = MeasureSpec.getMode(measureSpec);
        int specSize = MeasureSpec.getSize(measureSpec);

        switch (specMode) {
        case MeasureSpec.UNSPECIFIED:
            result = size;
            break;
        case MeasureSpec.AT_MOST:
        case MeasureSpec.EXACTLY:
            result = specSize;
            break;
        }
        return result;
    }

3. protected int getSuggestedMinimumWidth() {
        return (mBackground == null) ? mMinWidth : max(mMinWidth, mBackground.getMinimumWidth());
    }

4.  protected final void setMeasuredDimension(int measuredWidth, int measuredHeight) {
        boolean optical = isLayoutModeOptical(this);
        if (optical != isLayoutModeOptical(mParent)) {
            Insets insets = getOpticalInsets();
            int opticalWidth  = insets.left + insets.right;
            int opticalHeight = insets.top  + insets.bottom;

            measuredWidth  += optical ? opticalWidth  : -opticalWidth;
            measuredHeight += optical ? opticalHeight : -opticalHeight;
        }
        setMeasuredDimensionRaw(measuredWidth, measuredHeight);
    }

 5.  private void setMeasuredDimensionRaw(int measuredWidth, int measuredHeight) {
        mMeasuredWidth = measuredWidth;
        mMeasuredHeight = measuredHeight;

        mPrivateFlags |= PFLAG_MEASURED_DIMENSION_SET;
    }
ViewGroup 测量(调用方法不一定顺序执行):

测量相关源码
1.protected void measureChildren(int widthMeasureSpec, int heightMeasureSpec) {
        final int size = mChildrenCount;
        final View[] children = mChildren;
        for (int i = 0; i < size; ++i) {
            final View child = children[i];
            if ((child.mViewFlags & VISIBILITY_MASK) != GONE) {
                measureChild(child, widthMeasureSpec, heightMeasureSpec);
            }
        }
    }

2.1.protected void measureChild(View child, int parentWidthMeasureSpec,
            int parentHeightMeasureSpec) {
        final LayoutParams lp = child.getLayoutParams();
        final int childWidthMeasureSpec = getChildMeasureSpec(parentWidthMeasureSpec,
                mPaddingLeft + mPaddingRight, lp.width);
        final int childHeightMeasureSpec = getChildMeasureSpec(parentHeightMeasureSpec,
                mPaddingTop + mPaddingBottom, lp.height);
	//开始调用View的方法
        child.measure(childWidthMeasureSpec, childHeightMeasureSpec);
    }

  2.2  protected void measureChildWithMargins(View child,
            int parentWidthMeasureSpec, int widthUsed,
            int parentHeightMeasureSpec, int heightUsed) {
        final MarginLayoutParams lp = (MarginLayoutParams) child.getLayoutParams();

        final int childWidthMeasureSpec = getChildMeasureSpec(parentWidthMeasureSpec,
                mPaddingLeft + mPaddingRight + lp.leftMargin + lp.rightMargin
                        + widthUsed, lp.width);
        final int childHeightMeasureSpec = getChildMeasureSpec(parentHeightMeasureSpec,
                mPaddingTop + mPaddingBottom + lp.topMargin + lp.bottomMargin
                        + heightUsed, lp.height);
//开始调用View的方法
        child.measure(childWidthMeasureSpec, childHeightMeasureSpec);
    }

//先获取ViewGroup的Spec即parentSpec,再加上childView的LayoutParams这两个信息,然后调用getChilMeasureSpec获取childView的Spec,既然获取到了Spec了,那么在调用View类的.measure方法把这个Spec交给measure方法处理就是了。


3.  该方法为ViewGroup类的一个静态方法,事实上getChildMeasureSpec这个方法最后也就是调用了makeMeasureSpec!

public static int getChildMeasureSpec(int spec, int padding, int childDimension) {
        int specMode = MeasureSpec.getMode(spec);
        int specSize = MeasureSpec.getSize(spec);
        int size = Math.max(0, specSize - padding);
        int resultSize = 0;
        int resultMode = 0
        switch (specMode) {
        // Parent has imposed an exact size on us
        case MeasureSpec.EXACTLY:
            if (childDimension >= 0) {
                resultSize = childDimension;
                resultMode = MeasureSpec.EXACTLY;
            } else if (childDimension == LayoutParams.MATCH_PARENT) {
                // Child wants to be our size. So be it.
                resultSize = size;
                resultMode = MeasureSpec.EXACTLY;
            } else if (childDimension == LayoutParams.WRAP_CONTENT) {
                // Child wants to determine its own size. It can't be
                // bigger than us.
                resultSize = size;
                resultMode = MeasureSpec.AT_MOST;
            }
            break;
     ………
        return MeasureSpec.makeMeasureSpec(resultSize, resultMode);
    }


4. public static int makeMeasureSpec(@IntRange(from = 0, to = (1 << MeasureSpec.MODE_SHIFT) - 1) int size,
                                          @MeasureSpecMode int mode) {
            if (sUseBrokenMakeMeasureSpec) {
                return size + mode;
            } else {
                return (size & ~MODE_MASK) | (mode & MODE_MASK);
            }
        }
相比于View的测量,ViewGroup因为不同的布局方式必然导致不同的测量方法,所以真正的测量是放在继承ViewGroup的父容器的相关mesure()方法中,下面以LinearLayout的源码为例。
1.   @Override
    protected void onMeasure(int widthMeasureSpec, int heightMeasureSpec) {
        if (mOrientation == VERTICAL) {
            measureVertical(widthMeasureSpec, heightMeasureSpec);
        } else {
            measureHorizontal(widthMeasureSpec, heightMeasureSpec);
        }
    }

2.  void measureVertical(int widthMeasureSpec, int heightMeasureSpec) {
       ……..

        final int count = getVirtualChildCount();

        final int widthMode = MeasureSpec.getMode(widthMeasureSpec);
        final int heightMode = MeasureSpec.getMode(heightMeasureSpec);

………
//调用ViewGroup的方法
 final int childHeightMeasureSpec = MeasureSpec.makeMeasureSpec(
                            Math.max(0, childHeight), MeasureSpec.EXACTLY);
//调用ViewGroup的方法
 final int childWidthMeasureSpec = getChildMeasureSpec(widthMeasureSpec,
        mPaddingLeft + mPaddingRight + lp.leftMargin + lp.rightMargin,lp.width);
                    child.measure(childWidthMeasureSpec, childHeightMeasureSpec);
……….

setMeasuredDimension(widthSizeAndState | (childState&MEASURED_STATE_MASK),
    resolveSizeAndState(maxHeight, heightMeasureSpec,
                        (childState<<MEASURED_HEIGHT_STATE_SHIFT)));

if (matchHeight) {
            forceUniformHeight(count, widthMeasureSpec);
        }

3. private void forceUniformHeight(int count, int widthMeasureSpec) {

        int uniformMeasureSpec = MeasureSpec.makeMeasureSpec(getMeasuredHeight(),
                MeasureSpec.EXACTLY);
        for (int i = 0; i < count; ++i) {
           final View child = getVirtualChildAt(i);
           if (child != null && child.getVisibility() != GONE) {
               LinearLayout.LayoutParams lp = (LinearLayout.LayoutParams) child.getLayoutParams();
          …….
//调用ViewGroup的方法,
                   measureChildWithMargins(child, widthMeasureSpec, 0, uniformMeasureSpec, 0);
                   lp.width = oldWidth;
               }
           }
        }
    }
===============================================>
第二步:
layout : 将整个根据子视图的大小以及布局参数将View树放到合适的位置上,及设定视图在父视图中的四个点(分别对应View四个成员变量mLeft,mTop,mLeft,mBottom)。若View是个ViewGroup类型,需要遍历每个子视图chiildView,调用该子视图的layout()方法去设置它的坐标值。
在ViewGroup中onLayout函数被abstract修饰,即所有派生自ViewGroup的类必须实现onLayout函数,从而实现对其包含的所有子视图的布局设定。
View layout相关源码:
1.public void layout(int l, int t, int r, int b) {

	 boolean changed = isLayoutModeOptical(mParent) ?
                setOpticalFrame(l, t, r, b) : setFrame(l, t, r, b);

        if (changed || (mPrivateFlags & PFLAG_LAYOUT_REQUIRED) == PFLAG_LAYOUT_REQUIRED) {

            onLayout(changed, l, t, r, b);
            …….
        }

	………
}
特别注意:上面的源码提到View的子类不应该重写该方法,而是重载onLayout(…),该方法应该由他们的子元素来调用。
2.  protected void onLayout(boolean changed, int left, int top, int right, int bottom) {
	//重新设置子元素在父容器的位置。
    }

3. protected boolean setFrame(int left, int top, int right, int bottom) {

	…….
            if (sizeChanged) {
                sizeChange(newWidth, newHeight, oldWidth, oldHeight);
            }
	…….
         return changed;
    }

4.private void sizeChange(int newWidth, int newHeight, int oldWidth, int oldHeight) {
        onSizeChanged(newWidth, newHeight, oldWidth, oldHeight);
	……
            }

5. protected void onSizeChanged(int w, int h, int oldw, int oldh) {
    }
ViewGroup layout相关源码:
layout被fianl修饰符限定为不能重载,不过ViewGroup中onLayout函数被abstract修饰,即所有派生自ViewGroup的类必须实现onLayout函数,从而实现对其包含的所有子视图的布局设定。
1. @Override
    public final void layout(int l, int t, int r, int b) {
        if (!mSuppressLayout && (mTransition == null || !mTransition.isChangingLayout())) {
            if (mTransition != null) {
                mTransition.layoutChange(this);
            }

	//调用View layout(…)方法
            super.layout(l, t, r, b);
        } else {
                       mLayoutCalledWhileSuppressed = true;
        }
    }

2.@Override
    protected abstract void onLayout(boolean changed,
            int l, int t, int r, int b);
LinearLayout的源码为例
1.  @Override
    protected void onLayout(boolean changed, int l, int t, int r, int b) {
        if (mOrientation == VERTICAL) {
            layoutVertical(l, t, r, b);
        } else {
            layoutHorizontal(l, t, r, b);
        }
    }

2.void layoutVertical(int left, int top, int right, int bottom) {
	……
               setChildFrame(child, childLeft, childTop + getLocationOffset(child),
                        childWidth, childHeight);
                childTop += childHeight + lp.bottomMargin + getNextLocationOffset(child);
……

3. private void setChildFrame(View child, int left, int top, int width, int height) {
	//回调view的layout方法。
        child.layout(left, top, left + width, top + height);
    }
========================================================》
第三步:
draw()绘图
由ViewRoot对象的performTraversals()方法调用draw()方法发起绘制该View树,值得注意的是每次发起绘图时,并不会重新绘制每个View树的视图,而只会重新绘制那些“需要重绘”的视图,View类内部变量包含了一个标志位DRAWN,当该视图需要重绘时,就会为该View添加该标志位。
draw()方法实现的功能流程如下:
1、调用background.draw(canvas)绘制该View的背景
2、调用onDraw(canvas)方法绘制视图本身(每个View都需要重载该方法,ViewGroup不需要实现该方法)
3、调用dispatchDraw(canvas)方法绘制子视图(ViewGroup类已经为我们重写了dispatchDraw ()的功能实现,其内部会遍历每个子视图,调用drawChild()去重新回调每个子视图的draw()方法,可以重载父类函数实现具体的功能。)
View draw相关源码:
1.  /**
     * Implement this to do your drawing.
     * @param canvas the canvas on which the background will be drawn
     */
    protected void onDraw(Canvas canvas) {
    }


2. /**
     * Manually render this view (and all of its children) to the given Canvas.
     * The view must have already done a full layout before this function is
     * called.  When implementing a view, implement
     * {@link #onDraw(android.graphics.Canvas)} instead of overriding this method.
     * If you do need to override this method, call the superclass version.
     *
     * @param canvas The Canvas to which the View is rendered.
     */

 @CallSuper
    public void draw(Canvas canvas) {
	…….
/*
         * Draw traversal performs several drawing steps which must be executed
         * in the appropriate order:
         *
         *      1. Draw the background
         *      2. If necessary, save the canvas' layers to prepare for fading
         *      3. Draw view's content
         *      4. Draw children
         *      5. If necessary, draw the fading edges and restore layers
         *      6. Draw decorations (scrollbars for instance)
         */
// Step 1, draw the background, if needed
        int saveCount;

        if (!dirtyOpaque) {
            drawBackground(canvas);
        }

        // skip step 2 & 5 if possible (common case)
        final int viewFlags = mViewFlags;
        boolean horizontalEdges = (viewFlags & FADING_EDGE_HORIZONTAL) != 0;
        boolean verticalEdges = (viewFlags & FADING_EDGE_VERTICAL) != 0;
        if (!verticalEdges && !horizontalEdges) {
            // Step 3, draw the content
            if (!dirtyOpaque) onDraw(canvas);

            // Step 4, draw the children
            dispatchDraw(canvas);

            // Overlay is part of the content and draws beneath Foreground
            if (mOverlay != null && !mOverlay.isEmpty()) {
                mOverlay.getOverlayView().dispatchDraw(canvas);
            }

            // Step 6, draw decorations (foreground, scrollbars)
            onDrawForeground(canvas);

            // we're done...
            return;
        }          …..

}
ViewGroup 相关源码:
1. @Override
    protected void dispatchDraw(Canvas canvas) {
       boolean usingRenderNodeProperties = canvas.isRecordingFor(mRenderNode);
        final int childrenCount = mChildrenCount;
        final View[] children = mChildren;
        ……

            final int childIndex = getAndVerifyPreorderedIndex(childrenCount, i, customOrder);
            final View child = getAndVerifyPreorderedView(preorderedList, children, childIndex);
            if ((child.mViewFlags & VISIBILITY_MASK) == VISIBLE || child.getAnimation() != null) {

                more |= drawChild(canvas, child, drawingTime);
            }
	…….
}

2. /**
     * Draw one child of this View Group. This method is responsible for getting
     * the canvas in the right state. This includes clipping, translating so
     * that the child's scrolled origin is at 0, 0, and applying any animation
     * transformations.
    protected boolean drawChild(Canvas canvas, View child, long drawingTime) {
// 回调View 的draw(…)方法。
        return child.draw(canvas, this, drawingTime);
    }
=========================================================》
view 常用方法的补充说明:
1.invalidate()方法
请求重绘View树,即draw()过程,假如视图发生大小没有变化就不会调用layout()过程,并且只绘制那些“需要重绘的”视图,即谁(View的话,只绘制该View ;ViewGroup,则绘制整个ViewGroup)请求invalidate()方法,就绘制该视图。
一般引起invalidate()操作的函数如下:
a、直接调用invalidate()方法,请求重新draw(),但只会绘制调用者本身。
b、setSelection()方法 :请求重新draw(),但只会绘制调用者本身。
c、setVisibility()方法 : 当View可视状态在INVISIBLE转换VISIBLE时,会间接调用invalidate()方法, 继而绘制该View。
d、setEnabled()方法 : 请求重新draw(),但不会重新绘制任何视图包括该调用者本身。
2. requestLayout()方法
请求对View树重新布局,重新调用measure()和layout()过程,不会调用draw()过程,不会重新绘制任何视图包括该调用者本身。但是在invalidate()方法设置setVisibility()时,如果View的是由可视状态在INVISIBLE/ VISIBLE 转换为GONE状态时,会间接调用requestLayout() 和invalidate方法。同时,由于整个个View树大小发生了变化,会请求measure()过程以及draw()过程,同样地,只绘制需要“重新绘制”的视图。
3. requestFocus():请求View树的draw()过程,但只绘制“需要重绘”的视图。
View绘制过程转载的一部资料来源:http://blog.csdn.net/qinjuning/article/details/7110211
=========================================================》对于onMeasure(...)、onLayout(...)、onDraw(...)的实际运用,可以参考我项目中自定义View的使用,项目:https://github.com/xianjuren/CustomView


 607
607


 被折叠的 条评论
为什么被折叠?
被折叠的 条评论
为什么被折叠?
 到【灌水乐园】发言


